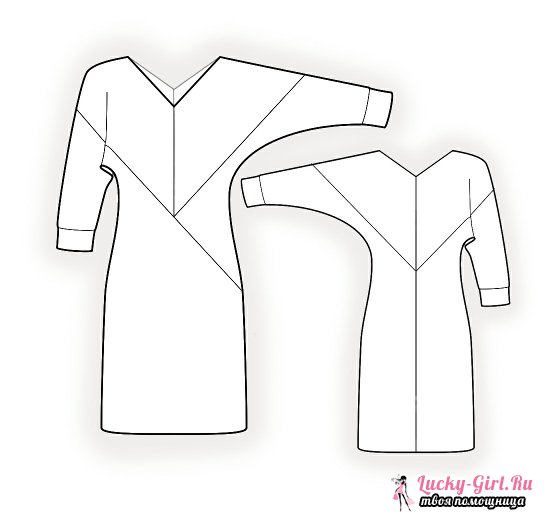
Pattern of a one-piece dress for plus size people. Dress pattern with one-piece sleeves for women with any body type. Who does not suit the style?
Of course, every woman wants her outfit to look perfect and unique, so many people wear clothes that they sew themselves. It is believed that the dress pattern with one-piece sleeve- the simplest, because this style does not have strict lines. Any clothing with such a sleeve looks feminine and elegant. How to make such a pattern with your own hands? Let's look at a few models.
Sleeve designs can be a little intimidating. Editing them is something of a science in itself, and it's hard to know what shape you need to start with if you don't have prior experience with their patterns; trial and error is usually inevitable, and if you don't have the time to commit to it, it will probably never get done.
Whether you're looking for a shirt sleeve template but can't find the right one, or you want to create custom sleeve templates for yourself, we think the information here can at least help you get started. We've put together a chart and a bunch of images various types sleeves used in fashion and costumes that you can use as a reference, as well as descriptions, notes and tips for putting them together yourself! Knowing the shape is half the battle, and combined with a little math and measuring, the task should be much more manageable for you!
Pattern of a straight dress with one-piece sleeves: master class
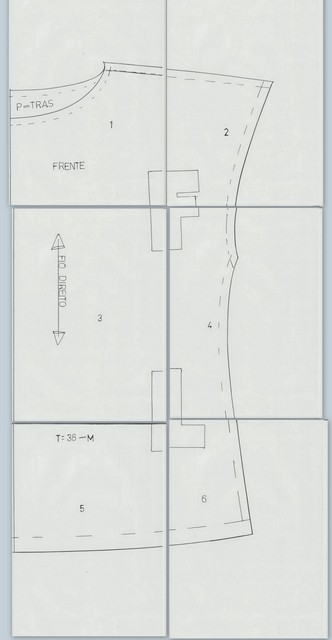
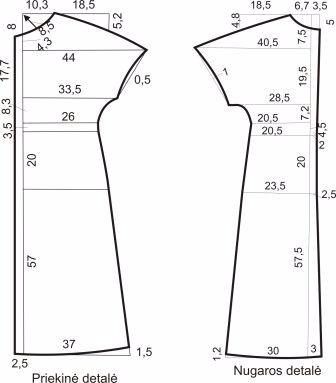
The main secret of a one-piece sleeve is that it needs to be cut out simultaneously with the back, as well as the front of the entire dress.
Necessary materials:
- scissors;
- paper or old wallpaper for patterns;
- pencil;
- centimeter for taking measurements;
- chalk or a piece of dry soap.
Construction of a dress pattern with a one-piece sleeve:
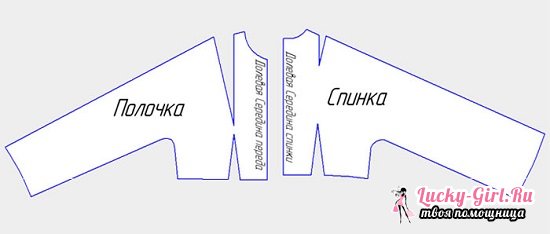
This creates a sheath dress pattern, and all that remains is to cut out the drawn elements, and then transfer them to the fabric and sew them.
Below we highlight each type of sleeve, as well as a close-up comparison image between what the sleeve would look like, as a patterned example, depending on how it would look overall on a person. Take a look and see what types of sleeves you might want to try for painting!
One of three "primary designs" of sleeve patterns. It's nice to have a T-shirt sleeve on hand at any time, so you can use it as a base for other sleeve designs. This type of sleeve is short in design and can be finished at the end in several ways, although T-shirts usually simply have a folded hem and stitching for the cuff.
Dress pattern with bat sleeves
When creating this pattern, you need the same materials that are used in the previous model.
The procedure for constructing a pattern:
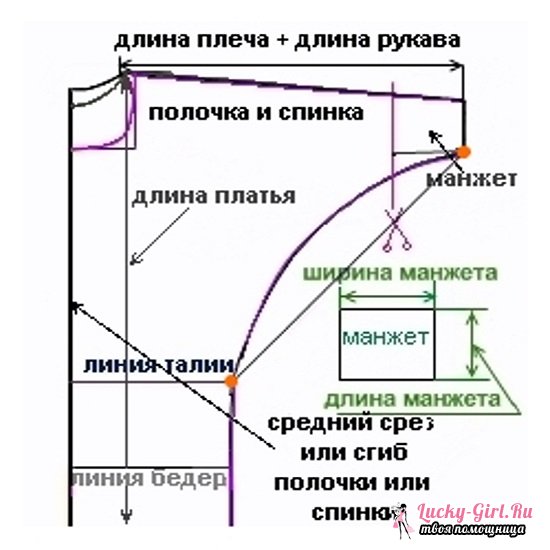
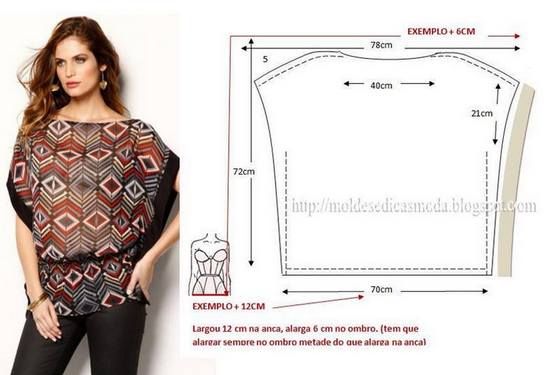
- To create a dress pattern with a sleeve bat, you must first draw the top of the outfit, and then increase it to the desired length of the product. When creating a pattern, you must mark the entire length of the product.
- Then you should check the width of the hip area. The width of the part itself should be a quarter of the circumference of the hips, to which 1 cm is added so that the product lies freely.
- Mark the length of the sleeve. To do this, you need to start taking measurements from the neckline itself, ending with the bottom of the sleeve. Then mark the desired size on the pattern itself according to the measurements taken.
- It remains to mark from the very bottom line of the cuffs, the length of which is approximately 15 cm. Then you need to draw another straight line parallel to the bottom line and you can start cutting out the finished pattern.
The clutch should be assembled a little when the collar is also added. This sleeve is one of my favorites as it plays with the shape and weight on the arms! This adjustment is intentional; this helps the sleeve shape fit closer to the shoulder. The wider bottom edge is gathered as in the photo and attached to the cuff.
Creating a dress pattern with one-piece sleeves
See in the picture how the lines are parallel to each other until the flash starts? The flash is also a bit exaggerated in this design. The cuff is loose and leaks at the wrist. See in the picture how the piece of patterned bodice flows as one in the shape of a sleeve? Instead of a single seam placed on the lower arm, the final product has two seams, one above and below the handle. The seam lines of the bodice are aligned with the lines of the sleeves.
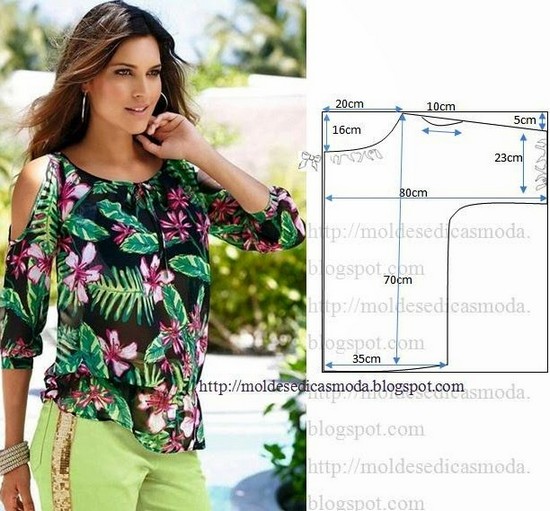
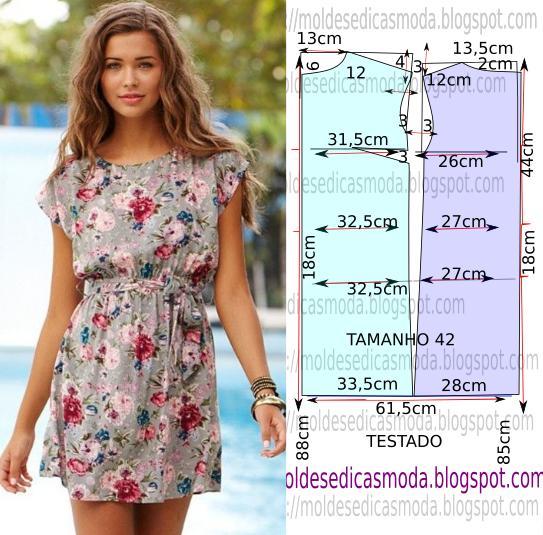
The principle of constructing patterns different models Dresses with one-piece sleeves are similar, but there are certainly differences. If you want to sew summer dress, then you can use the following pattern, substituting your measurements.
To pattern a dress with a one-piece sleeve, you do not need to have any special skills. Even novice needlewomen can handle it. Experienced craftswomen It is recommended to choose draping materials for tailoring. It is important to take into account that one-piece sleeves have certain design features, so they try to make such products as short as possible. The sleeves become an extension of the dress, which gives the whole outfit an unusual and elegant look.
The design is also curved under the handle and is designed to withstand wear. With this design, the cuff should be gathered to fit well around your arm so you'll be puffed up. They can be short or long, but they often have a tulip-like appearance.
The shape of the shoulder is a gentle slope, and the two parts basically mirror each other when overlapping. The mold shape for these sleeves is huge and very wide. Think of a 45-degree angle coming down from your shoulder. They are great for exaggerating weight and volume, or for wrapping in your favorite fabric.
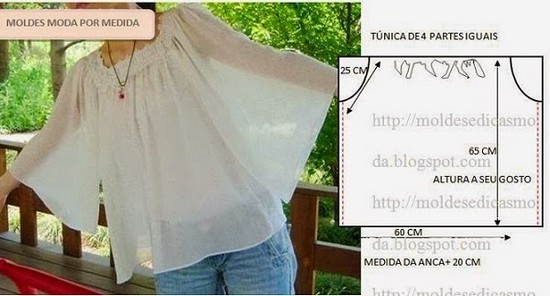
A tunic with one-piece sleeves is what a beginning craftswoman needs. There is no need to cut out the sleeves separately and sew them to the product, which, you will agree, greatly simplifies the task. At the same time, a tunic is a very necessary thing in any woman’s wardrobe. Therefore, having a sewing machine, a piece of fabric and a pattern at hand, it’s simply a sin not to take advantage of the opportunity to make something new.
Usually this is just an extension of the shoulder line on the bodice figure - not from the sleeve itself. If you look closely at the picture, you can see this difference! This type of sleeve is great for pajamas and sweaters because the cut is usually loose and unrestricted, making for a comfortable shirt to wear around the lounge!
They are great when made with fabrics such as knits that are loose and they give your look a very elegant and small touch. They have the same shape as the top of their pattern design, but they are not as long and usually cut a little wider. This is another elegant and petite style that you can use for warmer weather!
Ready-made patterns for a simple tunic with one-piece sleeves
To sew a tunic, we will need a soft, easily draped fabric measuring approximately 1.3 * 1.4 m. For models with an elastic band, you will also need an elastic band. So, I suggest downloading two ready-made patterns simple tunic.
Model No. 1. The pattern is designed for size M, height 164 - 170 cm. Download the archive with the pattern and print the sheets in full size (100% scale).
These types of sleeves are cut as long rectangles and are usually assembled in several segments. The shoulder line is set very wide and shallow, which will also give your sleeve a large and billowing shape from shoulder to stop. Elasticity can be used to maintain the shape of these segments, or if left looser, something more rigid, like strips or bands.
Dress with one-piece sleeves: create it yourself
They are incredibly comfortable for lounge shirts as the sleeve cut is free at the shoulder. The hem of the sleeve shoulder is different from the others because it fits all the way to the neckline. Think of it as a circle miniskirt, but for your arm! The actual sleeve may vary in length and so there may be a "skirt" so this design can go many different ways!
Download patterns for a simple tunic (size M):

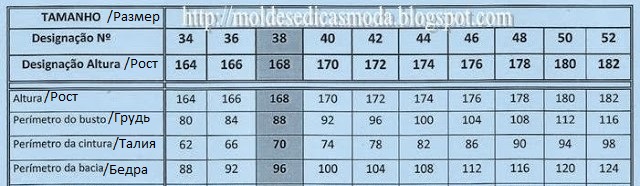
Model No. 2. The second model is similar to the first, except for the length and size. This pattern is designed for 40 Portuguese size(size chart for this pattern below).
Its final appearance has a large puff around the shoulder and narrows most hands and wrists. The tightening is mainly at the shoulder and does not continue. This is an open style sleeve that is a great option for revealing shoulder designs. This design is also very nice.
You can sew them all together as one large piece at the sides for a more stable shape, or sew them together at the shoulder for a freer flow for tiers. Obviously this sleeve is very short, with only a small lip coming out of the hem of the shoulder. The shape of the pattern is very wide and has the slightest, gentle slope to it.

Download tunic patterns No. 2 (for parameters 92-74-100):
Simple tunic: drawings with calculations
Here are a few more interesting ideas tunics with one-piece sleeves. The drawings already have all the calculations, so making a pattern yourself will not be difficult.
It is usually not limited in size and its shape is quite unique. This design is often used for t-shirt designs. Some of the most common types of sleeves used in fashion are broken. There are other types of sleeves, but hopefully this is enough to help you get started and make it easier to plan how to pull out your sleeves! What other types of sleeves do you think would be useful? Sleeves are such an important part of clothing as they are one of the first things you see on a garment. They should fit properly and be comfortable to wear.
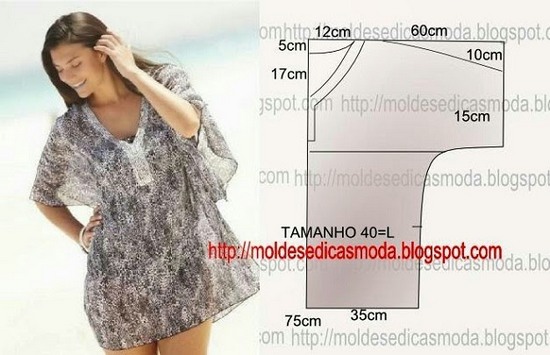
Tunic with cut-out sleeves - size 38 - 40 (Portuguese)


How to cut a dress
Sleeve style varies greatly across time and fashion. Sleeve fashions come and go. One moment a particular sleeve may be all the rage, but then they disappear completely over the course of decades, only to reappear and become all the rage again. The two main categories of sleeves are installed in the sleeves and one sleeve. Then there is what connects the bodice with a slightly curved seam. A set in sleeve refers to those sleeves that are connected to a curved sleeve. They join the side seams from the bodice at the armpit.
One-piece sleeve option for girls
The different types of sleeves are as follows. This is a sleeve that is set into a sleeve with a sleeve head curved to accommodate the roundness of the shoulder. This is a sleeve connected to the bodice with a diagonal seam running from the front armpit and back to the neckline. Place your order for the tutorial and assemble the raglan sleeves.

This is a sleeve that almost covers the upper arm. You can also check the slightly assembled cover bushings in detail to figure this out. This sleeve is a cap sleeve with a slight extension from the shoulder. This sleeve has a length between the elbow and the wrist. The whole idea is that when you wear this sleeve, you can see your bracelet. From the elbow it measures about 4 inches.
Modeling the base of the dress shoulder
This long sleeve with two sections. Top part This sleeve flares from the head of the sleeve to the wrist. The bottom flares from the fitting wrist to meet the flare at the top. The two parts are connected by a seam that maintains its torch-like lantern shape. A long lantern sleeve and a short lantern can be made.

This sleeve has two pleats at the buttoned cuff and frame opening. This is a fully assembled sleeve head that tapers to fit the wrist, giving it a mutton-skin look. It looks like a leg of lamb. The difference is that this sleeve has two parts. The top of the case head is very full. This is assembled and connected to the installed bushing part at the bottom of the arm.
Rules for taking measurements for a dress pattern
The sleeve has a full flare at the edge giving it a bell shape. This tutorial contains instructions. It's more short version long bell-shaped sleeve, generally shorter than the elbow. This sleeve is set to the elbow, and from there the frill is attached. Place an order for sewing such sleeves. This is a sleeve that is set at the shoulder and has tiered ruffles on the lower arm at the wrist.
How to sew a tunic: brief step-by-step instructions
- Transfer the pattern pieces onto the fabric and cut out.
- Sew the shoulder and top seams on the sleeve using a single stitch.
- Process the neck cut.
- On each side, use one line to sew the side seam and the bottom seam of the sleeve.
- Hem allowances. Iron the bottom and edges of the tunic slits (if any) inside out. Iron the allowances of the lower sleeve seams/side seams back to the upper ends of the cuts - diagonally.
- Sew the edges of the cuts according to the markings. Sew the bottom edge of the tunic at a distance of 2 cm, starting/ending the stitches at the finishing stitches of the cuts.
- Fold the tied belt along the faces. sides inside. Sew the edges together, leaving a small part open for turning. Turn the belt inside out and sew up the open area.
How to sew a simple tunic with a one-piece sleeve without a pattern: Master class
You will need 2 pieces of fabric 80 cm wide and long, equal to your OB (hip circumference) * 1.5. For example, if the hip circumference is 90, then the length will be 135 cm. For master classes, the values below are indicated in inches (inches), I have already carried out the translation with an accuracy of tenths, of course, these values can be rounded. Just in case: 1 inch = 2.54 cm.
This is a sleeve with the top part installed and the bottom part burned out. The flashes are gathered at the wrist with a cuff. This is a gathered ragalan sleeve that is gathered at the neck and has a corded or elastic hem. The breakdown is not curved, but angular, mostly square. This interesting element design.
This is a one piece sleeve that is an extension of the bodice. There will be no seam between the bodice and the sleeve as it is cut as one. Sometimes a gusset is added for the armrest. In this case the sleeve has a shoulder pad and is made very wide to accommodate this.


