Draw an applique for children's clothing. DIY appliqués on clothes
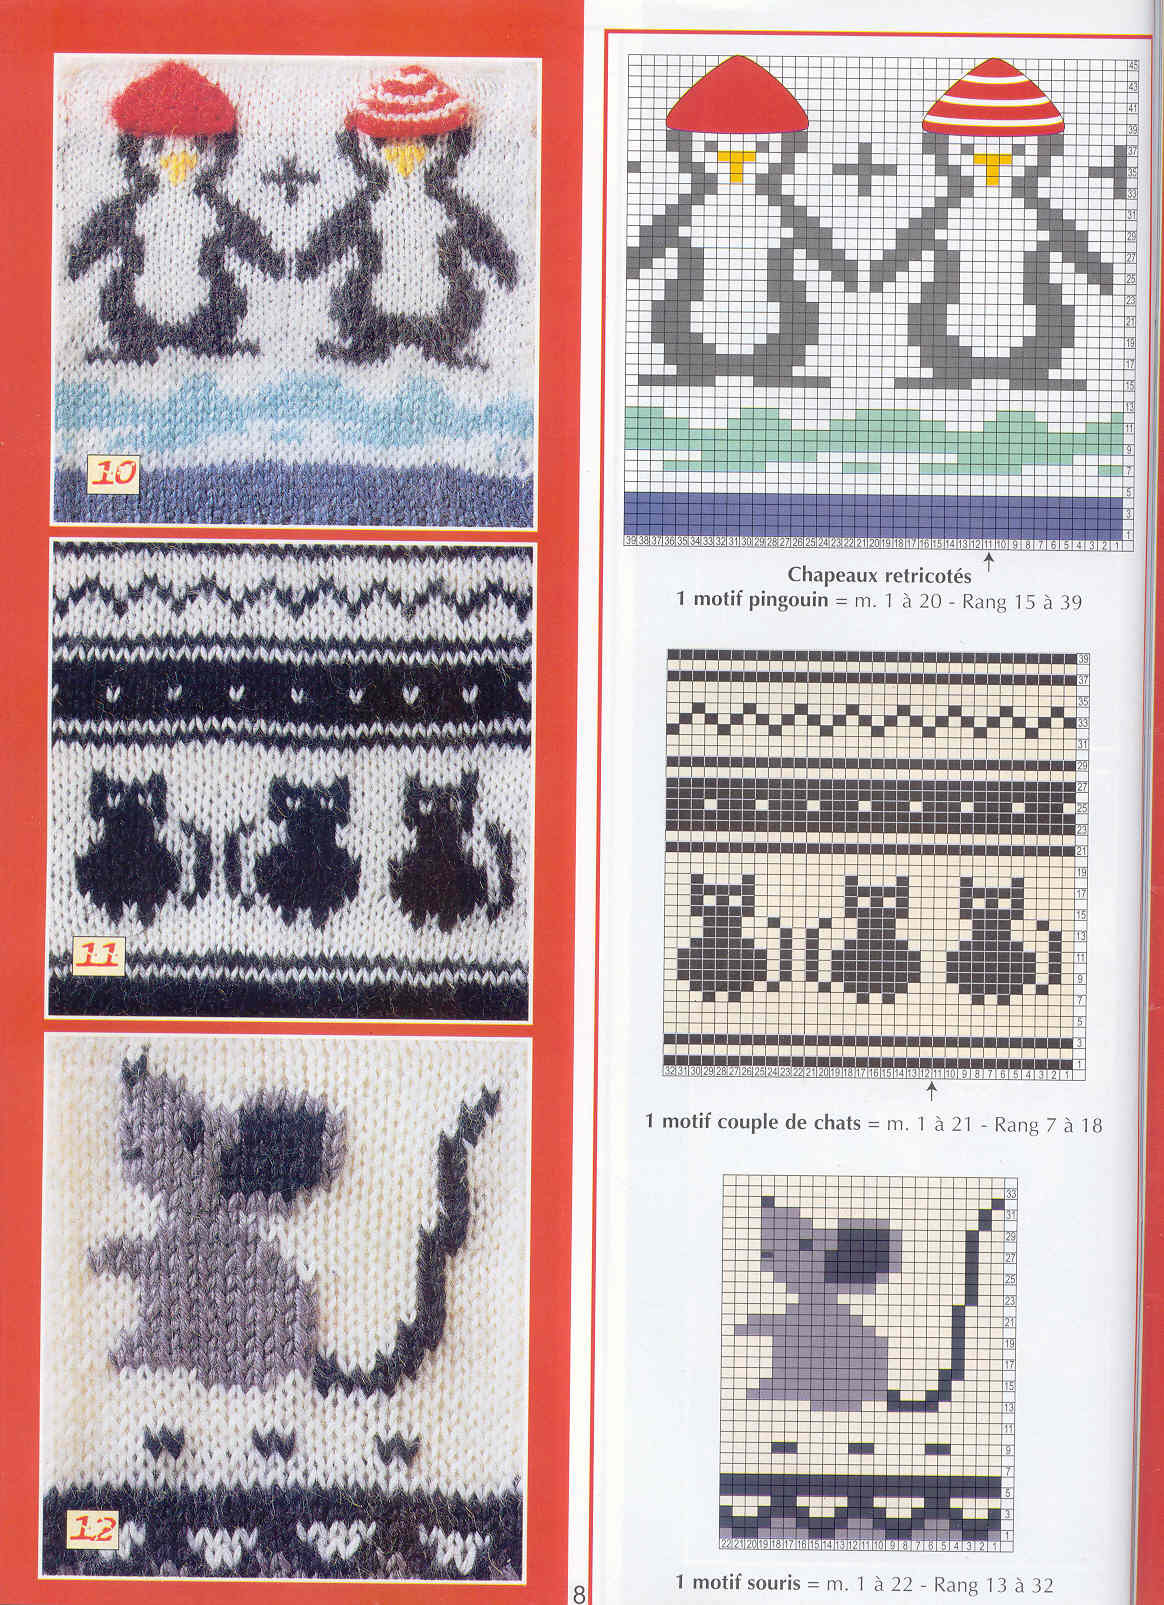
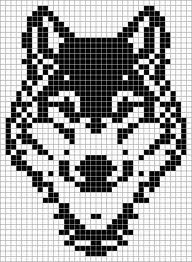
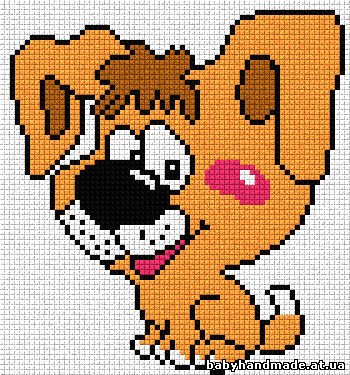
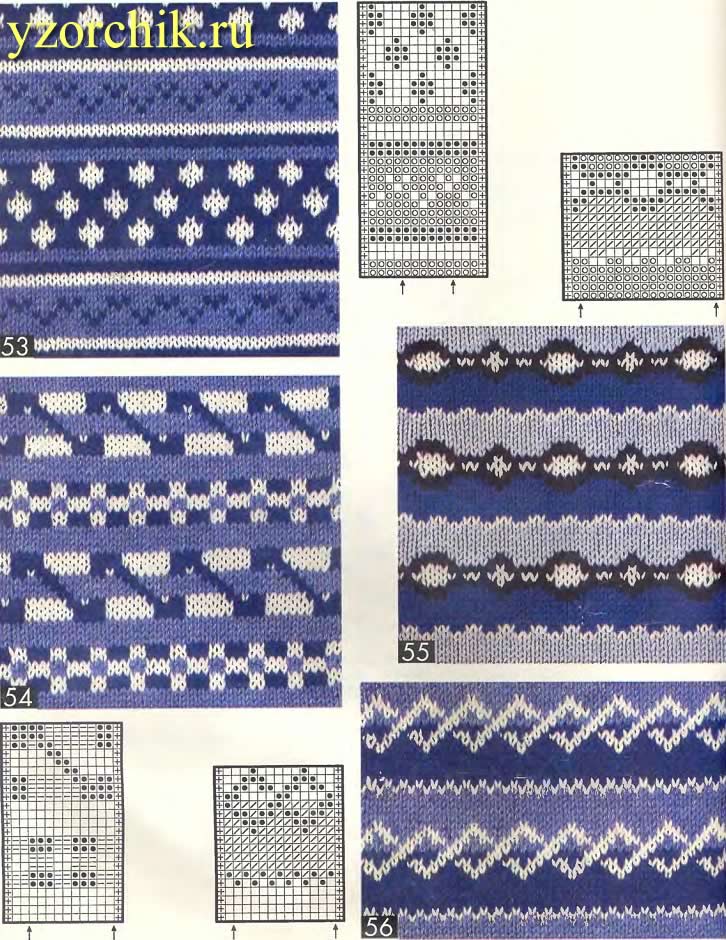
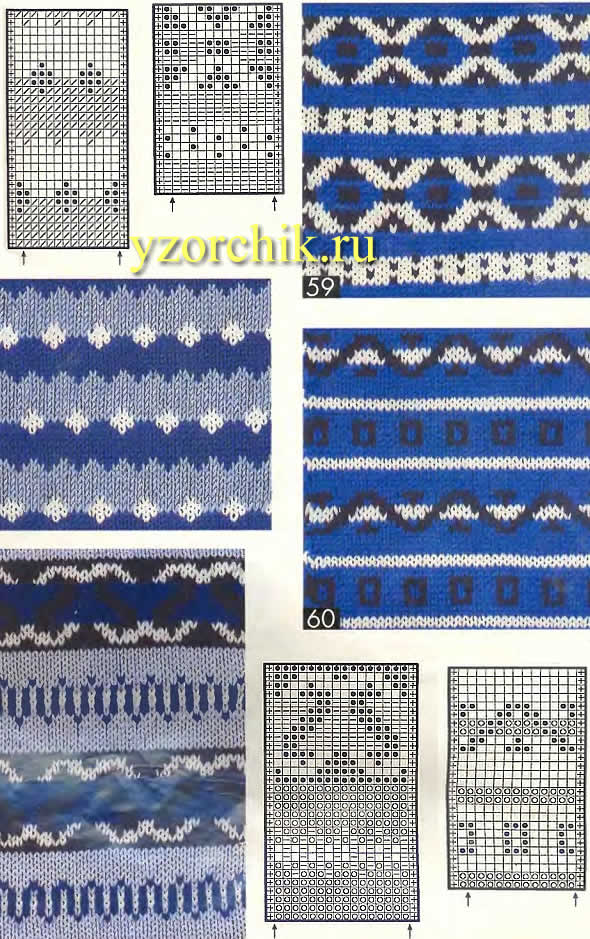
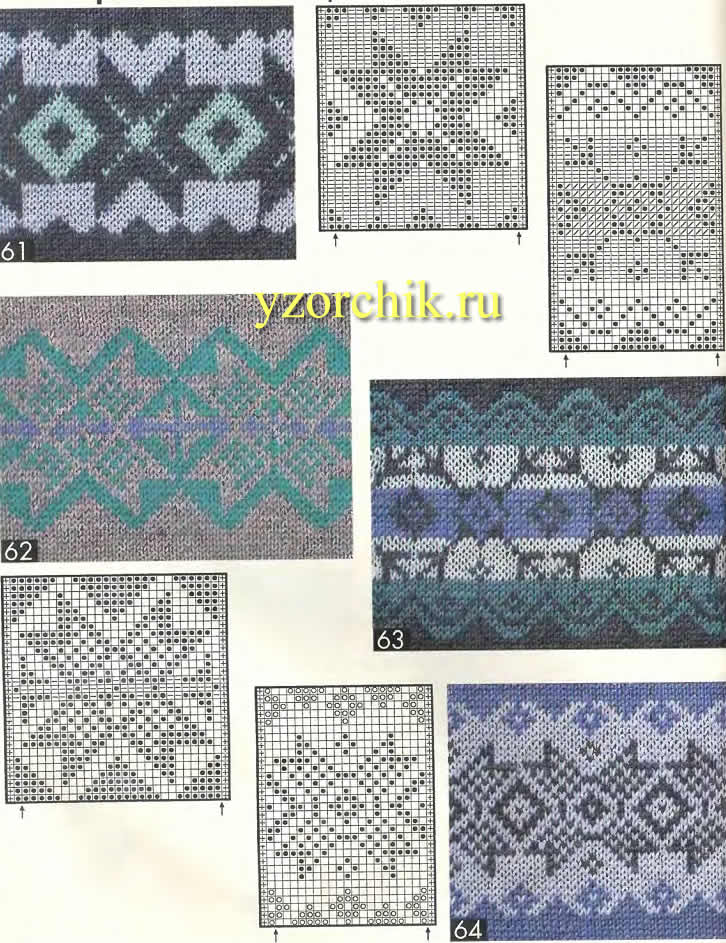
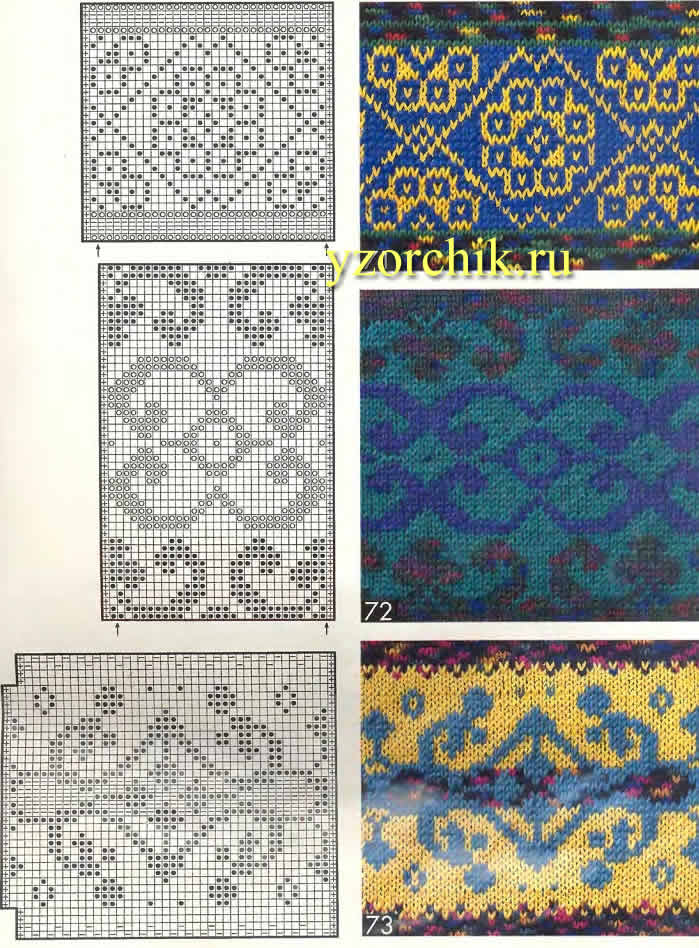
Children's patterns-drawings for knitting
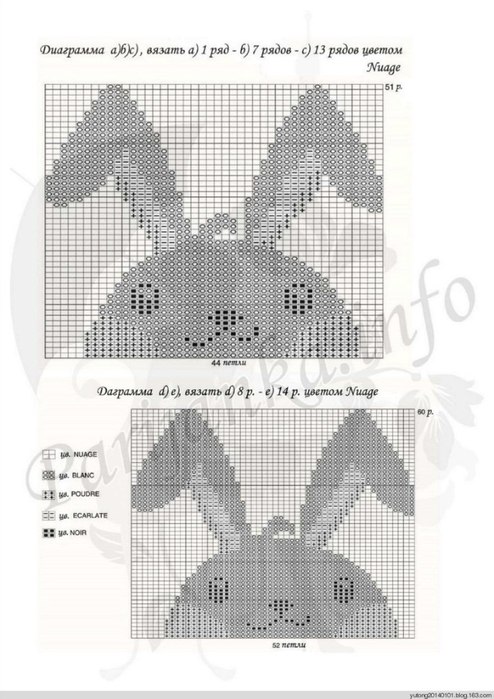
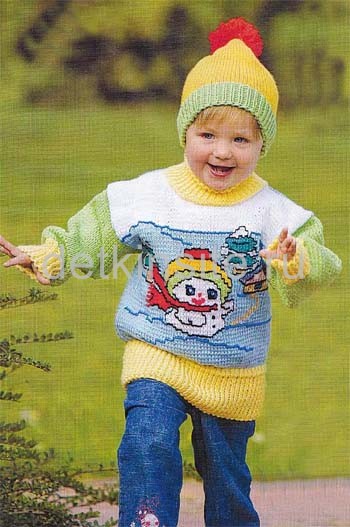
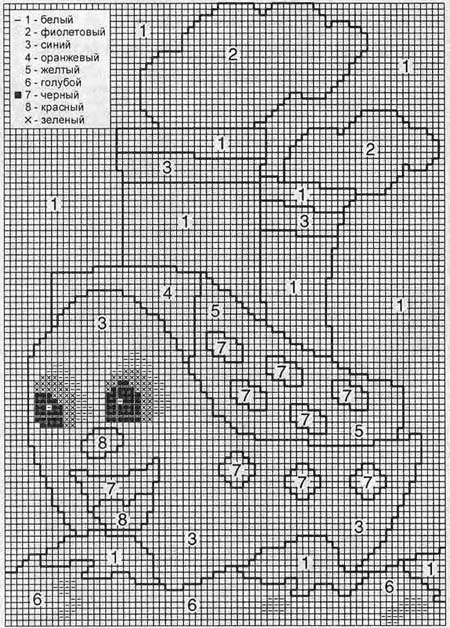
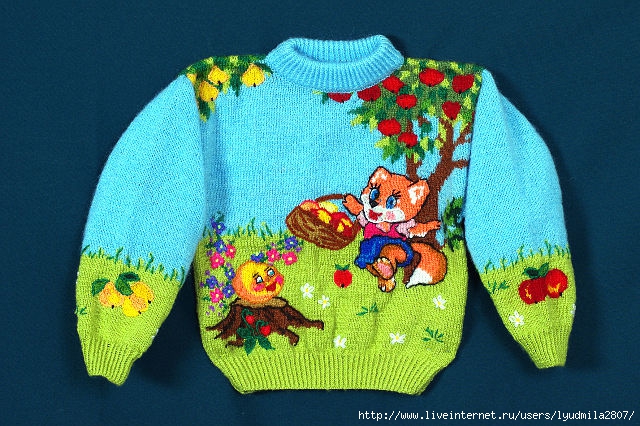
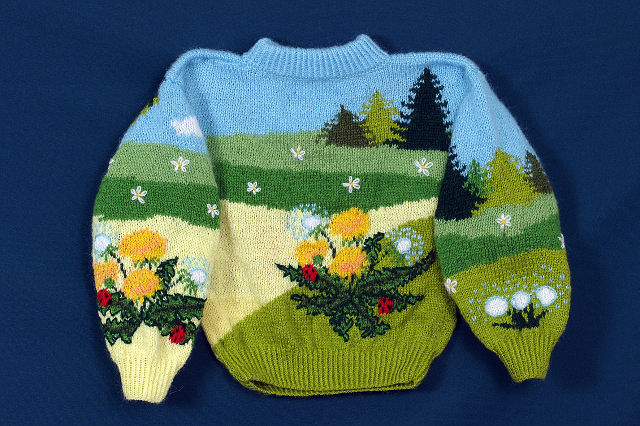
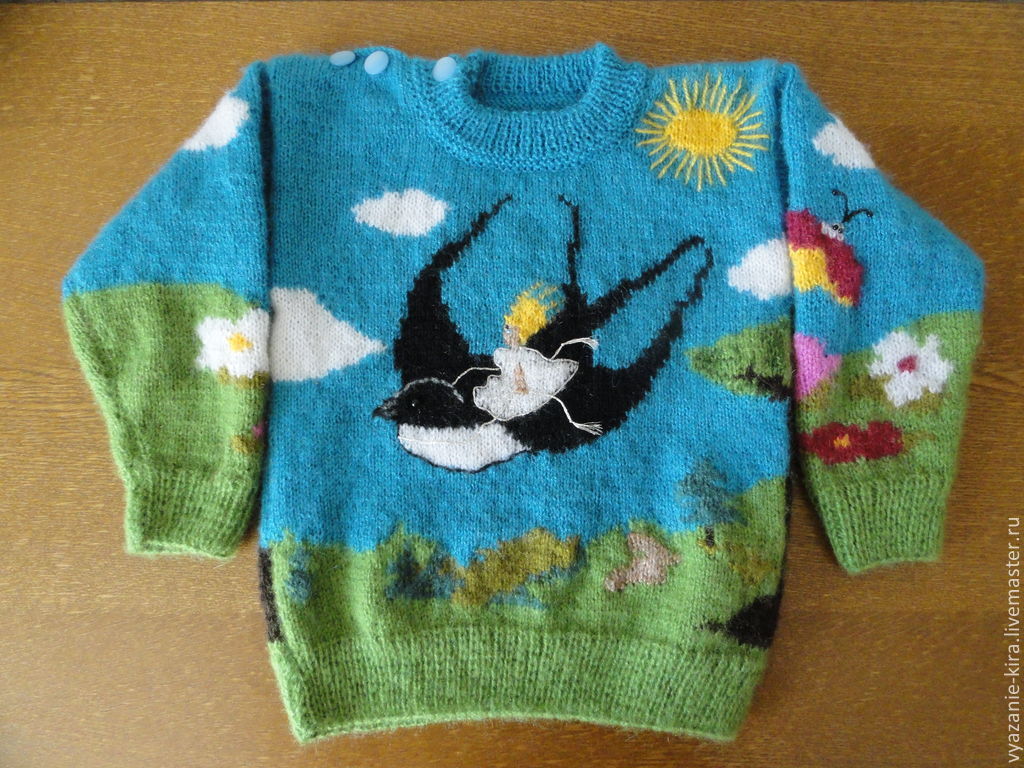
A cute set for spring or autumn for a boy 2-3 years old: a description of knitting a jumper and a hat with a pattern and pattern.
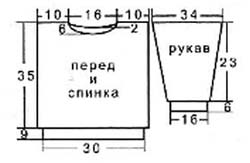
You will need: yarn (100% acrylic; 100 g/230 m): 100 g each of light green, white and yellow flowers, 150 g blue color, some yarn different colors, knitting needles No. 3, hook No. 3.
Knitting density: 10 x 10 cm = 19 p. X 27 r.
Motive: according to the scheme.
Pompom hat:
Using a light green thread, cast on 79 sts, knit 5 cm with 1 x 1 rib and continue with 11 cm of thread yellow color persons satin stitch Then divide the work into 7 parts of 11 points each (+ 2 edge points). Mark the beginning of each part with a contrasting thread. Next in each person. R. at the beginning of each part, knit 2 stitches. persons vm. until 16 stitches remain on the knitting needle. Thread the thread through the remaining stitches and pull off. Make a seam. Sew a red pompom with a diameter of 9 cm onto the top of the hat.
Jumper with pattern:
Before: cast on 72 stitches with a yellow thread and insert 7 cm with a 1×1 elastic band, then 2 cm with a double drawstring elastic band. Continue with a thread of blue faces. satin stitch At a height of 4 cm in the middle of the part, make a motif. Next knit with thread white. At a height of 38 cm for the neckline, close the central 6 sts and on both sides of them 2 times 2 sts, 5 times 1 st. At a height of 44 cm close the sts.
Back: knit as before, do not follow the motif. At a height of 42 cm, for the neckline, close the central 10 sts and on both sides of them 4 sts, 3 sts. At the height of the front, close the sts.
Sleeves: With a yellow thread, cast on 38 sts and knit 6 cm with an elastic band 1 x 1. In the last p. evenly add 5 sts. Then knit with a light green thread. satin stitch For bevels, add sleeves on both sides every 4th r. 9 times, 1 p. At a height of 29 cm, close the p.
 Assembly: use black thread to embroider the contours of the motif. Make seams. For the neckline, use a yellow thread to cast on 80 stitches and knit with an elastic band 1 x 1. At a height of 6 cm, close the stitch. Sew the binding along the edge of the neckline. Using a light green thread, crochet a chain from c. p. 110 cm long and stretch it through the double elastic drawstring. Sew tassels onto the ends of the resulting lace (cut threads 7 cm long, gather them, fold them in half and tie them with thread at the fold).
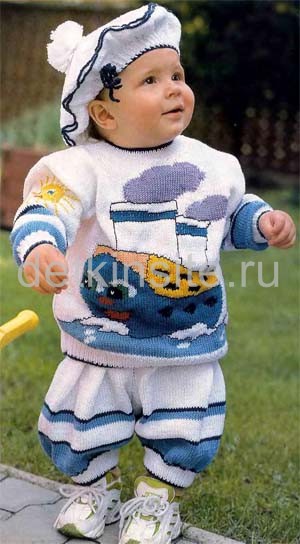
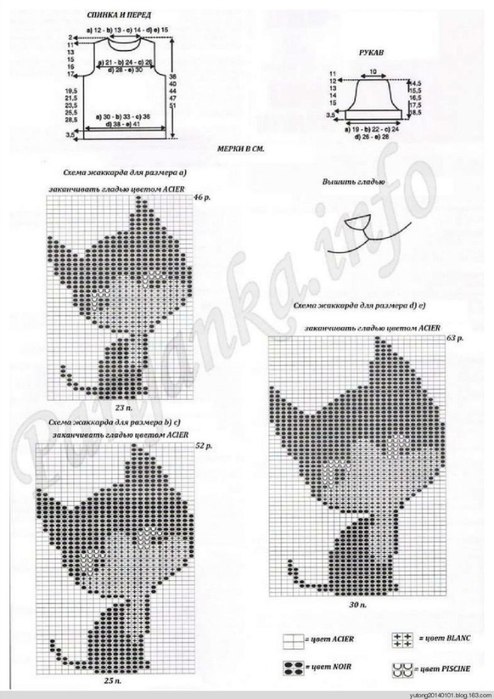
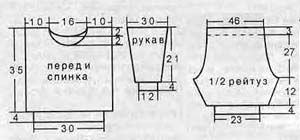
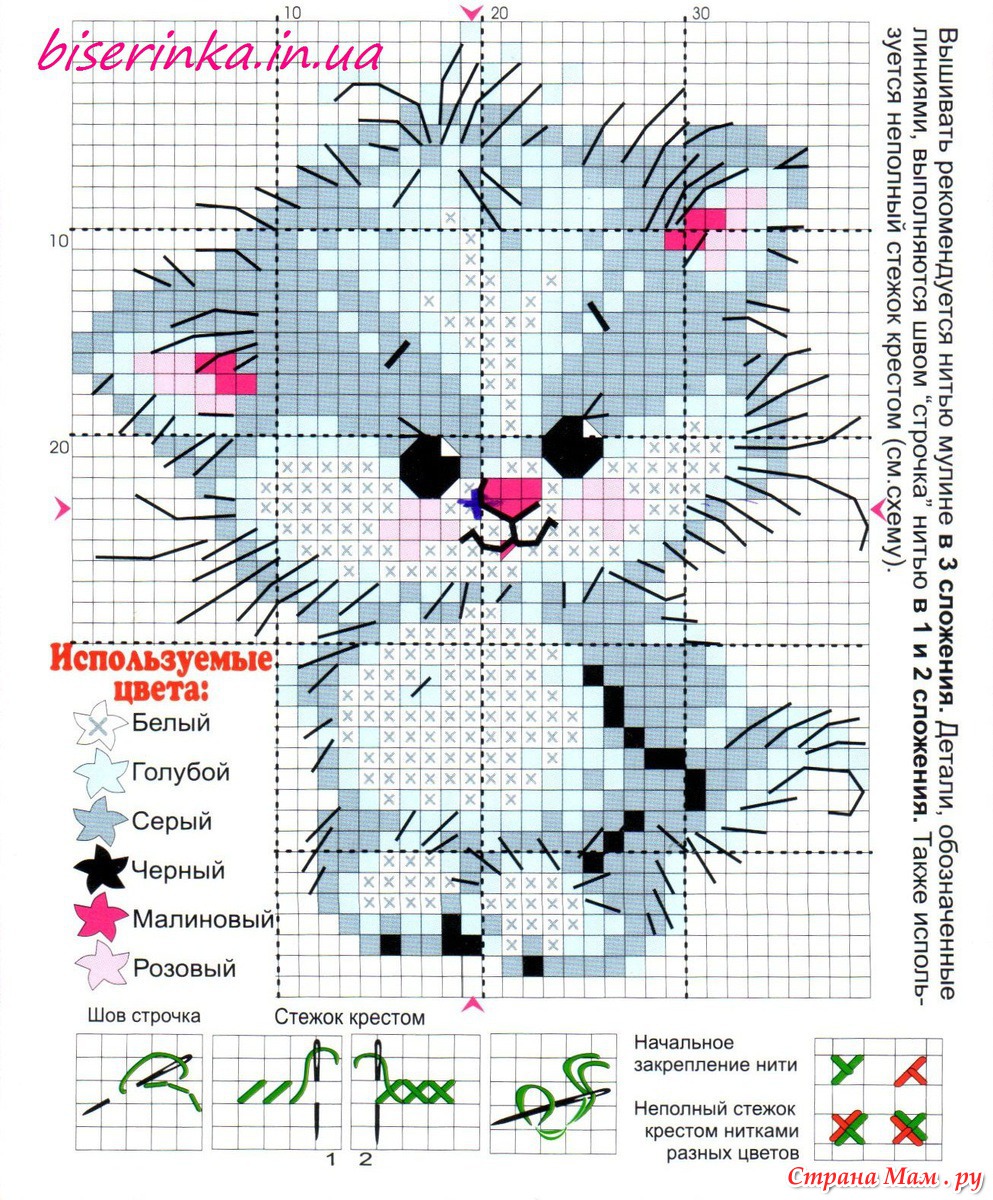
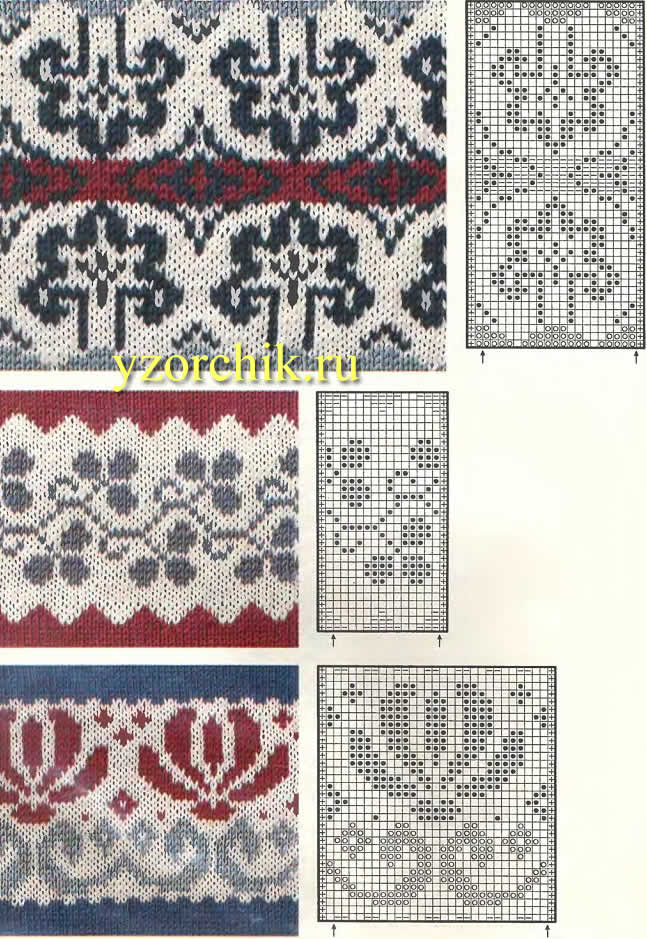
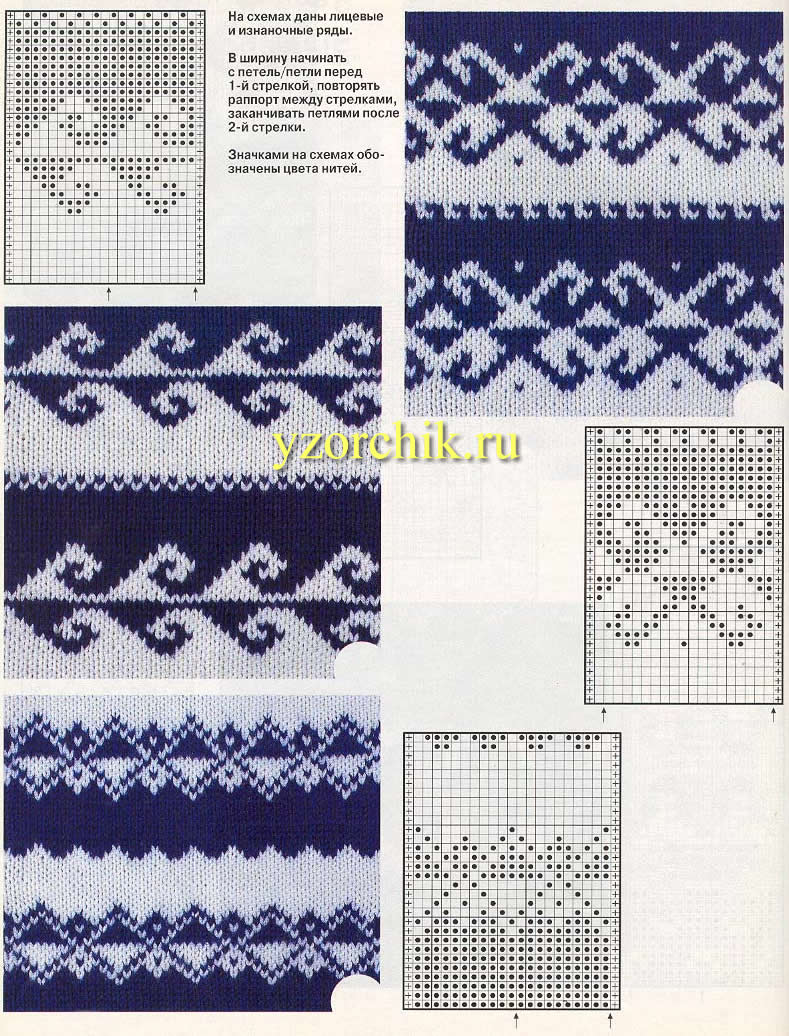
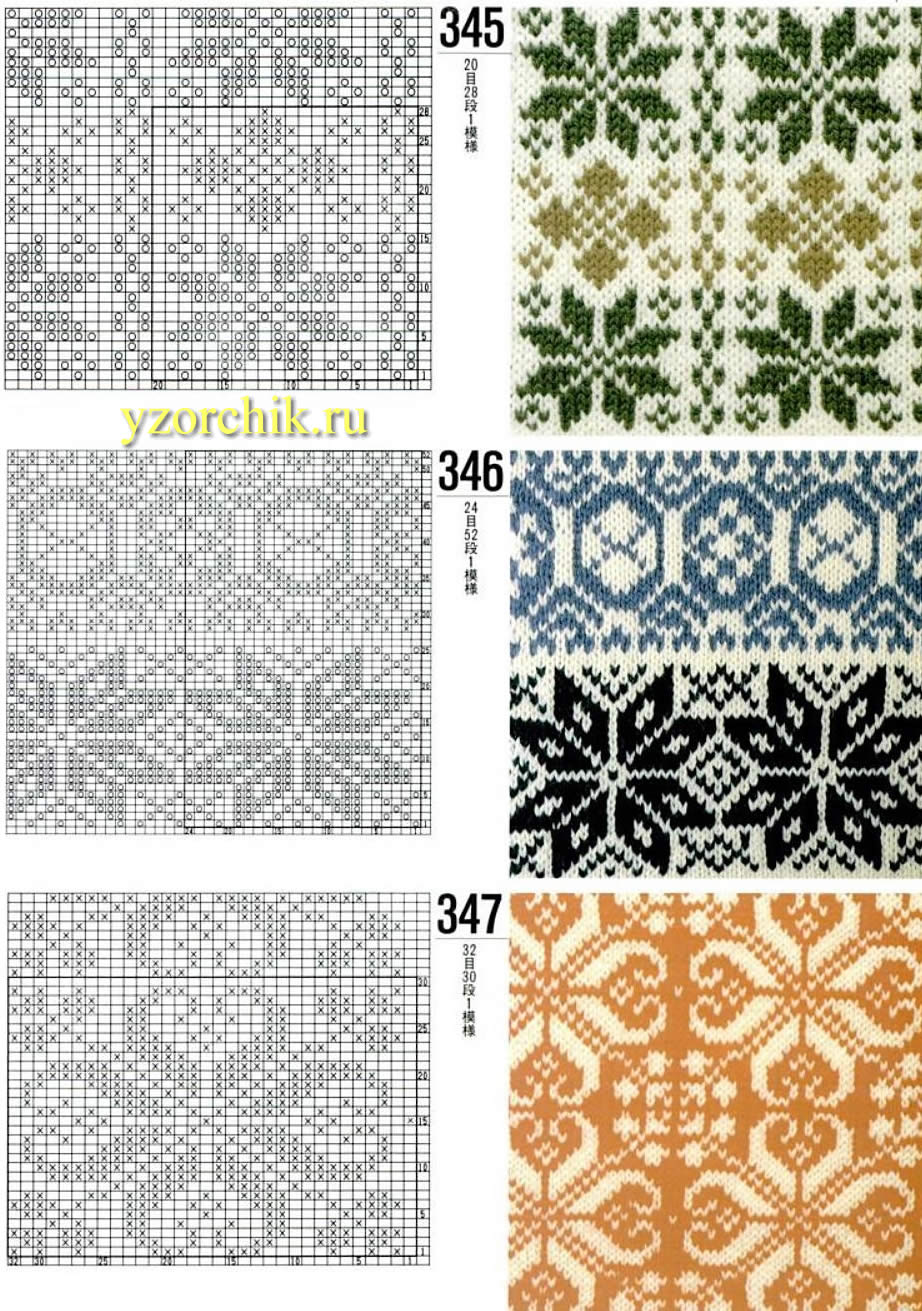
Knitting density: 24 p. x 32 p. = 10×10 cm.
Patterns: according to diagrams.
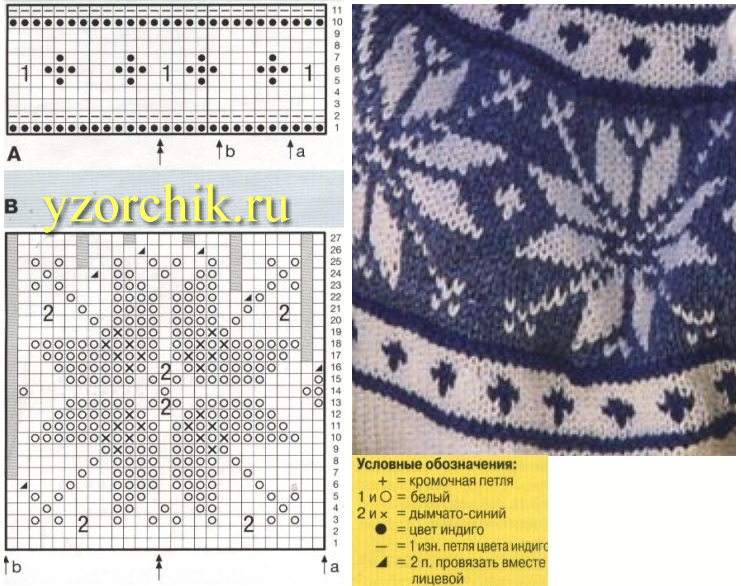
Beret
On knitting needles No. 2.5, use a white thread to cast on 121 sts and knit with a 3.5 cm drawstring. Then knit on needles No. 3. In the 1st r. behind the elastic band, knit 2 stitches from each stitch = 240 stitches + 2 edges. p. Knit 5 cm knit. stitch straight and divide the work into 6 parts of 40 stitches. At the beginning of each part, knit 19 times, 3 stitches together. in every person. r.. and at the beginning and at the end of the knitting needle, knit only 2 stitches together. Close the remaining steps. Sew the beret seams, sew a white pompom with a diameter of 7 cm to the top of the head. Tie the elastic band with thread dark- of blue color 1 rub. single crochet, at a height of 8 cm and 8.5 cm, tie the edge of the beret with a chain of dark blue thread. Using a dark blue thread, in two folds, crochet a chain 33 cm long and tie it with a bow. Sew the bow to the beret at a height of 4 cm from the edge of the elastic band.
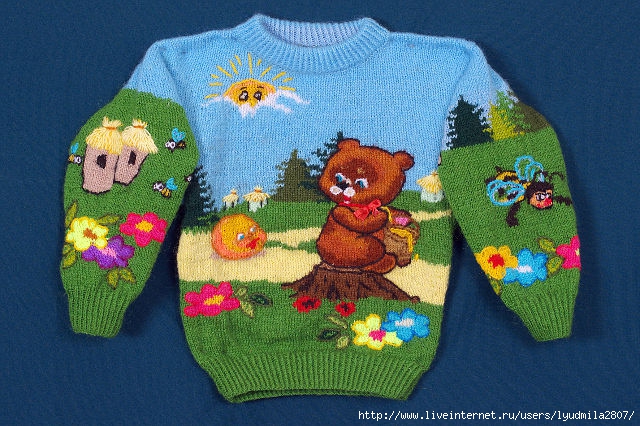
Pullover
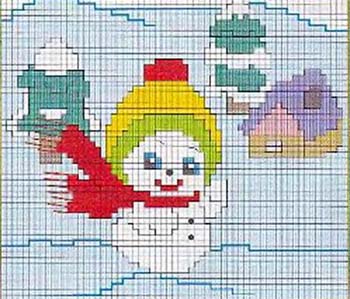
Before: on knitting needles No. 2.5, cast on 85 stitches with a dark blue thread and knit 2 rows with an elastic band 1 x 1. dark blue thread and 4 cm white thread. In the last r. elastic bands evenly add 11 sts (= 96 sts). Then knit on knitting needles No. 3. satin stitch and in the middle of the part, make a motif. At the bottom of the pattern, knit with a blue thread along the width of the front. After completing the motif, knit 2 r. With a white thread, close the middle 14 stitches for the neckline, and decrease on both sides 1 time 4 stitches, 1 time 3 stitches, 2 times 2 stitches, 2 times 1 stitch each, knit 2 more rows. straight and close p.
Back: knit as before, but without the “boat” motif with a white thread. To cut the neckline, close the middle 24 sts 2 cm above the front, decrease on both sides 1 time 4 sts, 1 time 3 sts, 1 time 1 st ., knit 1 p. straight and close p.
Sleeves: on knitting needles No. 2.5, using a dark blue thread, cast on 35 stitches and knit 2 rows with an elastic band 1 x 1. dark blue thread and 4 cm white thread. In the last r. elastic bands evenly add 14 sts. Then knit on knitting needles No. 3. satin stitch 18 rub. blue thread, 2 r. dark blue thread, 10 rub. white thread. 4 rub. blue thread, 2 r. dark blue thread, 8 p white thread. In the middle of the right sleeve, make a “sun” motif (knit the left sleeve without a motif). 12 rub. with a white thread and close the st. For bevels, add 1 st on both sides in every 6th row.
Assembly: embroider the boat and water along the outline with dark blue thread, pipes with black thread, embroider yellow rays on the sleeve. Sew stitches Along the edge of the neckline, cast on stitches on circular needles and knit with white thread 1 r. purl and 9 rub. elastic band 1 x 1.2 r. elastic band 1 x 1 thread of dark blue color and close st.
Panties
On knitting needles No. 2.5, with a dark blue thread, cast on 81 sts and knit 2 r. elastic band 1 x 1 and 4 cm with white thread. In the last r. knit 2 stitches from every 2nd stitch. Continue knitting on knitting needles No. 3. satin stitch 2 r with dark blue thread, 18 r. blue, 2 r. dark blue, 10 rub. white, 4 rub. blue, 2 r. dark blue and until the end of the part with a white thread. For bevels on both sides in every 2nd r. add 18 times 1 p. Starting from the 21st r. decrease on both sides 1 time 5 p., 2 times 3 p., 1 time 2 p., 8 times 1 p. Knit to a height of 43 cm, perform 1 p. purl satin stitch, 3 cm knit. stitch and close st. Knit the second leg in the same way. Sew the seams, fold the drawstring along the wrong side. R. inside and sew, thread an elastic band 2.5 cm wide.
Socks
Work on 2 double needles. Using a dark blue thread, cast on 20 p. Using an elastic band 1 x 1, knit 2 p. dark blue thread and 8 r. white thread. Then knit faces. satin stitch 4 cm with white thread. 2 r. with a blue thread, then knit with a white thread. At a height of 10 cm, perform a heel: decrease 1 st on both sides 7 times, pick up decreased sts on both sides, knit straight 6.5 cm, then perform the toe in the same way as the heel. Connect the chrome on both sides. n. front part with chrome. n. bottom part. Change the color of the thread according to the front part.

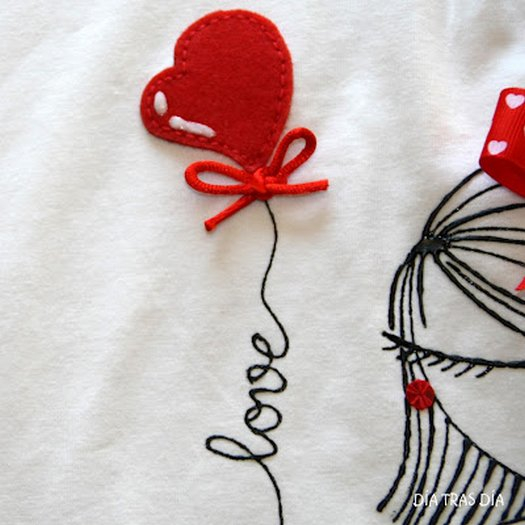
Any boring clothes can be turned into a work of art if you approach the decorating process creatively. Personally, I have already made excellent appliqués on a T-shirt, so I advise you to use this method of decorating clothes.
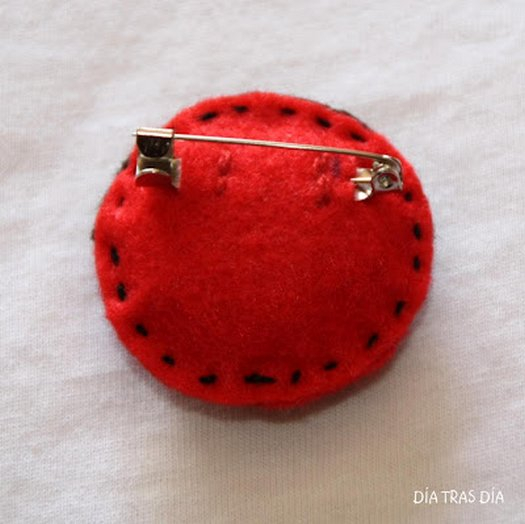
For such an applique you will need small pieces of felt, colorful fabric, sequins, satin ribbons, beads, threads, a needle, scissors and padding or cotton wool for stuffing.
We cut out two identical parts from red felt - the outline of a butterfly. From colored fabric we cut out the same outlines of a smaller size. We sew a fabric butterfly in the center of one part of the felt. We decorate the product with four red sequins and beads. We sew together two felt parts of the butterfly and stuff the product with synthetic down. We sew the body and head of the butterfly from satin ribbon.
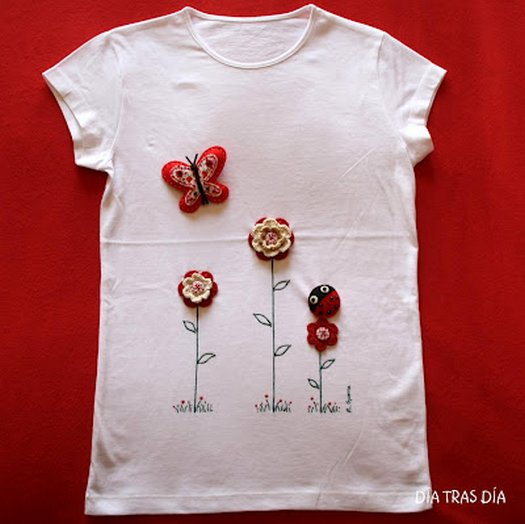
We also sew a ladybug from felt and beads. We will make the outlines of the wings using a dotted seam with black thread. Sew the parts and stuff them ladybug synthetic fluff.
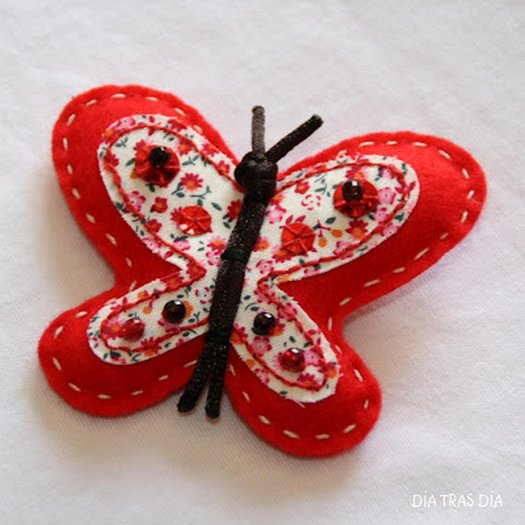
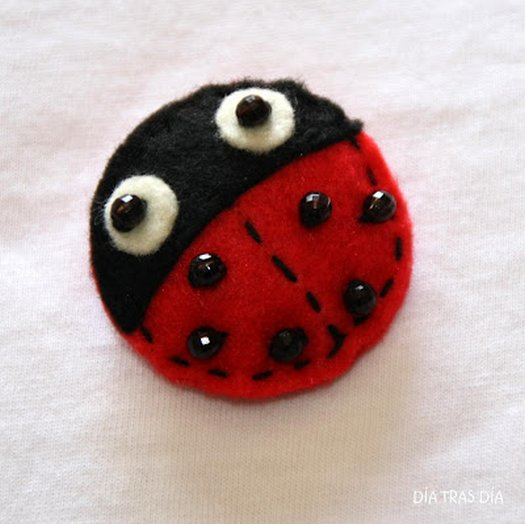
We turn both the butterfly and the ladybug into brooches - we sew on a clasp for the brooch. Now these brooches can be attached to a T-shirt. We crochet flowers, place them on a T-shirt and paint on the grass with acrylic paint. A product with this paint can be washed, it will not crack or fall off!
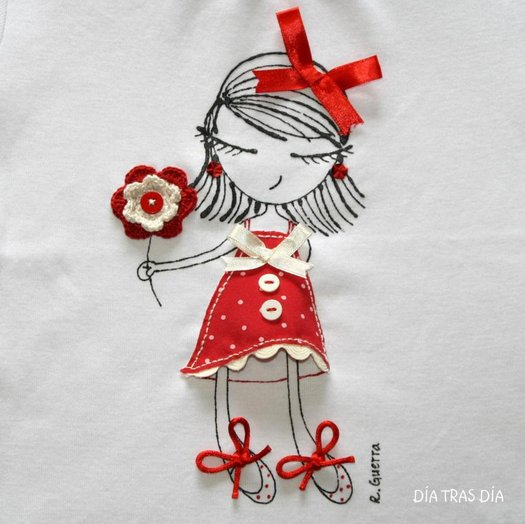
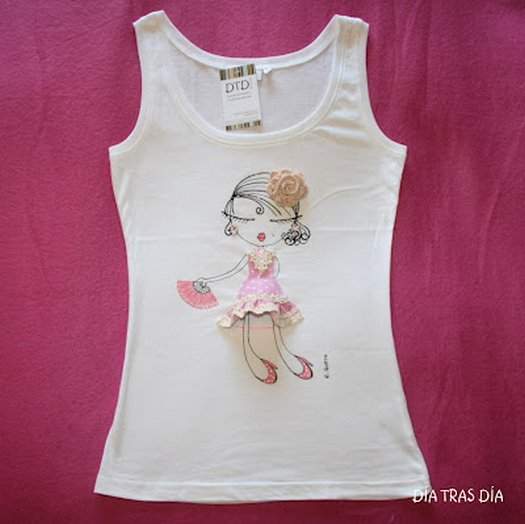
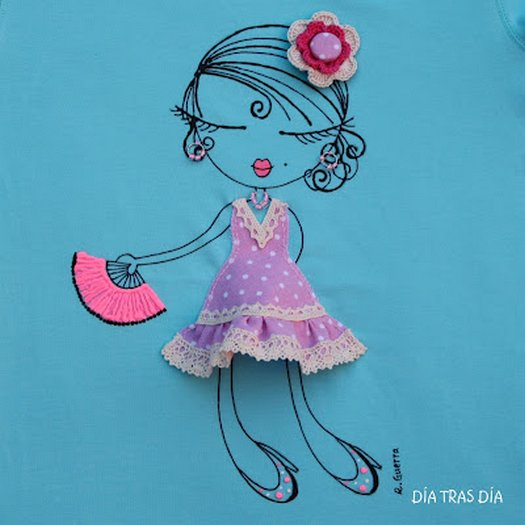
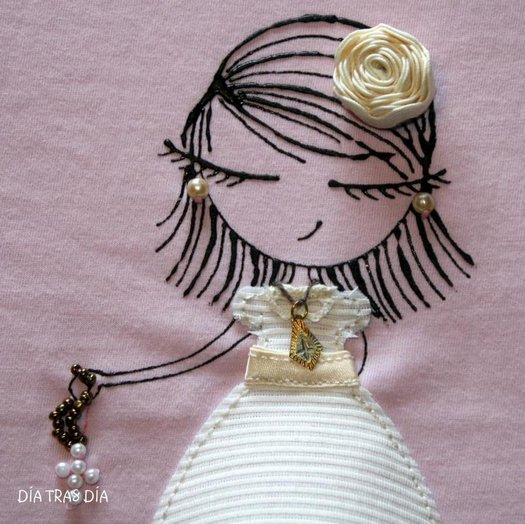
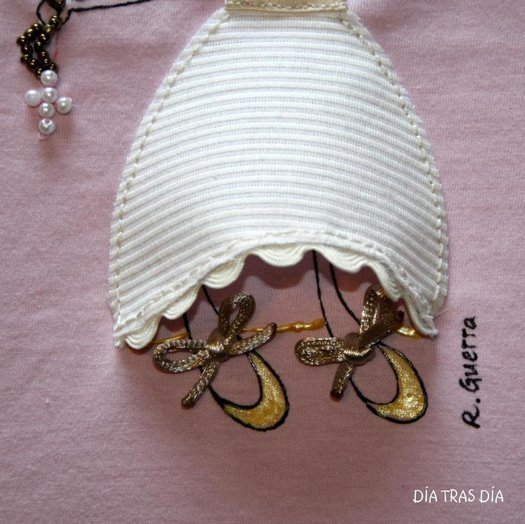
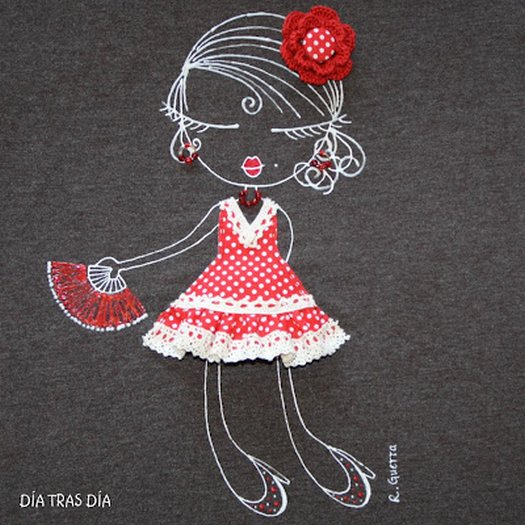
A t-shirt with a girl is also very easy to make. Main element appliqués for her dress. We cut it out of red fabric with polka dots, sew buttons and a bow to the fabric, and decorate the bottom with wavy braid. Then we sew the dress to the T-shirt and draw a girl around it acrylic paints. We sew a bow from a satin ribbon to her head, and similar bows to her shoes. The girl holds in her hand crochet a flower that we sew onto the T-shirt along with a button in the center of the flower.
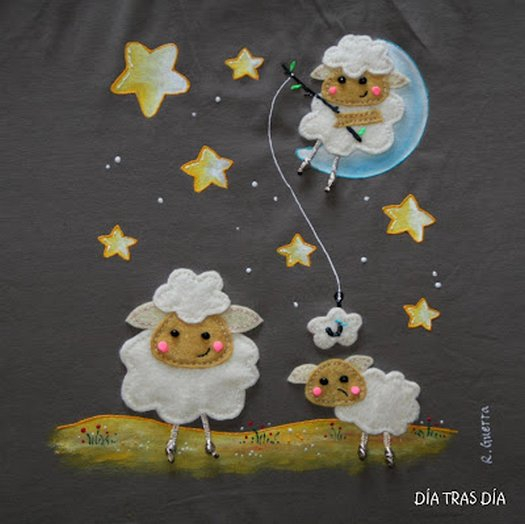
The sheep applique is made almost entirely of felt. From this material we cut out the outlines of sheep, their heads and ears. We sew the sheep to the T-shirt, make the eyes and cheeks from beads. The legs of the sheep are thin laces with knots at the ends. One of the sheep caught a cloud on a fishing rod - we also make it from felt. We cut out stars from cotton fabric and sew it to the T-shirt between the lambs. We make small stars by sewing white beads. We paint the lawn with acrylic paints for fabric.
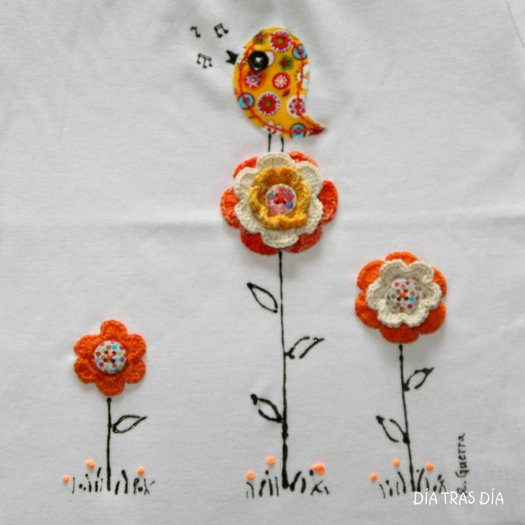
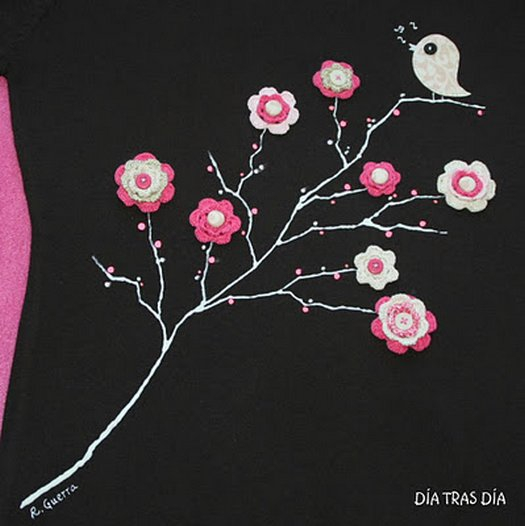
Flowers with a singing bird also do not require special knowledge and skills. We make this applique like this: we crochet the flowers (the centers are multi-colored buttons), we cut out the bird from cotton fabric (the eye is a dark button). We paint flower stems, grass and notes with black acrylic paint.
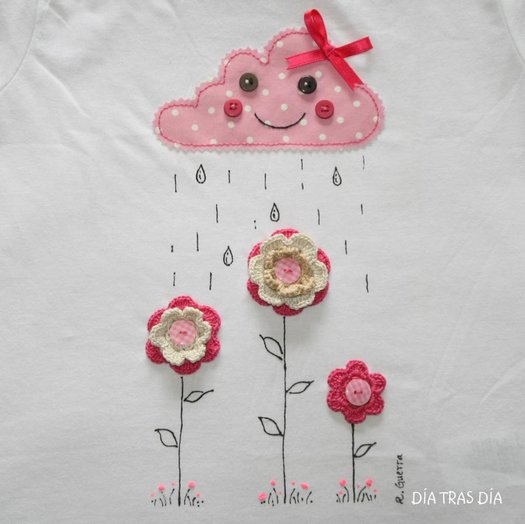
Here we make flowers in the same way. We cut out the cloud from cotton fabric, make eyes and cheeks from small buttons. Sew the cloud to the T-shirt and add a satin ribbon bow. The mouth of the cloud and the drops are acrylic paint.
Here the bird is made of cotton, the flowers are knitted with buttons in the middle. Tree branches - acrylic + beads.
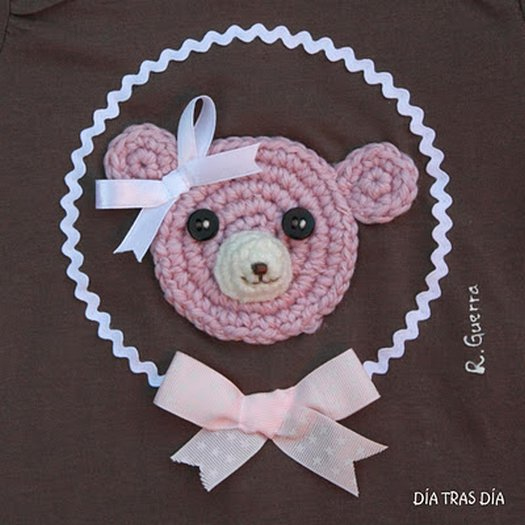
We can crochet a bear in a circle (the ears are also crocheted circles, the muzzle is a three-dimensional circle). We decorate the bear with bows and sew a wavy braid headband around it.
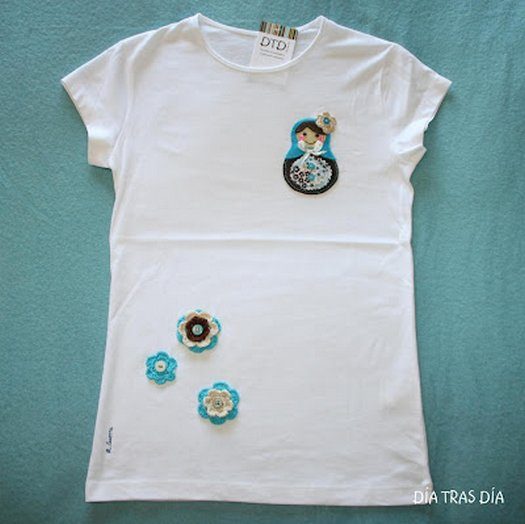
And here is a Russian style T-shirt.
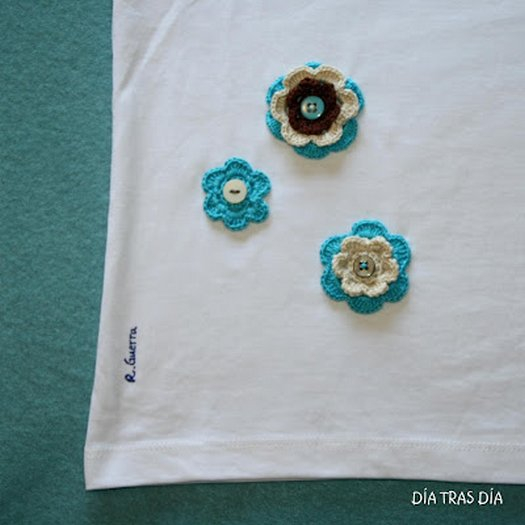
Flowers are traditionally crocheted and decorated with button centers.
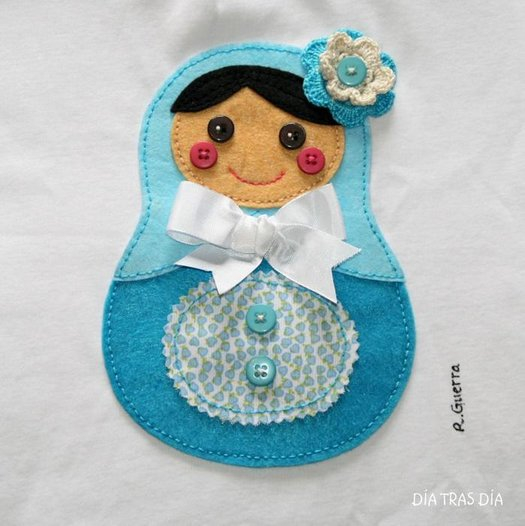
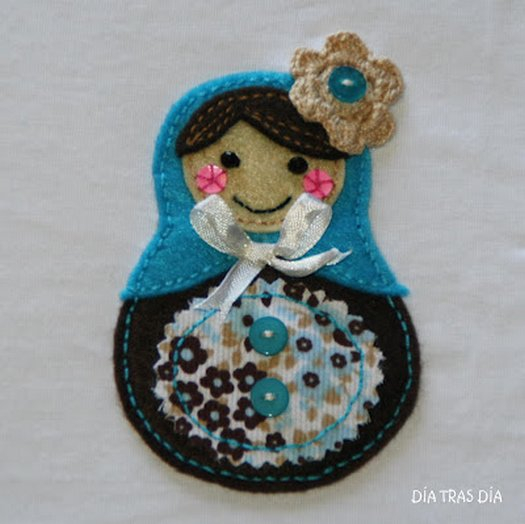
We make the matryoshka from felt, decorate it with buttons and ribbon bows.
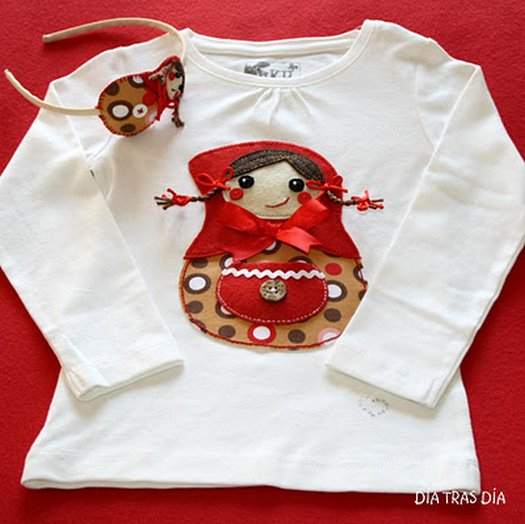
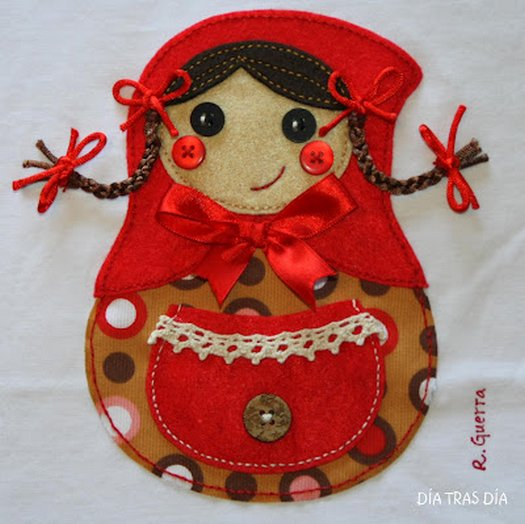
Particular attention should be paid to the details in the appliqués: we sew frills to the girl’s dress, and we sew earrings - wire with beads - to her ears.
A beautiful rose is obtained by folding the wavy braid.
Focus on the cute little details and you'll make great appliques too!
| Categories: | |
Fabric appliqués on clothes are used not only to disguise scuffs or holes that have appeared. Nowadays, such patches are widely used as unique decorations, and also as a way to update a boring item.
For those who want to learn how to create various fabric panels on things with their own hands, this article will present several master classes describing various techniques.
Adhesive application
You will need:
1) Fabric in two colors;
2) Non-woven fabric with adhesive backing;
3) Tracing paper;
4) Template;
5) Pencil;
6) Scissors.
Manufacturing process:
1) Using tracing paper, transfer the image onto non-woven fabric.
2) Cut out the parts, making a small indent from the contours.
3) Apply them to the wrong side of the fabric and iron them.

4) Cut out along the contour of the applique (non-woven fabric along with the fabric).
5) Peel off the paper from the wrong side, place the applique face up and iron it.
6) To finally secure the image, zigzag stitch the contours of the design on a typewriter or by hand.
We create an application with our own hands
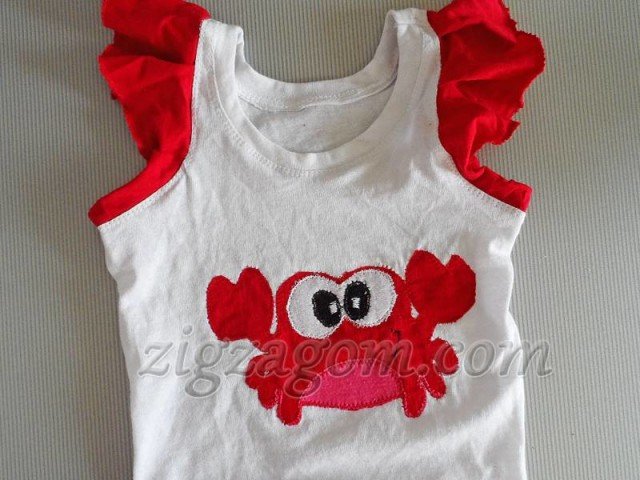
Of course, stores offer a wide range of adhesive applications for clothing. However, it is not always possible to find a drawing that a parent, much less a child, will like. And the sticker size may not be suitable or the applique material may be too thick. In this case, you can make your own application the desired shape and sizes. Let's consider this option using the example of creating a crab, which is perfect for clothes for boys.
You will need:
1) Fabric for applique;
2) Non-woven fabric;
3) Scissors and needles;
4) Drawing;
5) Tracing paper;
6) The thing on which there will be an applique.
Stages of work:
1) Transfer the selected image onto tracing paper, with all elements of different color range draw separately from each other. We do not cut out the image.
2) Place a piece of non-woven fabric under the main fabric with the adhesive side. We place the fabric from which the applique will be made on top and fasten everything together with needles.
3) Place the tracing paper with the image on the last layer and also attach it with needles.
4) Using a sewing machine, sew the pattern along the contours. After this, carefully remove the tracing paper.

5) Cut off the excess fabric as close to the stitching as possible.
6) Add elements of other colors. In this work, such a detail is the eyes. We put a piece of white fabric, on top - tracing paper with the image of eyes, fasten it with needles and stitch it.
7) Then remove the paper again and cut off the unnecessary fabric.
8) Similarly, we make black pupils.
9) Sew the applique using a zig-zag stitch along the contours.
10) From the wrong side, cut off the interlining that is located outside the image. Ironing.
Reverse appliqué technique
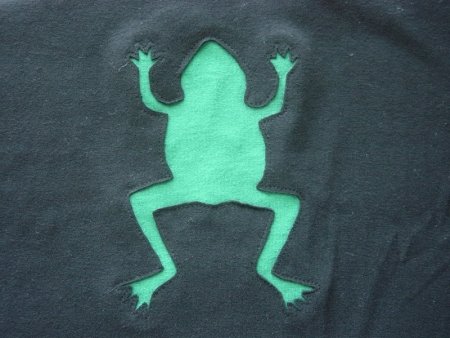
If the fabric on which you plan to make the appliqué does not tend to crumble when cut, you can use the reverse technique. Its essence is to secure the image from the wrong side of the base. Application patterns should be as simple as possible. Let's take a closer look at the example of making a frog.
You will need:
1) White paper;
2) Pencil;
3) Scissors;
Procedure:
1) Transfer the selected design to a piece of fabric or a paper napkin, which can be easily removed upon completion of the work.
2) Turn the base inside out and outline the area where you are going to make the applique. Using large stitches, we attach the fabric used on top of it.
3) Turn the base right side out and use needles to secure the applique template so that it does not move during the process.
4) Place a small seam along the edges of the pattern. Thus, we fasten the main fabric and the fabric for the applique together; the template should not be sewn on. Upon completion of this stage of work, we remove all the needles and the template itself.
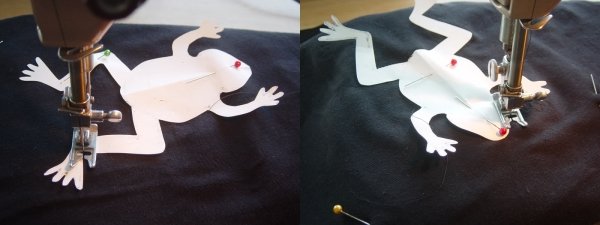
5) Cut out the contours of the image from the front side of the base using sharp small scissors. The distance from the seam should be from 1 to 3 mm, depending on the density of the fabric. We make a small cut in the middle of the base above the applique and begin to expand it to the seam. You should be extremely careful not to touch the application itself.
6) The final stage will be trimming the excess fabric from the inside.
How to make a volumetric applique: general manufacturing rules
Step-by-step instructions for creating 3D appliqués on clothes.
1) Draw the applique pattern. Separately, we create a template for the part that will be three-dimensional. Patterns should be without allowances and a few millimeters smaller than the main part.
2) Attach the image to the base and outline it with chalk. We apply the volumetric parts to the foam rubber of the required thickness and cut them out.
3) Fold the edges of the applique if necessary. You can make perpendicular notches at a distance of several mm from each other so that the material lies evenly. Iron to fix the result.
4) Attach the applique to the main fabric. First, we sew the foam rubber with a regular seam around the perimeter. Cover the top with applique.
5) To obtain an invisible seam, you should grab only the part of the fabric that was folded. It is better to make stitches as small as possible.
6) Decorate the outline of the applique with satin ribbon or beads.
Video on the topic of the article