A simple way to create a dress pattern. Designing the main bodice pattern
Good afternoon to you!
Spring has finally arrived, and it’s already a little over +15 outside! And as always, with a new positive influx of emotions after the weekend, I’m ready to please you with a new lesson!
Construction of a bodice pattern– this is what you asked me to do for a long time, and what I finally got to :)!
Bodice base pattern will be built according to Italian methods using highly elastic fabrics. What does it mean? The fact is that the pattern does not have undercuts or allowances for freedom of movement. This means that the fit on the figure will be tight. And if the fabric does not stretch well, then you are unlikely to fit into the product...
Highly elastic fabric is jersey, lycra, stretch, etc. That is, those fabrics that stretch 1.5 times. For example, 10 cm of fabric will stretch into as much as 15. Such fabric will be very successful.
Construction of a bodice pattern
I divided the construction into three stages:- Taking measurements for sewing a shoulder product (otherwise known as a bodice);
- Construction of the back half - back;
- Construction of the front half.
How to take measurements of a woman.
If in previous topics (building a skirt and trousers) you could somehow do it yourself, then here you will need a person to help you.
Measurements needed to build the bodice, without undercuts:
- Waist circumference
- Hip girth
- Hips height
- Bust
- Torso circumference above the chest
- Distance between chest centers
- Chest height
- Front length to waist
- Back length to waist
- Back width
- Shoulder width
- Size
How to take measurements from a woman, you will learn more from the video that you can
Or watch the tutorial on the blog:
A distinctive feature of this pattern, as I said above, is the absence of increases. But you can add them! When building, I mention this point in the video, but here I will tell you more about it.
Just below you see a table of increases:
Based on it, you can regulate “freedom”. However, remember that the increases given here are in general. And if the formula looks like this:
½ Waist + Increase
then you need to calculate it in the following form:
½ Waist + ½ Increase.
Construction of a bodice pattern - the first and second stages.
This is what the pattern will ultimately look like: 
We start building from the back, that is, from left to right. Most formulas are related to the “size” measure. So let's see what it is. This measure is present only in the Italian method, and is calculated as follows:
Torso circumference above the chest/2
Therefore, be careful when taking all measurements from the figure...
How to make a video pattern
The front half of the bodice is built on the back. But not like in trousers. No overlap.
Main role Here comes the first point from which we started constructing the back, from it we will set aside: ½ of the chest circumference and from this point we will build the front of the bodice pattern. This stage is even easier to build, as it is very similar to the first.
Sale of outerwear from trusted brands: always convenient, comfortable, and most importantly warm on the coldest days of winter. Sale outerwear from down jackets to light trench coats for the new season 2012-2013. All sizes are in stock... Buy now!
Valentina Nivina Alexander Nivin
If you have not yet created a pattern for the base of a dress, we recommend using ours. You will need this drawing in the future when mastering the modeling of various types and styles of clothing.
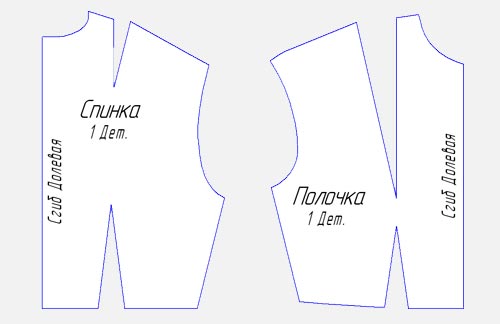
Let's copy the back and front of the bodice of the dress onto a blank sheet of paper.
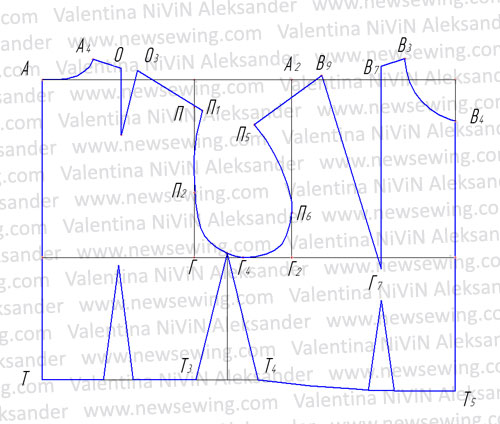
We move the side line of the bodice to the middle of the armhole.
To do this, draw a line from point G4 down to the intersection with the waist line. In our drawing, point G4 is located in the middle of the width of the armhole. If you are using a base constructed using a different method, divide the width of the armhole in half and draw a vertical line from the division point, thus obtaining a new one side line bodice. Along with the side line, we also transfer the side dart.

Move the shoulder seam 1cm closer to the front. This means that on the back we raise the shoulder by 1 cm, and on the shelf we lower it by 1 cm.
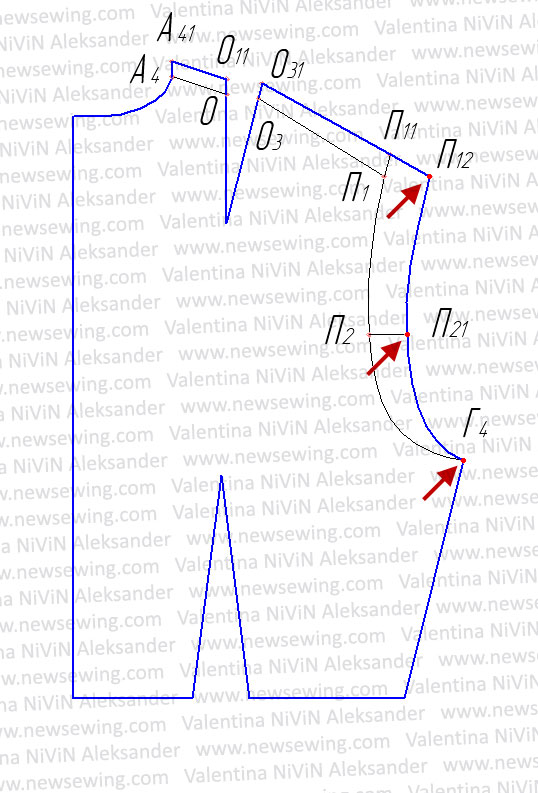
Back. Raise the shoulder line of the back at the sprout (back neckline) and at the dart lines by 1 cm, and raise the edge of the shoulder at the armhole by 1.5 cm. To do this, set aside 1 cm from point A4 and place point A41. From points O and O3 upward we also set aside 1 cm and place points O11 and O31, respectively. From point P1 up, continuing the armhole line, set aside 1.5 cm and place point P11.
We connect points A41, O11, O31 and P11, we get new line back shoulder.
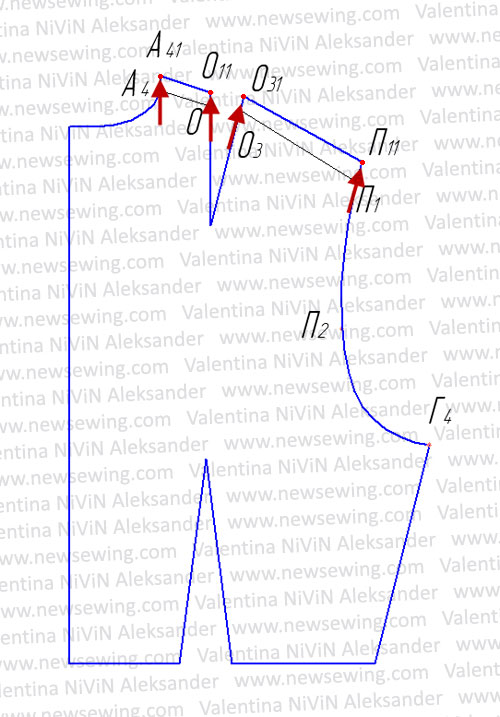
You can do this simpler: from point A4, set aside 1 cm upward, and from point P1 - 1.5 cm, close the dart and draw a new shoulder line.
Note: The dart at the back shoulder line may be reduced or completely absent.
Sleeve length. From point P11 to the right, continuing the shoulder line, set aside the desired sleeve length of 1.5-4 cm and set point P12. Section P11P12 determines the length one-piece sleeve.
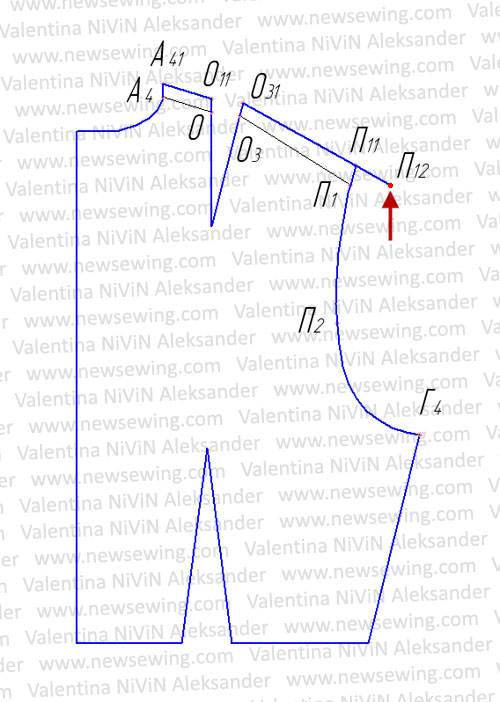
From point P2 to the right horizontally we set aside 2-3 cm and place point P21.
By connecting points P12, P21 and G4 with a smooth curve, we get a new back armhole line, i.e. back with one-piece short sleeves.
Shelf.
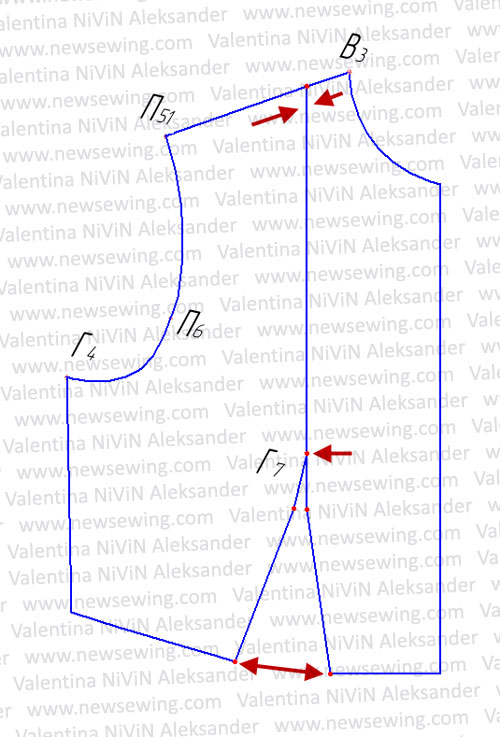
Reduce the opening of the chest dart by 2 cm. We use compasses to construct. From point G7, as from the center, through point B9 to the right we draw an arc. Then we place the leg of the compass at point B9 and with a radius equal to 2 cm we make a notch on this arc, denoting the intersection point with the letter B91.
We connect points G7, B91 and get a new dart line.
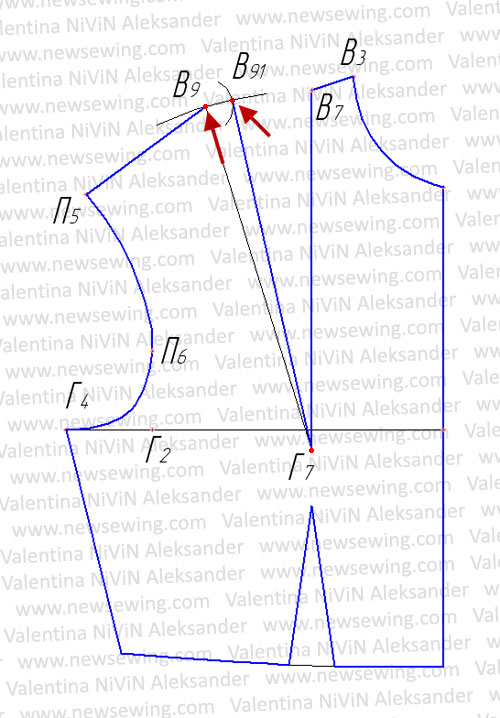
Now we reduce the shoulder line by the same distance (2cm). To do this, from point P5 to the right along the shoulder line, set aside 2 cm and put the letter P51.
We connect points P51 and B91. We connect points P51 and P6 with a smooth curve.
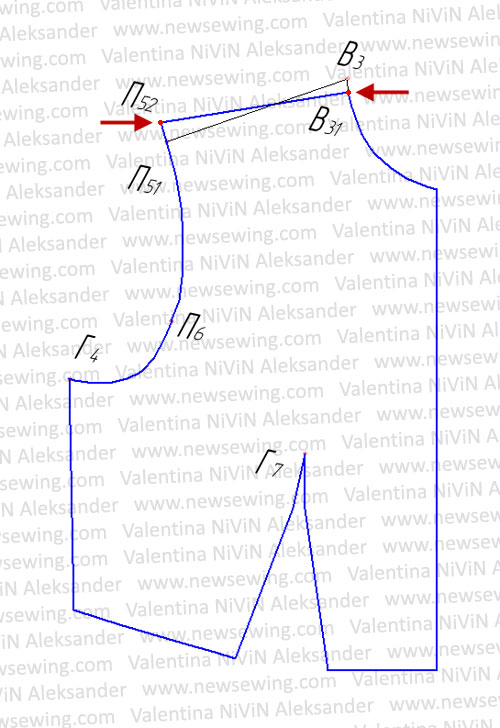
For further construction, we will close the chest dart (for the duration of construction).
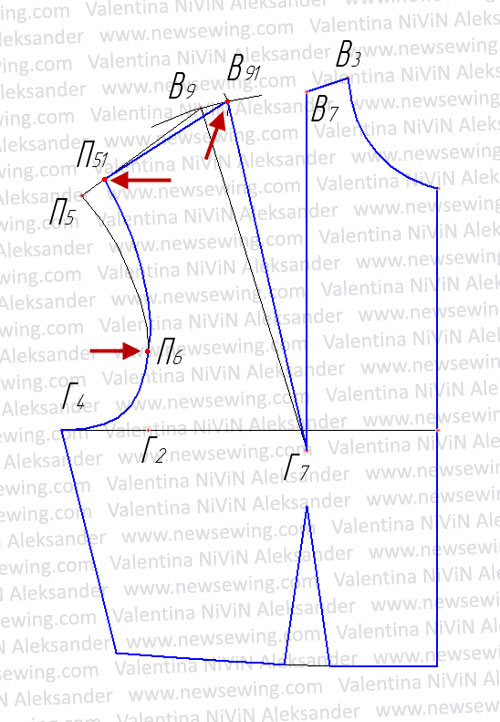
From point B3 we put 1 cm down and put point B31. From point P51 up, continuing the armhole line, set aside 1.5 cm and place point P52.
We connect points B31 and P52 with a straight line.
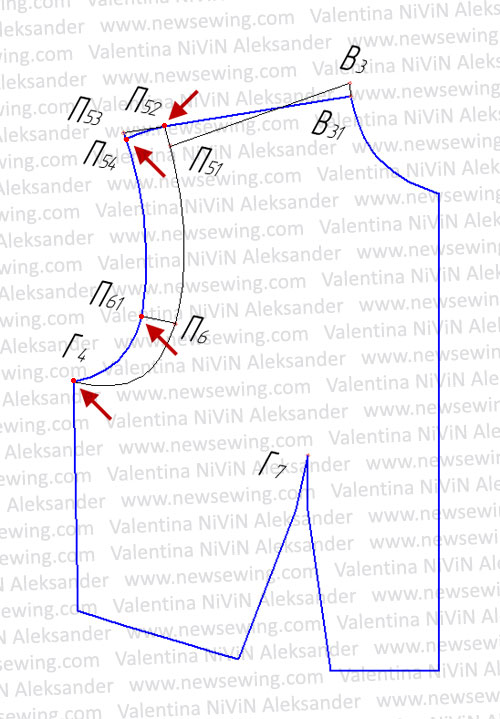
From point P52 to the left, continuing the shoulder line, set aside the length of the sleeve 1.5-4 cm (corresponding to the back) and place point P53.
To achieve a greater fit of the sleeve from point P53 down at a right angle, set aside the bevel value of 0.5-1 cm and set point P54. This value is not constant and depends on the tasks assigned, i.e. on the model, on the fullness of the arm (shoulder), on the degree of fit, etc. The final bevel size is determined during fitting. Section P52P54, which determines the length of the one-piece sleeve, is shaped by a smooth curve.
From point P2 to the left horizontally we set aside 2-3 cm and place point P61. By connecting points P54, P61 and G4 with a smooth curve, we obtain a new line for the front armhole, i.e. shelf with one-piece short sleeves.
We return the chest dart to its original position.
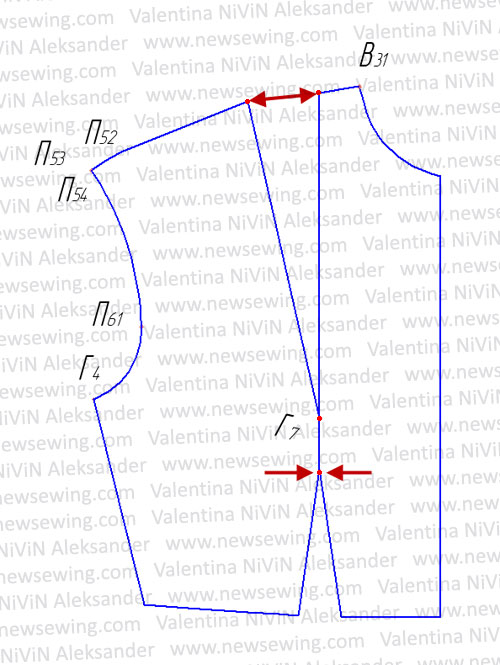
The construction is complete.
The resulting drawing can be used as the basis of a bodice with a one-piece sleeve for further modeling. Using modeling methods known to you, based on of this drawing you can create a wide variety of styles of blouses, dresses, dressing gowns, etc. For example, using various options moving the chest dart.
Cutting details.
In our article, all figures are given as an example only. You can take any values suitable for your case. This is another of the variety of options for constructing a short one-piece sleeve that exist and which we will master.
Follow the news of the site, you can subscribe to our newsletter and you will be the first to know about new publications.
|
The method of creating a pattern using a measuring stick is recommended for beginners; it will allow you to create a pattern for an individual figure very in a simple way. No formulas or many measurements are required. The entire pattern is constructed using a simple strip of paper. In this article we will look at the construction of an almost standard figure, with minor deviations. If you have magnificent bust or stooped back, the construction principle will remain the same, but differences will arise. About this - in the forum thread, where scans of the construction of figures with features are posted. Having become familiar with general principle construction, do not forget to return to taking into account the features. |
Let's take it paper tape equal in size POG(half chest circumference) and divide it into 36 equal parts: bend it in half, then in half again, and between the bends divide it into three equal parts. As a result, we get a tape divided into 36 parts. 1/36th part is called measuring stick. It is this strip of paper - 1/36 POG that will be needed in creating the pattern. The pattern turns out to be quite accurate, but correction during fitting will be necessary, as with any other technique. Therefore, to begin with, we recommend sewing a sampler from calico and making changes to it during fitting. To create a pattern, you will need several measurements taken from the figure.
Taking measurements
POG- half chest circumference. Measured around the body at chest level, the measuring tape is placed horizontally along the most protruding points of the mammary glands. Write down half the girth.
SWEAT- half waist circumference. It is measured at the narrowest point of our body, at waist level. If this line is much higher than what is comfortable for you, measure the girth in the usual place where the skirt waistband is conveniently located. Write down half the girth.
DST- back length. Measured from the 7th cervical vertebra to the elastic band put on LT(waist line).
VG- chest height. Measured from the point where the neck meets the shoulder to VTG (highest point chest), where VTG- the most protruding place of the chest.
Shs- back width. It is measured between the points of articulation of the arms with the body along the back. The measuring tape is positioned horizontally.
How girth measurements are correctly measured is described in the article Dart - basic concepts.
Increases for CO (freedom of fit)
Increase by CO is already included in the drawing and is equal to 1/36 POG*5. Therefore than larger size, the greater the increase. And this is very logical and correct. If a large increase is required CO, sew a sample from calico, look at the desired amount of increase and adjust it using the side seams.
The principle of constructing a pattern for the base of the bodice using a measuring stick
Briefly, the principle is as follows: having a diagram in front of your eyes, use it to plot the distances from the point with a measuring stick in accordance with the numbers. For example, in the diagram the number 5 , this means that five measuring sticks must be set aside from the point. There are two measurements that are taken when constructing a pattern using a measuring tape, these are VG And DST.
Constructing a drawing grid using a measuring tool
|
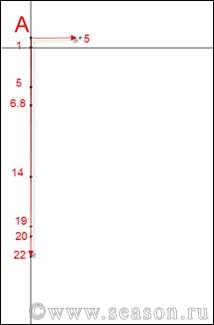
Take a sheet of paper. It is wider in width than POG by 10-15 cm. Sheet height is greater DST by 10-15 cm. We take pencils and a prepared measuring stick, hang a centimeter around our neck, we will need it to control some areas of the drawing, And, we begin. Important! Each subsequent size is postponed from point A. As soon as all the numbers on the vertical are entered, from the point A draw the horizontal to the right at right angles to the vertical. To the right along this horizontal line from the point A set aside 5 measuring cups, put a dot 5 . |
 Click on the photo to enlarge the drawings.
|
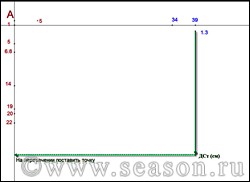
We start from the number 1 . To the right horizontally we set aside 34 measuring sticks and put a dot 34 , from point 34 to the right we put 5 measuring sticks, put a dot 39 . From point 39 put 1.3 measuring cups vertically down, put a dot 1.3 . Centimeter from point 1.3 place the measurement vertically downwards DST, put a point, and from it to the left draw a horizontal line until it intersects with the vertical and put a point. This horizontal line is the original LT. On the back it will remain in this place, but on the shelf it will still go down. |
 We determine the width of the future product and find LT.
 Construction of the neck of the shelf and back
|
The neck of the back is drawn in a smooth curve from the point 34 to the point 1.3 on the right vertical, which is the middle of the back. |
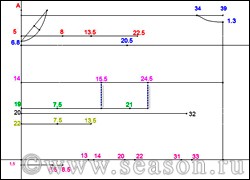 Next, from all points on the vertical, draw horizontal lines to the right, marking the necessary segments on them, in accordance with the drawing on the left. For ease of perception, all horizontal lines and their corresponding numbers are indicated
 Construction of the chest dart and shoulder line of the front
|
We build the left side of the dart. Take a centimeter or compass. We measure the right side of the dart ( dotted line in the drawing) and put exactly the same distance on the left side (beam 7.5 - 8 ). Place a point and connect it with a line segment to the point 5 . On the right side of the dart top point connect to a point 20.5 . The shoulder section of the shelf is ready. |
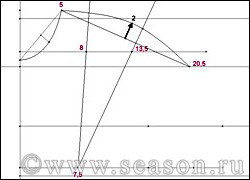 From the point 7.5
on line 19
draw two rays through points 8
And 13.5
. Connecting the dots 5
And 20.5
auxiliary line. We divide this straight line in half and from the division point we restore the perpendicular upward. We put 2 measuring sticks on it, put a dot 2
. We carry out
From the point 7.5
on line 19
draw two rays through points 8
And 13.5
. Connecting the dots 5
And 20.5
auxiliary line. We divide this straight line in half and from the division point we restore the perpendicular upward. We put 2 measuring sticks on it, put a dot 2
. We carry out