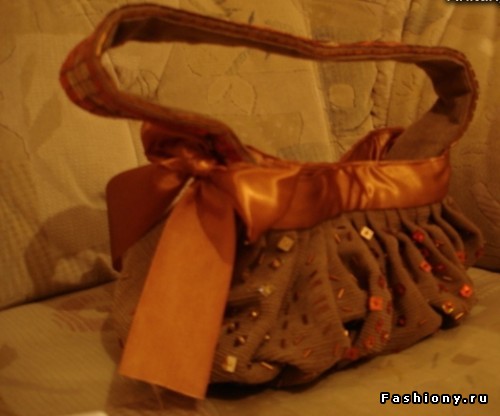
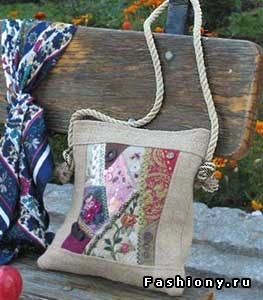
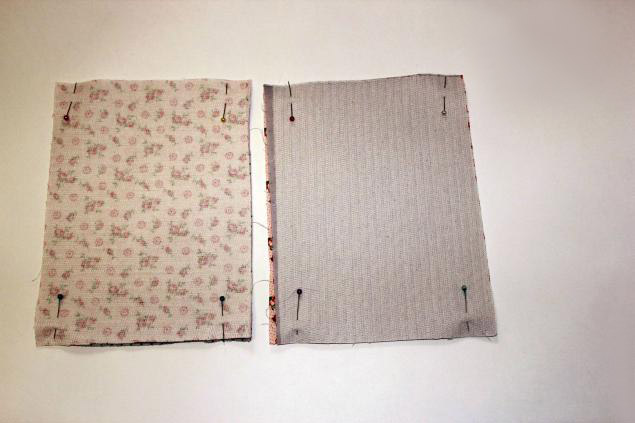
Canvas bag pattern. A DIY linen bag is an eco-friendly accessory for your everyday look.
An ideal option for walking is a DIY linen bag. This accessory will emphasize your love for natural materials and comfort. This accessory is not suitable for formal events, but for everyday use it is a very convenient thing.
Material selection
There are many types of linen fabrics. There is linen for dresses, and there is for curtains, there is even coarse linen, which is difficult to imagine in any product other than a rug. Each of the presented options is suitable for making a bag, but it is still recommended to focus your attention on thick fabric. This choice should be made to ensure that the bag holds its shape.
You should not choose 100% linen, as it wrinkles very much. It is better to choose a mixed fabric, which contains a small percentage of synthetic fibers, which will help the bag keep neat and tidy. fresh look. There should be no more than 5% synthetics so that the fabric does not look like a tarpaulin.
Easy sewing of a handbag
For manufacturing you will need the following materials: thick fabric(burlap, canvas or matting), decorative fabric (textured linen with patterns and classic), threads, bias tape, zipper, interlining and decorative elements.
The pattern consists of two trapezoids that will serve as the sides and bottom, as well as two rectangles from which the handles will be sewn. It must be placed on the fabric in such a way that the threads run diagonally. The piece of fabric must first be folded in half with the wrong side out, using the center line of the warp thread. Using the diagonal sewing method, you can give the product additional wear resistance and no tendency to deform.
When transferring the workpiece to the fabric, you need to take into account the absence of allowances. For the top edge and sides you need to retreat 1.5cm, for the bottom the allowances should be large enough, so we leave a 10cm margin. The handles consist of four rectangles. The allowances for the handles are 1 cm on the short sides and 5 cm on the long sides. The decoration of the bag will be a circle of decorative fabric, which must be processed with a chain stitch. Then place it on one of the trapezoids and glue the middle using non-woven fabric; the edges should be firmly sewn to the product. The decoration can be anything else that suits your taste.
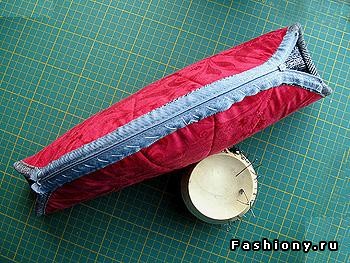
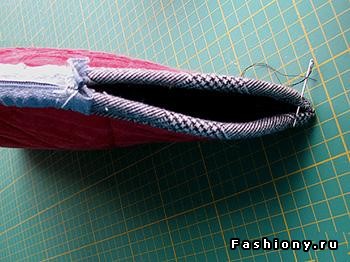
After the decorative element is secured, we begin to assemble the bag. Sew the side seams and sew the tops of the bottom sides to create the bottom of the bag. The allowances of the upper part are folded inward and also glued with non-woven material using an iron. Sew a zipper onto the resulting flap and turn the accessory right side out. The bottom needs to be folded like an envelope and secured with hidden stitches. The details of the handles need to be stitched along the long sides, placing interlining on one of them. After this, unscrew the handles. The binding will be needed to sew the handles on the front side. Then sew them to the bag from the wrong side. The bag is ready to use.

Summer bag
Let's look at another master class on making a linen bag. For it you need to purchase thick fabric for the front part, lining fabric, handles, zipper or button, decorative elements, such as cords, ribbons and beads.
In the photo you can see what parts should be cut out to sew this bag. From the remains of dense fabric you can make big flower and attach it to the accessory.
Bag decorated with painting
To get started, you will need 0.5 m of thick flax, the same piece of lining fabric, acrylic paints, it is desirable that they are intended for fabric, a design you like, copy paper and thin artistic brushes.
Made from linen and lining material We cut out 2 squares with sides 40 cm and one rectangle 8x33. For handles, only linen is used, the size of the strips is 8x52. After this, we transfer the design to one of the parts of the front fabric. To do this, you can use a carbon copy or redraw it by hand.
When the outline of the drawing is ready, we begin coloring. To mix paints, it is most convenient to use a palette, and carry out the work in stages by color.
When the picture is dry, you can start sewing the bag. First, the upper parts of the front and lining fabric are sewn together, while the handles should already be basted, the distance between them is 12 cm. We sew this part on the machine. The result is a pipe made of two fabrics. We insert the lining into the linen and make a finishing stitch so that inner part didn't hang out.
The next step is to baste the bottom to the bag and sew the seam using a sewing machine. The edge of the joint must be overcast so that the fabric does not fray inside the bag. The accessory is ready for use.
Video selection
This collection contains lessons on sewing a lightweight linen bag, which even a novice needlewoman can handle.
A bag is not only a fashionable accessory in an outfit, but also a necessity, otherwise, where would we put cosmetics, a mirror, a comb and a bunch of other necessary and useful things. It happens that it is almost impossible to choose a bag in a store that meets your requirements and desires, but you can create on your own what you really want to have. I won’t convince you that it’s very easy and simple, but if you have the desire, a little patience and accuracy, it’s quite possible ;-)
Here's a look at some handmade bags:


It's pretty simple models, but this is how the needlewomen saw them, who created them for themselves, which is why they earned respect. Besides, these are bags made by amateurs, not professionals.
Preface to the work
Unfortunately, I do not have the opportunity to post a variety of patterns, but this is not necessary. I like to tell general rules, starting from which you can create something unique. By the way, if you decide to sew something, you’d really like to see what it turns out and read how it was done.Since I am not a professional seamstress, I hope more experienced participants will give their advice in the comments to this publication.
What to sew from
Before you sew a bag, you must design it, then draw it. This must be a picture taking into account all the details, otherwise you will not be able to pick up everything you need to create it, although I do not rule out that additions and changes will be made during the work, and someone, having almost finished it, will decide to start all over again and completely otherwise. But such is the creative process, exciting, fascinating, interesting.You probably noticed that in the photos presented above there is little leather goods. Working with leather is much more difficult, in the sense that it is more difficult to stitch due to the density and thickness of the material. If you want to work with it, make sure that your sewing machine can work with such material.
Other fabrics, which are most often used for sewing bags are corduroy, raincoat fabric, cotton fabrics, tweed, flock, velor, gabardine, denim and other dense types of fabrics, although some thin materials are also suitable for summer bags.
For finishing You can combine various dense fabrics, as well as thin ones; in addition, from thin fabrics you can make patterns and designs, voluminous flowers, bows, etc.
Threads for sewing bags, it is better to take stronger ones, that is, silk, nylon or nylon, although you can also use regular thread. The seams need to be sewn 2-3 times, because they will have to hold the contents of the bag, and if you make one seam, then under load it can unravel and become unsightly, and it will no longer be possible to return it to its original position.
Decorations may be different, your taste, imagination and purpose of the bag will play a role here. You can buy ready-made appliqués and patches in the store; many of them can be made yourself. Silk and satin ribbons, decorative laces, rhinestones, sequins, beads, glass beads, embroidery, lace, sewing, and fringe are also used for decoration.
Handles and fastenings can be done independently from basic or auxiliary material. You can purchase special rings, chains, clips, rivets, buttons. Here's what the handles might look like:


Lining. You will definitely need to make a lining for the bag. For it you need to buy a special lining fabric. The color can match the top of the bag, or maybe you want to make it contrasting. Cardboard or other similar material if you want to make a solid bottom.
To work with thick fabrics, you may need an awl. And of course, scissors, chalk or pencil for cutting fabric, a ruler and tracing paper or newspaper for creating a pattern, needles and safety pins for attaching the pattern to the fabric, a tailor's centimeter.
Constructing a pattern
I think the most difficult thing is to make a pattern that matches your desires. But for any model there are basic details: the walls of the bag, the bottom, handles, and there may additionally be pockets and patterns. A pattern for patterns will be required if you want to decorate the bag with a composite pattern made of fabric.The most common shapes of bags: square, rectangle, oval, circle. For the first three, you will need to make a side pattern of the desired size and cut out 2 parts from it. Then make the bottom along them. This will be a strip; its length must be calculated based on the length of the base and two heights added. You can make it strictly rectangular, or you can narrow or widen the ends. For a round bag, you need to cut out a circle - the bottom, and the walls will be in the form of a rectangular strip, the length of which will be equal to the circumference of the bottom (for those who don’t remember, the circumference is calculated using the formula L = 2pr, where r is the radius, p = 3, 14). Choose the width for the bottom as desired. To cut out round parts, you can use a compass or a plate (any other dish with a smooth edge). By the way, for such a bag the bottom can also be made in the form of a polygon (on 6, 8 sides, for example).
All other forms will be one way or another close to standard figures. When creating patterns, you can immediately add seam allowances (1-2 cm), or you can add them when transferring the pattern to the fabric; the latter option is preferable, then you will not have any distortions in size.
Here are several options for patterns: The lining pattern will consist of the same parts as the base of the bag: the sides and bottom. But some models can be sewn without a bottom, cutting out the sides as a single piece on a fold of the fabric.
Product assembly
After you have decided on the style, size, material of manufacture, finishing materials, made patterns and purchased everything in the store, it begins practically The final stage work.We transfer the patterns to the fabric, securing the patterns on it with safety pins and tracing the outline with chalk or pencil. It is better to use special chalk, you can buy it, it is different from regular topics, which is more dense in structure, and its edge is thin. We cut out the lining. Cut out the product.
We sew together the top parts separately and the lining parts separately. If you plan to make a design by sewing it on top, then make the pattern first. Once the lining and top are finished separately, you can join them together. They will be sewn along the top edge of the bag. It is best to fasten them together with a separately tailored part - a strip, a rectangular strip. Another option: the top of the bag should be made taking into account the hem on the main fabric, and the lining should be slightly shorter by 2-3 cm. The edge of the top will be folded inward and ironed or stitched with a seam by 2-3 mm. from the edge to give rigidity. The top of the bag and the lining will need to be sewn together with inside, leaving a small gap, but enough to then turn the bag on the right side. After which, it is finished off by hand.
Handles can be sewn in 2 ways.
Fold both edges inward and stitch along the top.
Sew along the left side and then turn it inside out. If you end up with a narrow handle that cannot be twisted by hand, you can do this using the unsharpened edge of a pencil. You put the stitched part on it, slightly turning it inward to turn it inside out, and push the fabric through its entire length (similar to the process of threading a linen elastic). This will significantly reduce your efforts and time.
Then we attach the handles. They can be sewn inside the bag, on the side or on the edges. They can be sewn on top and attached with fabric of the main material or the same texture, but of a different color. Or attached to rings sewn into the bag. Here are some handle options:
After the entire product is assembled, you need to fasten the fasteners on it, if they are zippers. Those parts and fasteners that need to be sewn onto the sides of the bag will need to be attached in advance, even before assembling the product. The same applies to the pockets that will be made along the top of the bag.
If you are making the bottom, then it is advisable to cover it with lining fabric or any other, leaving allowances on the long sides in order to fix it by sewing it into the main seams of the upper part of the bag
To give the corners of a bag a certain shape you can sew them like darts, that is, fold them inward with a corner to the desired depth and stitch them, just don’t forget that this will change the length around the perimeter and take this into account when making the bottom.
You can also fasten the lining and the top of the bag together by laying adhesive interlining between them and ironing it with an iron, then the lining will fit snugly and will not “loop around”.
Here are sketches of a violet bag, which is made in the form of a circle of fabrics different colors in several layers (top, interlining, lining):


That's probably all I wanted to tell you about the process of making bags. If you don’t understand something, ask; those who know and want to complement it, complement it. I will be happy to answer your questions and rack my brains on how to create some kind of bag model.
How convenient are small but roomy ones in summer! And if you made this masterpiece yourself, then it’s doubly enjoyable. You can take this fabric bag with you to the beach or just for a walk around the city with your children.
The size of the proposed bag is 33x36 cm, the length of the folded handles is 27 cm.
The main fabric is linen, the lining fabric is nylon.
4 pockets are also processed: 1 external with a zipper and 3 internal (1 with a zipper and 2 pockets).
The master class is suitable for beginner craftswomen. By following the steps, you can easily sew such a handbag from fabric. And so let's get started.
For the manufacture of summer bags we will need:
- Linen fabric – 35 cm;
- Lining fabric – 35 cm (nylon, twill);
- Lightning – 1 pc. by 40 cm;
- Zippers – 2 pcs. by 20 cm;
- Threads in the color of the main and lining fabrics;
- Cutting scissors, sheath;
- Measuring tape, soap, ruler;
- Pins;
- Equipment includes a stitching machine, an overcasting machine (overlock), and an electric steam iron.

DIY summer bag made of fabric, master class with photo:
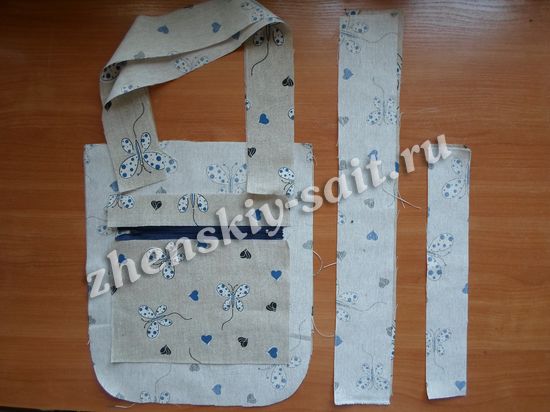
First, let's iron our fabric. Then we proceed to cutting the parts from linen fabric. You can change the dimensions of the summer bag parts at your discretion. In our case, we cut (the sizes are indicated with allowances):
− main side part – 2 parts in the form of a rectangle with rounded ends, size 30x33 cm;
− side insert – 2 parts (for economy) in the form of strips 6 cm wide, and their total length is equal to the length around the main side part, excluding the top;
− upper inserts for zippers – 2 strip-shaped pieces, 30x6 cm in size;
− straps – 2 pieces in the form of strips, measuring 60x6 cm.
− external pocket – 1 piece in the form of a square, size 20x20 cm. 
We cut the lining parts according to the main fabric. We receive the following details:
− main side part – 2 parts, size 30×33 cm;
− side insert – 2 parts 6 cm wide, and their total length is equal to the length around the main side part, excluding the top;
− pocket with zipper – 1 piece, size 20×20 cm;
− open pocket – 1 piece, size 10x20 cm. 
We sew down the details of the side insert. We pin this seam to the middle of the main side part. Then, using pins, we distribute and secure the insert. ![]()

Using an overlocker, we connect the parts of the main fabric. We do the same with the lining details. 
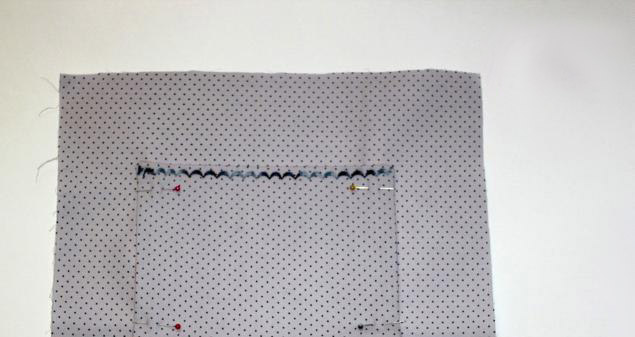
We prepare an open pocket with a lining. We bend the top of it 2 times by 0.5 cm and secure it with a stitch of 0.1-0.2 cm with a seam with a closed cut. 
We prepare a pocket with a lining and a zipper. We divide the part into 2 parts (the top is about 3 cm, and the bottom is 17 cm). Using pins, pin the zipper 20 cm to the edges of the pocket parts. 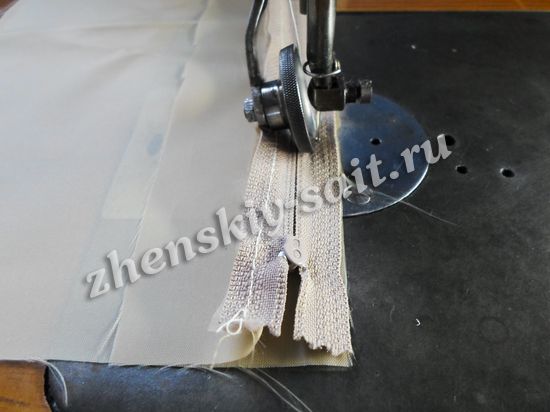
Sew the zipper to the pocket. To secure the seam allowances, we resew them by 0.1 cm from the front side. In the same way we process the outer pocket with a zipper made of the main fabric. 
Iron the finished pockets. It is advisable not to touch the zipper teeth with the iron to avoid damaging them. 

After this, we outline the location of the pockets on the bag and its lining (in our case, almost in the middle). For ease of work, you can iron the allowances for sewing pockets by 0.7 cm. On the open pocket, use soap to mark a line dividing it into 2 parts. You will get 2 pockets. 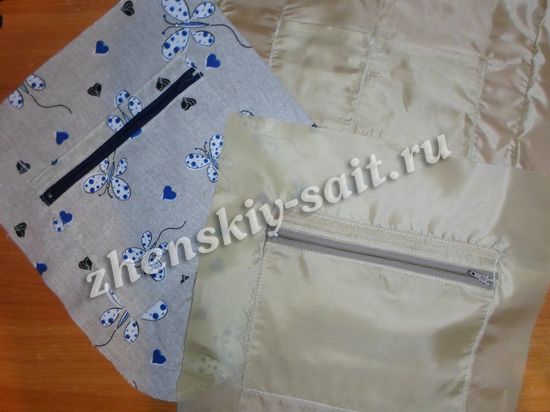
We adjust pockets with zippers around by 0.1-0.2 cm. We adjust the open pocket only on three sides (sides and bottom), because its top has already been processed in advance. 
We connect the main parts of the bag with the side insert. But in the lining we leave an unstitched area of about 10-13 cm, so that in the future we can turn the bag onto its face. 
Let's move on to preparing the straps. We fold the parts face inward and grind them. 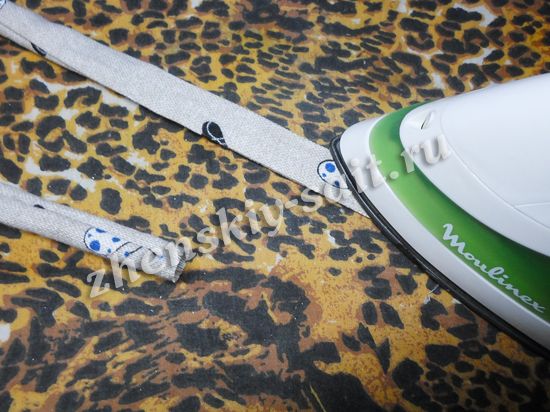
Then turn the straps right side out. We straighten the facing seam to the side and iron the straps along the entire length. 
At the top, the summer bag is fastened with a zipper, which we will pre-process. To do this, take the upper inserts for the zipper (2 parts) and compare the length of the zipper along their length plus 4 cm, cut off the excess. The main thing in further processing is to monitor the cut end of the zipper so as not to accidentally remove the pawl. To avoid this, you can stick a pin across the teeth. 
We sew the ends of the inserts with a seam into the hem with an open cut of 0.1 cm. Then we cut each insert in half along the length. 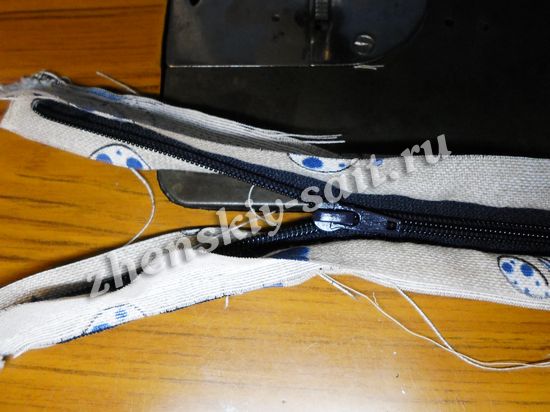
We insert the edges of the zipper between the parts of each insert. Give a line of 0.5 cm on each side. 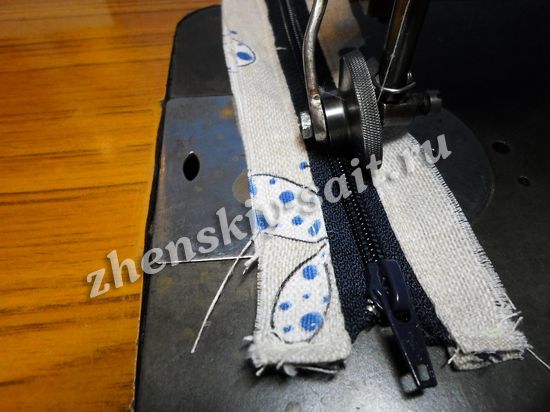
We redraw the seam connecting the zipper with the insert by 0.1-0.2 cm. You can carefully iron the processed zipper along the edges. 
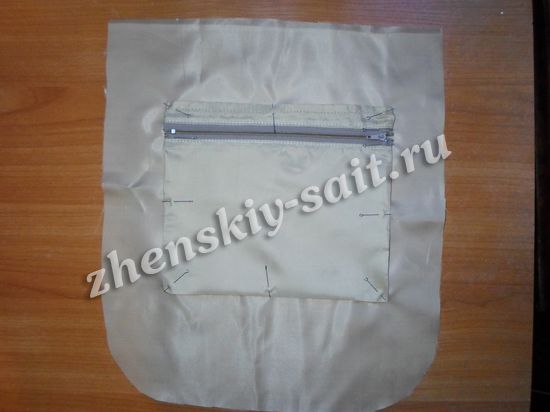
Turn the base of the bag inside out. We insert the straps at the desired distance, then secure the prepared zipper with pins. 
We place the assembled lining of the bag into the main part face to face. For convenience, we pin them with pins. Then under the machine we connect our bag with the lining. 
Remember we left an unstitched area in the lining? It needs to be closed. To do this, we go along the edge by 0.1-0.2 cm, bending the seam allowances inward. 
We process the edge of the zipper with a small piece of the main fabric. Cut a square the width of the zipper plus allowances. We grind it, turn it inside out, and then insert a zipper into this pocket. Close the seam by 0.1-0.2 cm. 
Bags are an invariable accessory of our Everyday life. We go with them to work, to the store, on dates, to various meetings, simple walks, important events, and so on. Today not only in women's wardrobe you can find a bag, but also in children's, and even in men's.
We invite you to familiarize yourself with several master classes that describe sewing bags in detail. Patterns are included with each of the proposed types of bags. And these are simple fabric, denim, household, travel, men's and clutches.
How to make fabric bag patterns with your own hands
Easiest to find ready-made pattern on the Internet or in a magazine. Then, if necessary, you can simply increase or decrease its size and begin cutting and sewing the selected type of bag.
The second option is to draw patterns for a fabric bag with your own hands. To do this, you will need to sketch out a model of the future bag and imagine what elements it will consist of. For example, it can only have a front and back wall, bottom, sides, the handle can be sewn separately or be one piece with the main part, and so on.
Small cloth bag
Such a small fabric handbag is very relevant at any time of the year. It is great for walking with friends and for everyday wear, because it will fit the necessary cosmetics, phone and notepad.
Master class on sewing a small fabric handbag:
- Cut out the paper parts of the fabric bag pattern with your own hands.
- Transfer the pattern to the reverse side of the fabric, cut out the required number of parts.
- Sew the two sides together (front and back), the sides and the bottom together.
- Sew the sides together.
- Sew the bottom completely to the walls.
- Place the lining over the fabric frame.
- Sew the lining and frame together, leaving a small opening so you can turn the bag inside out.
- Sew the hole closed with a blind stitch.
- Sew the lid of the bag.
- Make a strap and sew it to the bag.
A small fabric bag is ready!
Clutch bag
This clutch is very convenient because its size is adjustable with buttons. When closed it is small in size, but when unzipped it becomes a spacious bag.
Master class on creating a clutch:
- Transfer the details of the fabric bag pattern with your own hands onto the prepared material.
- Cut out the required number of parts.
- Make a bag out of them.
- Make the lining in the same way.
- Place the lining and bag together.
- Turn the bag right side out.
- Glue two pairs of magnets or buttons.
- Sew on the snake.
The clutch bag is ready!
Denim bag
Master Class:
- First thing you need is a pattern denim bag, which is located above. Print it out and cut out the pieces.
- Now the denim bag pattern is transferred directly to the fabric.
- Cut out all the parts.
- Sew the pattern pieces together as shown in the picture above.
- Make and sew the lining.
- Turn the bag inside out, fasten the handles and decorate it with a bow.
All is ready!
Man's bags
It has long been no secret that men also need a bag. As many keys, a wallet, a handkerchief as possible, mobile phone and put other small things in your pockets? It's much more convenient to put it all in one small bag, especially since today there are many various styles especially for men. We suggest you sew one yourself.
Step-by-step sewing instructions men's bags:
- First of all, you will need a pattern for a man's bag. An example of this is above. Just take it and print it out, then cut out the individual elements.
- Take fabric for the bag. It is better to opt for a thick one (for example, waterproof, nylon, leather, and so on).
- Take fabric for the lining (it is better to choose cotton) and dublerin (this is a special fabric for connecting the lining and the main fabric).
- Transfer the pattern to the fabric and lining. Cut out all the pieces.
- Glue the dublerin using an iron where it may be needed.
- Make a belt. Take its parts, fold the right side in half inward and sew the parts together. Unscrew the belt.
- Sew the lining to the main parts of the bag.
- Sew on the snake.
- Sew on the bag lid and pockets.
- Collect all the parts and stitch them together.
The man's bag is ready!
Summer bags
Summer bags are also called beach bags. As a rule, this is a fairly lightweight design with one large zip compartment. They can be sewn from different fabrics or knitted or crocheted. A pattern for the latter type of summer bag is not required. In this case, you simply take and knit a large piece, which is then sewn together.
Step-by-step master class on sewing a summer bag from fabric:

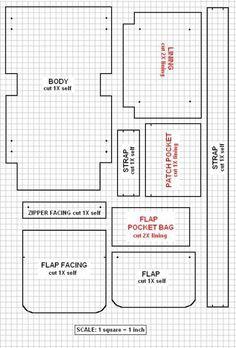
- First you will need a summer bag pattern. For example, you can use the one above. This bag consists of two front walls and sides, a bottom, handles and an inner pocket.
- Cut out the paper pattern pieces.
- Place the pattern on the back of the fabric and transfer the pattern.
- Cut out all the details from the fabric, stepping back from the edge a couple of centimeters.
- Cut out the lining.
- Sew two pockets in the center of the two linings. Don't forget to fold the edges.
- Place the lining and the front wall together, the lining and side wall. Put it all together.
- Assemble the second wall and side in the same way.
- Sew together two pairs of walls and sides.
- Sew the bottom to all the walls.
- Make handles. To do this, fold each ribbon in half lengthwise with the right side inward and stitch the edges. After this, unscrew the handles.
- Sew the handles to the bag. Fold the edges of the lining and walls inward. Attach the straps to the bag and tuck their edges. Sew everything together in two rows for greater security.

Summer beach bag is ready! It is suitable for both going to the beach and walking around the city with friends.
Travel bag
Travel bags should be comfortable and roomy. And although there is a wide variety of them, it is difficult to find the most suitable one. If you want to sew such a bag yourself, then read the instructions below.
Instructions on how to sew a travel bag:

- The pattern for a travel bag is not much different from the pattern for a summer bag. home distinguishing feature- it is necessary to increase the size of all walls and bottom by at least one and a half to two times.
- Transfer the pattern onto the fabric. For travel bags, it is better to choose the following types of fabric: polyester (900d, 1200d, 1800d or 2400d), nylon.
- Cut out all the pieces of the bag and lining.
- Repeat steps 6-11 from the previous master class. If desired, you can make several internal and side pockets.
- Sew a zipper to the top of the bag.
- Sew on the handles. Additionally, you can sew on another long handle.

The travel bag is ready!
Shopping Bag
A shopping bag is something between a summer bag and a travel bag. It usually consists of one large compartment and is made of durable material (for example, nylon or cotton).
Detailed instructions for sewing a shopping bag:
- The shopping bag pattern is the outlined outline of a simple bag with handles, often called a “T-shirt.” An example of such a pattern is above.
- Cut out the pattern from paper.
- Attach the paper pattern to back side fabric that has been previously folded in half. The fold should be at the bottom, where you plan to make the bottom of the bag.
- Cut out the details of the bag, stepping back from the edges of the pattern a couple of centimeters. Don't cut the bottom.
- Sew the fabric together, leaving holes in the places for folding and handles, that is, at the top of the bag.
- Sew the handles together.
- Fold the fabric where you don't want the bag to be sewn and finish the edge. Either carefully baste or adhere using hemming tape.
- Turn the bag inside out.

The shopping bag is ready!
Women cannot do without such an accessory as a bag. You can never have too many bags; you can sew another bag from fabric with your own hands. Our ancestors long ago understood one simple truth: pockets alone are not enough. It all started with the fact that ancient people sewed bags from animal skin, which they carried over their shoulders or in their hands. Today a person simply cannot imagine himself without the accessory he needs.
Fashion 2015


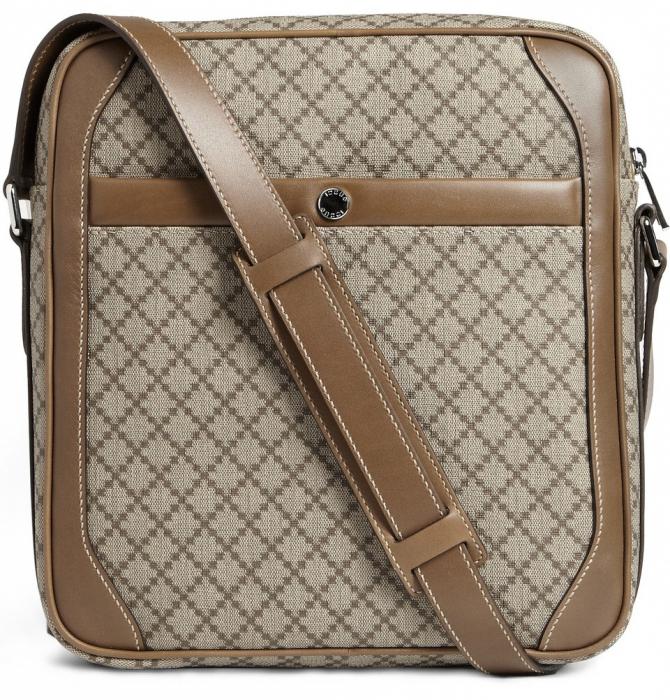
As for fashion 2015: the good old classic rectangle has returned to us. The “messenger bag”, large or small, with a long shoulder strap, will also be fashionable in 2015.
The bags amaze with their variety. They play not only a decorative role, but also a practical one. Bags are not only sewn, but also crocheted and knitted. Bags can be large: (suitcase, shopping, beach, travel). These are the bags that should hold large volume of things). Youth: (backpack, sports bag, pouch bag, briefcase, laptop bag). For celebrations: (Bentley, clutches, ladies' and theater) handbags. A reticule also belongs to the theatrical category - this is a bag that imitates ancient bags in which coins were carried.
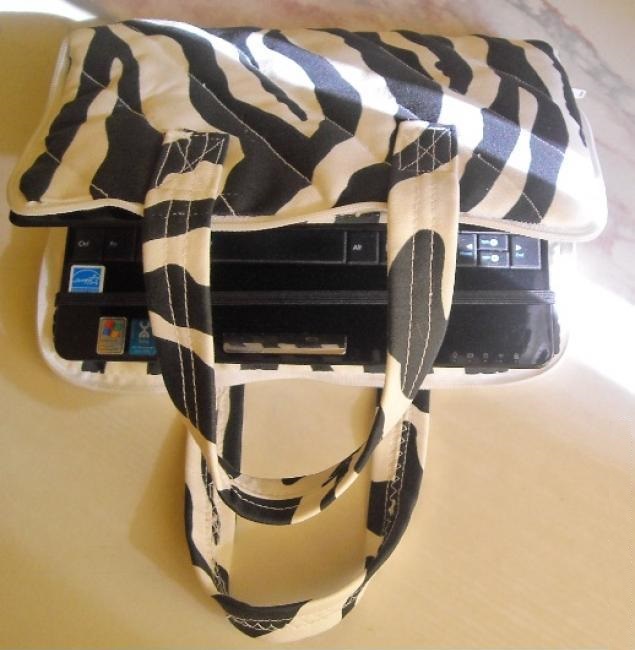
I would like to focus on a laptop bag. Such a bag should protect your laptop from damage and scratches, and, of course, have an attractive and not too gloomy appearance. Below we will sew such a bag. To summarize, I would like to point out that a woman or girl needs a comfortable, fashionable bag. When choosing a bag, we pay attention not only to practicality, but we also need it to please the eye and lift our spirits, and it does not necessarily have to match the color of our clothes; this is not the main thing this season. Let her help you create your own unique style. We will try to help you choose.
We sew a comfortable laptop bag. Please note that the bag is more suitable for carrying and traveling with a laptop. If you need to turn on your laptop and work on it, it is better to take it out of your bag.
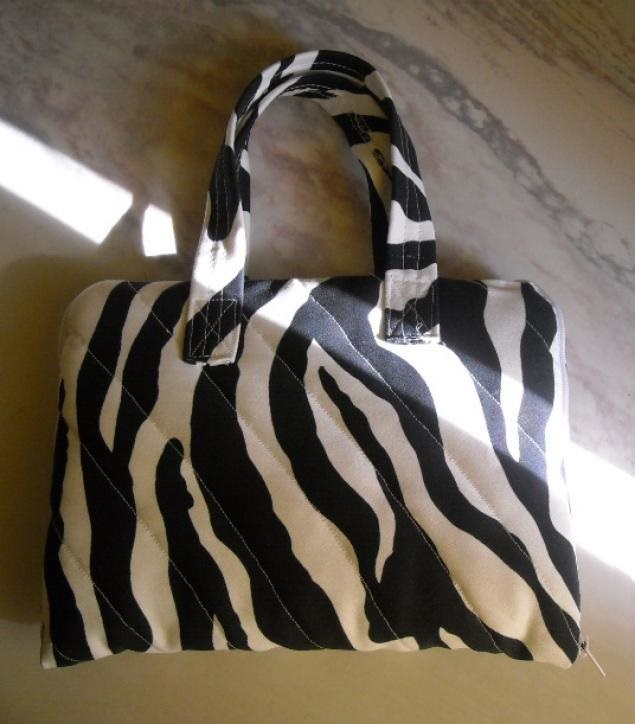
To work on the bag you will need:
- denim or any other thick fabric
- padding polyester
- lightning
- threads
- scissors
- sewing machine
- lining fabric
Making a bag
Fold the main fabric in half, wrong side up. Fold the padding polyester in half. We also fold the lining fabric. We outline the outline with a pen, making a seam allowance of 1.5 cm.
![]()
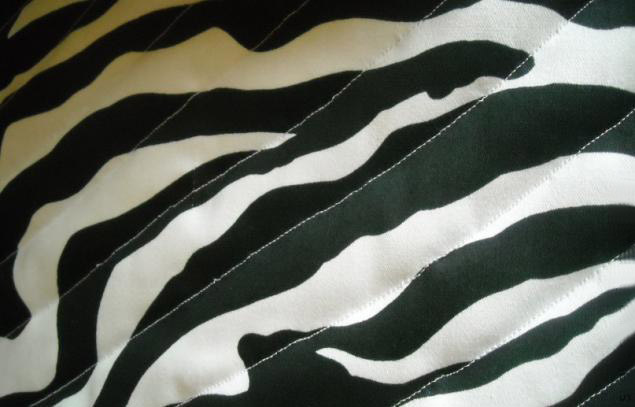
We cut out the blanks. We fold it into a sandwich (fabric + padding polyester) and machine quilt it. We quilt with diagonal stripes at an angle of 45*. You can quilt with diamonds. It will be good if you sew a patch pocket on top for various small items.
Fold and baste the zipper to the workpiece.

Unfasten the zipper and sew it on the machine.

We sew handles. Wrap fabric around this braid, stitch it and sew it to the bag.

Hand sew the lining inside the bag. IN in the right place inside we sew black elastic in several places. This is done to secure the laptop.

Sew on the handles.

The bag is ready.

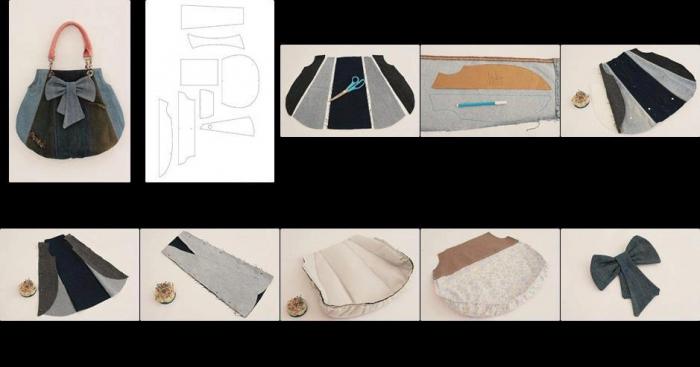
Convertible Messenger Bag
We are sewing a fashionable bag, very trendy this year. A bag with a long handle, worn over the shoulder or diagonally.

You can cut it out of any thick material; old jeans or any thick fabric will come in handy. If you want a more elegant option, you can decorate it with appliques made of leather, suede, or fabric. There is room for imagination here.
Pattern

Making a pocket on the folding flap of a bag.
![]()

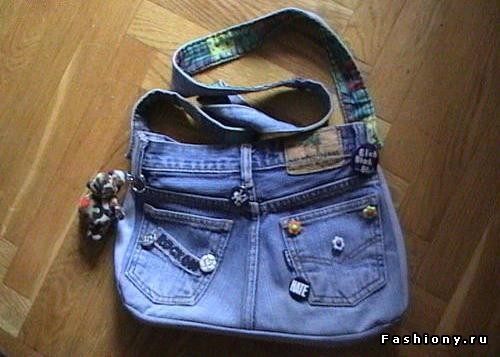
Bag made from old jeans
A bag made from old jeans is small in size, as it is based on such a detail of jeans as a pocket. The pattern of the bag is built around the pocket. The larger the pocket, the larger the bag size.

If you want to make a bag bigger size, open the pocket and stitch it to the part you cut.
Pattern

Additionally, 2 strips are cut out for the bag handles. The width of the strips is 4 cm and the length is 50 cm. And 2 parts for processing the top are 20 cm long and 4 cm wide. When cutting, take into account seam allowances of 1-1.5 cm.
Making a bag
1 Take the main fabric and the lining fabric. We put them together, apply the pattern, trace them with a pen and cut them out. Then we cut out 2 strips for the handles and 2 parts for processing the top. We should get:
- bag detail - 2nd detail
- bottom of the bag - 1 piece
- strip for handle - 2 parts
- strip for processing the top - 2 parts
- Cut out the bottom from thermal fabric or oilcloth (for strengthening).
- Sew the bottom of the bag to the sides.
- Baste and stitch the sides.
- Sew the lining in the same way.
- Place the lining inside the bag inside out.
- Baste the top edges.
- Take 2 parts to process the top and attach a zipper to them.
- Baste and stitch the handles of the bag. You can cover the upper parts of the handles with leather.
- Process the top of the bag by basting it first.
The bag is ready.
“Mailman bag” made of fabric
This fashionable “messenger bag” made of printed fabric will be very useful for any needlewoman. Of course, it will take a lot of time to make, but the result is worth it.
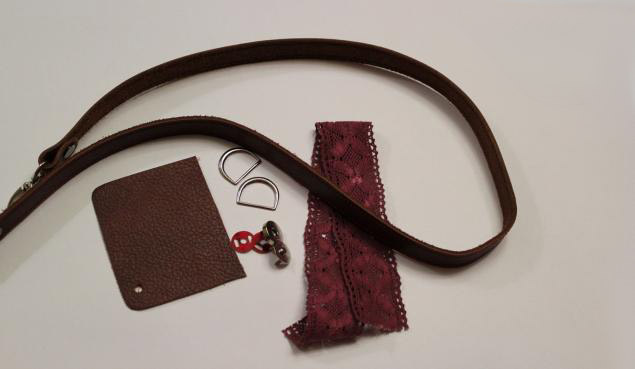
To work you will need:
- fabric size 34/27cm, 34/35cm, for valve 2 pieces 27/13 cm
- fabric for lining and pocket
- lace scrap 34 cm long
- hard doublerin
- a small piece of leather (can be fabric)
- half rings 2 pieces
- carabiners 2 pieces
- magnetic button
- leather bag belt (length at your discretion)
- ruler
- scissors
- threads
- pins

Since the bag is textile, the fabric needs to be strengthened. We glue the fabric going to the front side of the bag with doublerin. Then the bag will keep its shape. Glue from the inside out, through gauze, at high temperature, through gauze.
Let's get started
Fold 2 pieces of fabric right to right sides 34 cm. It’s okay if one end is larger than the other. We will simply form the bottom further and the floral motif will only be on the front wall of the bag.

Sew, leaving a seam allowance of 1.5 cm. Press the seam, pin the lace on the front side and topstitch on both sides, press.

We got a rectangle 60/34cm. Fold the fabric right side to right side. Sew the side seams, leaving a 1.5 cm seam allowance.
Forming the bottom. Fold the corners and secure with pins. Use a ruler to draw a 6 cm line and sew it on the machine. Cut off excess fabric, leaving 1 cm.

Turn out and press side seams. Here's what happens:

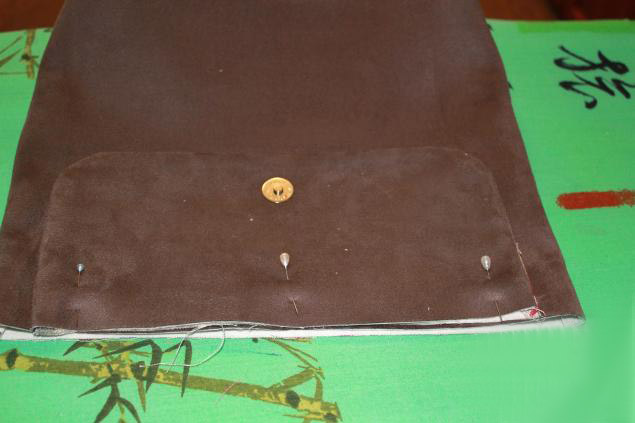
We sew the valve. We fold the prepared pieces of fabric (glued) front to front. Draw a chalk line for stitching and round the corners of the valve. Sew on three sides, leaving one (27cm) completely open.

Trim off the excess, find the middle, mark with chalk: here we will put a magnetic button.

Cut the fabric to the right and left of the mark at a distance of about 5 cm. The cuts should not be larger than 0.5 cm. Insert and secure the part of the button that is without a magnet. Turn out.
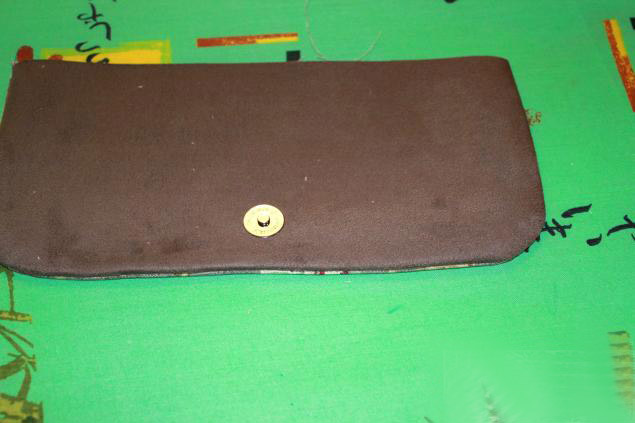
Sew and iron. Next is the installation of the second part of the valve. Fold the flap onto the front of the sukmi. Mark the location for the second part of the button. We install half rings. Cut out 2 strips of leather, 2 cm wide and 8 cm long. Thread a ring into each strip and sew it to the side seams strictly in the center.

Set the bag aside. Cut out the lining: 2 rectangles 30/34cm. Cut out pockets, there will be 2 of them. For the pockets, cut out 4 rectangles of 22/17 cm from the remaining fabric.
Sew them around the perimeter, leaving the seam open. Before turning, cut off the corners. Turn it inside out and sew up the open seam. Where the top of the pocket will be, sew a line, retreating 0.5 cm from the edge. Pin the pockets to the lining pieces and sew them on. We make a compartment for a mobile phone: we stitch it, retreating 8 cm from the edge.
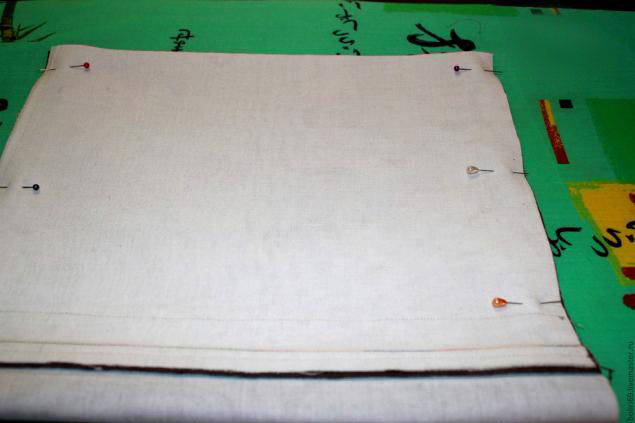
Next, fold the front parts of the lining. Sew side seams. Stitch the bottom. When stitching the bottom, leave a 10 cm area in the middle unstitched for turning inside out. Sew down the corners of the lining. Place the outer part of the bag in the lining, join the seams, pin, and stitch.

Turn it inside out and sew up the bottom on your hands.
 Attach the belt. All is ready.

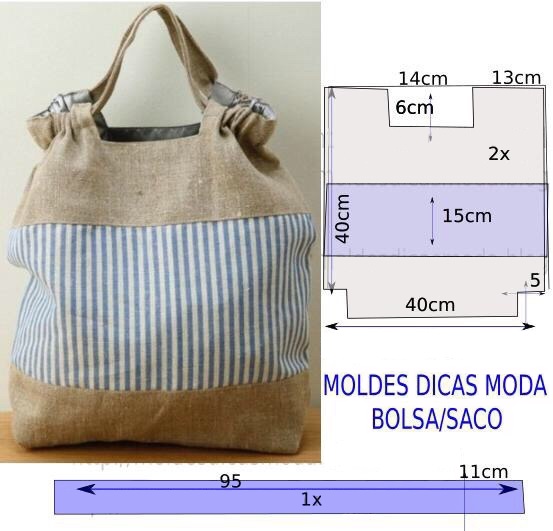
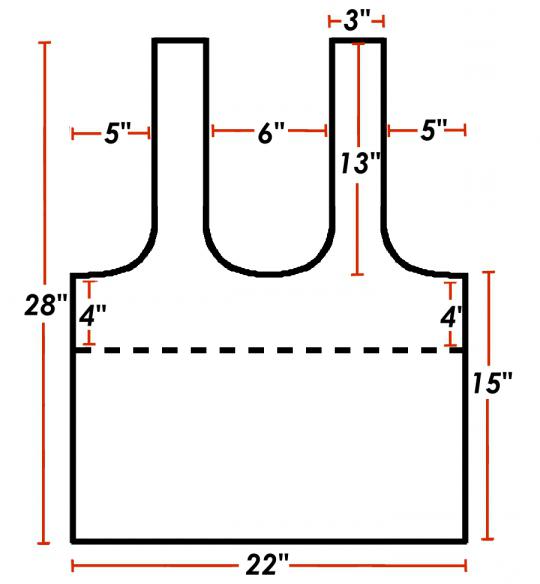
Shopping bag pattern
A very interesting pattern for a shopping, everyday bag. It is very convenient to go to the store with such a bag. It is light and roomy. Blue color indicates striped material. I hope you find the pattern useful.