Raglan cut for the dress. DIY dress with raglan sleeves. Cut out dresses with raglan sleeves.
Feature of the cut raglan is not closed, like a set-in sleeve, armhole line. Starting in the classic version at the neckline, it goes to the lower parts of the armhole, and the continuation of the sleeves at the top is the shoulder part of the front and back.
The designs of clothes of this cut allow you to create a soft, rounded shoulder line, visually reducing (mostly) their width. By volume they can range from moderate to very large. Shoulder girdle shape(Figure 9.8) is determined by the design top lines sleeves and can be rounded-sloping, ham-shaped, saddle-shaped, etc. With different inclination, shape and length in the shoulder area. Width at bottom they can be narrowed (with or without an elbow dart), widened or straight, with different designs at the bottom of the sleeve.
Plus, when you mix and match colors and patterns, they look a little cute than plain t-shirt. Once your pattern is set and you've made one shirt so you know the process, you can pull out additional tops in about 45 minutes each.
To create own pattern, you will need a T-shirt that fits your child well. Don't make the mistake of grabbing a t-shirt from last year - you'll end up with a shirt that doesn't fit! I like to use freezer paper to trace patterns - it's cheap and comes in rolls that are wide enough to fit almost any baby's shape.
Different sleeve plumbness allows you to create both a clear, strict shape and a gentle one, coinciding with the direction of the shoulder lines. Respectively sleeve hem height at the same time, from maximum, as with a set-in sleeve, it decreases to minimum (almost zero). Opportunity guy ropes along the top line sleeve front in the shoulder area in case of cutting sleeves along the "oblique thread" gives the sleeve additional vertical direction. Reducing the plumbness of the sleeve is ensured by increasing the width of its rim.
Adding personality to the dress
Place the t-shirt on freezer paper, with the straight edge of the paper going through the exact middle of the shirt. Trace around the shirt as you can see in the photo above. For the sleeve, you want a straight line from the neck down over the shoulder. Once you move the shirt, you will have a basic sketch of the shirt like the one you see below. Draw a slightly lower curve for the cutouts for the front of the shirt. Also draw a straight line from the armpit to the neckline as you see below.
Cut out a piece of the design and divide it along the armpit line. It should look similar to the second photo below. Now we're going to trace each of our two shapes, this time adding whatever seam allowance and hem allowance you like to sew. Don't forget to transfer the front cutouts to the new shapes. Cut them out and throw away the old ones so you don't get mixed up!
Figure 9.8 – Options for the shape of the shoulder girdle with cut sleeves
The nature curvature of the visible part of the armhole line can be convex, concave, straight, in the form of shoulder straps, etc. Traditionally, based on the location and shape of the connection line between the sleeve and the product, the following are distinguished: cut options(Figure 9.9):
· classic (typical) raglan;
Another quick step to finish the design: right now the sleeve piece should be cut at the crease. Follow a piece of the sleeve pattern, then flip it over and trace it around again to get the full pattern. On one side of this shape you will trace the back cut, and on the other side you will trace the front cut. Don't forget to add a little room for the hem if you haven't already.
Negative sides of the sleeve
Okay, now you can cut your fabric. Remember that the back will have a higher cutout. Okay, the hard part is done! This shirt comes together very quickly. Start by unrolling the back bodice and laying it flat on the table. Take one of your sleeve pieces and place it on top of the bodice, on the right side as shown.
· zero raglan;
· semi-raglan;
· raglan - shoulder strap;
· raglan – fantasy;
Raglan - yoke (arched).
a B C D E F
Figure 9.9 – Raglan cut options according to the shape of the armhole line
According to the depth of the armhole line can be overestimated, underestimated (in-depth), can occupy any intermediate position. Shaped at the bottom– oval, slot-shaped, even square if desired.
Repeat this with the other sleeve on the other side. Your shirt will look like this. Next you want to line up the front bodice with the front sides of each sleeve and sew them together, again on the right side. Once the sleeves are attached, you can attach and sew the side seams.
Start at the bottom of the sleeves, sew up and under the arm, then fold out to the side. Turn the shirt right side out and it looks like this. Then you just need to finish the neckline as desired and the hem of the shirt and sleeves. My favorite method for finishing necklines on tank tops can be found here.
By number of sleeve seams Raglan are often designed as two-seam (with upper and lower seams), less often as three-seam. Sleeves with one bottom seam can have a dart or pleats along the shoulder line from the neckline or from the cuff line.
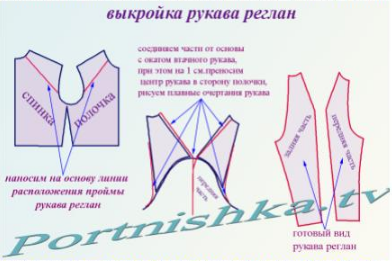
The design of the raglan cut can be obtained by 3 methods: the template method, the tattoo method, and the calculation and graphic method.
Here's what the finished shirt looks like. Now you can sew the side seams. Then it's time to add the elastic waistband. I like to mark where the elastic should be with masking tape or paper tape on inside dresses. Then attach an elastic piece that will gather the dress.
Then clip the elastic to the clothing, stretching the elastic as you do. At this stage you need to finish the neckline and hem of the sleeves and the bottom of the dress. I had no problem with this dress going over my daughter's head so I didn't have to adjust for any neckline.
The essence of the template method is that the front and the backs are marked with a raglan armhole line(Figure 9.10). Upper parts of front and back parts, those located above this line are cut off and attached to the elbow and front parts of the set-in sleeve, aligning the notches. The tops of the edging of the sleeve parts are combined with the shoulder points of the back and front armholes.
However, if you choose to sew this dress with woven body fabric, you may need to make adjustments if it doesn't fit over your girl's head. Style and comfort come together in this top! The neckline is designed to be flattering. female body, with fitted sleeves, soft shaping across the torso and a wider neck strap.
The possibilities of this peak are endless. Depending on your choice of fabric, it can become anything from a sleepshirt to sequins. Use contrasting fabric for sleeves, cuffs or an extra pocket. Add a lace overlay to the bodice. Use woven material or even leather for the pocket. Make a shirt out of nylon lycra and it will be a rash, size and use fleece for sweatshirt!
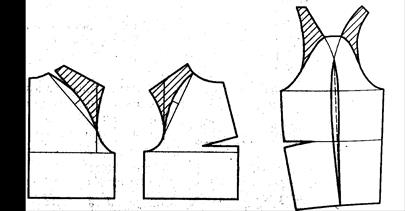
Figure 9.10 – Construction of a raglan cut design using the template method
It is allowed to attach the front and elbow parts of the sleeve to the supporting sections of the front and back (described in detail in the literature [Atelier magazine]). The complexity of this method is to skillfully prepare the sleeve template in an appropriate manner.
This versatile yet simple top is a super easy stitch, perfect for your first foray into knits. If you choose to use bracelets and a belt, there is no hemming. You will not receive a paper copy, only a digital file.
You can download, print and start sewing right away! The purchase includes the right to sell clothing made using this pattern. You may not redistribute, redistribute, or resell this template or the copyright illustrated in it, or use any photographs without permission.
For execution tattoos fabric must have the original shape of a human figure or mannequin, large quantity materials and skills to perform quite labor-intensive work.
Regardless of the chosen method of obtaining the design of this cut, it is necessary to take into account some peculiarities. Due to the fact that this cut somewhat limits the freedom of movement of the arms, it is possible to increase the volume of the entire product and the sleeve width by 2-4 cm compared to the design with set-in sleeve the same silhouette. The increase in armhole freedom (Pspr) increases by 1.0 - 2.0 cm. The distribution of Pg across sections of the structure for raglan cut products is:
Don't forget to share your creations! Insertion sleeve, visible in upper parts, shirts, etc. Although kimono sleeves, as the name suggests, can be seen in kimonos. Dolman, the wing of Bath - its variation. It is also the easiest way to stitch and gives the most leverage of all the other insert sleeves. Great if you work hard. It can be added to casual, semi formal and formal outfits by simply changing the fabric.
Step 1: Materials Required Creating a Template
Don't select the right crop option. If you like this tutorial, please vote for me in the swatch contest. Any large craft or White paper for papers - 2 pcs. Clothing whose sleeve pattern you want to draw. Mother of pearl pins or clothing pins.
to the back (0.3 ÷ 0.4) Pg;
to the armhole (0.6 ÷ 0.3) Pg;
to the front (0÷0.2 Pg.
The direction and shape of the armhole line can be changed depending on the width of the front and back parts of the sleeve along the back and front neckline. The position of the point of contact of the armhole with the verticals that determine the width of the back and front is also taken into account.
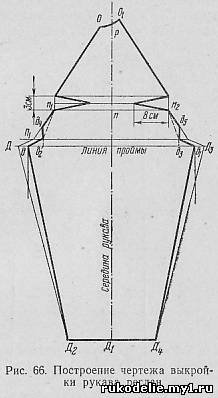
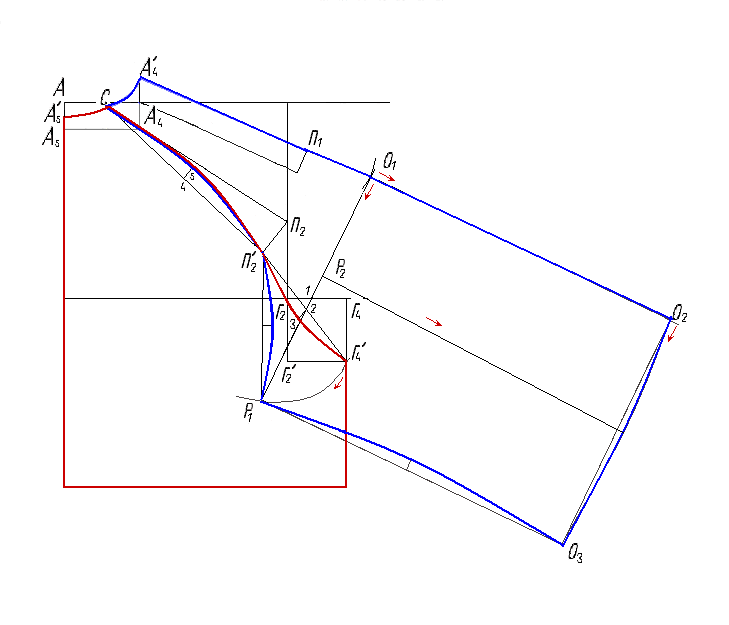
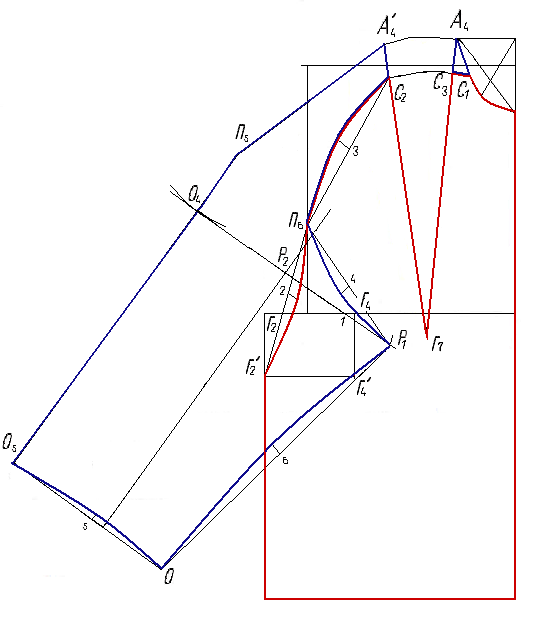
The computational and graphical method for constructing the design of products with raglan sleeves includes several constructions of the front armhole, back, and details of the front and back parts of the sleeve.
Steps before creating a template
Some nice fabric for the sleeve. This style of pattern making is also known as the Scandinavian pattern making technique. Note. All measurements are in inches. Feel free to convert them to centimeters if you wish. Conversion: 1 inches = 54 cm; 1 cm = 4 inches.
On your laptop, pay attention to the following. Sleeve length = 8-10 inches. Place your clothes on a piece of paper. Trace the front and back holes in the arm of the garment. Go ¼ inch and re-unscrew the handle hole without its seam on the paper and mark the side seam.
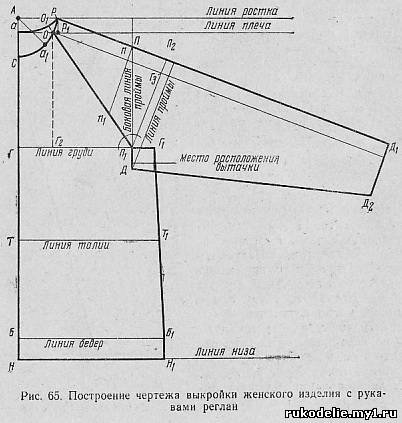
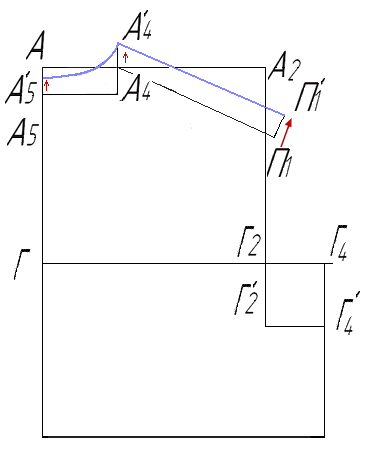
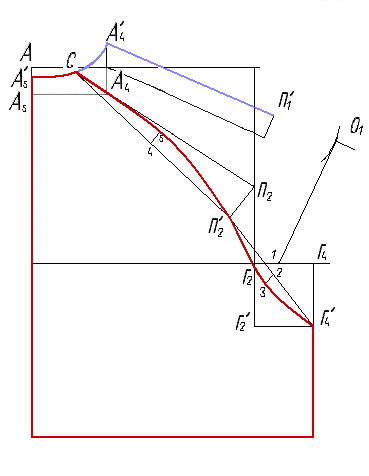
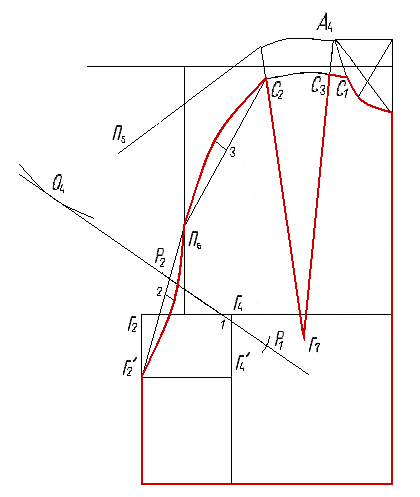
Constructing a raglan back line. The chest dart from the shoulder line is transferred to the neckline at a distance of approximately 5.0 - 6.0 cm from highest point neck:
A 4 A 41 = 6.0 cm (Figure 9.11).
The width of the front part of the sleeve at the front neckline ranges from 0 to 7.0 cm, i.e. A 9 A 91 = 0 ÷ 7.0 cm. Usually for classic version take 2.0÷4.0 cm.
Measure the length of the curve from 1-3 to 5 accordingly. This will be the length of the weapon. Measure the straight length from 2-3 to 5 and this will be a measure of the width of the weapon. Measure the circumference of the person's biceps. This is the widest measurement of your shoulder. You can even flex your muscles and see. If you don't do this, you won't be able to raise your hand.
Raglan line of the shelf
Find out the height of the cap using the formula. Please refer to the pictures for clear drawings. Take your paper and draw a straight vertical line about 8 to 10 inches down the middle. Mark as and accordingly. Draw a small horizontal line at the point.
Point A 91 is connected by a straight line to point P 6. Segment A 91 P 6 is divided in half and point 3 is placed. A perpendicular is drawn to the left of it and segment 3 - 4 is laid out according to the model:
From 0.5÷1cm. in classic raglan
Before raglan - coquette, "epaulet", "fantasy".
Front armhole line– a smooth curve through points A 91, 4, P 6, 2, G 2.
To avoid the formation of inclined folds from possible stretching of the “oblique” sections of the back armhole and to maintain the balance of its middle and side parts, perform raising the shoulder line and back neckline(Figure 9.11). This provides a better fit along the back in the area of the shoulder blades.
Master class: how to sew a dress with raglan sleeves with your own hands
Measure the line and divide it into three equal parts. Likewise, measure the line and divide it into four equal parts. Draw small perpendicular lines at these points. On the image; The arc is drawn in red. Make sure the curve is nice and smooth. Check how the line goes at the point.
Step 8: How to Make a Leaf Bushing
For a better fit, make these lines slightly curved. Continue with this pattern to make a petal sleeve, otherwise add ¼" or ½" of seam on the curves and about 2" for the hem. Mark all cut points and draw a grain line. Notice how the pattern ends in rubbing.
A 2 A" 2 = a – perpendicular to the shoulder line, where
a = 0÷0.7cm – for light clothing, a = 0.7÷1.5cm – for outerwear.
P 1 P 11 = 1.5a – perpendicular to the shoulder line;
Wardrobe items with raglan sleeves have not lost their relevance for many years. This sleeve model is cut out together with the front and back of the product and advantageously corrects the figure. It all depends on the line of inclination; with its help you can visually widen or narrow the shoulder line. Patterning and constructing a raglan sleeve will not take much time from needlewomen if you understand the basic principles of work.
Mark both panels on a separate sheet of paper. Cut out the design without a guide. And arrange them together as shown in Figure 14. Scan the design on another piece of paper with all its cutouts and smooth the bottom using a small curve line.
Add ¼ inch of seam allowance. Double check to make sure all notches are in place. There are several ways to finish a sleeve. You can use any of the following methods. Only with lining in the sleeve part. Also use a contrasting lining made from another dull fabric; The process is described in detail below. The time will vary depending on how quickly you can hem.
How to make a raglan sleeve pattern
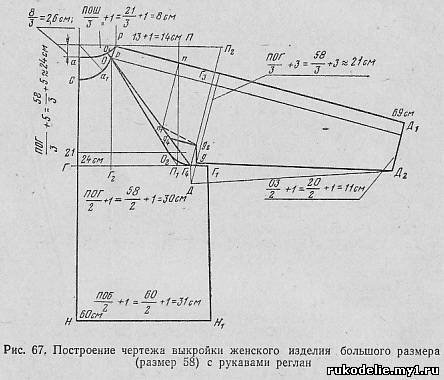
In order to correctly make a pattern for the selected sleeve model, you will need a sheet of white paper, preferably thick, measuring 150 centimeters by 120 centimeters. You need to draw two lines on the sheet: vertical line- line of the middle of the back, horizontal line- neck line, these two elements should intersect at right angles. The point of intersection of the lines should be marked as point A, from this point the length of the back should be set aside according to specific measurements in order to place point B, which will mark the waist line. Then, from point B, point B should be set upward; the distance between these two points should be equal to the side length measurement, that is, the length from the waist to the place where the sleeve should begin. Next, you need to return to point A and from it put down the measurement of the length of the product and mark this point with the letter G. In turn, from point G, set aside the measurement of the hip line and put the letters E and D.
Please note: you do not need to approach if you are unable or do not have the patience. Pinning the edges also works. And not to mention, you will learn different types of hemlines. Iron all kinks and folds in the fabric. Don't forget to follow the marks. When tracing the other sleeve, be sure to reverse the pattern.
So that they do not move when cutting. Using a rotary cutter or a sharp pair of scissors, cut out the design. Start and complete the lock stitch. You can now remove the pins holding the shell and lining together. Cut the slits as shown in the picture.
Next, the construction of the raglan sleeve model pattern should be continued as follows: from point A to the right, it is necessary to set aside one sixth of the neck circumference measurement and from this mark, set aside three centimeters upward and mark with the number 3, then connect this point and point D, thereby marking the raglan connecting line. Further using right triangle and a ruler, you should draw a shoulder line and mark it with point I, then connect points D and I, draw a line through point three and mark point K. From this point you need to put the sleeve length measurement to the right and mark it with point L and through this point draw a line parallel to points I and D. Then, from point L down, you need to set aside the measurement of the line of the brush and mark the point with the letter M, then connect points M and D.
Match the mark with the lid, followed by the other two. If you make the front back, the tulip design will be visible from the back. It depends on your design, but either way it's correct. Pin the sleeve and bodice together. Turn it over on the right side to make sure there are no wrinkles. Otherwise you will have to undo the stitch to fix it again. But it's hard to make any mistakes with this tulip sleeve.
Measure the hole in your hand and add about 2 inches to it. You can use these readily available bias strips. If you don't have enough fabric to cut in one piece, cut 2 pieces together using a diagonal stitch. Make sure all aids are facing the same direction.
What the pattern should look like is shown in the photo.
Leaving a strip around the Inch, attach it to the side seam. Make sure you are relevant to your topic. Insert the thread from the inside of the strip. Depending on the weight, take 1 to 3 threads from the body, pass the needle and wipe it. Reinsert the needle back into the strip where the thread came out earlier. Pull the needle out after taking ¼ inch from the fabric.
Ahem, until you almost get to the end. Fold the other end over to check how much fabric is needed and trim off any excess. Fold both edges together as shown in the picture and fold the hem over on one side. Pin the other side in the same way and complete the hem as before.
How to knit a raglan sleeve model with knitting needles
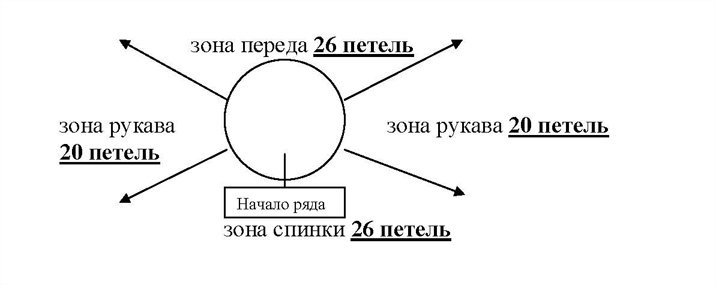
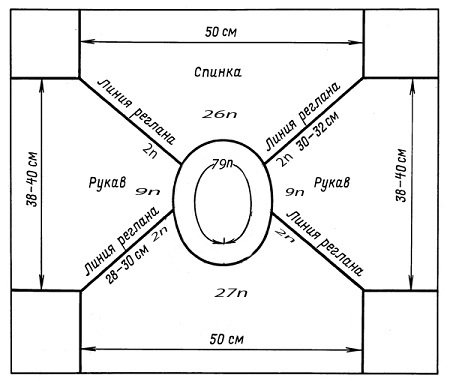
Knitting raglan sleeves on knitting needles has one feature, namely that the bevels of the sleeves must coincide with the neckline. Therefore, during the knitting process, it is necessary to reduce the number of loops so that at the moment when the sleeve is knitted to the neckline, all the loops of the sleeve are closed.
How to knit a raglan sleeve with knitting needles is clear, thanks to the diagram: in order to make an armhole line on required height, first you need to close off three loops, and then knit the next rows, decreasing one loop on each side in every second row. To make the neckline look beautiful and not pull down, you can knit the “back” element one centimeter more, but then you need to reduce the number of stitches.
The diagram will help needlewomen understand how to sew a raglan sleeve: first you need to knit the first two or three loops of the row, then knit the loops tilted to the left, then you need to make a decrease, for this, before the last two or three loops of the row, you need to knit two loops together with the front loops.
How to build and sew a raglan sleeve model
In the selection of videos presented below, needlewomen will share their experience on how to correctly calculate the number of loops and rows to build a raglan sleeve model according to the measurements and how to properly sew the sleeve into the product.


