Conical skirt. Conical skirt "from the corner".
Basic patterns for conical skirts
Sizes 164 - 96 - 104.
The following measurements are required, see:
half waist circumference St - 38;
semi-hip circumference Sat - 52;
skirt length Du - 70.
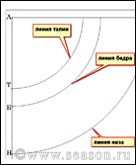
Conical skirts include those in which the difference between the width of the skirt at the bottom, folded in half, and the half-waist measurement (St) exceeds 2/3 of the length of the skirt. In this case, it is necessary to take into account the uniform expansion of the skirt along the entire length. Conical skirts can be recommended for women who have a significant difference between the half-circumference of the hips and waist (15 cm).
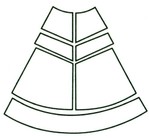
These skirts, unlike straight ones, are characterized, as a rule, by the absence of darts along the waistline and varying degrees of flare. Conical skirts include sun, half-sun, bell, and flared skirts. Their degree of expansion is determined using the coefficient K (curvature coefficient of the upper arc). Depending on the type of skirt it has following values: 0.32 - sun; 0.64 - half-sun, 1 - 0.8 - bell (small, medium, large); 1,2 - flared. All conical skirts have the same construction pattern. Constructing a pattern conical skirt comes down to constructing a drawing of one of the panels (with a two-seam skirt) or half of the entire skirt (with one seam).
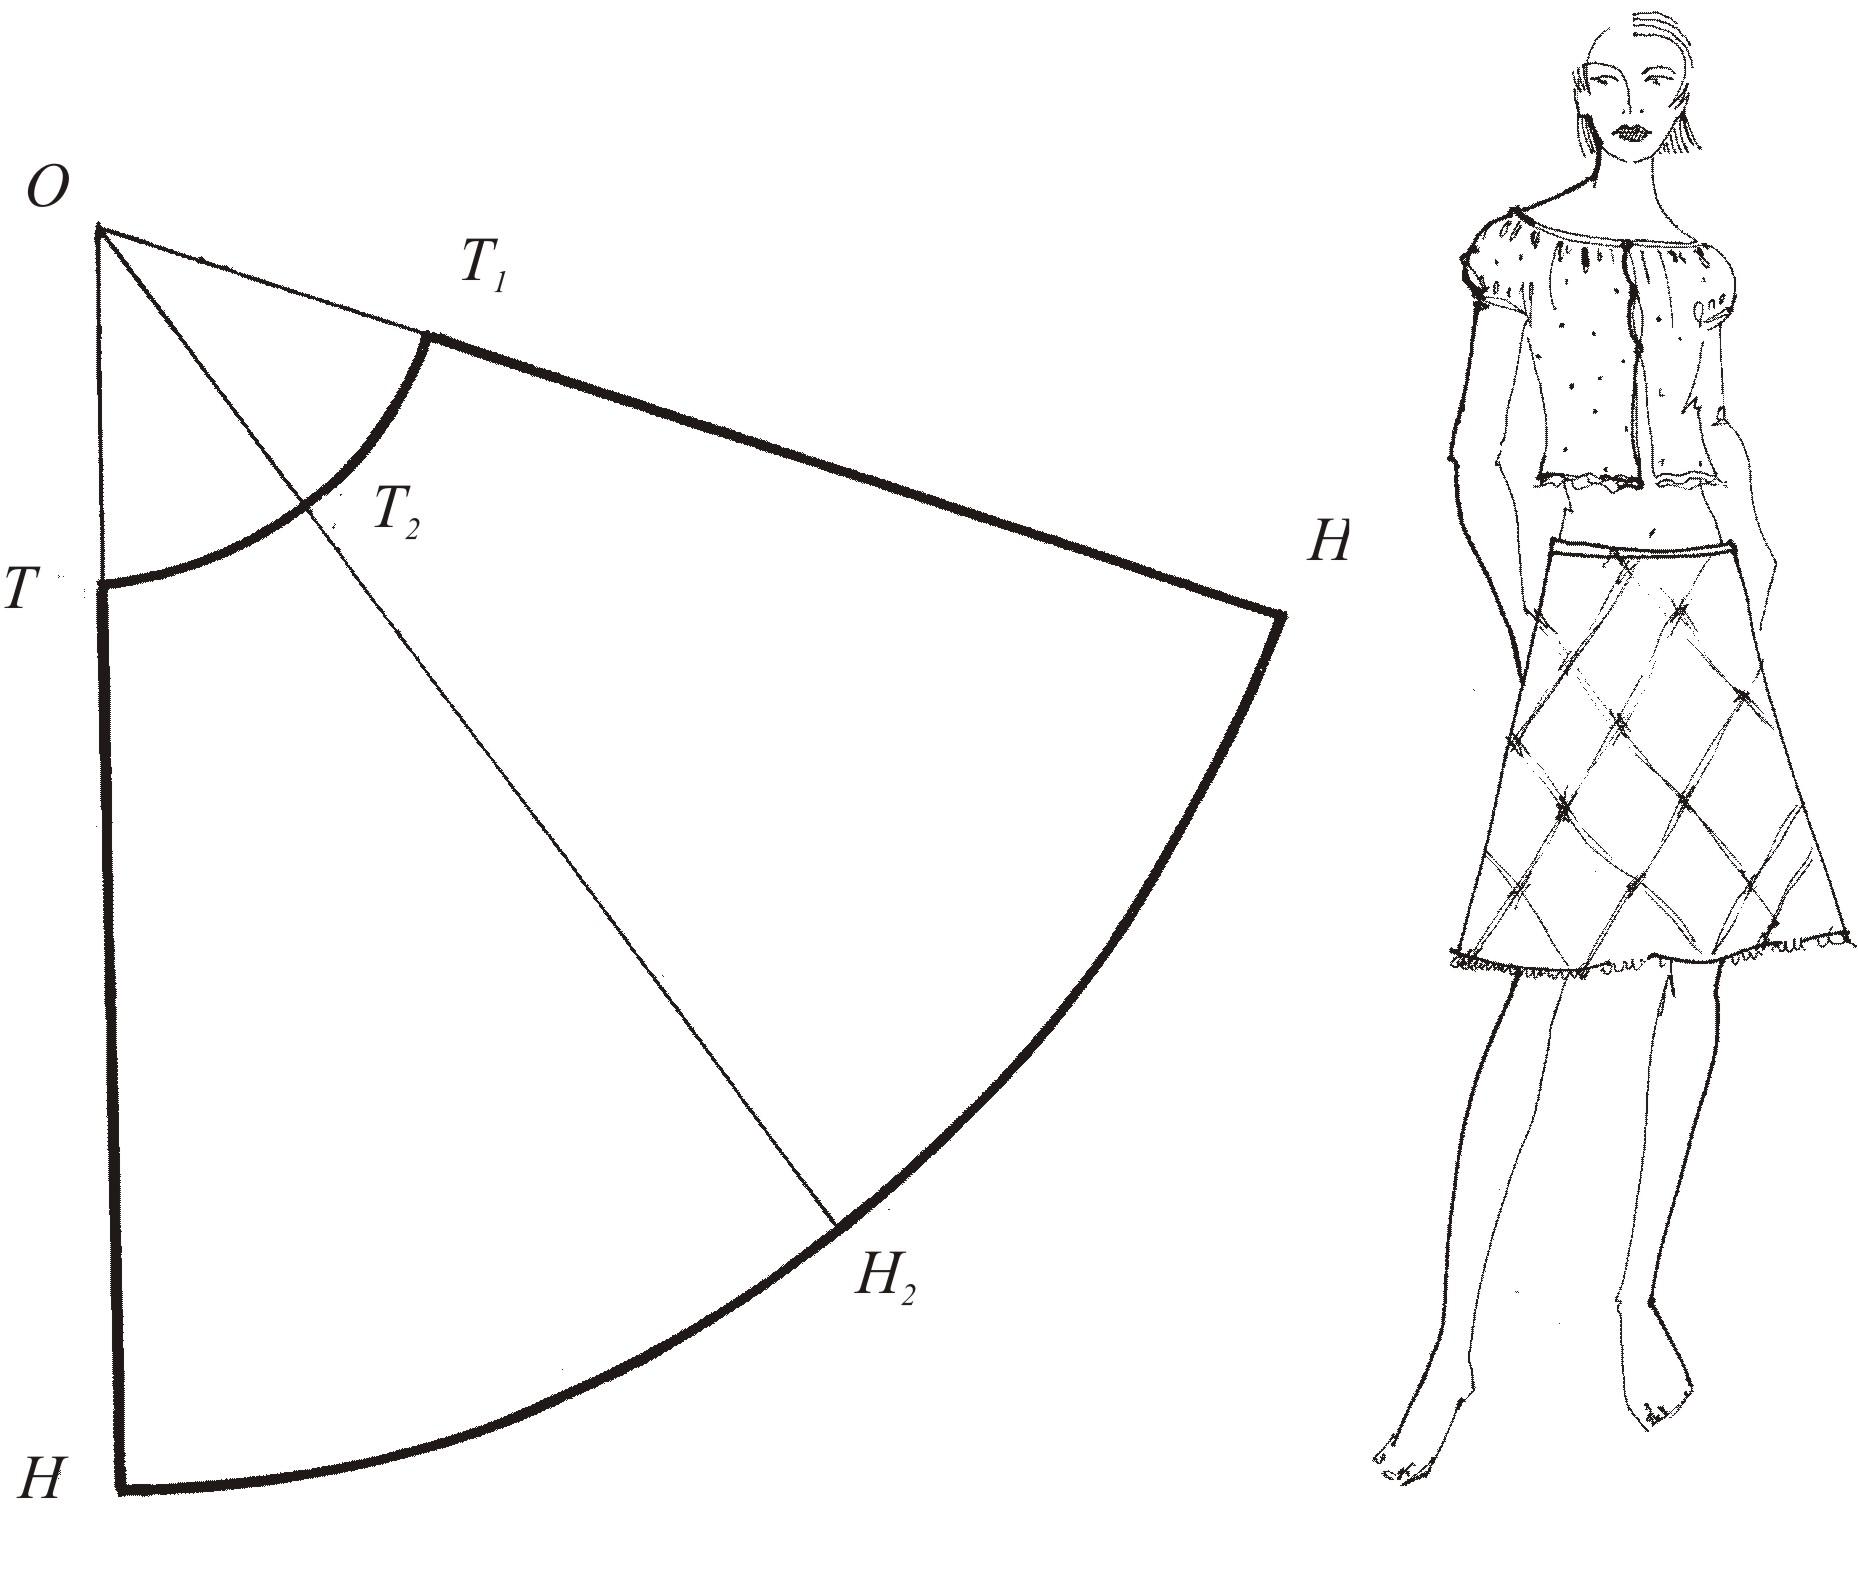
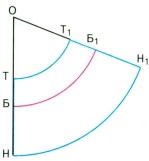
Flared skirt (Fig. 10.18). Through point O, draw a vertical line down and on it sequentially plot the values of the segments OT, TB, TN: OT=StK=38x1.2=45.6 cm; TB=19 cm; TN = 70 cm. From point O as from the center through points T, B, H, draw arcs to the right. Then determine the width of the skirt at the waistline. From point T along an arc, lay off the segment TT 1 = St = 39 cm. Connect point O with a straight line to point T 1 and continue it to the bottom line.
The side seam line of the skirt passes through point B 2, which is located on line BB 1 at a distance from point B equal to BB 1 / 2-1 cm. If the width of the skirt along the hip line after clarification turns out to be less than the calculation formula (Sb + Pb), then increase arc BB 1 by the missing amount and connect the resulting point to point O. Distribute the difference along the waist line evenly into the side dart (at point T 2).
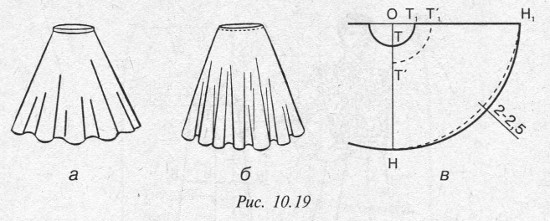
Half-sun skirt. In the “half-sun” skirt (Fig. 10.19, a, c), the arcs intersect with the vertical drawn down through O (the angle at point O is 90°). The segment OT" 1 is equal to: StK = 38x0.64 = 24.3 cm. The pattern is made for half of the skirt.
Skirt sun". In the “sun” skirt (Fig. 10.19, b, c), draw the arcs until they intersect with the continuation of the horizontal passing through point O (the angle at point O is 180°). The segment OT 1 is equal to CxK = 38x0.32 = 12.2 cm. The pattern is made for half of the skirt.
The peculiarity of the designs of these skirts is that the cut of the waist line when unfolded in a “semi-sun” skirt is a semicircle, and in a “sun” skirt it is a circle. Along the bottom line of the skirt in areas where the warp thread runs at an angle of 45°, it must be shaped with a slight deflection of up to 2 - 2.5 cm to prevent the bottom of the skirt from sagging when finished (Fig. 10.18, b and 11.21, c). In all flared skirts, design the bottom in the same way.
Note. When developing skirt models, take into account the features of the figure, which should be combined with the shape and lines of the product, creating a certain visual impression. In addition, it is necessary to provide for the design features of the model in its subsequent processing, as well as the technological properties of the fabric from which the product will be made.
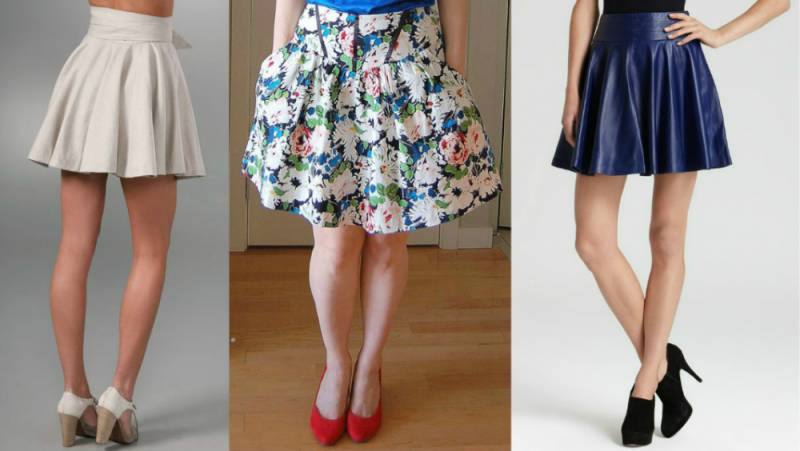
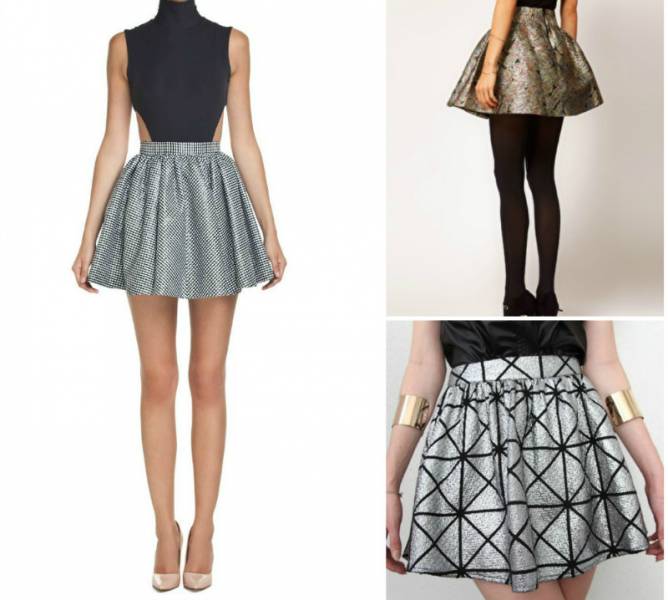
What is a conical skirt? The first thing that comes to mind is a bell skirt. But designers easily refute this statement, stating that the “cone” styles are much more diverse. And this, in turn, allows you to create many interesting images no matter what silhouette the beautiful lady has.
Variety of styles
The conical skirt attracts designers, first of all, because, depending on the cutting technique, a wide range of models can be created on its basis. In this case, the emphasis is on how many vertical seams it has. As a rule, there are three main subtypes: seamless, single-suture and double-suture. And on their basis, the types of conical skirts are distinguished.

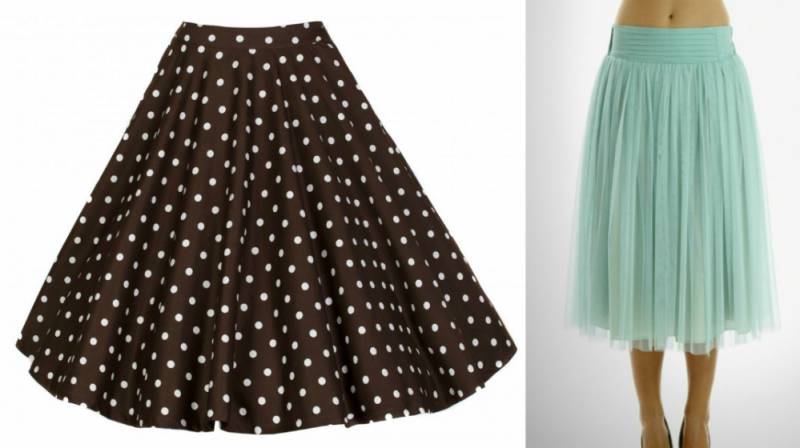
The first and main one is the famous style presented in the collections of the great Dior New Look. It's about O sun skirt. Fashion experts confidently say that this cut (usually seamless or single-seam) is suitable for beautiful ladies of any size, due to the fact that the main materials from which it is sewn are light, airy, easily draped fabrics (for example, chiffon).
The second type is called "half sun", which is most often a single-seam model. It is quite similar to the first type, but unlike it, it has significantly less volume, which visually improves the circumference of the hips. In addition, most often the “semi-variant” is sewn not on a belt, but on an elastic band, thereby allowing you to adjust the location of the skirt - at the waist or on the hips.
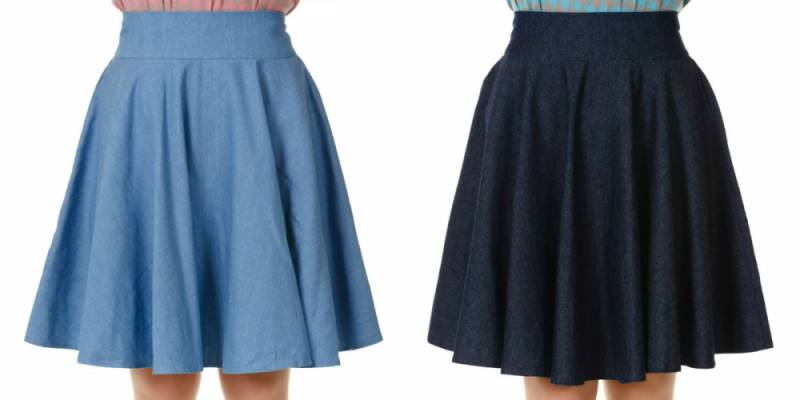
Third type - bell. At its core, it is a two-seam conical skirt with an accentuated wide belt, a tight-fitting area around the hips and a slight flare visible in the to a greater extent to the bottom of the skirt. In addition, this look is distinguished by the absence of folds and draperies at the waist. The fabrics used to sew it must be dense enough to maintain the “bell” shape. And therefore, most often it is cut from wool, leather, cotton or linen.
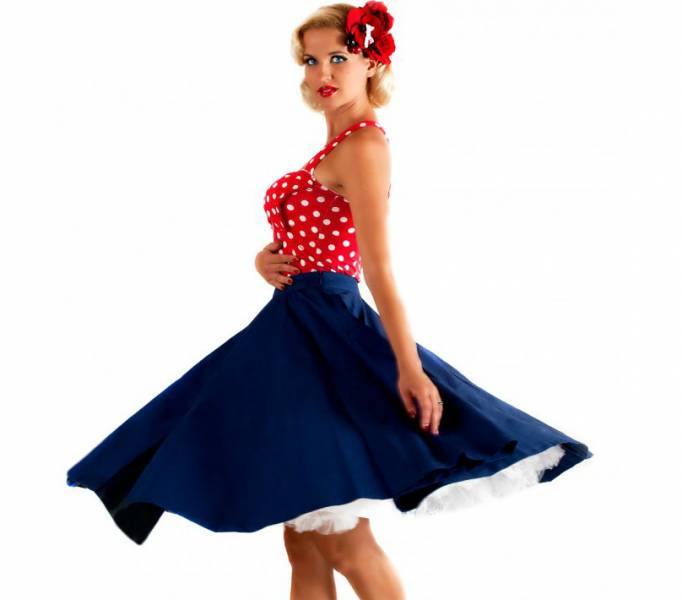
The fourth and most clear example such flared skirts. His appearance is also associated with the New Look trend, which was designed to show how feminine and fragile a beautiful lady can be. The flared skirt itself is a style of waist-length clothing, in which, due to the opposing folds, a pronounced contrast is formed between the thinnest waist and lush hips. And such a skirt is usually worn on the hips, even if, according to the designer’s plan, it was given an excessive ruffled style. The fabrics from which it is recommended to sew a flared model are distinguished by an enviable variety: taffeta, brocade, chiffon, organza, leather, linen and many others, including synthetic ones.
But which model should you choose so that the cone skirt fits perfectly into your look?
Choosing a style depending on the silhouette
Due to the fact that the models of conical skirts are quite diverse and have a number of distinctive characteristics, stylists strongly recommend that you familiarize yourself with the selection rules good style depending on the silhouette, degree of thinness and height of the beautiful lady.
So, the “sun” skirt, as well as its “semi-variant”, puts forward some requirements for its choice. So, specialists in compiling fashionable images They recommend that ladies with a slender, tall physique give preference to midi or mini lengths. At the same time, the style itself can be classic or differ in many draperies, asymmetrical cut and the presence additional decor. There are no restrictions regarding fabrics.
But for those with curvaceous shapes, the “half-sun” and its “full” version are recommended in midi or maxi length; the fabrics should be high-density and easily maintain the shape given by the cut (for example, satin or leather).
For those with long slender legs Stylists strongly recommend taking a closer look at the “bell” model. In addition, this style is ideal for those with a “Triangle” silhouette, both “Pear” and “Inverted”. The secret is that this particular model has a belt tailored in such a way that sometimes it resembles a skirt with a yoke. It is the latter that allows you to visually adjust the volume of your hips.

As for the “flare”, fashion designers are sure that this style fits perfectly on any figure if you choose the right fabric. Thus, dense, shape-holding fabrics are ideal in situations where you need to “balance” a significant difference between the volumes of the waist and hips. And airy, flying ones, for example, chiffon - when, on the contrary, this difference needs to be created.
In general, there are certain selection rules that all types of cone skirts obey:
- The skirt will fit perfectly on the figure if the difference between the waist and hips exceeds 10-15 cm.
- If it is necessary to narrow the waist without reducing the volume of the hips, then you should choose models with a wide belt, especially if the conical skirt is three-color or four-color and the division runs horizontally.
- The ideal length is a cone skirt whose hem goes down to the narrowest part of the leg. A model with a frill along the hem, creating an additional accent, will help to emphasize your slimness.
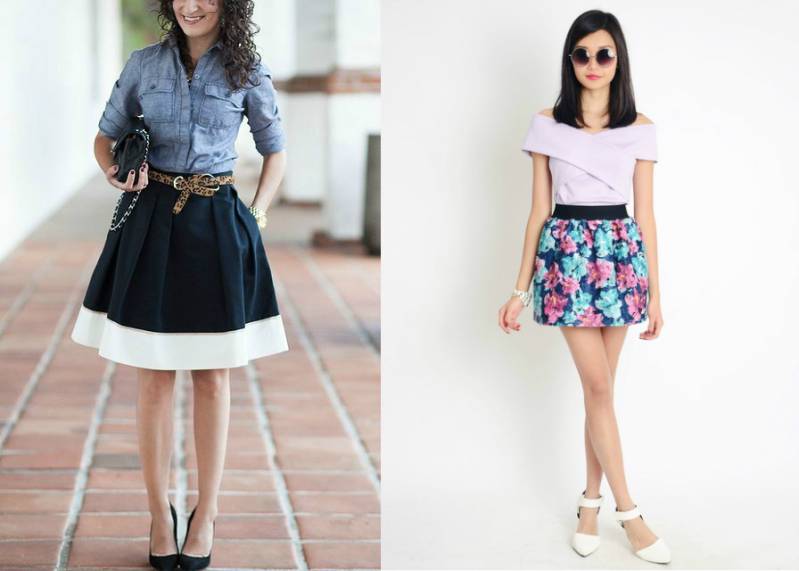
Rules for building a bow
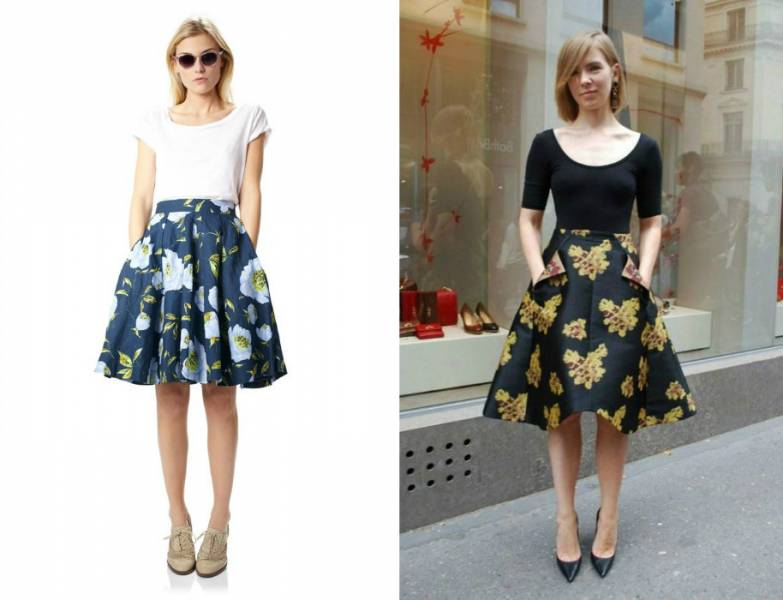
Looking at photos of conical skirts, you can see that each of its varieties obeys special rules acquisition. And taking them into account will help present the image in the most feminine light.

For example, the “sun” and its “semi-variant” go perfectly with shirts tailored according to the male model. Add femininity to in this case A slight slouch on the waistband of the skirt will help. In addition, tops, semi-tight turtlenecks and airy blouses are ideally combined with this style. Depending on what kind of look is being created (summer, demi-season or winter), the set can be completed with a thin cardigan, a jacket with a peplum, a vest in combination with a short jacket, a voluminous coat or parka, as well as a sweater or sweatshirt in “Oversize” size. Shoes have their own rules, based on the length of this style of skirt. So, for mini or “tea length” stylists recommend choosing a pair with heels or wedges with a high rise, and the maxi length allows you to wear any type of shoe.
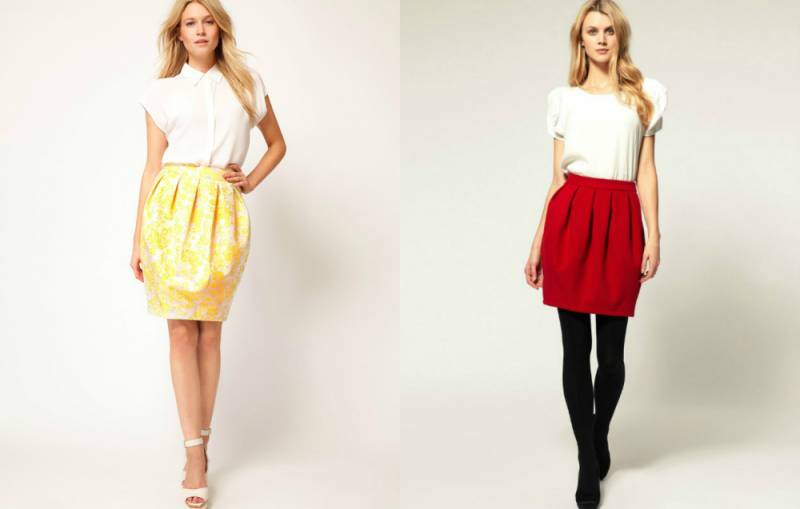
“The Bell” is subject to slightly different composition rules, based in most cases on what stylistic direction the beautiful lady chooses. This cone skirt with a pronounced belt looks best in business and evening looks. Possessing a smooth texture, it goes perfectly with both strict shirts of an almost masculine cut, and extremely feminine blouses, decorated with complex drapery, ruffles, and bows. Depending on the purpose of the set, designers complement the set with fitted jackets or jackets with a cropped hem, peplum or stylized sleeves. But that is not all. "Bell" is appropriate in street fashion and the Casual direction. Therefore, a beautiful lady can pair it with cropped blazers, cardigans, T-shirts and T-shirts, knitted sweatshirts, and fine wool sweaters. All that remains is to choose the right shoes. It is quite clear that for business and evening looks, stylists recommend exclusively shoes and sandals for high heels, regardless of the length of the “Bell”. The description of the range of shoes for the street is much wider. These can be the already mentioned options, as well as ballet flats, loafers or oxfords, sandals flat sole and even sneakers and sneakers.
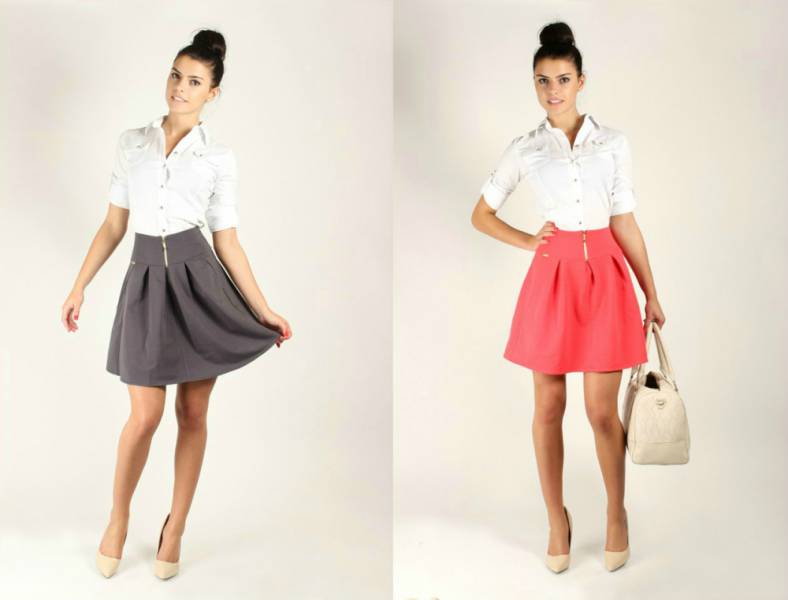
As for “Flare”, it is customary to combine it with a particularly tight-fitting top - a turtleneck, top or blouse. And you can complement the set with a voluminous coat, biker jacket, jacket, vest and jacket, and a demi-season parka. Depending on which option was chosen, the look is completed with high-heeled or wedge shoes, sneakers, ballet flats or high-top boots. And ankle boots are strictly contraindicated.
A beautiful lady should not be afraid of a conical skirt, because when making the right choice and when combined, it can become the basis of the most feminine image.
Skirts of conical shapes can be of varying degrees of flare, including flared options such as “sun” and “half-sun”.
The design drawings are based on conical the skirts lie part of a circle (sector): most often from 1/8 to 1/2 of a circle (half of the length). The middles of the skirt at the back and front are radii, and the original l. waist, hips, bottom – in arcs ( rice. 66–68).
The schematic diagram for constructing their drawings is as follows: from the point ABOUT the distance that determines the levels of the waist, hips and bottom is laid down vertically. In this case, the distance from the point ABOUT to the waist line is chosen depending on the designed shape of the skirt:
FROM= TO· WITH T ,
Where TO– coefficient characterizing the curvature of the upper edge of the skirt, equal to 0.3÷1.4.
So, for moderately flared skirts it is equal to 1.2÷1.4, for larger flared ones - 0.8÷1.0, and for “half-sun” and “sun” type skirts it is reduced to 0.65÷0.32, respectively.
Having determined the position of the point T, lay off the segment TB And TN;
TB= 20.0 cm;
TN= D AND .
The lines of the waist, hips and bottom are drawn to the right from the point ABOUT both from the center, with radii equal to the segments respectively FROM, ABOUT And HE.
From t. T the measurement value is plotted along the curve WITH T(T. T 1). Through t. ABOUT And T 1 draw a straight line until it intersects with arcs of points B And N(dots B 1 And N 1 ).
When constructing a drawing of skirts, the degree of flare of which is determined by a coefficient equal to 1.2÷1.4 for figures with thin waist and increased hip circumference and arc length BB 1 is checked and, if it is less than the value WITH B + 2.0 cm, it is extended by the missing amount to the point B 11 (rice. 66).
Rice.66 . Construction of a drawingdesignsconical skirt« bell-bottom»
From point ABOUT through the obtained point B 11 draw a straight line until it intersects with arcs of points T And N at points T 11 And N 11 . As a result, the width of the skirt along the waist line will be larger than the designed one by the size of the segment T 1 T 11 . If this value does not exceed 1.5 cm, then it is adjusted during the making of the skirt. If the excess exceeds 1.5 cm, then it is removed into a dart (one or two), placed either in the sections of the skirt, or in the locations of the side (with a single dart with a solution of up to 3.0 cm) and back darts (if it is necessary to construct a second dart ).
A distinctive feature of the designs of “half-sun” and “sun” skirts is that the line of the upper cut when unfolded is a semicircle in the first case, and a circle in the second. Therefore, the construction of drawings of such skirts is greatly simplified.
To construct a drawing of the design of the skirt of the “half-sun” option, construct a right angle with the vertex in the so-called ABOUT (rice. 67a). to construct a drawing of the skirt of the “sun” option through the so-called. ABOUT (rice. 67b) draw a vertical straight line. From t. ABOUT radius equal to the segment FROM, carry out l. waist, with a radius equal to the segment HE, carry out l. bottom until it intersects with the lines drawn through the so-called. ABOUT.
![]()
Rice.67 . Construction of a design drawing for conical skirts: a –« half sun» ; b –« Sun»
Wherein FROM= TO· WITH T (TO– coefficient equal for skirts of the “sun” option – 0.65, for skirts of the “sun” option – 0.32), TN= D AND .
Depending on the model, conical skirts can be single-seam or multi-seam; on the upper section they can be designed with gathers and pleats, which make it possible to increase their volume to an even greater extent.
Conical multi-seam skirts can consist of four or more wedges. Moreover, a smaller number of wedges (four to six) is typical for skirts with less flaring downwards, and a larger number (six to eight or more) is typical for skirts that are wider at the bottom (such as “half-sun” and “sun”). The designs of multi-seam conical skirts can be developed using a drawing of a corresponding two-seam conical skirt or by specially constructing one symmetrical wedge.
Rice.68 . Drawing a design drawing for a conical skirt« bell»
It should be noted that the variants of classic skirt shapes discussed above are the basis for the development of new models. In Fig. P.3.1–P.3.8 presents sketches and design solutions of the most current models of modern skirts.
Measurements for creating a skirt pattern
Waist circumference ( FROM) - 76 cm.
Hip girth ( ABOUT) - 100 cm.
Thigh height ( WB) - 19 cm.
Skirt length ( DU) - 70 cm.
Constructing a skirt pattern
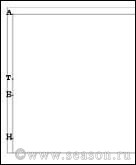
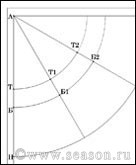
Place a dot in the upper left corner of the piece of paper A, lower the vertical from it. We lay out the segments on the vertical: AT =FROM=76 cm, TB=WB=19 cm, TN =DU=70 cm.
From point A draw circles through all points - T, B, N until it intersects with the horizontal line emanating from the point A.
The resulting arcs are called: waist line, hip line and bottom line (from top to bottom). Along the hip line (along an arc) from a point B set aside ½ ABOUT=100/2=50 cm, put a dot B2. Divide the arc B-B2 in half and put a dot B1. From point A through points B1 And B2 draw straight lines until they intersect with the bottom line. At the intersection of straight lines with the waist line, place points accordingly T1 And T2.
 |
 |
 |
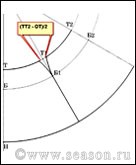
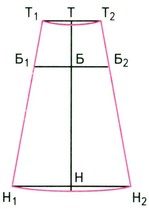
We measure the length of the arc T-T2. This length turned out to be longer than SWEAT. We calculate the difference between the length of the arc and SWEAT. The resulting value is the side dart solution. Divide the solution in half and put the resulting value on both sides of the point T1. We use smooth lines to create a side dart - from the hip line to the points on the waist line.
We received a drawing of the skirt " A-silhouette with a fold in the center of the front, a seam in the center of the back and two side seams.
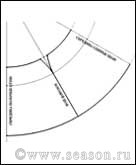
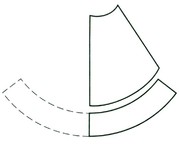
When cutting one half of a skirt pattern upside down, you can significantly save fabric by placing the pattern in its entire width, moving the patterns relative to each other in height.
 |
 |
 |
The skirt can be slightly tapered from the hip line. This will not affect the fit, and in some cases it will help if the fabric is not long enough. We make the narrowing no more than 5 cm at the bottom.
Making a skirt
Skirt, sewn with your own hands, doubly pleases its owner. Firstly, with its beauty and individuality. Secondly, pride in a job well done without anyone’s help. A well-constructed skirt drawing is always a guarantee of an excellent result.
There is a basic drawing of a skirt pattern, on the basis of which various model options are designed.
P 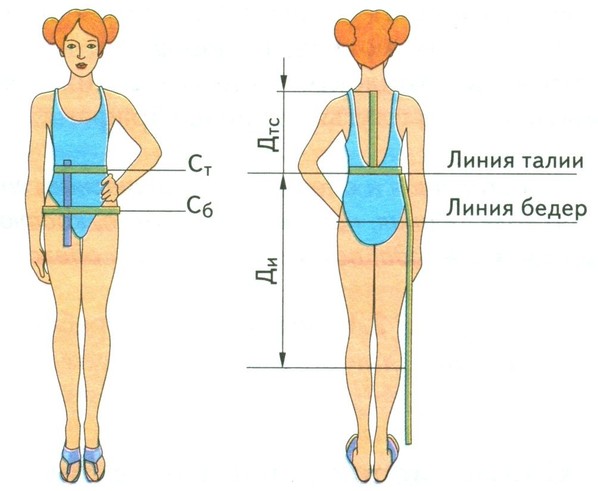
A detailed description of how to make a skirt drawing can be studied in the following sections:
Measurements required to draw a skirt drawing
|
Measurement name |
Measurement designation |
Measurement results, cm |
|
Half waist |
||
|
Half hip circumference |
||
|
Back length to waist |
||
|
Length of the product |
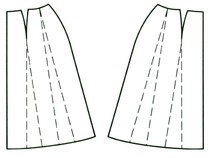
Designing the “Big Flare” Skirt
Construction of a conical flared skirt
1. From point ABOUT swipe down vertical line and plot the radius of the arc of a circle on it to construct the waist line (point T):
OT = (C T + P T ) x K = (31.6 + 1.0) x 1.2 = 39.1 cm
From the center ABOUT radius equal to FROM, draw an arc to the right TT 1 , the length of which along the curve is equal to:
TT 1 = C T + P T = 31.6 + 1.0 = 32.6 cm
2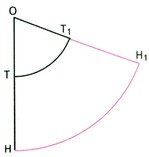 .
From point T put down the length of the skirt D And Designate the resulting point N:
.
From point T put down the length of the skirt D And Designate the resulting point N:
TN = D And = 50.0 cm
Radius HE draw a second arc to the right, the point of intersection of which with the continuation of the straight line FROM 1 designate N 1 .
 Arc NN 1
- bottom line of the skirt
Arc NN 1
- bottom line of the skirt
3. Draw an arc on the drawing BB 1 radius ABOUT to get the hip line:
TB = D ts : 2 = 38.2: 2 = 19.1 cm
To ensure that the skirt is not narrow at the hips, check the arc length BB 1 . It should be no less than the half-circumference of the hips with an increase in freedom of fit:
BB 1 = (C 6 + P 6 ) = 44.7 + 2.0 = 46.7 cm
Trace the outline of the drawing TT 1 N 1 N solid main line
Modeling the “Big Flared” Skirt
Three-color conical skirt
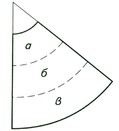
1. On the finished drawing of a conical skirt, apply cut lines dividing the skirt into three stripes of equal width or in any arbitrary proportion
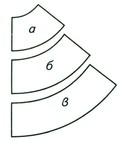 2.
Cut the pattern along the marked lines and use the resulting parts as patterns for cutting from three different pieces of fabric, selected according to color and pattern
2.
Cut the pattern along the marked lines and use the resulting parts as patterns for cutting from three different pieces of fabric, selected according to color and pattern
Conical skirt with frill
This model is a development of the previous one. First you need to draw a line defining
the width of the frill, and then increase the length of the lower part of the skirt (frill) by 1.5-2 times. To obtain a frill, gather the fabric into small folds or gathers
Conical skirt made using patchwork technique
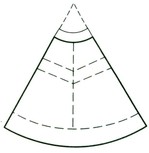
1. Construct a drawing of a two-seam conical skirt and apply cut lines on it so that they coincide on the side seams of the front and back panels
 2.
Cut the pattern along the marked lines and use the resulting parts as patterns for inserts made using the patchwork technique
2.
Cut the pattern along the marked lines and use the resulting parts as patterns for inserts made using the patchwork technique
Designing a wedge skirt
Construction of a drawing of a wedge skirt
1. From point T draw a vertical line down and mark the distance to the hip line on it TB and skirt length TN:
TB = D ts : 2 = 35: 2 = 17.5 cm;
TN = D And = 50.0 cm
2. Through the point T draw a horizontal line and place on it symmetrically to the right and left half the width of the wedge along the waist line:
TT 1 = TT 2 = (C T + P T ): N = (33 + 1) : 6 = 5.7 cm
(N = 6 - number of skirt wedges)
3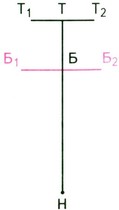 .
Draw a horizontal line through point B and mark it to the right and left
.
Draw a horizontal line through point B and mark it to the right and left
half the width of the wedge along the hip line:
BB 1 = BB 2 = (Sat + Pb) : N = (43 + 3) : 6 = 7.7 cm
4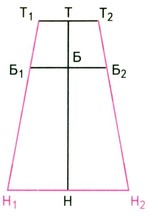 .
To obtain the width of the wedge along the bottom line, draw straight lines through the points T 1
And B 1
, and also through T 2
And B 2
and continue them down until they intersect with a horizontal line drawn through the point N. Mark intersection points N 1
And N 2
. Length
.
To obtain the width of the wedge along the bottom line, draw straight lines through the points T 1
And B 1
, and also through T 2
And B 2
and continue them down until they intersect with a horizontal line drawn through the point N. Mark intersection points N 1
And N 2
. Length
segment N 1
N 2
- width of the wedge along the bottom line
5. From points T And N put down 0.5 cm. Outline the outline of the drawing with a solid main line, drawing out the waist line and bottom line with smooth curves
M 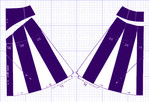 styling a wedge skirt
Extension of the wedge along the bottom line
P 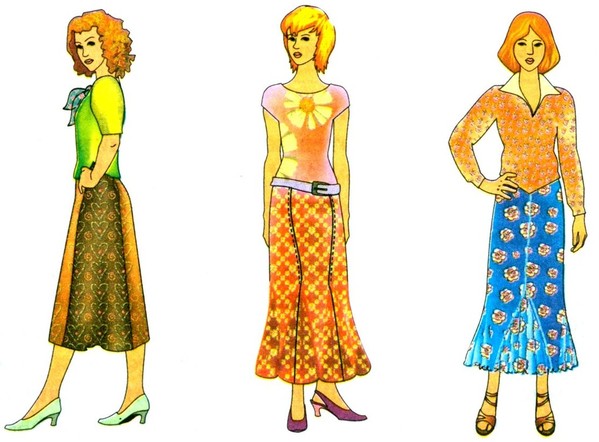 First way.
N 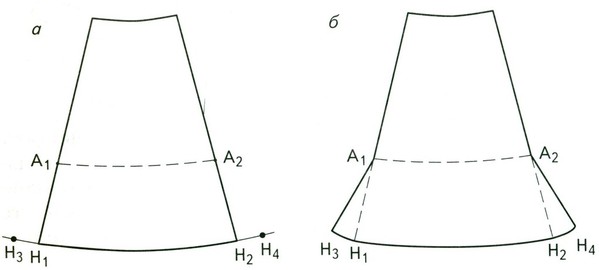 and draw a line on the wedge drawing A 1
A 2
, from which the expansion begins. Then extend the bottom line to the right and left and put on it symmetrically in both directions the required amount of expansion (points N 3
And N 4
) (Fig. a). Connecting points with straight lines A 1
And N 3
, and A 2
And N 4
, we get a new drawing of a wedge with an expanded lower part (Fig.b). Wherein A 1
N 3
= A 1
N 1
and A 2
N 4
= A 2
N 2
.
and draw a line on the wedge drawing A 1
A 2
, from which the expansion begins. Then extend the bottom line to the right and left and put on it symmetrically in both directions the required amount of expansion (points N 3
And N 4
) (Fig. a). Connecting points with straight lines A 1
And N 3
, and A 2
And N 4
, we get a new drawing of a wedge with an expanded lower part (Fig.b). Wherein A 1
N 3
= A 1
N 1
and A 2
N 4
= A 2
N 2
.
Second way.
The expansion of the wedge skirt along the bottom line with a small amount of fabric can be achieved by inserting additional wedges between the main wedges, the size of which depends on the desired width of the skirt.
F 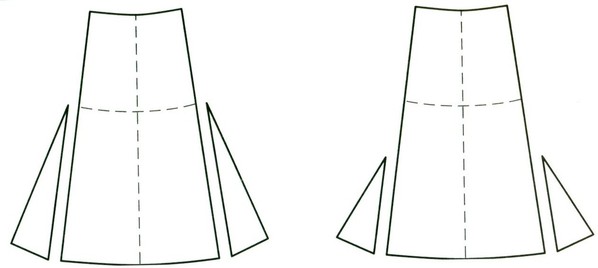 The wedge shape can be complicated. For example, for a tighter fit of a skirt along the hips, a slight decrease in the wedge below the hip line is allowed, while the width along the hem line remains the same (Fig. a) or can be increased (Fig. b).
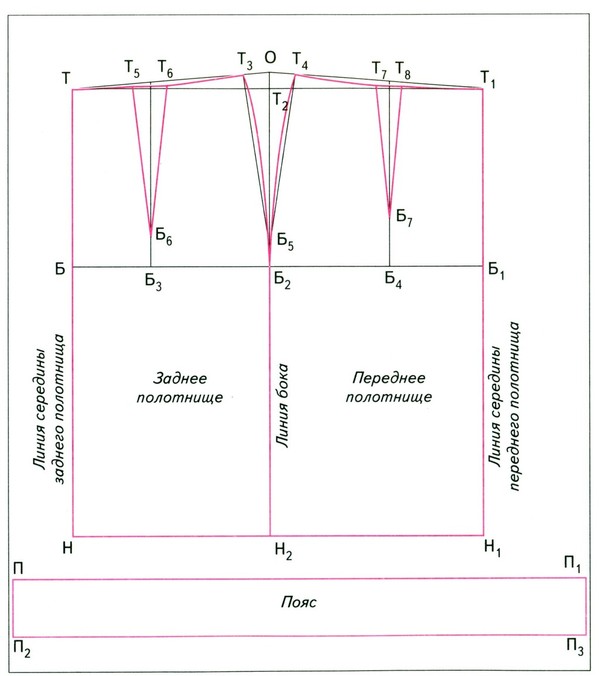
TO  designing a straight skirt
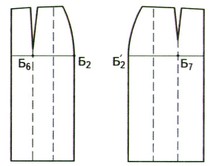
Drawing a straight skirt
|
Sequence of drawing construction |
Calculation formula |
Calculation, cm |
|
|
Construct a right angle with vertex at a point T. Set aside the distance to the hip line TB |
TB = D ts: 2 |
||
|
Set aside skirt length TN |
|||
|
Through dots B And N conduct horizontal lines hips and bottom of the skirt |
construction |
||
|
Set aside the width of the skirt along the hip line BB 1 |
BB 1 = S b + P b |
44,7 + 2,0 = 46,7 |
|
|
Through the point B 1 draw a vertical line, mark the point of intersection with the waist line T 1 , and with the bottom line - N 1 |
construction |
||
|
Set aside the width of the rear panel BB 2 |
BB 2 = BB 1: 2 - 1.0 |
46,7: 2 - 1,0 = 22,4 |
|
|
Draw a vertical line through a point B 2 . Mark the point where it intersects with the waist line T 2 , and with the bottom line - N 2 |
construction |
||
|
Check the width of the front panel B 1 B 2 |
B 1 B 2 = BB 1 - BB 2 |
46,7 - 22,4 = 24,3 |
|
|
Set aside the amount of waist lift along the side line T 2 ABOUT |
T 2 O = 1.0 ... 1.5 cm |
||
|
Draw a new position for the waist line by connecting the dots T, ABOUT, T 1 |
construction |
||
|
L = (C b + P b) - (C t + P t) |
(44,7 + 2,0) - (31,6 + 1,0) |
||
|
Side dart solution T Z T 4 set aside symmetrically at the waist line to the right and left of the side line |
|||
|
Set aside the top of the side dart B 2 B 5 . Connect the opening points of the dart with its top B 5 |
B 2 B 5 = 2 ... 3 |
||
|
Determine the position of the center line of the dart on the back panel BB 3 |
BB 3 = 0.4 x BB 2 |
0.4 x 22.4 = 9.0 |
|
|
Determine the position of the center line of the dart on the front panel B 1 B 4 |
B 1 B 4 = 0.4 x B 1 B 2 |
0.4 x 24.3 = 9.7 |
|
|
Draw the vertical center lines of the darts through the points B 3 And B 4 |
construction |
||
|
Place these points along the waistline symmetrically to the right and left of the center lines of the darts: the top of the back dart B 6 , the top of the front dart B 7 . Connect the points of the dart openings with their vertices with straight lines |
|||
|
Decorate the sides of the side dart with smooth lines with a deflection of 0.5 cm |
construction |
||
|
Shape the waist line smooth lines, passing through the opening points of the darts. At the same time, at points T And T 1 must be a right angle |
TT 5 T 6 T 3 and T 1 T 8 T 7 T 4 |
||
|
Outline the outline of the drawing with a solid main line |
construction |
||
|
Set aside belt length PP 1 |
PP 1 = C T x 2 + 3 |
31.6 x 2 + 3 = 65.2 |
|
|
Set aside waist width PP 2 |
PP 2 = 6 ... 8 |
||
|
Complete the rectangle PP 1 P Z P 2 |
construction |
Modeling a straight skirt
Based on the drawing of a straight skirt, you can get a large number of skirt models: narrow and wide, long and short, with yokes at the back and front, with slits and folds of various shapes. When constructing a drawing of a straight skirt, drawings of its two parts were obtained: the front and rear panels. For modeling, these parts need to be separated (cut), since each panel is modeled separately.
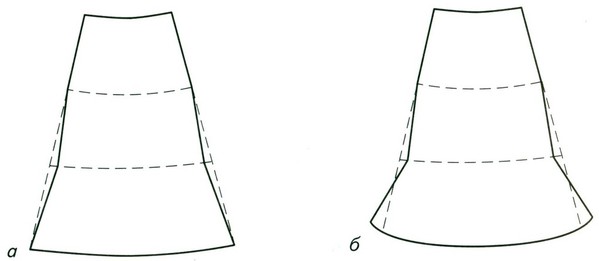
Extension of the skirt along the hemline
N 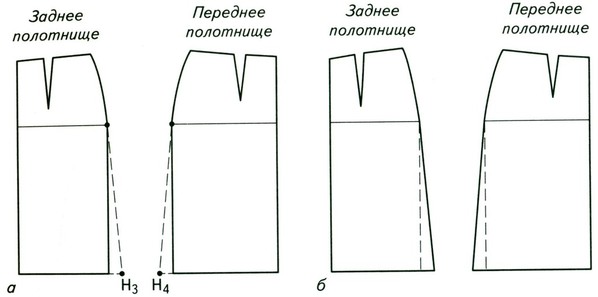 and in the drawings of the front and rear panels, from the side cut line, set aside the required expansion along the bottom line (no more than 7 cm). Then connect the resulting points H 3 and H 4 with the side cut lines, drawing tangent lines to the lines of the side dart (Fig. a). Trace the outline of the drawing along the outlined lines (Fig. b).
Tapering of the skirt along the hemline
N 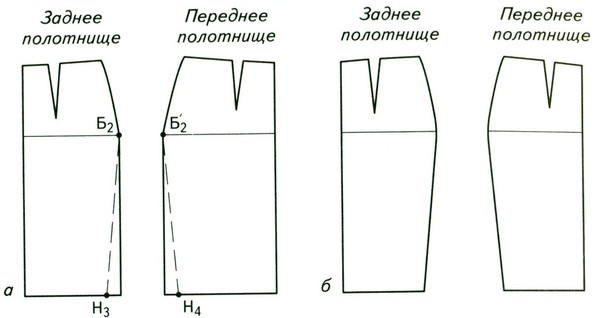 and in the drawings of the front and rear panels from the side cut side, reduce the width of the skirt along the bottom line by the desired amount (points H 3 and H 4). Then connect points H 3 and H 4 with points B 2 and B "2 on the hip line (Fig. a). Cut off the excess parts of the pattern (Fig. b). To ensure freedom of movement, cuts can be made.
AND 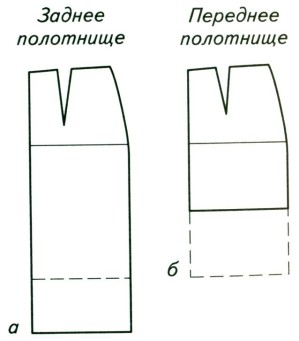 Changing the length of the skirt
The length of the skirt - from maxi to mini - is determined by fashion. In order to change the length of the skirt, the bottom line in the drawing is either lowered to the desired amount (Fig. a) or raised (Fig. b). For freedom of movement, very narrow long skirts are made with slits, slots, and fasteners.
Ways to expand a straight skirt
1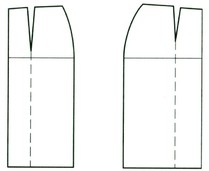 . Method of closing darts
![]()
1. 2. 3.
1. By center lines darts of the front and back panels, draw vertical straight lines until they intersect with the bottom line and cut the patterns along these lines
2. Pull apart the patterns at the bottom until the darts are completely closed
Z.
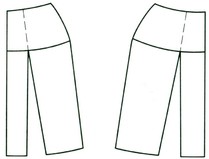
2. Using the method of partial closure of the dart and an additional cut
1. Along the axial lines of the darts of the front and rear panels, as well as through the middles of segments B 6 B 2 and B "2 B 7, draw vertical straight lines until they intersect with the bottom line
2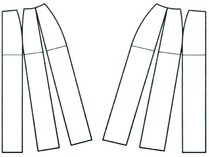 .
Cut the patterns along the marked lines and spread the resulting parts to the desired width along the bottom line
.
Cut the patterns along the marked lines and spread the resulting parts to the desired width along the bottom line
Z. Create a smooth curve for the bottom line
window sill made of natural stone http://www.nikitadesign.com/. window sill made of natural stone


