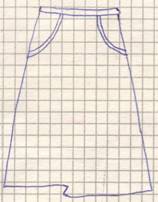
Making a straight skirt pattern with your own hands. Construction of the design of conical skirts. Where are the darts located?
Hello, my dear readers of the blog “site”. Now we will learn how to build straight skirt base.
Earlier in the article about the straight classic skirt, we talked about the fact that if you want to sew a skirt of any models, You cannot do without this knowledge. So let's get down to business.
Don't let the size of the text below scare you. In fact, everything is very simple if you figure it out once. I wish you good luck with this!
This article will be especially useful for beginners sew, as I describe the whole process in great detail. Therefore, if you already have experience, make a discount on it)).
To start building a drawing, we need to take our measurements correctly. Now I take measurements of approximately 44 sizes.
Initial data (cm):
St = 36 Pt =0.5;
Sat = 47 Pb =1;
Dlb = 20;
Dis = 60.
I recommend doing it drawing on graph paper, and not on tracing paper, since it is very convenient to draw on the cells.
You can buy graph paper at any office supply store. It is sold in rolls and sheets. Any option will suit you.
When constructing a drawing, you substitute your measurements.
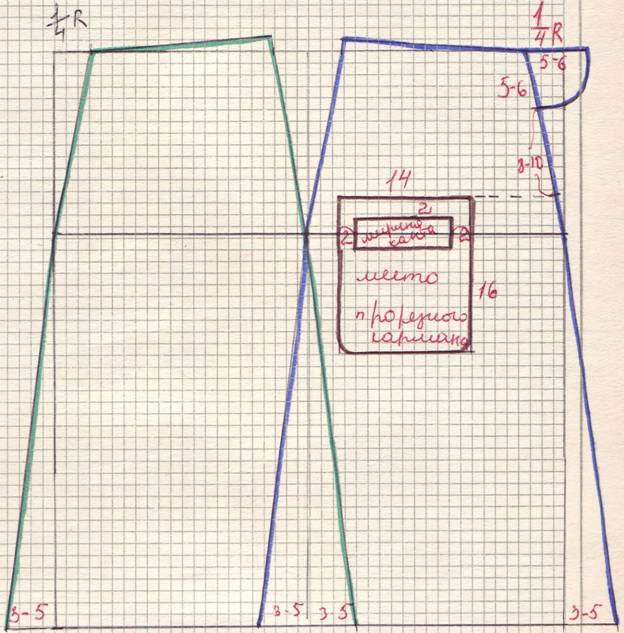
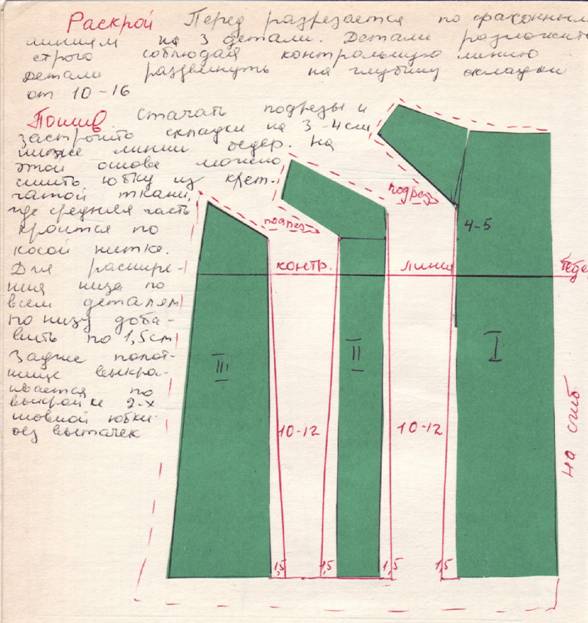
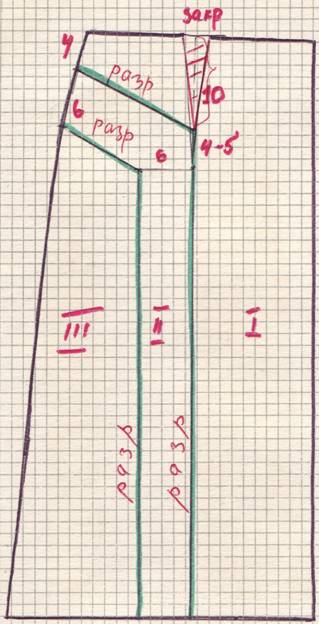
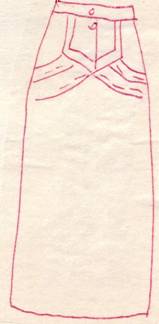
The skirt is three-seam (two side seams and one middle back).
First, we make a preliminary calculation of the waist grooves.
The difference between St and Sat = (Sat + Pb) - (St + Fri) = (47 + 1) - (36 + 0.5) = 11.5.
Rule for distributing the difference:
1. Undercut of the middle seam is 1.5 cm. Find the remainder 11.5-1.5=10. We distribute this remainder to the remaining grooves:
2. Side seam undercut: 1÷2 from the remainder = 1÷2 from 10 = 5; Max side recess 7.5 cm.
3. Undercut of the rear panel (RP): 1÷3 from the remainder = 1÷3 from 10 = 3.3; Max undercut of the seal can be 3.8 cm.
Very important note If the difference between Sat and St is more than 14 cm, then two undercuts are made on the ZP.
Drawing of a straight skirt.
Let's put a point T.
1. TN down-level of the bottom line = Diz = 60;
2. TB down - hip line level = Dlb = 20;
3. From points T, B, H, draw horizontal lines to the right;
4. Grid width: BB1 to the right = Sb + Pb = 47 + 1 = 48. Draw a vertical through point B1 and find points T1 and H1;
5. Side seam position:
Divide BB1 by 2 - this is for standard figures;
Divide BB1 by 2 + (from 0.5 to 1 cm to the right) - this is for figures with protruding buttocks;
Divide BB1 by 2 - (0.5 cm set aside to the left) - this is for figures with a protruding tummy.
Place point B2 and draw a side seam line through it vertically. We put points T2, H2.
6. Side seam dart: T2T3 left = T2T4 right = 1/2 side seam dart = 5/2 = 2.5. We set aside 2.5 cm from point T2 to the right and left. We put points T3 and T4.
From point B2 upward we set aside 2 cm - this is auxiliary point 2. A constant value for all skirts that are built on the basis of a straight line, except for the A-line skirt.
Points T3 and T4 are connected to point 2.
We shape the side cuts under the pattern. We bend the lines by 0.2 cm using a pattern.
7. Tall deflections:
on ZP = 0-2 cm (for protruding buttocks - 0, for flat buttocks - 2 cm), we take 1 cm;
on PP = 0.5 - 1.5 cm (05 - with a small tummy, 1.2 - standard, 1.5 - with flat stomach), take 1.2 cm.
From point T downwards we set aside the waist deflection of the ZP -1cm. We put point T'.
From point T1 downwards we set aside the waist deflection of the PP - 1.2 cm. Place point T.” We draw up the waist line under the pattern. Connect points T’ and T3. There should be a right angle at point T'. We connect points T2 and T.” At point T there must also be a right angle.
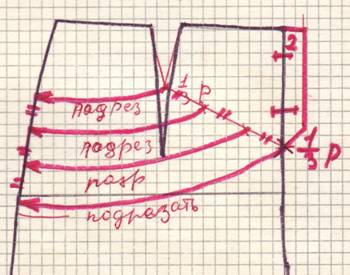
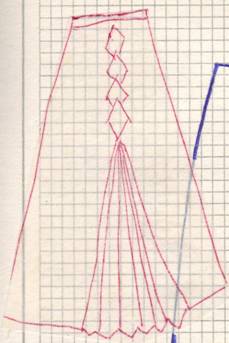
8. Undercut of the middle seam on the seam: from point T’ should be set aside 1.5 cm to the right. Connect point 1.5 with a straight line to point B.
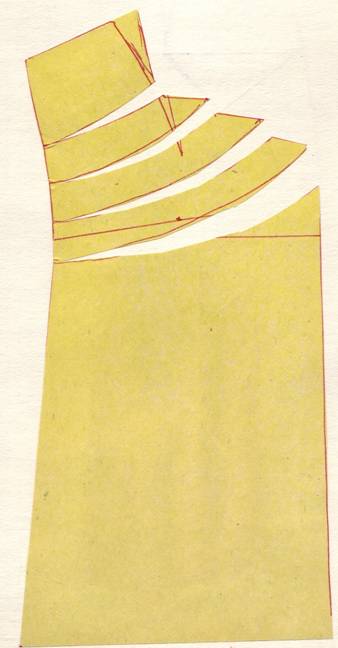
9. Groove ZP: Divide the line between points 1.5 and T3 by 2. And draw through point 2 vertical line- center line of the groove. From point 2 we put 3.3÷2 = 1.7 cm to the right and left.
The undercut on the waistband is sewn up as an independent element, so it must be shortened above the hip line by 4 to 6 cm.
by 4 cm - for flat buttocks;
by 6 cm - for convex buttocks.
We align the sides of the groove along the larger side, bring the left side of the groove to point 1.5 under the pattern.
10. PP undercut.
Divide the line between points T and T4 by 2.
And as in the ZP, we draw a center line through point 2 vertically to the line of the hips. From point 2 we put 1.7÷2 = 0.9 cm to the right and left.
The PP undercut is also sewn up as an independent element, so we build it 10 - 12 cm long. center line set aside 12 cm from top to bottom.
We equalize the sides of the groove on the larger side and bring the right side under the pattern to the T point.”
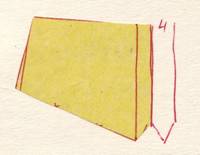
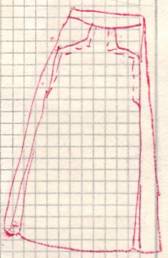
11. If the skirt is BELOW the knees, then to maintain a straight silhouette, reduce the width of the skirt along the bottom line by 1 cm on each side.
We set aside 1 cm from point H2 to the right and left and connect these points with straight lines to point B2.
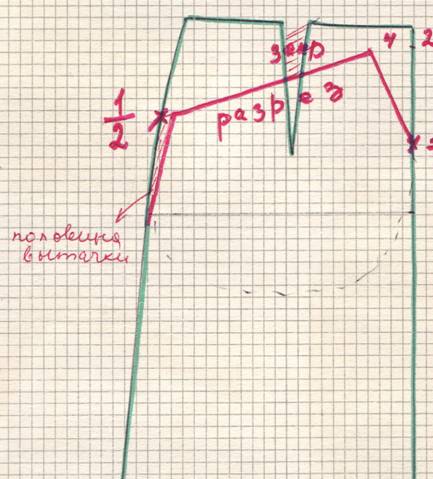
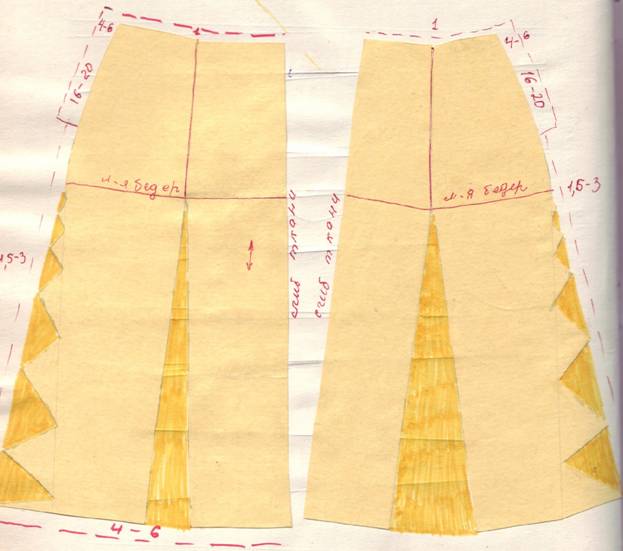
12. The skirt is located at the natural waistline and is decorated with a split belt, so you need to cut off half the width of the belt from the drawing.
For example, the width of the belt is 3 cm. We set aside 1.5 cm from the top of the skirt and shade it, i.e. cut it off. Marked on the drawing yellow.
13. On the ZP, you need to place the control point of the fastener 2 cm above point B2.
If the skirt is built at a low waistline, then the control point of the fastener is 2 cm below point B2.
14. On the ZP we mark the control point of the cut. From point H upward we set aside 18 cm.
15. Belt.
The belt is a rectangle 3 cm wide. In cutting 3 × 2 + 2 cm allowances = 8 cm,
Length = length (St + Fri) × 2 + 2 cm allowances + clasp opening 3 cm = (36 + 0.5) × 2 + 2 + 3 = 78 cm.
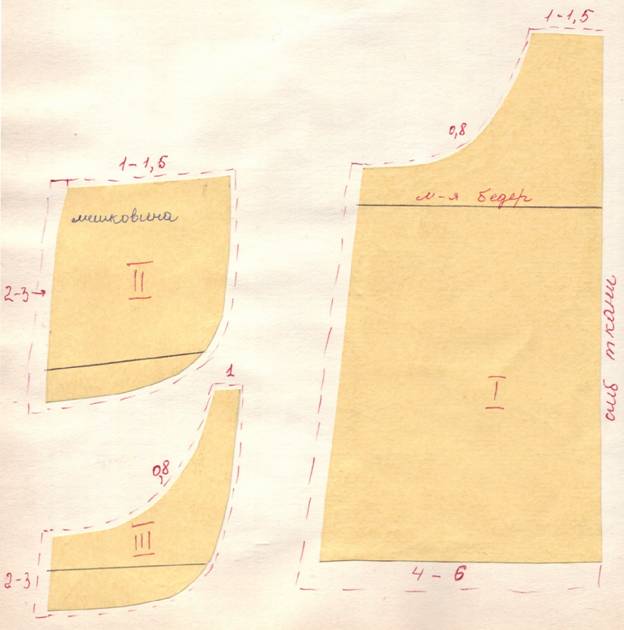
Layout on fabric:
Allowances are 1 cm at the top, 1.5 cm at the sides, 3 cm at the bottom. The grain of the fabric is marked with an arrow in the drawing.
We cut out the parts of the PP and ZP or transfer them to tracing paper.
We transfer the pattern to the fabric, taking into account the allowances.
And we begin to SEW a straight skirt.
Look very good video about how to make a straight skirt pattern directly on the fabric:
I hope it was easy for you to master all this, which means there are great prospects ahead! I wish you good luck and see you soon on the pages of the blog “Sheisomnaya.rf”
Construction of drawings and cutting of skirts
To create drawings for skirts, you need to take a few additional measurements. Tie a cord or thin elastic band along the waist line and make sure that you remain in the same position all the time, otherwise the measurements will be inaccurate.
1) waist volume 2) hip volume 3) back length 4) distance from the waist line to the floor at the side 5) distance from the waist line to the floor at the back 7) distance from the floor to the bottom edge of the skirt. Subtract the distance from the floor to the bottom edge of the skirt from the length measurements from the waist to the floor in front, side, back, i.e. determine the length of the skirt in front, side, back. When constructing a drawing for a skirt pattern, start from horizontal line skirt bottom
|
Name |
Measurements | ||
|---|---|---|---|
| Skirt straight cut with 8 darts for a figure with high hips |
Measurements: From = 37, About = 52, Length = 38 Skirt length in front to floor 100, Skirt length in back to floor 100, Side length of skirt to floor 102. 2 sides darts=0.55R=8.8 (each=4.4) front darts=0.15R=2.4 rear darts = 0.3R = 4.8 |
 |
|
| Straight-cut skirt with protruding belly |
Measurements: From = 39, About = 52, Length = 38 Length of skirt in front to floor 103, Length of skirt in back to floor 100, Length of skirt on side to floor 101. from the floor to the bottom of the skirt= 35 R=(OB+2)-(FROM+1)=54-40=14 2 sides darts=0.4R=5.6 (each=4.4) front darts=0.25R=3.5(2 and 1.5) rear darts = 0.35R = 4.9 |
 |
|
| Straight-cut skirt with 10 darts for a figure with a narrow waist |
Measurements: From = 33, About = 52, Length = 38 Length of skirt in front to floor 100, Length of skirt in back to floor 100, Length of skirt on side to floor 101. from the floor to the bottom of the skirt= 35 R=(OB+2)-(FROM+1)=54-34=20 2 sides darts=0.25R=5 (each=4.4) front darts=0.2R and 0.15R (4 and 3) back darts = 0.2R = 0.4 each |
 |
|
| Skirt with figured darts |
Measurements: From = 37, About = 52, Length = 38 Length of skirt in front to floor 100, Length of skirt in back to floor 101, Length of skirt on side to floor 101. from the floor to the bottom of the skirt= 35 R=(OB+2)-(FROM+1)=54-38=16 2 sides darts=0.35R=5.6 front darts=0.35R=5.6 rear darts = 0.3R = 4.8 |
 |
|
| 5 | Straight-cut skirt with 8 darts for a figure with protruding buttocks |
Measurements: OT-35, OB-52, D sp- 38 R =(OB+2)-(OT+1)= 54-36= 18. The size of the side dart solution = 0.35R = 6.3. The size of the front dart opening is 0.15R=2.7. The opening size of the two rear darts = 0.5R = 9 (each = 4.5). |
 |
| 6 | Half-flared skirt |
 |
| Name and style | Cut | ||
|---|---|---|---|
|
4-seam skirt with welt
|
 |
 |
|
| Skirt with curly pleats |
 |
 |
|
| Skirt with one-way pleat at the back. Front dart creates a pocket |
Sewing: Pocket burlap is sewn to the upper and lower hems. A finished leaf 4 cm wide is sewn to the bottom line of the capman. Pocket line m.b. straight or somewhat convex, i.e. curly |
This style of skirt can be cut without a side seam. Make a one-sided fold on the back. Along the shaped line of the front we make an undercut on the fabric. |
|
|
Skirt fantasy. shaped line forms a pocket |
Sewing: the canvas and the cutting part are basted to the shaped line of the 2nd part. Everything is attached to the car together. Then we turn the undercut part right side out and iron it. Then we sew the 2nd piece onto the 1st piece using finishing lines. Lastly, we sew the burlap of the pocket. The 2nd part is sewn with these lines and the 2nd part is partially adjusted to the 1st part using the same lines. Make 6-7 lines at a distance of 0.5-0.7 cm. The direction of the lines alternates to the right and left. |
|
|
|
Skirt with flaps
|
|
 |
|
|
Skirt with figured stalemate and drapery
|
|
Sewing:Lay the drapery. process the stalemate with undercut facings. Place the pattern on the bottom of the skirt, baste, topstitch and iron. |
|
|
Vera-pleated skirt
|
 |
 |
|
|
Skirt with pockets and pleats
|
  |
 |
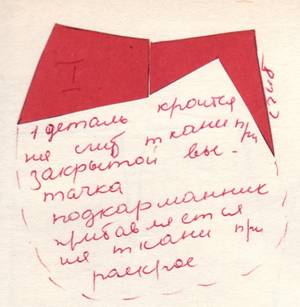
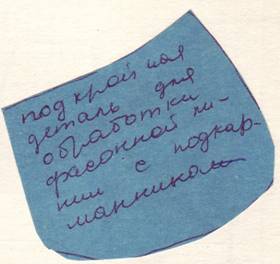
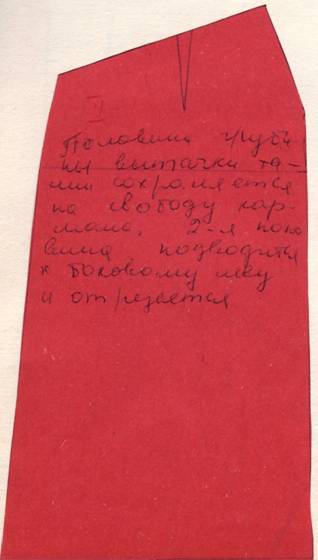
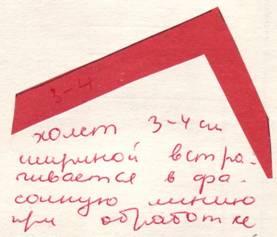

 1
1
Styles, drawings and cuts of skirts |
|
|---|---|
|
Skirt with asymmetrical one-sided pleats |
|
|
Cut |
|
 |
|
 |
|
|
Draped skirt |
|
|
|
|
 |
|
|
Skirt with one-sided pleat that goes into a pocket |
|
|
The model is developed on the basis of a straight skirt in an unfolded form. apply a shaped line and a fold line. When cutting, add 6-10 cm to one side fold. Sewing. stitch up the darts. Under top part put a pocket lining fabric and work the loop. Stitch the pocket facing to the fold stock, then stitch the pocket facing to the fold stock, then turn the facing to the front side of the skirt, baste and stitch all 3 layers on top at once. turn out the toe, release the piping, add a finishing stitch. Place the piece with the pocket facing on the front of the skirt and stitch along 1/3 of the length of the fold. Sew the inner seam of the fold and finish the fastener. |
|
|
Cut |
|
|
|
|
Skirt with zipper and one pocket |
|
|
The model was developed on the basis of a drawing of a straight skirt in an unfolded form. Instead of a fastener, it is made at the location of the right front dart. Sewing Finish the top of the flap with a trim piece made of finishing fabric with a lining, and stitch the skirt onto the yoke. The finishing stitch runs along the pocket and yoke. Process both sides for fastening. Make loops. Hem the bottom. |
|
|
Cut |
|
|
| Style | |||
|---|---|---|---|
| Two-seam suit skirt |
Notes: the line of the side cuts can be shifted both towards the rear and towards the front panel. it can also pass through the middle of the mesh width. For small sizes, the latter option is recommended. Explanations for the drawing - B=(OB+2)-(OT+1) Side out=1/2 V Back dart opening=1/3B Front dart opening=1/3V |
||
| Skirt with a large difference between hips and waist circumference |
|
||
| Skirt with lots of pleats |
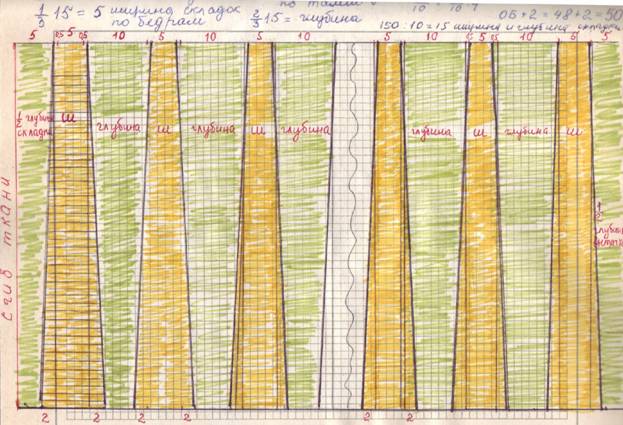
Number of folds - 20 Waist fold width-OT/10=40/10=4 1/3x15=5 width of the folds along the hips 2/3x15= depth 150:10=15 - width and depth of the fold Panel width 50x3=150 The skirt is drawn on the fabric |
|
|
| Cut skirts with lots of pleats | |||
 |
|||
| Flared two-seam skirt | Place the patterns with their centers on the folded fabric with the right side inward. Prips are given for the seams and for the hem of the bottom. The bottom allowance is 4-6. Side seam 2-3 and waist 1 cm |
 |
|
| Cutflared two-seam skirt | |||
 |
|||
| Skirt with bow fold from the side |
From the middle of the panel along the waist line we set aside a segment equal to (OT/4=38.4=9.5). From the resulting point to the bottom, a cutting line is drawn parallel to the line of the middle of the front. The front dart is brought to this line. Fabric consumption for a width of 75-80 - 3 skirt lengths +10-15 cm. With a width of 90-100-2 lengths +20 cm. With a width of 1.4 1 length + 10-15 cm (if hip circumference<=50см) |
Uncover The pattern is cut along the cut line into 2 parts. The 1st piece is placed from the middle of the folded fabric along the fold. The 2nd part is moved away from the 1st to a fold depth of 12-16cm. The depth of the fold along the bottom line decreases on each side by 1.5-2 cm. |
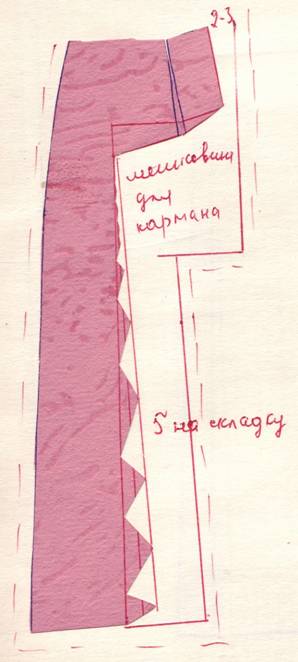
|
| Skirt with welt pockets |
1.4- 1 length + 20-25 cm Sewing: The pocket burlap is attached right side to the front side of the skirt and basted along the main piece and turned with a 0.8cm wide seam. Turns right side out. the seam is swept out to form an edge 0.2 cm wide and ironed. After which it is delayed |
|
|
| Skirt cut with welt pockets | |||
 |
|||
| 6 | yoke skirt |
 Coquettes come in different shapes: straight, oval, curly, etc. The width of the yoke is determined in relation to the length of the side cut. The yoke can be stitched or applied (the yoke is fitted onto a panel or the panel onto a yoke. The edge of the yoke is trimmed with stitching, edging, lace, frill, flounce, braid. Coquettes come in different shapes: straight, oval, curly, etc. The width of the yoke is determined in relation to the length of the side cut. The yoke can be stitched or applied (the yoke is fitted onto a panel or the panel onto a yoke. The edge of the yoke is trimmed with stitching, edging, lace, frill, flounce, braid. |
 |
| Skirt cut with yoke | |||
 |
 Fabric consumption: 75-90- 2 lengths + 15-20cm
TAILORING SKIRTS
1) Snares are laid along the contour lines. the middles of the panels are marked with interfacing stitches, and the darts are swept away. The side sections previously pinned together with pins are swept away. On the left side, the seam does not reach the upper cut by 16-20 cm, where the fastener will be processed. A karsage braid or belt is basted to the upper cut. Fitting is done.
2) The darts are sewn down, at the end the line is folded to nothing and processed in this place. Slack fabrics are ironed. Darts can be cut or uncut. Sometimes they turn into soft folds or are replaced by tucks, pleats, undercuts, and raised seams. Darts are basted from the center to the cut and ground from the waist down. In thin and soft fabrics, the darts are ironed towards the middle. In dense, thick fabrics, iron on both sides of the seam. Darts that turn into soft folds are stitched first along the length, and then at an angle to the fold. Folds are swept from the fabric line to the hips and ironed with fabric soaked in water with the addition of vinegar (for 1 glass of water, 1 tablespoon of vinegar)
| Name | Description and tailoring | ||
|---|---|---|---|
| Flared skirt - half sun |
Before sewing a sun or half-sun skirt, you must take into account that you cannot cut fabric with pile, as well as fabric with a one-sided pattern. from checkered fabric, the pattern does not match; in pile fabrics it will shine. Before cutting, you need to check whether the drawing matches. In a finished skirt, the bottom sometimes stretches unevenly. This can be avoided this way: the cut fabric needs to be folded 6-8 times. Pin a piece of fabric to the folded skirt and place tension weights inside. drawn out irregularities are leveled out during fitting.
|
 a blue line is drawn if the skirt is one-seam a blue line is drawn if the skirt is one-seam |
|
| Flare "sun" | Clasp processing The front and back panels are cut out with an allowance for processing the fastener along the left side sections, 16-20 cm long, 3-4 cm wide. An edge or filler is placed on the fold of the upper part of the fastener on the wrong side, equal in length to the fastener + 2 cm, width 1. 5-2 cm and stitched at a distance of 0.2 cm from the edge. The cut of the allowance is edged. To process the lower part of the fastener, a facing is cut out of lining fabric to match the top of the skirt with a length equal to the length of the fastener +2 cm. The facing is applied right side to the front side of the allowance and stitched. The free edge of the facing is folded 0.5 cm and sewn along the wrong side with a seam of 0.2 cm. The allowance for fasteners is secured at the end with 2-3 transverse stitches |
 |
|
| Bell(with one seam) |
You can use fabric with a checkerboard pattern. Consumption - 2 lengths. for those who are full, the length of the product from the bottom and along the waist line is adjusted |
 |
|
| Six blade |
OT=76, OB=104, (OB+4)/6=108/6 |
 |
|
| Six-blade GODET |
|
||
Skirts with yokes
Yokes in skirts can be on both the front and back panels. They are distinguished by length and by the design of the cutting line - the connection with the main part of the panel. It is important to know that a small yoke on a skirt elongates the figure, while a large one shortens it.
If possible, darts along the waist line should be moved to the cutting line of the yoke, so it is better to draw it through the tops of the darts. If the yoke line is located above the ends of the darts, then their upper part is closed, and the remaining part is included in reliefs, folds and other design lines. If the yoke is located below the dart line, then they are either kept or extended to the cutting line.
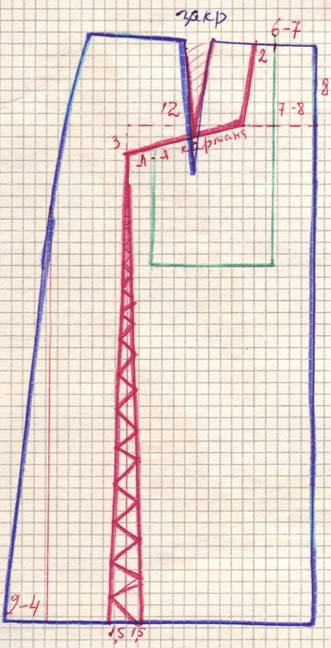
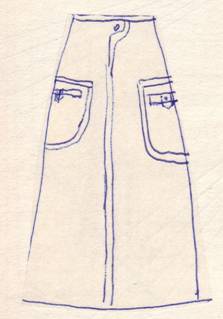
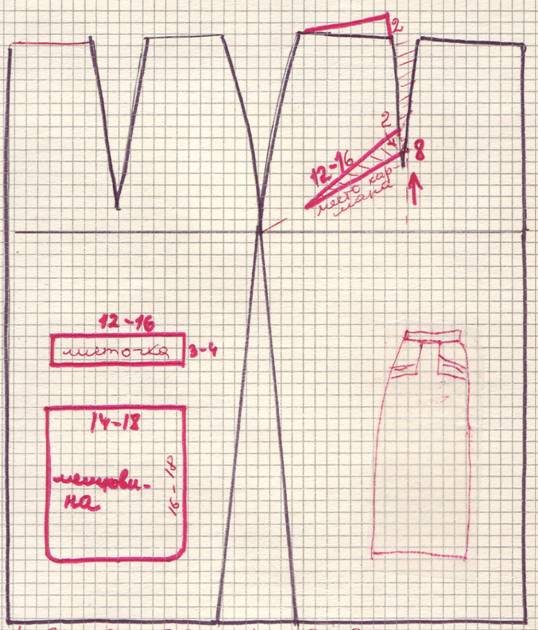
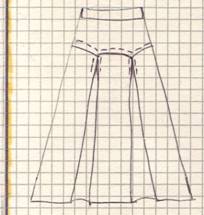
Skirt model with a trimmed yoke (at 14-18 cm) along the hips(Fig. 1)
Upper edge of front and rear panels skirts with trim yoke laid in small folds 4 cm deep each. There is a button closure in the middle of the front yoke and the front panel of the skirt.
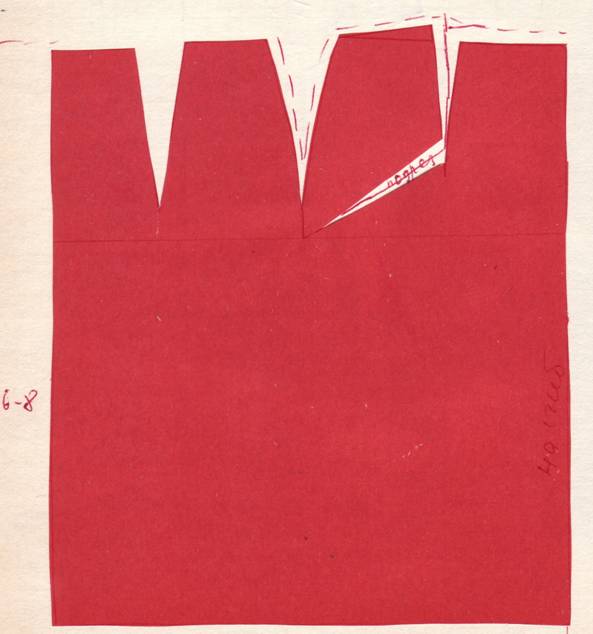
A yoke line is applied to the pattern of the front panel of the skirt (Fig. 2). The dart is extended to this line. The lower part of the front panel is cut off along the yoke line. The dart on the yoke of the front panel is closed, bringing its sides closer together, but not overlapping them. The upper and lower edges of the yoke are decorated with smooth lines. Along its lower edge, control marks are marked for the location of the folds of the front panel of the skirt. At the level of these marks, the pattern is moved apart by the depth of the folds (4 cm for each). From the middle of the front half of the yoke and the front panel of the skirt, set aside the size of the half-skirt under a 4 cm wide fastener (Fig. 3)
A yoke line is applied to the pattern of the back panel of the skirt. It passes through the lower end of the dart. The lower part of the back panel of the skirt is cut off along the yoke line. The dart is closed by bringing its sides closer together. The upper and lower edges of the yoke are decorated with smooth, rounded lines. Along the lower edge of the yoke, mark the location of the folds of the back panel of the skirt. At the level of these marks, the pattern is moved apart by the depth of the folds (4 cm each).
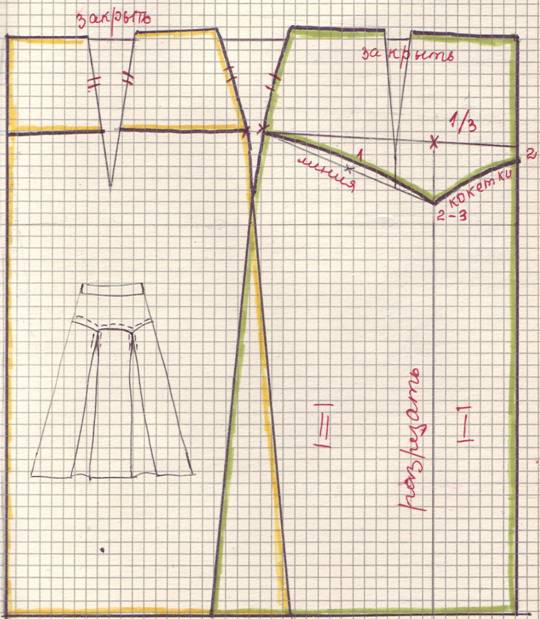
Model of a skirt with a detachable yoke (Fig. 4)
At the front, the yoke is designed with an extension in the center, at the back it is parallel to the upper section of the skirt. On the front panel in the middle of the front there is a counter fold, and at the level of the darts there are one-sided folds. On the back panel of the skirt at the level of the darts there are one-sided folds.
A yoke line passing through the lower end of the dart is applied to the pattern of the front panel of the skirt (Fig. 5). The pattern is cut along the yoke line. Then close the dart on the yoke of the front panel of the skirt, bringing its sides closer together, but not overlapping each other. The upper and lower edges of the yoke are decorated with smooth lines.
On the pattern of the lower part of the front panel of the skirt, mark the line for the location of the fold. The pattern is cut along the intended line and moved apart to the depth of the fold (from 8 to 14 cm). From the middle of the front panel of the skirt, set aside the depth of the counter fold in the center (from 8 to 14 cm). The folds are laid in a given direction and accordingly form the upper section of the front panel of the skirt (Fig. 6),
A yoke line parallel to the top cut is applied to the pattern of the back panel of the skirt. The yoke is located above the end of the dart. The pattern is cut along the yoke line. The upper part of the dart is closed, shaping the upper and lower edges of the yoke with smooth rounded lines, and the remaining part is included in the fold from the lower end of the dart on the back panel of the skirt. Along the intended fold line, the part is cut and moved apart to the extent of its depth (from 8 to 14 cm). The fold is laid in a given direction, taking into account the depth of the remaining part of the dart, and the upper cut of the back panel of the skirt is formed.
Along the lower cut of the front and rear panels, a slight flare is given (2-3 cm) and the lines of the side seams and the bottom of the product are drawn accordingly.
Skirt model with a detachable yoke of a complex oval shape at the front and back (Fig. 7)
Model skirts with detachable yoke complex oval shape front and back. The front and back panels of the skirt are lined with soft folds coming out from under the yoke. The skirt is tapered. A yoke line is applied to the pattern of the front panel of the skirt (Fig. 8). The lower end of the dart is extended to this line. On the lower part of the front panel of the skirt, three parallel lines are drawn parallel to its middle. The pattern is cut along the yoke line. Close the dart on the yoke of the front panel of the skirt, bringing its sides closer together, and use smooth lines to decorate the upper and lower edges of the yoke. On the pattern of the lower part of the front panel of the skirt, cuts are made along the marked lines, the pattern is moved apart by the amount of fold opening (from 4 to 10 cm), while the lower cut is left unchanged. Then the upper and lower sections of the front panel of the skirt are decorated (Fig. 9).
Skirts with frills
Frill skirt designs are built by converting the drawing of the straight skirt base. The ruffle sewing lines are applied to the base pattern and decorated depending on whether they are sewn with or without gathering.
|
Fig.1. Skirt with frills at the bottom. |
Rice. 2. Skirt stitching line. |
Fig.3. |

The skirt is straight, tight-fitting at the hips with a frill at the bottom. On the pattern of the front panel of the skirt, stitching lines for the gathering are applied (Fig. 2) and the pattern is cut along it. Then the pattern of the lower part of the skirt is divided into 5 equal parts, drawing four lines parallel to the middle of its front panel, cut and moved apart to the required size depending on the style - 5-15 (Fig. 3). The back panel of the skirt is built in a similar way.
Skirt with undercuts and frills on the side
The skirt is straight, tight-fitting along the hips, with raised lines at the level of the darts in the front and back. The side parts at the bottom are decorated with undercuts with frills.
Lines of reliefs and undercuts are applied to the pattern of the front panel of the skirt (Fig. 2). Relief line. parallel to the middle of the front panel of the skirt, begins at the level of the end of the dart and continues to the bottom. On its side there is a line for fitting the frill. Then the lower part of the frill is divided into 4 equal parts and three lines are drawn parallel to the middle of the front panel. The pattern is cut along the relief line (Fig. 3), taking into account the depth of the dart opening, and along the line by stitching the frills. To obtain a frill, the lower part of the skirt is cut into four parts and moved apart to the required amount depending on the style (by 5-15 cm).
The back panel of the skirt is constructed similarly to the front.
A skirt with complex cuts - with yokes from the side seams, turning into relief lines, and three gathered frills from under the yokes on the side parts.
|
Fig.1. Skirt with complex undercuts and frills on the sides |
Fig.2. Drawing complex cutting lines |
Fig.3. Expanding the drawing of a skirt pattern with complex hems |
Fig.4. Expanding the drawing of a skirt pattern with complex hems |
A complex undercut line is applied to the pattern of the front panel of the skirt (Fig. 2). Then parallel to the bottom of the skirt draw lines for stitching the frills and then parallel to the middle of the front - lines dividing the frills into three equal parts. The pattern is cut along the line of the complex undercut, and then the contours of the upper, middle and lower parts of the frills on the side of the skirt are transferred from the pattern to another sheet of paper. Each of the frills is moved apart by the size of the gather - from 5 to 15 cm (Fig. 3 and 4).
The pattern for the back panel of the skirt is similar to the pattern for the front panel, with minor changes. The complex raised undercut line is located here close to the end of the dart. Therefore, it is advisable to close the latter, and extend its end to the relief line, thereby placing the dart in the relief line at the level of the yoke. If the width of the fabric allows, side seams on gathers should not be made.
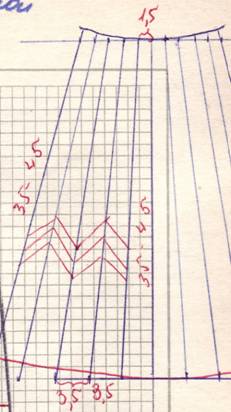
Three small unpressed pleats emerging from a slanted, slightly curved dart create a draped effect.
The direction lines of the drapery folds are applied to the pattern of the front panel of the skirt (Fig. 2). The pattern is cut along the marked lines and spread to the desired size. The distance between the folds should not be the same: between the first and second it is approximately 3.5-4 cm, and with each subsequent one it decreases by 0.5 cm compared to the previous one (Fig. 3).
Model 2 (Fig. 4)
Skirt with asymmetrical drapery along the front panel.
With asymmetrical drapery, the pattern of the front panel of the skirt is made in full size. Drilling can be placed from the waist line to the hip line and below. If it passes below the hip line, then for greater elegance the skirt is tapered at the bottom along the side seams by 2-3 cm on each side. On the pattern, mark a cutting line along which the folds of the drape will be located (Fig. 2). It is not advisable to place them at the extreme points of the cutting line; it is necessary to retreat 2-3 cm. From the cutting line to the side seam, draw lines that determine the direction of the folds.
First, cut the pattern of the front panel of the skirt along the hem line (Fig. 3) and close the dart on its left side, and then along the intended drapery lines. The width of the folds ranges from 3.5 to 4.5 cm.
The back panel of the skirt is left unchanged.
Model Z (Fig. 4)
Softly draping wrap skirt along the front cloth
The pattern for the front right panel of the skirt is made in full size. Mark the undercut lines (Fig. 2) along which the folds of the drapery will run. These lines run from the side seam to the bottom of the skirt to the dart at the waist at a distance of 5-6 cm from each other. According to the style, mark a rounded bottom line.
Along the marked lines, the pattern of the right front panel is cut and spread to the accepted size (Fig. 3) - from 10 to 15 cm.
The left front panel of the skirt is left unchanged, that is, with darts at the waist. The rear panel is also left unchanged.
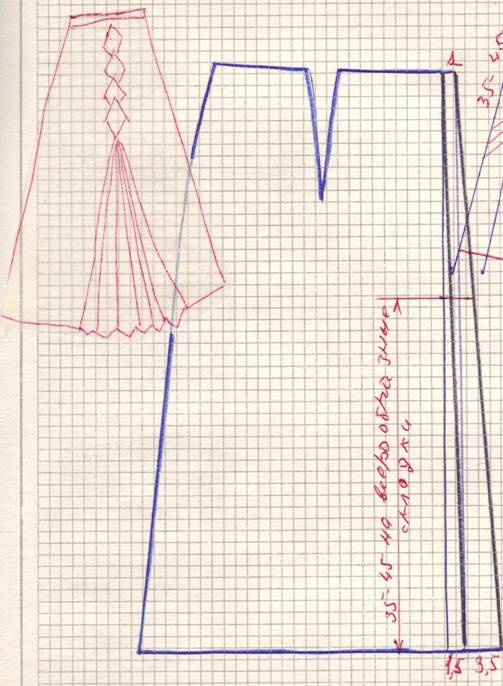
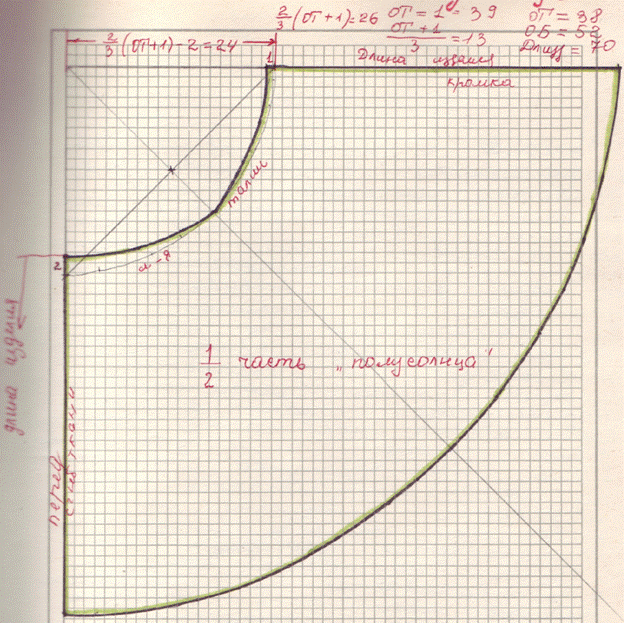
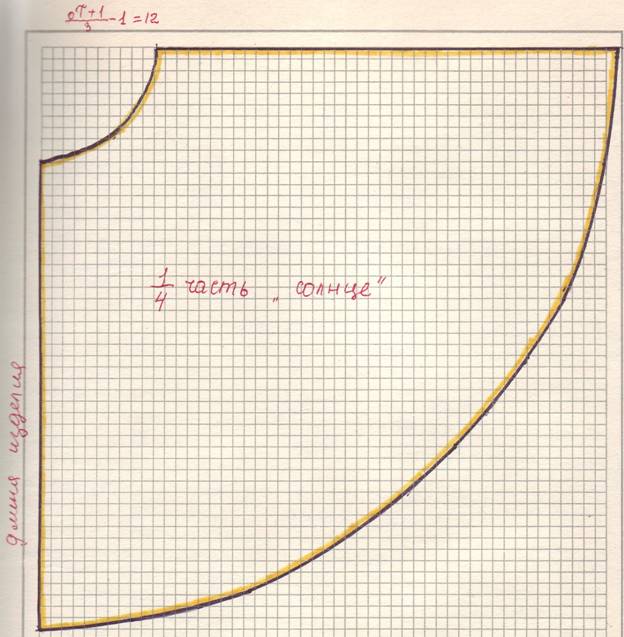
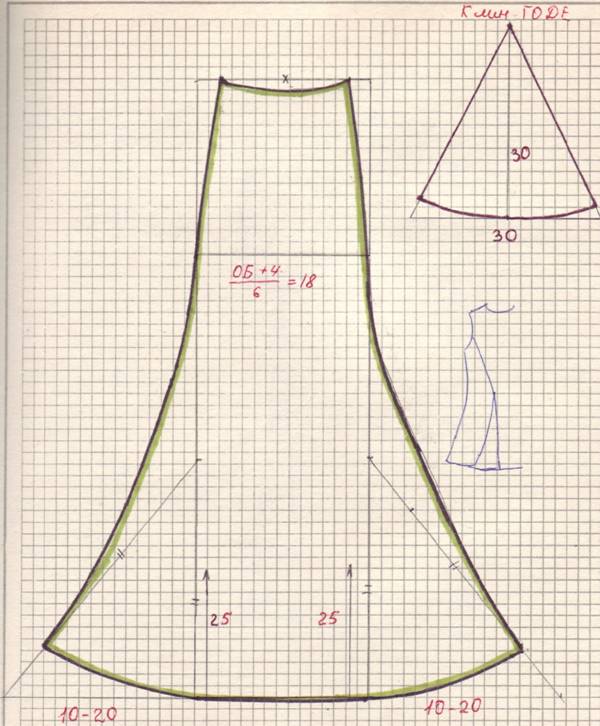
Building the design of conical skirts
BUILDING THE DESIGN OF CONICAL SKIRTS
Conical include flared, “sun” and “half-sun” cut skirts - flared, “bell”.
The principle of constructing patterns for such skirts is the same:
When constructing a drawing, the level of the waist, hips and bottom lines is determined from point O down vertically. In this case, the distance from point O to the waist line is chosen depending on the designed shape of the skirt, when OT=K*St, where St is the half-circumference of the waist, and K is a coefficient characterizing the curvature of the upper section of the skirt. For conical skirts, K is: for sun cut - 0.32; half-sun - 0.64; large bell - 0.8; average -0.9; small - 1.0; large flare - 1.2; flare - 1.4.
Depending on the model, the skirt can be single-seam or two-seam.
When constructing a sun skirt pattern, a point O is placed in the middle of a straight horizontal line (Fig. 1) and a segment is laid to the right of it:
OT=0,W2(St+Ft).
From point O with a radius equal to OT, draw a semicircle T, T1, T2 - the waist line of the skirt. From point T, a segment TN is drawn off - the length of the skirt, and from O with a radius equal to OH, an arc HH1H2 is drawn along the bottom line of the skirt
Due to the fact that the grain of the fabric runs along the H1H2 line, the oblique part of the skirt will be located on the OH line. To protect it from stretching, adjust the bottom line: set aside 4 cm from H and place point H1’, and measure 2 cm from T up and get point T1’. The waist line is drawn through points T1, T1’ and T2, and the bottom line is drawn through H1, H1’ and H2 (see Fig. 1).
When constructing a drawing of a half-sun skirt, draw a right angle with the vertex at point O on a sheet of paper (Fig. 2). A segment FROM is laid down from it:
OT=0.b4(St + Fri).
An arc is drawn from O with radius OT until it intersects with the second side of the right angle at point T1. A segment TN equal to the length of the skirt is measured on it, and a bottom line is drawn with a radius of 0H.
On the pattern of the oblique part of the skirt, the hem line is reduced by 3.5 cm and the waist line by 1.7 cm in order to protect this part of the skirt from stretching.
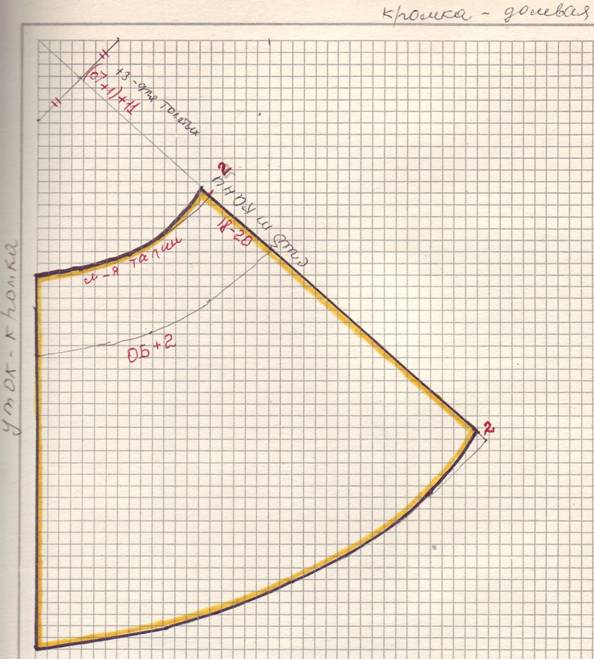
When constructing a drawing of a skirt, the bell in the middle of the horizontal line marks point O (Fig. 3). To the right of it, depending on the model, segments are laid:
OT1=0.8(St+Pt) - for a large bell;
OT2=0.9(St+Pt) - for average;
0T3=1 (St+Pt) - for small.
A semicircle is drawn from point O with radius OT1. From T1 along the curve, the measurement of the half waist circumference (St) is plotted and point T1’ is placed. A straight line is drawn through points O and T1'. From T1’, the segments T1’B1’ and T1’H1’ are measured horizontally:
T1B1 = Dts/2,
and T1H1 is the finished length of the skirt.
From point O, as from the center, lines of the hips and bottom are drawn with radii OB1 and OH1.
Drawings of medium and small bell-cut skirts are constructed in the same way.
On the oblique part, the dimensions are reduced along the bottom line and waist: for a large bell along the lower cut - W and along the waist - 1.5 cm; medium - 2.5 and 1.25 cm, respectively, and small - 2 and 1 cm.
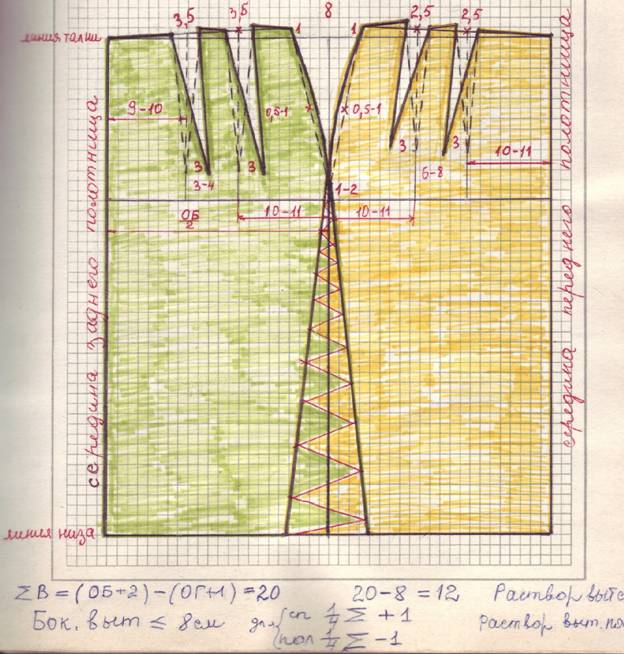
For skirts, the degree of flare of which is determined by a coefficient of 1.2-1.4, the drawings are constructed similarly to the previous one. However, for figures with a thin waist and large hip circumference, the width of the skirt along the beler line may be insufficient - less than the Sb measurement. In such cases, when constructing a drawing, it is necessary to check the length of the arc along the hip line (Fig. 4). If she less than the value Sb + 2 cm, then it is extended by the missing amount and point B is placed. From O through the resulting point B, a straight line is drawn until it intersects with the arcs from T1 and H1 at points T and H. As a result, the width of the skirt along the waist line will be greater than the designed one . If the excess exceeds 1.5 cm, then it is removed into one or two darts, located either in the sections of the skirt or in regular places.
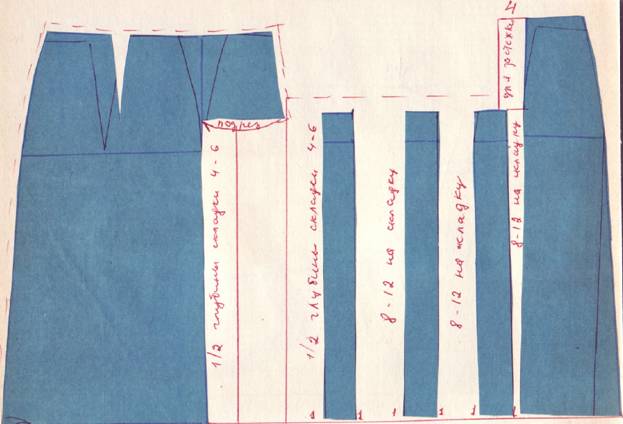
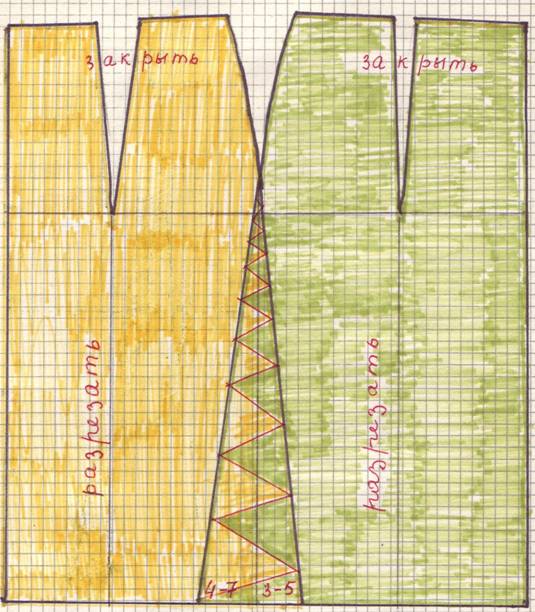
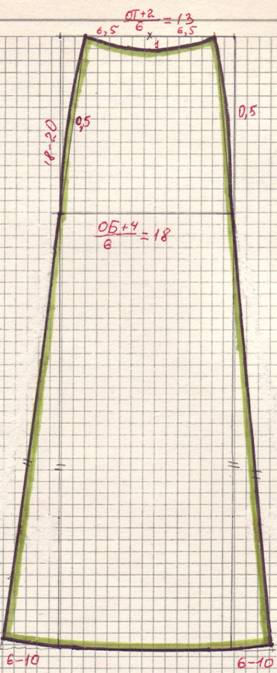
SKIRT TAPERING TO THE BOTTOM
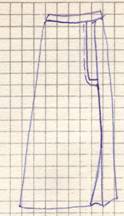
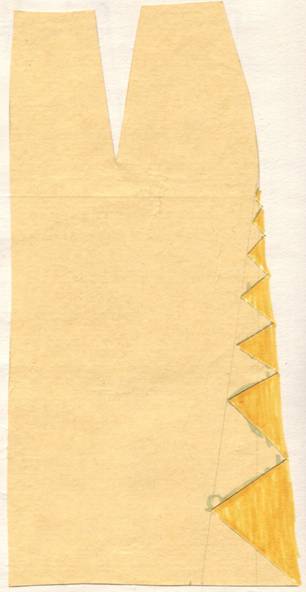
In Fig. 5 shows a skirt with a yoke, tapering downwards. In order to make a pattern for such a skirt, style lines are applied to the main pattern of a straight skirt with six darts. This is done as follows (Fig. 6a). The middle of the front from the waist to the hip line is divided in half. Then the distance from the division point to the hip line is also divided in half. From the top dividing point (the distance from the waist to the hips) to the left at a right angle to the mid-front line, 4 cm is set aside. The end of the front dart is connected to point 4 and then to the lower dividing point on the mid-front line. Along the bottom of the skirt from the middle front to the left, place 6-10 cm. Points 6-10 and the lower division point on the line of the middle front are connected. The shaded part of the pattern is cut off, the dart is closed and, if provided for by the style, cut along the line. style.
Laying out the pattern on the fabric(Fig. 6 b). When cutting, make the following seam allowances (in cm): along the waist line - 1, along the gray
A product such as a narrow straight skirt made of wool or some other dense fabric is always relevant. Depending on the fashion, it can be worn in combination with a blouse or jumper.
1:923 1:933

3:9
Based on the drawing of a classic skirt, you can make patterns for all straight skirts(with tucks, wraparound, pleated, pleated, corrugated, yoke, embossed, etc.).
3:331Therefore, the basis of a skirt is the very first thing you need to learn if you want to succeed in cutting and sewing.
3:539 3:549To construct the base of the skirt you will need the following measurements (in cm):
See how to take measurements correctly
PoT (38);
PoB (53);
Du (72);
Dp (70);
Ds (71);
DST (42).
It is also necessary to make increases for a loose fit (in cm):
3:983- PT (this is an increase along the waist line) - 1 centimeter;
- PB (this is an increase along the hips) - 2 centimeters.
Let's start building the base of the skirt:
3:1285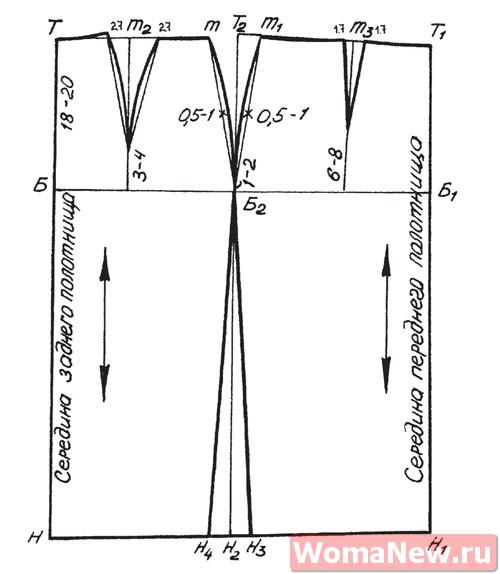
4:9
- We start from the line of the middle of the rear panel. Skirt base
Place a point T in the upper left corner of the sheet. Draw a vertical line down from it.
4:304 4:314- Bottom line. Skirt base
For the bottom line, from the T point along the line in the middle of the back panel, set aside a segment that is equal to the length of the skirt at the back from the waist. Label the resulting point with the letter H and draw a horizontal line from it to the right.
4:766 4:776- The next step in constructing the base of a straight skirt: the hip line
To do this, from point T in the middle of the back panel, set aside a segment, the length of which should be equal to half the length of the back to the waist, and you need to subtract 1 cm (in this case, 21 cm). Label the resulting point with the letter B and draw a horizontal line from it
to the right.
- The line of the middle of the front panel. Skirt base
Now, from point B along the hip line, we will set aside a segment equal to the half-circumference of the hips with an allowance for freedom of fit along our hip line.
4:249Place point B1 and draw a vertical line through it. At its intersection with the bottom line, place point H1. Up from point H1, lay a vertical segment equal to the length of the front. Label the resulting point with the letter T1.
4:658 4:668- Side cut line. Skirt base
To the right of point B, along the line of the hips, you need to set aside a segment equal to half the half-circumference of the hips with an increase for a loose fit and you need to subtract 0.5-1 cm. Place point B2 and draw a vertical line through it. We will denote the point of its intersection with the bottom line by the letter H2. And from point H2 upward, set aside a vertical segment equal to the length of the skirt. Label the resulting point with the letter T2.
You can shift the line of the side cuts towards the back or front panel. But if you are going to sew a skirt of a small size or wider at the bottom, it is better that the width of the panels be the same.
4:9
- Front and rear panels. And the waist line. Skirt base
Using a ruler, connect the T points to T2 and T1.
4:217 4:227- Darts. Skirt base
The pattern of a straight two-seam skirt involves three darts.
4:393And at the same time, the sum of the dart solutions should be equal to the difference between the width of the finished product along the hip line and its width along the waist line (in this case
4:676B = (Pob + Pb) - (Pot + Pt) = (53 + 2) - (38 + 1) = 16 cm).
4:764So, the solution of the side dart should be equal to half the sum of the solutions of all darts.
4:930And to the right and left of our point T2, set aside a segment equal to half the solution (4 cm), and place points t and t1, respectively. And using a ruler, connect these points with auxiliary lines to point B2 and divide each of the resulting segments in half. From the division points, restore perpendiculars inside the darts (the length of each perpendicular is 0.5-1 cm).
4:1613Then connect t, t1 with a point located about 1-2 centimes from the hip line. You should get smooth concave lines with a bend at the points of 0.5-1 centimeter.
4:301The back dart opening should be equal to 1/3 of the sum of all dart openings.
4:448And to the right of point T, set aside a horizontal segment equal to 1/4 of the half-circumference of the hips and minus 2 cm (that is, 11 cm). Label the resulting point t2. Down vertically from this point, draw an auxiliary line to the line of your hips, and to the right and left of it set aside 2.7 cm (half the dart solution). Use a smooth concave line to connect the points 2.7 centimes. with a point located approximately 3-4 centimeters above the hip line.
4:1225The opening of the front dart should be equal to 1/6 of the sum of the openings of all darts.
4:1370To the left of point T1, set aside a horizontal segment equal to 1/4 of the half-circumference of the hips and minus 1 centimeter. Place point T3 and draw an auxiliary line from it to the hip line. Set aside 1.7 cm to the right and left of point T3 (half the tuck solution). Connect the resulting points with a point located 6-8 centimeters above the hip line using a ruler.
4:2035Side cuts. Skirt base.
If you are going to sew a completely straight skirt, the width of the back panel along your hemline should be equal to the width along your hips.
4:329You can also make the skirt a little wider. In this case, the width of the back panel of the skirt along the bottom line should be 2-6 centimeters greater than the width along the hip line.
4:637 4:647Guided by this rule, place point H3 at a distance of 2-6 centimes. to the right of point H2 and connect it to point B2 using a ruler (in the case of a straight skirt, connect point B2 to point H2).
4:1003The width of our front panel along the bottom line of our straight skirt should also be equal to the width along the hip line, if slightly wider, 3-4 centimeters more. To the left of point H2 along the bottom line, set aside 3-4 cm, place point H4 and use a ruler to connect it to point B2.
4:1522The top section of the base of the skirt. Skirt base.
Design it with a slight bend with the dart closed.
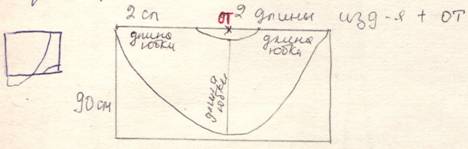
4:192If the width of the fabric you choose is 140cm, One skirt length plus 5-8 centimeters will be enough.
With fabric width 80-100 cm you will need two skirt lengths and another 10-15 cm.
Fold the material lengthwise with the right side facing inward. Lay out the patterns of the back and front panels with the middles facing the fold of the fabric
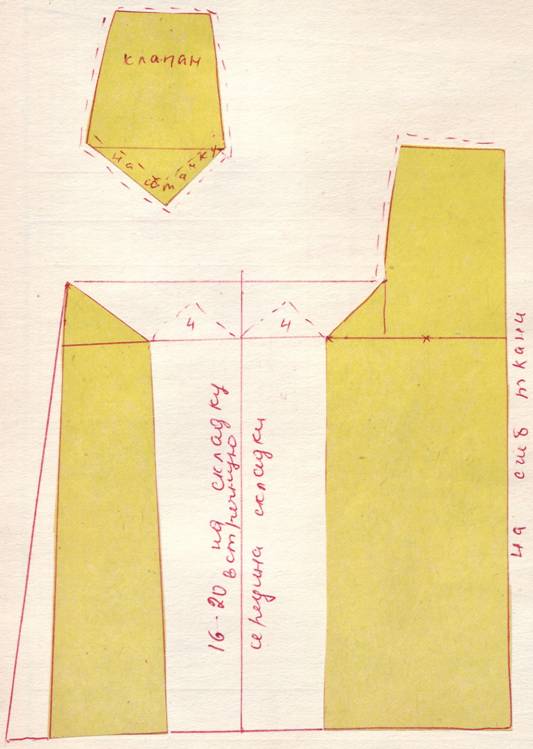
Make seam allowances and hem allowances. Please note that the clasp (16-20 cm) should be located on the left side.
Mark the darts on the seam allowance at our top edge with vertical lines. Place a copy stitch along the contour lines of the pattern.
Cutting a straight two-seam skirt:
cutting details:
a - rear panel;
b - front panel, respectively;
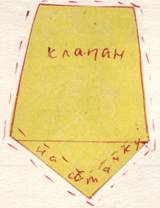
c - an extra allowance to decorate the top edge with corsage braid.
Mark the middle of the front and back panels with slip stitches. Then baste the darts. Pin the side sections together and sweep them away. At the same time, of course, do not forget that on the left side you need to leave 16-20 cm for the fastener.
5:832Baste a corsage braid to the top edge (you can use a belt). After the first fitting, any changes in fit should be noted. Stitch the darts. At the end, bring the stitches back to nothing and press up the resulting slack in the fabric.
5:1237Stitch and overcast the side seams. After this, process the fastener and the top edge, and hem the bottom. Then iron the garment and sew on the hooks and loops.
5:15165:9 5:13 5:23
Watch a short video from designer Olga Nikishicheva on how to sew a straight skirt with your own hands without a pattern.
5:2335:241 5:251
I'll try to explain using my own standards
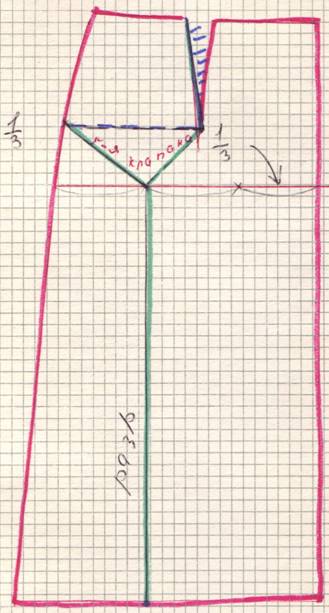
In order to create a pattern for a straight two-seam skirt, you will need the following marks:
- PO (half waist); i.e. measure the waist and divide by 2. (I have a girth of 80cm, I divide it by 2 = 40cm)
- POb (half hip circumference); i.e. measure your hips and divide by 2. (my hips are 96cm, divided by 2 = 48cm)
- Du (length of the skirt from the waist to the side); (perhaps 50cm)
- Dp (length of the skirt in the middle of the front); (I'll ignore it)
- Ds (length of the skirt at the back); (I will ignore)
- Dst (back length to waist). (I will ignore)
And allowances for loose fitting:
- Fri (increase along the waist line) = 1 cm;
- PB (increase along the hip line) = 2 cm.
Construction of the basic mesh for the skirt drawing.
The grid consists of 3 horizontal and 5 vertical lines.
Horizontal lines: waist, hips and bottom.
Vertical lines: middle of the back panel, middle of the front panel, side line, back dart line, front dart line.
Let me explain: My grid width (where it says “hip line”) will be equal to the half circumference of the hips 48+1 or 2 cm (I will indicate 2 cm) = 50 cm
The width of the rear panel (in the drawing on the left) will be equal to BB2 = (Pob + Pb)/2 – 1 cm = ... cm. I have 48 + 2 divided by 2 and subtract 1 cm = 24 cm
Accordingly, the front (in the drawing on the right) is 50 cm (my half hip circumference + 2) -24 = 26
The front panel of the skirt is made wider so that the side seams do not go forward, but go slightly back.
The distance from the waist line to the hip line is usually 18-20 cm, I make 20 cm in all patterns and don’t bother with formulas
That is, we got 4 rectangles on the grid, 2 small (top) and 2 large (bottom)
We determine where our darts will be. It's very simple - these lines go exactly in the middle of each small rectangle. I hope it's clear by now
Now the skirt itself, the back panel of the skirt is highlighted in blue, and the front panel is highlighted in red. The lateral line runs along one straight line
We calculate the darts (the hardest part, at least it took me a long time to figure out...)
The side dart (in the drawing in the middle of the mesh) is calculated (Sb + Pb) – (St + Pt)/2,
I decipher (half hip circumference + increase) - (half waist circumference = increase) I get the following example: 50-41 = 9 divided by 2 = 4.5 cm
That is, the distance from T3 to T4 is 4.5 cm
The back dart is equal to (you may get a different number if the measurements are not the same as mine) 4.5cm divided by 2 +1= 3.3cm
That is, the total width of the dart (its solution) is 3.3 cm, from the vertical line of the dart to the right and left along the waist line we set aside half of 3.3 cm, approximately 1.2 cm each
The front dart is calculated to be 4.5 cm divided by 2-1 = 1.3 cm
This means we set aside approximately 7-8mm to the right and left of the dart line
I also make the depth of the darts the same in all drawings, back 17cm, front 10cm.
Increased side cuts.
From points T3 and T4 we raise the perpendiculars up by 1.5 cm and place points T31 and T41.
We connect points T31 and T41 with a straight line to point B2, divide this segment in half and from the division point along the perpendicular to the left and right we set aside 0.5 cm to form a convex line in the hip area (side seam).
We draw the waist line with a smooth concave line, connecting point T31 to point T and point T41 to point T1.
If anything is unclear, ask, I’m still a teacher! My drawing looks like this (with my measurements)
On the basis of which it will be possible to then construct a drawing and make a skirt pattern of the appropriate sizes. You need to take measurements very carefully and do all measurements with great accuracy. Any measurement inaccuracy will then appear in the finished product.
As an example, calculations and construction will be made on a figure with the following measurements:
| Dimensional sign | Designation | Size(cm) |
| Half waist | ST | 38 |
| Half hip circumference | SB | 52 |
| Hip Length | db | 16-19… |
| Distance from waist to floor at side | DsB | 102 |
| Distance from waist to floor in front | Chipboard | 100 |
| Rear waist to floor distance | DsZ | 100 |
| Skirt bottom level | U | 30 |
U - level of the bottom of the skirt- measured vertically from the floor to the desired level of the bottom of the skirt. When calculating, the measurement value is subtracted from DsP, DsB and DsZ to determine the length of the skirt in each section.
Loose fitting table (CO) for the skirt
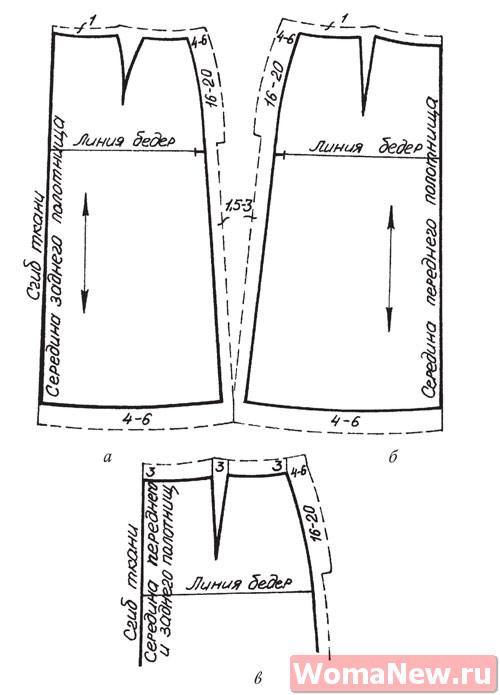
Construction of a straight skirt pattern with one dart along the front and back halves
1. Construct a right angle with the vertex at point T, from which we plot vertically:
Front length: TN = chipboard - U = 100 cm - 30 cm = 70 cm.
Length to hips: TB = Db = 18 cm.
Through the obtained points B and H, draw horizontal lines to the left.
2. Skirt width along the hips: BB 1 = SB + CO = 52 cm + 1 cm = 53 cm.
Through B 1 we draw a vertical line until it intersects with the waist line at point T 1 and the bottom line at point H 1. This straight line is the middle of the back panel of the straight skirt.
3. Length of the skirt along the back: H 1 T 1 = DsZ - U = 100 cm - 30 cm = 70 cm.
4. Front panel width:
- for a proportional figure: BB 2 = 1/2 (SB + CO) = 1/2 (52 cm + 1 cm) = 26.5 cm. Or taking into account the bulge of the abdomen 1/2 (SB + CO) + 1 cm = 1 /2 (52 cm + 1 cm) + 1 cm = 27.5 cm
- for a thin, flat figure or, accordingly, evenly full: BB 2 = 1/2 (SB + CO) = 1/2 (52 cm + 1 cm) = 26.5 cm
- for a figure with protruding buttocks, the back panel of the straight skirt should be wider than the front: BB 2 = 1/2 (SB + CO) - 1 cm = 1/2 (52 cm + 1 cm) - 1 cm = 25.5 cm
- for a figure with a strongly protruding belly, the width of the front panel is greater than the back one: BB 2 = 1/2 (SB + CO) + 2 cm = 1/2 (52 cm + 1 cm) + 2 cm = 28.5 cm
Draw a vertical line through B 2, we get points T 2 and H 2.
5. Side skirt length: H 2 T 3 = DsB - U = 102 cm - 30 cm = 72 cm.
Or, from T 2 up, set aside the difference in measurements DsB - Dsp = 102 cm - 100 cm = 2 cm.
6. To determine the side and all the undercuts of the front and rear halves of the skirt, find the difference between the measurements of SB and ST, taking into account their loose fit (SB) and then (SB + CO) - (ST + CO) = (52 cm + 1 cm) – (38 cm + 1 cm) = 14 cm
If, when calculating the total solution of the darts, we received a value greater than 14.5 cm, then to better fit the skirt on the figure, it is necessary to construct additional darts. If the amount of darts is from 14.5 to 17.5 cm, we build an additional dart at the back. If the amount of darts is more than 17.5 cm, we build another additional dart in the front. An additional dart is built between the main and side cuts.
7. Side dart solution equal to 1/2 14 cm = 7 cm. From T 3 to the right and left we put aside half of the tuck solution: 7 cm /2 = 3.5 cm.
T 3 T 4 = T 3 T 5 = 3.5 cm.
The remainder of the dart 14 cm - 7 cm = 7 cm is distributed among the darts of the back and front halves of the skirt.
8. The emphasis of the side dart either reaches point 3 or the hip line, point B 2. If the slope of the hips is large or the fabric is poorly ironed, the stop of the side dart reaches point B 2. If the skirt is without a side seam, then the emphasis is only at point 3 and above.
9. Connect straight points T 4 and T 5 with point 3, divide the segments in half and restore a perpendicular of 0.5 - 1 cm at the division point.
10. Draw convex side lines through points T 4 and 3, T 5 and 3.
In a straight skirt, the side sections below the hip line can be cut exactly in a straight line or with a slight extension downwards (up to 3 cm, symmetrically relative to point H 2). Extension downwards is desirable for full figures with a large difference in the half-circumferences of the hips and waist. In the finished product this expansion is invisible and the skirt looks straight.
11. Create an arched waist line through points T 4, T and T 5, T 1. At points T and T 1 a right angle must be maintained.
12.
This dart is placed either in the middle of the waist (segment TT 4 is divided in half) or its position is determined as 1/4 ST + 1.5-2-3 cm = 1/4 38 cm + 3 cm = 12.5 cm.
TT 6 = 12.5 cm. From point T 6, lower the perpendicular down to the hip line.
Dart solution the front panel is equal to 1/3 7 cm = 2.5 cm. From T 6 we put half of the solution in both directions.
T 6 T 7 = T 6 T 8 = 1.25 cm.
Increasing emphasis
The sides of the darts are aligned with each other on the larger side.
13.Construction of the back dart of a straight skirt.
Dart solution the back panel is equal to 2/3 7 cm = 4.5 cm. This dart is placed in the middle of the waist: we divide the segment T 1 T 5 in half, we get T 9, from which half of the solution is put on both sides.
T 9 T 10 = T 9 T 11 = 2.25 cm.
Increasing emphasis equals 3-6 cm.
Note. If there is a large deflection along the back and convex buttocks, then the sides of the waist dart of the rear panel are drawn with convex lines during fitting. If there is a convex belly along the front, the dart can be designed with concave lines.
Constructing a pattern for a straight skirt with two darts along the back
1. Calculation of the total solution of darts along the waist line:
(SB + CO) – (ST + CO) = (52 cm + 1 cm) – (38 cm + 1 cm) = 14 cm
2.Side dart solution equal to 1/2 14 cm – 1 cm = 6 cm. From point T 3 to the right and left we put aside half of the tuck solution.
T 3 T 4 = T 3 T 5 = 3 cm.
3. The remainder of the dart 14 cm - 6 cm = 8 cm is distributed among the darts of the back and front halves of the skirt.
4. Construction of the dart of the front panel of a straight skirt.
The position of the dart along the waist line is determined as 1/4 ST + 1.5-2-3 cm = 1/4 38 cm + 3 cm = 12.5 cm.
TT 6 = 12.5 cm. Point T 6 is the middle of the dart.
Dart solution the front panel is equal to 1/4 14 cm - 1 cm = 2.5 cm. From T 6 we put aside half of the solution in both directions.
T 6 T 7 = T 6 T 8 = 1.25 cm.
Increasing emphasis The waist dart is 6-8-10 cm.
5. Construction of darts for the back panel of a straight skirt.
The position of the first dart along the waist line is determined as 1/4 ST = 1/4 38 cm = 9.5 cm.
T 1 T 9 = 9.5 cm. Point T 9 is the middle of the dart.
First tuck solution equal to 1/4 14 cm = 3.5 cm. From T 9 to the right and left we put aside half of the solution.
T 12 T 9 = T 11 T 9 = 1.75 cm.
The second dart is located in the middle of the segment T 11 T 5. Point T 10 is the middle of the dart.
Second tuck solution equals 14 cm - (6 cm + 2.5 cm + 3.5 cm) = 2 cm, (where 6 cm is the side dart of the front and back halves; 2.5 cm is the waist dart of the front half; 3.5 cm is the first waist dart of the back half)
From T 10 to the right and to the left we put aside half of the solution.
T 10 T 13 = T 10 T 14 = 1 cm.
The increase in the stop of the first groove is 3-6 cm, the increase in the stop of the second groove is 6-8 cm.