Crochet cool little things patterns. Knitted things
The most family-friendly and bright spring holiday, of course, Easter. Both children and adults adore Easter cakes, krashanki, wicker baskets and clean white towels with candles. What else are we used to seeing as a symbol of Easter? Of course, chicks and hens! That is why amigurumi.com.ua offers to knit very beautiful openwork chickens. Their peculiarity is that they are not filled with padding polyester or other filler. A real or decorative egg is placed in them. So these hens and cockerels are real guardians easter eggs. Present such a surprise to mom, grandparents or children for Easter - The best decision annual gift problem. Inexpensive, healthy and tasteful!
The author of these chickens is Polish needlewoman Elzbieta Pawelec, who kindly provided the diagram for this chicken.
To create it you will need thin cotton and a No. 1 hook (I used Madame Tricote Almina). The wings and tail can be decorated with iris different colors. Imagination when creating such Easter decorations is only welcome! Happy knitting!
Hen
1st row: cast on 3 ch, and in the third row from the hook we knit 16 dc. Try to make sure that the hole is not visible after knitting the loops of the first row. But at the same time, the dc should not lie on top of each other. Everything should be as neat as possible, because this is the top of our chicken. Connect a row of ss, and make sure that there are exactly 16 loops.
Rows 2-4: sc in circle. Please note that we knit only the first row with dc, then with sc.
5th row: 9 increases, 7 sc. When you knit 4 increases, on the 5th one, pull a small piece of thread of a different color (marker) - this way we will mark the middle of the back of the head. It will be useful to us when we knit the comb, wings and tail, because the chicken should not be crooked.
Rows 6-7: sc in circles. We finish the 7th row with ss.
8th row: 3 ch rise, 1 dc in the next loop, (1 dc, increase dc) x 2 times, 11 increase dc, (dc, increase dc) x 4 times, 1 dc. Finish this row with a ss.
Row 9: make 14 arches of 3 ch (3 ch, sc in the third loop of the previous row).
Row 10: we knit 7 motifs - in the first arch we knit sc, in the second - 5 dc2n.
Row 11: 7 motifs - on the motif of the previous row, from the middle (third) loop we knit a sc, and in the sc of the previous row - 6 dc2n. Those. at the top of the motif there is a sc, and in the hole from the sc there is a motif. This way you will get a beautiful alternation. It will add delicacy to the chicken.
Row 12: exactly the same 7 motifs on the sc of the previous row, 7 dc2n and sc on the motif of the previous row.
Trying a chicken on a standard egg. Adjust its size - if it is too small, then in the 13th row knit 7 motifs with 8 dc2n.
Row 13: repeat the pattern of row 12.
Row 14: repeat row 11.
Row 15: again 7 motifs, but now we knit 7 dc on each of the 7 dc of the previous row. We fasten the thread and hide it.
Cockerel
Row 1: cast on 3 ch, and in the third row from the hook we knit 16 dc. Connect a row of ss, and make sure that there are exactly 16 loops.
Rows 2-5: sc in circle.
6th row: 9 increases, 7 sc. When you knit 4 increases, on the 5th one, pull a small piece of thread of a different color (marker) - this way we will mark the middle of the back of the head. It will be useful to us when we knit the comb, wings and tail, because the cockerel should not be crooked.
Rows 7-9: sc in circles. We finish the 7th row with ss.
Scallop
Fold the chicken in half, following the marker you placed at the very beginning of knitting. Determine the center of the head to knit the comb evenly.
The scallop can be made in several ways. I joined a red thread to the back of the ss at the place where the scallop begins, and then ch 2, sc, ch 3, sc, ch 2. For the cockerel, the comb was made higher and thicker - ch 2, sc, ch 3, sc, ch 3, sc, ch 2.
You can knit a chain of ch equal to the length of the scallop, and knit 2-3 ch on it, in the next sc, then again 3-4 ch, again sc. And so on along the entire length. Then sew it on.
You can cut it from fabric or a piece of leather and glue it.
Tail
Again we determine the middle of the chicken.
The tail can be made of any shape, splendor and thickness. I made chains of ch through the side to the middle and down to the other side, joining the body with a sl st. For the hens I knitted (4 ch, sc) x 6 times, for the cockerel (5 ch, sc) x 6 times + the second tail lower - (4 ch, sc) x 4 times.
It is very important that the front side is always visible when you hold the product facing you. Therefore, when knitting chains of ch, make sure that you do not need to break the thread and start from the other side, otherwise appearance won't be as neat as it should be.
Pattern for the chicken tail: knit in the middle of the arch - sc, hdc, dc, dc2n, dc, hdc, sc.
We tie the sc with iris (preferably in a different color).
Pattern for the cockerel's tail: in the middle of the arch - sc, hdc, 2 dc, dc2n, 2 dc, hdc, sc.
We tie the sc with iris (with one color at once, and then with the second; when knitting the second row with iris, it is better to knit a hdc with increases at the top of the pattern).
Wing
Mark out the location of the wings. It should be symmetrical.
For the chicken, we make a chain of 8 ch, joining directly to the body of the ss, unroll the knitting, make 4 mini-arches (3 ch, sc into a large arch), make a ss into the body, turn and knit a sc, hdc, 2dc, hdc, sc. We tie it with iris.
we make a chain of 8 ch, joining directly to the body of the ss, unfold the knitting, make 4 mini-arches (3 ch, sc into a large arch), make a ss into the body, turn and knit a sc, hdc, 2dc, hdc, sc. We tie it with iris.
For the cockerel, we knit a chain of 10 ch, joining directly to the body of the sl st, unroll the knitting, make 4 mini-arches (3 ch, sc into a large arch), make a dc into the body, turn and knit sc, hdc, 3dc, hdc, sc. We tie the iris in 2 rows in different colors.
Design of the work: embroider the beak (with several stitches of iris or other thin thread, so that the beak is small, but quite convex), sew or embroider the eyes. After embroidering the cockerel’s beak, we make a “beard” - two long stitches, and secure them. All the threads that remain after attaching the comb, tail and wings must be firmly secured, hidden in the middle of the chicken and trimmed. We don’t stuff the head, it should keep its shape well anyway. The chicken is ready!
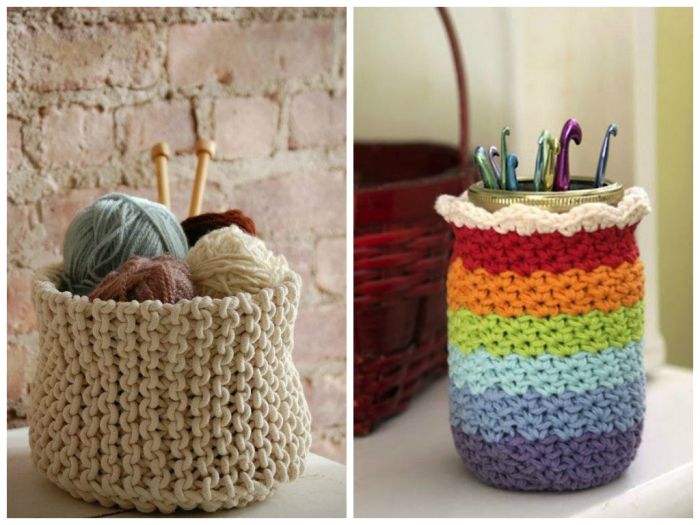
During the cold season, the lack of heat is felt even in the interior. You can compensate for it with decor. A few knitted items will make the atmosphere more cozy and harmonious.
Since childhood, I have associated knitted items with warmth. My mother is good at knitting and crocheting. Until now, in free time, she weaves products that delight me. That's probably why it seems to me What knitted decor in the interior it can create a pleasant atmosphere.
All you have to do is put a knitted pillow on the sofa or cover the bed with a wicker blanket, and your soul becomes warmer. It’s not for nothing that Scandinavians actively use knitted decorative and interior items to decorate their homes.

First of all, it is practical - sitting on a woolen pouf or armchair is much warmer than on a metal or plastic chair. Woven patterned pillows are more pleasant to touch than cold items made of silk, satin or synthetics. What can we say about how comfortable it is to wrap yourself in a knitted blanket and warm up under it, coming from a cold street. Do you agree?
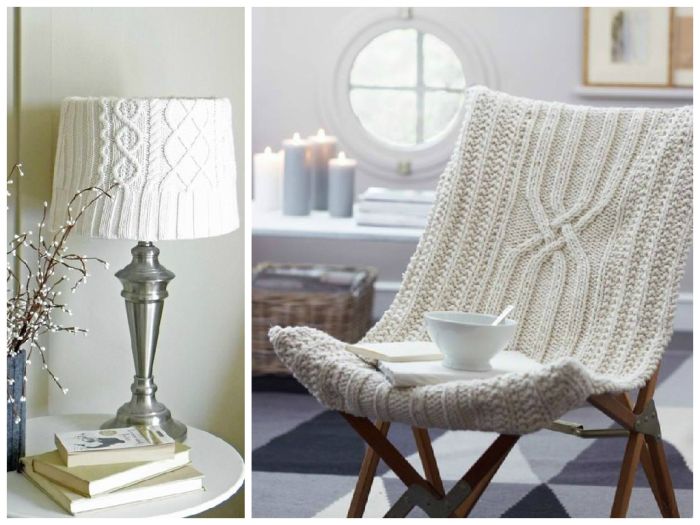


And secondly, knitted decor always pleases the eye and lifts your spirits. Especially if you approach the design of your interior with humor. For example, dishes in warm “clothes” look quite unusual and stylish. Such fashionable things can be tried on flower pots, and organizers for pens and pencils .
Kitchen mood
At breakfast:
a cup of coffee, scrambled eggs - what else do you need?
a piece of cake? or maybe radish?
Knitting potholders
The kitchen is a special place in the apartment. It can be considered the kingdom of women. And she doesn’t necessarily have to spend a lot of time there. It’s just that this is really a room that she can decorate as she sees fit. And here various accessories will come into play, which will help create a special atmosphere in the kitchen and convey the character of a woman. Such accessories include crocheted potholders, which will bring the unique coziness of a country house to the kitchen. The patterns for crocheting potholders are so simple that they are understandable even for novice needlewomen who have just dared to master this art.
Don't be afraid to take up knitting! Nothing wrong with that. Any pattern for knitting potholders with your own hands has detailed description, and in most cases also illustrated with photos. That is, all conditions for learning have been created for the knitter. You just have to want it and start working. Moreover, all lessons and schemes on the Internet are free. Therefore, knitting potholders only involves the preliminary purchase of yarn. For such an accessory you don’t need much. Therefore, a woman can create her own special style in the kitchen with minimal financial costs. Guests will definitely appreciate the efforts of the hostess.