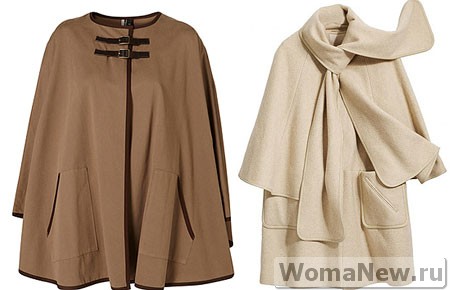
A very simple, but incredibly stylish women's cape - a DIY cape. Master class: how to sew a super-fashionable transformable cape in no time. the envy of all my friends!
CAPE PATTERN + IDEAS + PONCHO SEWING MK + A FEW MORE SIMPLE CAPE/PONCHO PATTERNSCape- this is something between a poncho and a raincoat, such a hybrid and capes with slits for arms, in other words, a sleeveless cape.
 |  |
The cape pattern is quite simple, so sew a new one stylish coat It will turn out to be a very simple matter.
Choice of fabric.
The cape can be worn from spring to autumn, so the fabric can be both warm and light. Choose the fabric that you like best. If we talk about autumn, then it can be soft bouclé wool, which can be used both for spring and for early autumn. If it's summer, choose a light, flowy fabric that will highlight your grace!
We have chosen the fabric, let's start creating the pattern.
Step one.
We will need fabric measuring about 130x260 cm. With these fabric sizes, the cape itself will be approximately 100 cm long. Fold the fabric in half, right sides facing each other. You get a rectangle measuring 130x130 cm. Fold the fabric again to form a triangle (see picture).
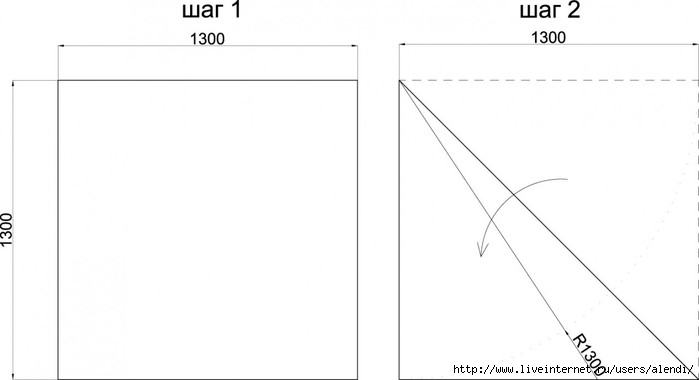
Cape pattern, lay out the fabric.
Step two.
We set aside a radius of 130 cm from the top current. Trim off the excess. We unfold the completed cape pattern on the fabric. Let's see: we have a large wedge of a flared sun skirt. We shift the fabric so that the edges of the fabric fall into the middle (the place for fasteners).
Step three.
Set aside the length of the back. Smooth lines We mark the shoulder seams and outline the neckline. We cut it off. Sew the shoulder seams. You can throw the kei on yourself. Does it fit as it should?
Step four.
We make slits for the arms at such a distance and width from the center of the product that it would be comfortable for you to walk in the cape. The height of the slot is somewhere around 30-35 cm. 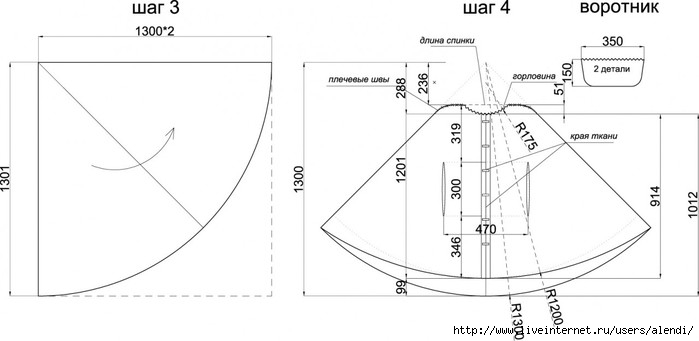
INCREASE
Step five.
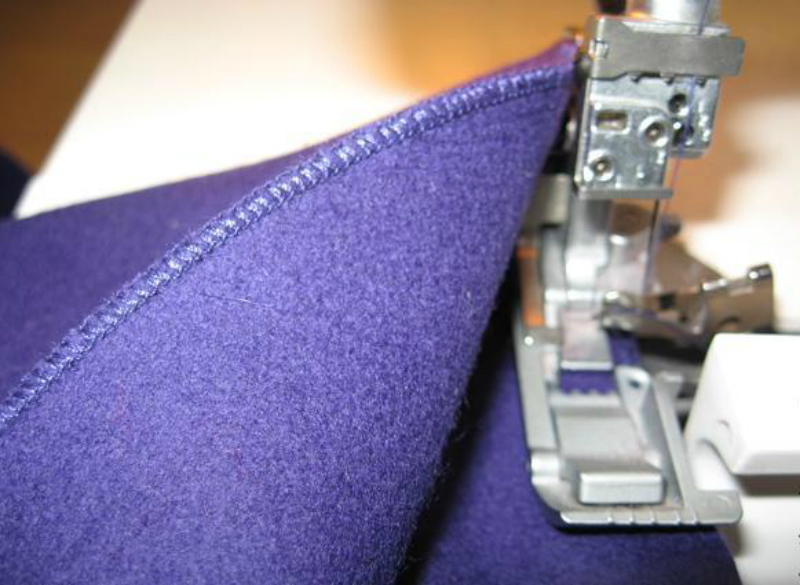
We finish the edges of the fastener, the bottom of the product and the slots for the arms. You can make the edging from a different material, you can use the same one, or you can take leather, the main thing is that the fabric does not fray too much.
Cut strips 2.5-3 cm wide. If the fabric does not fray, then apply the trim first from the front side and attach it to the main fabric, and then wrap it on the wrong side - attach it again. We also do the same with the bottom of the product and with the slots for the arms of the cape. We sew on the fasteners we have chosen. You can fasten the cape only from the top using a homemade strap, a button, a chain - whatever you like best. You can use Velcro, decorating them in advance. Choose the option that you like!
And so it remained finishing touch. Collar!
Step six.
You can replace the collar of the cape with a hood, just hem it and use a cowl collar.
Consider the collar option.
We cut out two parts with a length equal to the length of the neck, 10-15 cm high. We fold them right sides together, make the edges flat, or maybe sharp-angled, and sew them together, leaving one long side of the collar unstitched. Let's turn it inside out. We apply it to the neck and sew it together.
Ready. Agree, the cape pattern is quite simple, it makes you want to reach for the sewing machine!!
Also, for motivation, you can see how to sew a beautiful poncho in a couple of hours. Good luck, joy and warmth to you!!
A transformable cape is a thing that should be in the wardrobe of every woman who keeps up with the times! This piece is as practical as it is simple in design.
Without a doubt, anyone can sew it in a maximum of 3 hours. Well, if you have at least once held a thread and a needle in your hands, then everything will work out much faster.

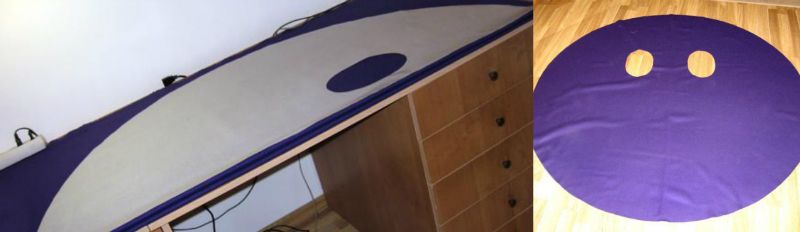
Cape pattern
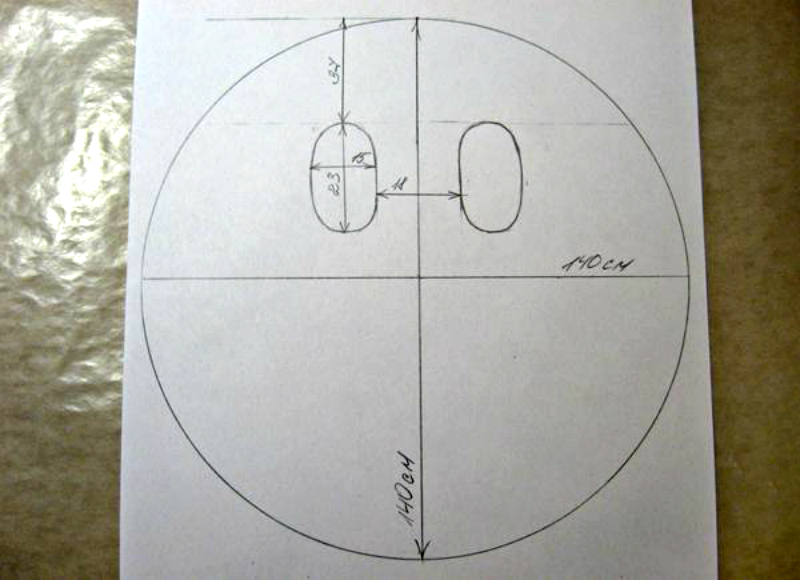
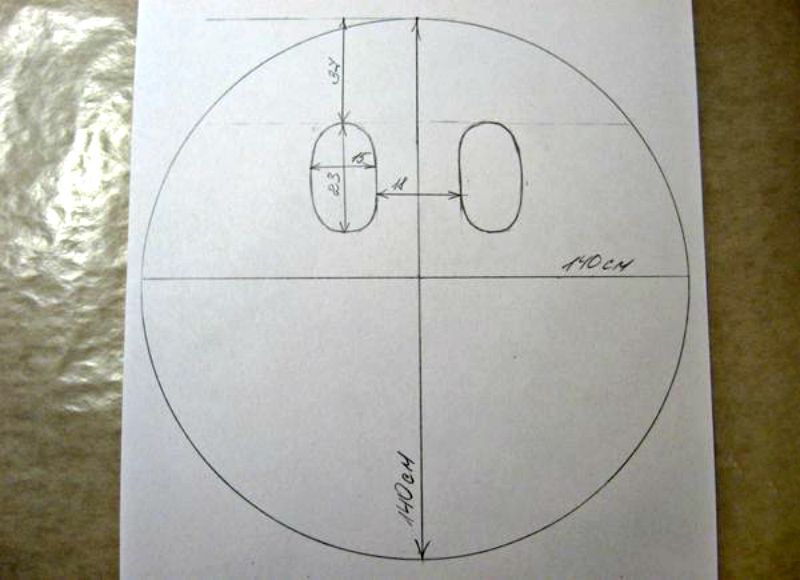
Depending on what time of year and what you will wear the cape with, the material and diameter of the cape are determined. A medium-weight fabric containing 50% wool and 50% polyester would be the best option. For size 42–46 (Russian) with a height of 170 cm, you will need a cut of 155 cm by 140 centimeters.
This is what the pattern should look like. The fabric should be ironed thoroughly before cutting.
It will be easier to cut if you fold the pattern and fabric in half.

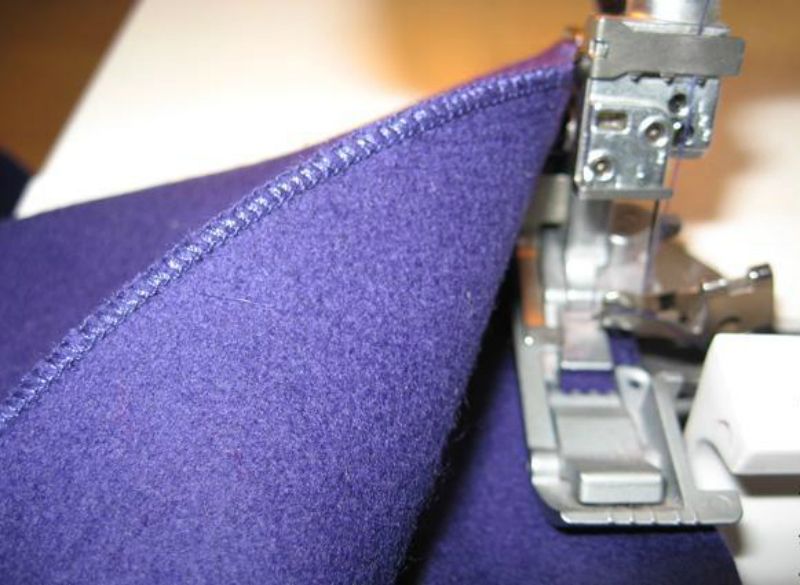
Actually everything! If you have fabric that does not fray along the cuts, then you will not need to sew the edges. If processing the cut cannot be avoided, and there is no overlocker on the farm, then the edges can be folded or edged with something.
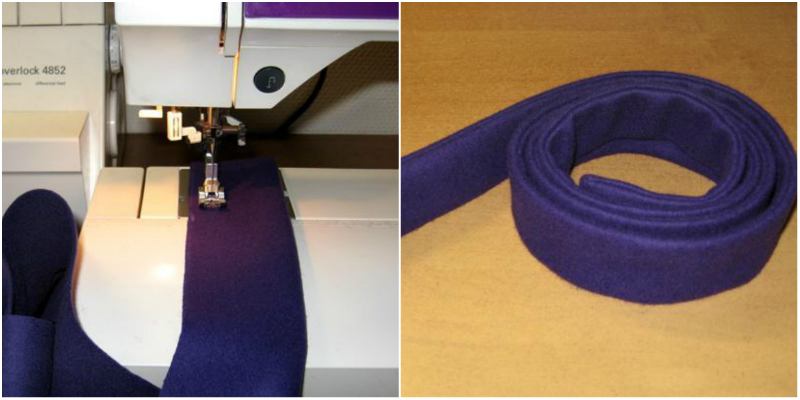
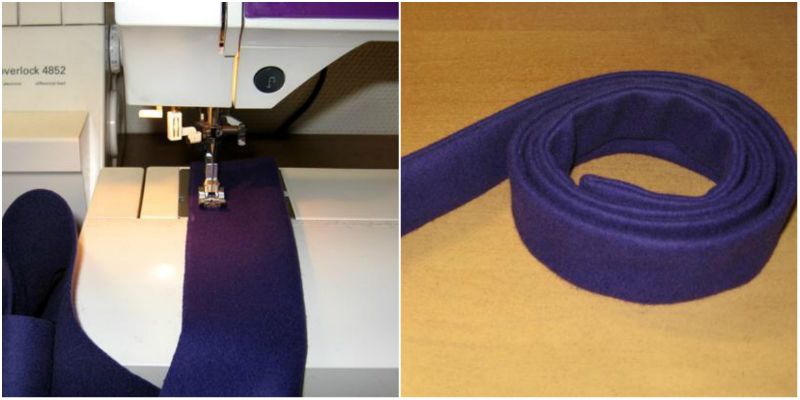
All that’s left to do is figure out what will be used as a belt at the waist. Can be cut wide stripe from the same fabric and, folding it in half, sew a belt, or you can choose some kind of wide leather belt, contrasting in color.
This is such a simple master class. I would like to add one small BUT. It seems to us that the pattern in this master class is not entirely correct, or rather, the length between the cuts is incorrectly calculated. Therefore, we add another pattern found on the Internet, and a short video on how to calculate the length between the cutouts.
![]()
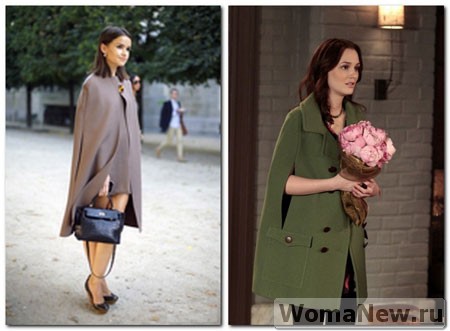
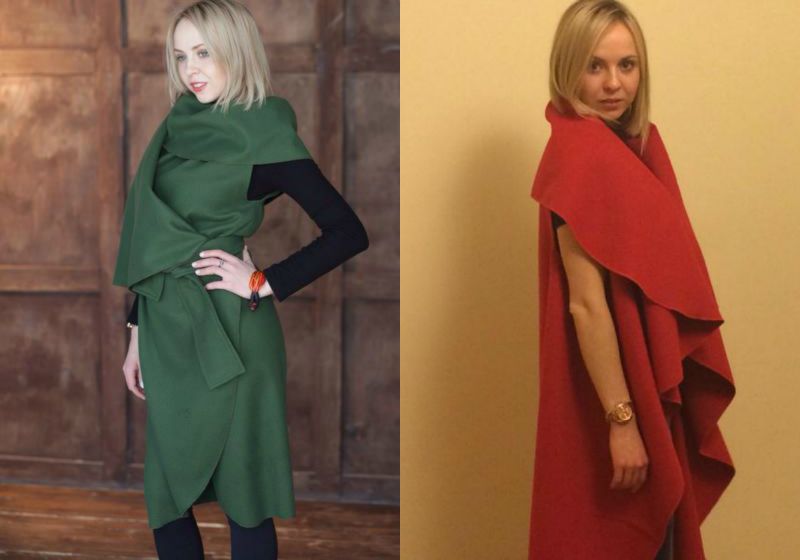
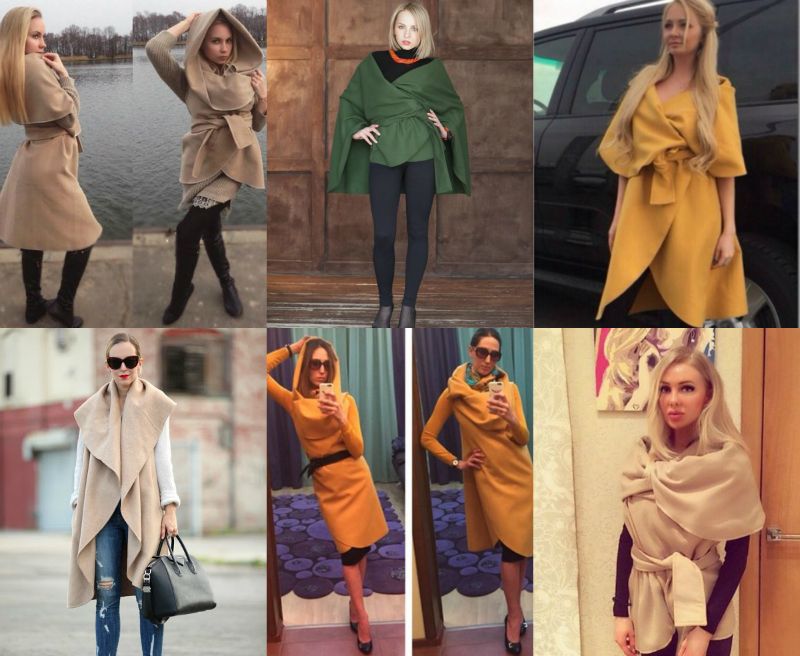
As soon as they don’t wear a transformable cape! Look!

![]()

For clarity, we offer you a video “10 ways to wear a transformable cape”
The product is almost dimensionless: it looks chic on any figure! To increase or decrease the size, you can slightly change the pattern by decreasing or increasing the diameter of the circle itself and the diameter of the armholes.
IN Lately In Europe and America, a sleeveless women's cape, called a cape, became very popular. Of course, you need to wear it at a time when the cold has not yet arrived, and the heat has already subsided. Since in Russia these periods are too rare and short-lived, in our regions it is not worn very often, but fashion is a harsh thing. A cape can replace any sweater or even put a cape on any warm clothes, if the weather is not at all pleasant.
Today we will tell you in detail how to sew a transformable cape with your own hands. This pleasant and simple process will take less than three hours, and the result will please your body and eyes!
Just look at different variants cape. It's hard not to admit that this thing looks incredibly stylish.
Cape pattern
First, you need to decide what time of year and what the item will be worn with, and depending on this, choose the material and diameter of the cape. A medium-weight fabric containing 50% wool and 50% polyester will be the best option. For sizes 42–46 with a height of 170 cm, you will need a cut of 155 x 140 centimeters.
This is what the pattern should look like. Before starting, the fabric should be ironed thoroughly.
Fold the pattern and fabric in half, this will make it much easier to work with.
That's all the instructions! Nothing else is required, only your sleight of hand. Pay attention to the edges of the fabric: if they fray, it is better to edge them.
But what is a cape without a chic belt? You can make it from the same fabric as the cape, or use a different one, such as leather or a brightly colored material.
Now you are the most stylish and chic woman! The cape looks great on absolutely any figure, allowing you to hide flaws and highlight your strengths. Focus on your measurements when cutting and look great!
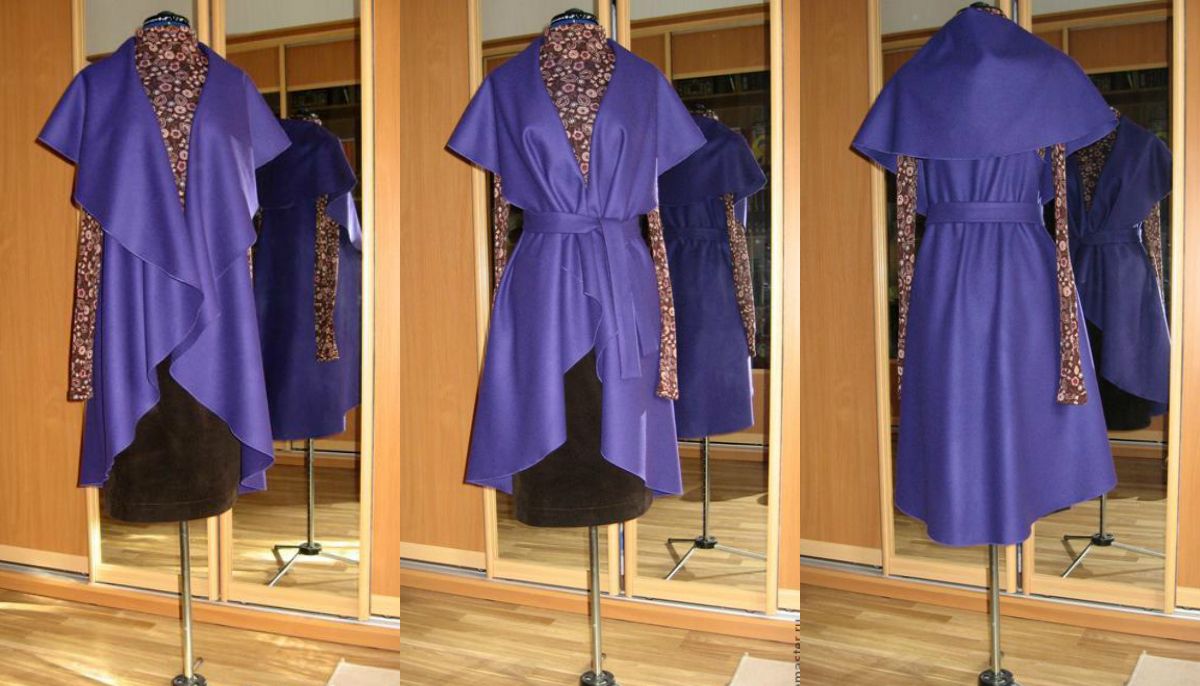
Cape coat is an elegant cape, the main highlight of which is the absence of sleeves. Instead, they make slits for the hands, which can be hidden in relief seams, as shown in our pattern, or made in the form of a pocket, distinguished by two facings.
Cape coat, photo which you see is very easy to do yourself. To do this, it is enough that you have a cape pattern. Below you will find drawings that you can use to make a pattern. All you have to do is decide what fabric it will be made from. Depending on this, the future cape coat will be either warm or, on the contrary, a light, cape-like option.
Cape pattern and its parameters
Cape, pattern which is presented below looks best with skinny trousers. Such a stylish outfit stylish woman. It is not necessary to follow our exact instructions, for example, instead of a collar you can make a hood - this is at your discretion.
The cape pattern has a wide range of applications and suits many body types, all because the cape coat is very spacious. Our option is provided for girls with the following parameters:
- chest circumference 104 cm
- waist circumference 86 cm
- hip circumference 110 cm.
In fact cape pattern accepted take into account only the chest girth, the other parameters are not so important, in any case, proportionally, you can always find exactly your version of a cape coat.
Download the cape pattern from this page at the bottom of the article and print all 25 pages on your printer, specify the scaling 1:1, that is, 100%. Then, following the main pattern, glue all the leaves together and you will have a finished cape pattern.
In addition to the beautiful women's clothing It is important to choose the right shoes. For example, women's moccasins, which can be bought in any store, can be stylishly decorated with independent additions. Considering that all female image will be done almost independently, the result will be an original and unforgettable style.
During the process, in addition to the main details of the slots of the cape coat, make additional leaves of 30x6 cm (they should be ready 3 cm) or process the slots with facings; before this, be sure to provide allowances when you cut out the middle side parts of the front.
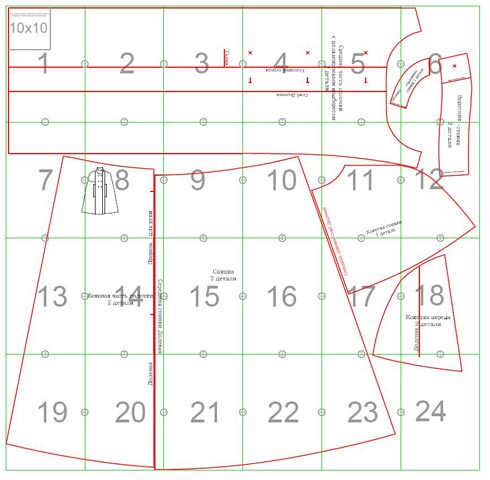
Pay special attention to the places that will be specified during fitting; additional allowances must be made there. When all details of the cape coat will be collected, do a rough fitting, so you will see where you need to make adjustments, and then feel free to start sewing your cape coat.
Separately, I would like to say about the lining; the cape can be made without it, if you so choose. If you make a lining, then cover it along the main parts, not taking into account the hems and facings of the back neck.
A transformable cape is a thing that should be in the wardrobe of every woman who keeps up with the times! This piece is as practical as it is simple in design.
Without a doubt, anyone can sew it in a maximum of 3 hours. Well, if you have at least once held a thread and a needle in your hands, then everything will work out much faster.
Cape pattern
Depending on what time of year and what you will wear the cape with, the material and diameter of the cape are determined. A medium-weight fabric containing 50% wool and 50% polyester would be the best option. For size 42–46 (Russian) with a height of 170 cm, you will need a cut of 155 cm by 140 centimeters.
This is what the pattern should look like. The fabric should be ironed thoroughly before cutting.
It will be easier to cut if you fold the pattern and fabric in half.

Actually everything! If you have fabric that does not fray along the cuts, then you won’t need to sew the edges. If processing the cut cannot be avoided, and there is no overlocker on the farm, then the edges can be folded or edged with something.
All that’s left to do is figure out what will be used as a belt at the waist. You can cut a wide strip from the same fabric and fold it in half to sew a belt, or you can choose some kind of wide leather belt that contrasts in color.
As soon as they don’t wear a transformable cape, just look!
The product is almost dimensionless: it looks chic on any figure! To increase or decrease the size, you can slightly change the pattern by decreasing or increasing the diameter of the circle itself and the diameter of the armholes.


