Draw a picture with paints on the theme of winter. How to draw a beautiful winter nature landscape with pencil and paints step by step for beginners? How to draw an easy winter landscape with a pencil for beginners? Various options for expressing talents
Drawings on the theme: “Winter” Winter is one of the most beautiful and mysterious times of the year. Many children love winter, and especially winter holidays. Very often, schoolchildren and others are asked to draw drawings on the topic “Winter,” but not everyone can independently come up with an interesting theme for their drawing. We want to help you create a topic, and we will also provide you with several step-by-step lessons on this topic. Here you will also find many elements for winter drawings, after drawing which you can create your own drawing. So, the most difficult thing is choosing a topic. That's where we'll start. Below is a very convenient diagram “Drawings on the theme of winter”. You can use it to guide you in choosing a drawing theme that is suitable in terms of complexity. This diagram is just a “framework”; you still have to use your imagination.
Any drawing on the theme “winter”, drawing on the theme “winter holidays”, etc. must contain the main winter elements - snowflakes, snow, holiday heroes (Father Frost, Snow Maiden), snowmen, snowdrifts, people in winter clothes. By combining these elements together on a certain background you will get options for themes for drawings.
Here's what we came up with:
WEATHER:
- Snowfall near the house (Draw a house with a snow-covered roof and snowdrifts over which snowflakes are falling, you can add children playing outside);
- A wonderful winter day (the bright sun is shining above the snowy forest, winter on the river);
- White bear in the north (You can draw any animal or bird in winter);
- Children in fur coats and felt boots are frolicking (Fantasizing about winter games on sleds, ice skating, playing “snowballs”);
- Blizzard (in the forest, near the house, a person who has difficulty making his way through the snowdrifts during a blizzard).
Examples of drawings and postcards on the theme “Winter” for sketching:


HOLIDAY:
- The New Year is coming (children are waiting for the holiday near the Christmas tree);
- Santa Claus with Snow Maiden;
- Santa Claus brought gifts;
- Round dance near the Christmas tree;
- Christmas evening (the table is set and the whole family is at it);
- My favorite winter holiday;
- How I spent my winter holidays (drawing a holiday or winter fun).
Elements that you can draw and add to help you create your own picture on a winter theme:


Step by step drawing lessons:
LANDSCAPES:
- Winter near my house (trees in the snow, house in the snow, a walk in the city);
- Winter forest;
- Mountains in snow;
- Winter landscape (forest, mountains, river, snowdrifts).
Examples of winter landscapes for drawing, postcards on a winter theme:


SNOW:
- We make a snowman (children roll large balls for the snowman, children decorate the snowman);
- Falling snowflakes (any variety);
- The most beautiful snowflakes;
- We play in the snowdrifts;
- Snowman near the Christmas tree.
The most beautiful snowflakes:
Snowmen in different versions:

FAIRY TALES:
- My favorite cartoon character in winter (we choose our favorite character and dress him in a winter outfit and place him near the Christmas tree, snowdrifts, snowman, etc. On our website you will find a large number of step-by-step lessons on drawing fairy tale and cartoon characters);
- Illustration for a cartoon on a winter theme (we draw a frame from any winter cartoon);
- Fabulous winter forest (beautiful trees, like from a fairy tale);
- Winter magic (think of some magic and draw it).
Step by step drawing lesson
Summary: Children's drawings on the theme of winter. How to paint winter with paints. How to draw winter with a pencil. How to draw winter step by step. Drawing of a winter landscape. Drawing winter fairy tale. Picture of a winter forest.
In winter, adults and children spend a lot of time at home, so there are more opportunities to get creative. Winter is a very beautiful time of year. Try to convey the beauty of this time of year in winter drawings. We will share with you simple drawing techniques with which you can independently teach your child to draw beautiful drawings on the theme of winter. From this article you will learn how to make voluminous snow paint and learn how to draw winter pictures using the spray technique. When drawing pictures on a winter theme, we will use all kinds of additional materials, and not just a brush and paints. You may not even suspect that you can draw winter using plastic film or salt, bubble wrap or shaving foam.
1. Winter drawings. "Volume snow paint"
If you mix equal amounts of PVA glue and shaving foam, you will get wonderful airy snow paint. She can draw snowflakes, snowmen, polar bears or winter landscapes. For beauty, you can add glitter to the paint. When drawing with such paint, it is better to first outline the contours of the drawing with a simple pencil, and then paint it with paint. After some time, the paint will harden, and you will get a voluminous winter picture.

2. Winter drawings of children. Using electrical tape in children's creativity
3. Winter drawings. Drawings on the theme of winter

If there is snow outside the window, you can depict it using a cotton swab.


Or use a brush to put snow on each branch.

11. Winter drawings. Drawings on the theme of winter
An interesting idea on the topic of children's winter drawings was proposed by the author of the Homeschool Creations blog. She used putty to paint snow on the transparent film. Now it can be applied to any winter pattern or appliqué, simulating falling snow. They put the film on the picture - it started snowing, they removed the film - the snow stopped.

12. Winter drawings. "New Year's lights"
We would like to tell you about one interesting unconventional drawing technique. To draw a New Year's garland like in the photo, you will need a sheet of thick paper of a dark color (blue, purple or black). You will also need regular chalk (the kind you use to draw on asphalt or a blackboard) and a light bulb stencil cut out of cardboard.
On a piece of paper, use a thin felt-tip pen to draw wires and light bulb sockets. Now apply the light bulb stencil to each socket in turn and outline it boldly with chalk. Then, without removing the stencil, smear the chalk on the paper using a piece of cotton wool or directly with your finger to create rays of light. You can replace chalk with colored pencil graphite chips.
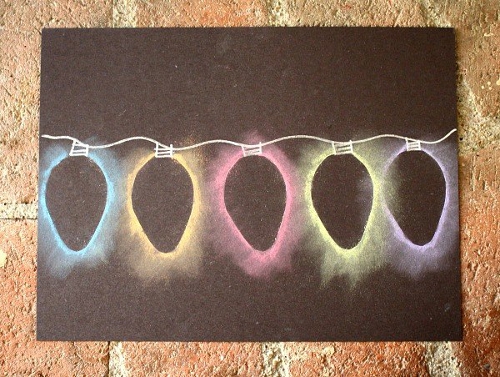

It is not necessary to use a stencil. You can simply paint over the light bulbs with chalk, and then gently rub the chalk in different directions to make rays.

Using this technique, you can also draw a winter city, for example, or the northern lights.

13. Drawings of a winter fairy tale. Winter forest drawings
On the Maam.ru website already mentioned above, you will find an interesting master class on drawing winter landscapes using templates. You will only need one base color - blue, a coarse bristle brush and a white drawing sheet. When cutting out templates, use the cutting method from paper folded in half. Look at what a magnificent drawing of a winter forest the author of the painting created. A real winter fairy tale!


14. Winter drawings. Drawings on the theme of winter
You are probably very eager to find out how the wonderful “marble” Christmas tree in the photo below was painted? We'll tell you everything in order...To draw such an original drawing on the theme of winter you will need:
Shaving cream (foam)
- watercolor paints or food coloring in green shades
- flat plate for mixing shaving foam and paints
- paper
- scraper

1. Apply shaving foam to a plate in an even, thick layer.
2. Mix different shades of green paint or food coloring with a little water to make a rich solution.
3. Using a brush or pipette, drip paint onto the surface of the foam in a random order.
4. Now, using the same brush or stick, beautifully smear the paint over the surface so that it forms fancy zigzags, wavy lines, etc. This is the most creative stage of the whole work, which will bring pleasure to children.
5. Now take a sheet of paper and carefully apply it to the surface of the resulting patterned foam.
6. Place the sheet on the table. All you have to do is scrape off all the foam from the sheet of paper. For these purposes, you can use a piece of cardboard.
Simply amazing! Underneath the shaving foam you'll find stunning marble patterns. The paint has time to quickly absorb into the paper; you just need to let it dry for a few hours.
15. How to draw winter. How to paint winter with paints
Concluding our review article on winter drawings for children, we want to tell you about another interesting way how you can paint winter with paints with your child. To work, you will need any small balls and a plastic cup (or any other cylindrical object with a lid).
Place a piece of colored paper inside the glass. Dip the balls in white paint. Now put them in a glass, close the lid on top and shake well. As a result, you will end up with colored paper with white streaks. Similarly, make colored paper with white streaks of other colors. From these blanks, cut out the details of the applique on a winter theme.

Material prepared by: Anna Ponomarenko
Other publications on the topic of this article:
| Winter drawings. Drawing winter with children
GCD for artistic and aesthetic development / Drawing Subject: "Winter landscape"Software tasks: -Teach children to draw a landscape, introduce children to a new word for them - snowfall, landscape, -teach children to work with white gouache, develop the ability to beautifully arrange images on...
 In our kindergarten "Rainbow" there is a stand in the foyer "Bright colors". Every season the stand is filled with children's works: drawings, applique from various materials: paper, straws, plasticine. Last winter I had a second junior group and we returned to our kindergarten after...
Winter drawings. We draw winter with children - “Winter tunes.” OD summary on unconventional drawing using the “spray” technique in the preparatory group
Goal: To enrich children's ideas about winter nature through painting, music, poetry, and to develop children's creative abilities using non-traditional materials and drawing techniques. Objectives: Summarize children’s knowledge about the winter season and natural phenomena. Enrich...
Abstract of the educational activity "Winter Landscape" on non-traditional drawing with children of the middle group Topic: “Winter Landscape” Goal: Development of creative abilities in children through non-traditional drawing. Objectives: To introduce unconventional methods and techniques of drawing: drawing with a sponge, toothpick, toothbrush, cotton swabs. Vaccinate...
 Goal: to introduce children to an unconventional way of drawing (with fingers. Educational objectives: to form a sustainable interest in visual arts, consolidate knowledge about colors, encourage children to answer the teacher’s questions. Developmental objectives: to consolidate skills...
Winter drawings. Drawing winter with children - Photo report from drawing classes “Winter in children's creativity”
 Winter is a very beautiful time of year. Try to convey the beauty of this time of year in winter drawings. Today the children of the “Tsvetik - Semitsvetik” group will share simple drawing techniques with which you can independently teach your child to draw beautiful drawings on...
 Goal: Continue acquaintance with non-traditional drawing techniques - drawing with plasticine (plasticineography. Objectives: Educational: Develop knowledge, skills and abilities in working with plasticine; Teach techniques for working with plasticine (rolling, pressing, smearing,...
Drawing winter with preschoolers: step-by-step master classes, collection of ideas.

Drawing winter with preschoolers
In this article you will find step-by-step master classes on drawing winter with preschool children using different techniques:
- drawing winter with gouache,
- we draw winter using the grattage technique,
- painting with salt.
Master classes will help teachers and parents conduct drawing classes in kindergarten, children's studio and at home.
Master class 1. Drawing winter with gouache with preschoolers
Author of the master class: Vera Parfentyeva, technology teacher, head of the children's art circle, reader of "Native Path". In the article, the photo shows drawings of children - students of Vera's studio.
Materials and tools for drawing
To complete a winter drawing, you need to prepare for your child:
- album sheet,
- paints (watercolor or gouache),
- brush (you need a wide flat brush),
- round brushes No. 1 -2, 4-5.
Children's age
This drawing can be drawn by children aged 5 years and older (senior preschool and primary school age.
How to draw winter with children: step-by-step description
Step 1.Prepare the background. To do this, you need to apply several strokes of blue, red, yellow, purple (can be green) paint with a wide brush. Then put white paint on the brush and stretch the color. Until the desired background is obtained, in which one tone transforms into another.

Step 2. We draw the outlines of the trees.
— Apply white paint to a round brush No. 4 or 5, and holding the brush vertically, first point out the contours of two trees in the center of the sheet (or do it using the poking method). The trees consist of three tiers in the form of a month-like figure or “cloud”. Start drawing from the bottom tier. Make the middle and upper tiers smaller relative to each other.
— Mark round “clouds” for the bushes on the sides of the trees.
— Using the poking method, fill in the inside of each “cloud.”

Step 3. Draw snow caps on the trees.
Mix white and black paint on the palette to get a light gray color and also dot the white “clouds” with a gray tint (shadow on the snow caps).

Step 4. We draw trunks and branches of trees and bushes.
Using brush No. 1 or 2, draw thin lines on tree trunks between the tiers of the crown and trunks of shrubs.
Paint the tree trunks with black paint, carefully so as not to touch the crowns.
Draw branches from the trunk.

Step 5. We draw snow on tree trunks and snowdrifts.
- Use white paint to apply thin lines along the trunks of trees and shrubs.
- Under the trees, outline the contours of the snowdrifts with a brush No. 5 and fill the “drifts” with white paint.

Step 6. Drawing falling snow.
Spray the finished drawing with white paint, brushing it over the brush, simulating falling snow. How to draw falling snow “spray” You are shown in the photo.

Our drawing is ready. Try to depict winter in a drawing! Good luck in your creativity!

And below is an example of a child’s drawing based on this master class. It was drawn by Nastya (7.5 years old).

Drawing winter with children using scratch technique
Drawing a winter picture with salt: technique
In the video you will see the drawing technique using the example of a snowman. But you can also create an image of a winter tree, house, clearing, forest.
How to draw winter with gouache: step-by-step video for children 6 years and older
Winter is one of the most inspiring times of the year.
Does your child love to draw, but has unfortunately run out of ideas? No problem.
We offer all kinds of winter drawings for children, and share the best techniques for turning them into reality.
This creative process captivates not only children, but also adults and will forever remain in their memory as a pleasant memory!
Various options for expressing talents

Winter themes are a field for flights of fancy. You can draw a house in the snow, various fantasies about this (snowman, snow queen, Santa Claus), children's games, snowdrifts, animals associated with this season, landscapes (day and night), a river or lake with ice on the surface.
There are many materials for this task: pencils, paints, felt-tip pens, gel pens, cotton wool, glue, glitter.
House in the snow
We present variations of children's drawings on the theme “Winter” with colored pencils and paints. One of them:

To begin, draw three large snowdrifts, one after the other. Draw Christmas trees on them. To do this, draw one stick with a brown pencil. Branches will extend from it. Draw needles on them in green. Draw snow with a white pencil. The house will be hidden behind the snowdrifts. Draw a square and a triangle on top of it. This is a wall with a roof. Place a small square on the wall and a rectangle next to it: a window with a door. Sprinkle the roof with white or blue snow. Ready.
It is better to do the drawing with shading rather than painting over all the empty spaces.
Painting winter with colors:

Here is the first snow and a house in winter. But painting with paints is a difficult task. To begin, make markings with a simple pencil (take the work plan from the first option). Then simply paint with gouache. Blue color indicates snow flakes.
Winter landscape
Winter-winter:

Divide a sheet of paper in half. Place two Christmas trees on the top line, followed by light green birch trees. Distribute as many trees as you think necessary on the sides. There should be snowdrifts in the center. To do this, leave a couple of lines of purple-pink color, shade the blue somewhere.
Winter tree:

We'll have to divide the horizon again. Only now on one third and two thirds of the sheet. In the upper right corner we draw a sun. There are Christmas trees on the horizon line. We will make them blurry, do not draw the outline and details. Using a thin brush, draw two semicircles on the lower part. These are snowdrifts. Using the same thin brush, we draw two birch trees without foliage onto them.
The desired fairy tale
When we hear the phrase “winter fairy tale,” most people think about a snowman, a Snow Maiden, and talking animals.
Therefore, we suggest in the background, and in the foreground, a smiling snowman and his mouse girlfriend:

To do this, draw three circles. The bottom one is the largest, the middle one is smaller, and the head is the smallest. She is wearing a red cap and a multi-colored scarf around her neck. There are two twig handles on the side, with warm mittens on them. New Year's gift in hand.
Fairytale winter house:

Nothing new. We combine elements from earlier works: there is a house, Christmas trees, and a snowman. This option is also suitable for children in grades 2 and 3.
Fun
The kids' favorite pastime is, of course, ice skating. Pictures on the theme “Winter fun”:

We draw the upper part of the man the way you are always used to doing it. Spread your legs a little wider than usual. In the second boy, you can depict how he pushes off the ice. The ice should be soft blue, otherwise color as desired.
Mischievous guys love hockey:

We divide the horizon into two parts. The top one is for the sky, trees and gates, the bottom one is for fun activities. How to make a gate: in a gray square, the strokes go diagonally, first from the bottom left to the top right, then from the bottom right to the top left. Place one child on a slide and let the other watch the beautiful picture. Give two children sticks in their hands and throw a black oval puck between them.
We remind you that it is difficult for children to work with paints because they blur on the sheet. The base should be made with a pencil, and blurry spots should be attached to it, symbolizing hair, clothes, and equipment.
Fantasies
Children fantasize and dream most often about gifts, the New Year and Santa Claus. We invite you to draw winter fantasies using sketches:

First, draw an oval, with a smaller oval in its center. We divide the large figure into two parts. We draw a semi-oval on top (and a semicircle on top), and a semicircle on the bottom. We got a hat without a pompom. Hurry up and finish drawing it. The very first oval will contain eyes, furry eyebrows, a nose and a mouth. From the mouth, draw another half circle. Starting from the hat, erase the boundaries, drawing out the beard in detail. Let's paint it over.
Another option:

Draw a circle and a smile in its center. This is the nose of Santa Claus. A luxurious mustache should extend from the nose. Then draw frills on the cap and a full beard in waves. Draw the cap and body, eyes, eyebrows, gifts behind the back. All that remains is to use the paint. Forward! A 4th grade student can easily handle this.
We depict nature from the earth to the sky
You can draw winter nature in different ways.
Animals
Who else, if not a bunny, stays awake all winter? What is not a symbol of this time of year:

The steps are extremely simple: draw an oval, not far from it there is a slightly elongated circle. Add the contours of the tail and paws. We connect the head with the body, attach long ears to the head. Add touches to create a wool effect.
Drawing animals with paints is not as difficult as it seems. Penguins live in the ice all year round. They deserve to be in your winter drawing:

How to draw animals: in the upper half we paint the excellent beautiful northern lights. Most of the leaf is occupied by snowdrifts and ice floes. Three little penguins walk happily on them. We make a black oval, slightly tapering at the very beginning. Next to him on the sides are flippers. Dip the brush into orange paint and carefully apply it downwards. These are webbed feet. We paint the eyes and abdomen white.
Forest
Forest - trees and animals collected in one place. How to depict a winter forest in the picture:

How to draw a winter picture with rowan: draw a trunk of medium thickness, short branches extend from it. At their ends we place small red circles in two rows. The first row is longer. Next to the rowan we draw a red semicircle, with two sticks extending from it. There are three more from these sticks: two diagonally, one in the center. Add a black head, beak, wings. Place a couple of Christmas trees and other animals of your choice in the picture. Don't forget to use white and blue pencils to create a snow effect.
Another variant:

First you need to draw the fir trees. Dip the brush into green paint, then press it onto the sheet evenly on both sides. The result is symmetrical needles. We use brown paint to mark the base of the trunk. The rest of it was covered by branches. After that, paint the bottom and top white, leaving space for the moon. We wait for the white paint to dry, then apply pink next to the yellow circle and blue around the edges.
Night
Fairytale night forest:

Even if you work in a minimalist style, there is a chance to achieve the desired recognition. Print the tree in green as in the step above. On top of this layer, apply almost the same, but white, leaving space for the previous one. It turns out to be a Christmas tree that is covered with snow. Add blue paint to the sky and paint stars and snowflakes on it with a thin brush.
River
Drawn picture with a river:

This drawing is also done using shading. Christmas trees are made with blue strokes obliquely and tilted to the right. The sky is in violet-blue tones. Let's add yellow-purple clouds. The river is blue-yellow with a horizontal streak.
Making crafts: pleasant gatherings
Winter illustration:

For such a simple craft, we will need a sheet of cardboard, glue, colored and plain paper, and gouache. Cut out a branch from brown paper. We paint snow on it with white gouache. Dip your palm into red paint and press it horizontally to the sheet. All that remains is to add the eyes, beak and legs. Cut out small snowflakes and glue them.
Another simple craft:

Available materials: cardboard, colored paper, cotton wool, cotton pads. Glue the disks on top of each other to make a snowman. We cut out all the necessary details for its decoration from paper. Glue brown tree trunks and a broom onto the leaf. Then we deal only with cotton wool. Tear off small pieces and fluff them up. These will be snowdrifts. Then roll into large balls - this is the crown of the trees. Smaller balls - Christmas tree. The smallest lumps are falling snow.
Works worthy of the competition
We have selected examples of drawings about winter with which your child will be able to win the competition. The implementation techniques were presented above.


For those over ten
Ten-year-old children are old enough to perform more complex techniques for drawing winter. They are already able to work out small details, handle paints so as not to go over the edges.
How to draw pictures on the theme “Winter” for children 10 years old and older:


Beauty - you can't take your eyes off it
Finally, we would like to show you beautiful painted, talented children’s portraits of winter:


We wish you success in all your creative endeavors! Let winter be remembered with a wonderful design.


