The old woman Shapoklyak is the author of the work. Old woman Shapoklyak: the story of character creation
The origins of dough modeling go back a long way. There is a legend that it was invented by Slavic cooks who were bored and had fun by creating interesting, edible figures from dough. In addition, this material is one of the cheapest and available to everyone. That’s why this type of creativity is popular in our time; everyone has flour, water and salt in their home. So, a few interesting crafts made from salt dough with your own hands, with photos and step-by-step instructions.
Crafts made from salt dough
If you decide to touch this art, and testoplasty really is such, you need to learn in detail about the material from which you will sculpt. For beginners who like to make dough, it is worth noting that the recipe is very simple.
- Flour - one glass
- Salt - half a glass
- Water – 125 ml
It is worth remembering that salt is heavier than flour, so you need to use half as much of it!
To sculpt thin relief figures, you need to add PVA glue, or starch, or wallpaper glue to the dough. Optionally, one tablespoon at a time, pre-mix wallpaper glue with water. To make the kneading process easier, use a mixer; it will make it better and make it easier to work with your hands.
For modeling colored dough, food coloring is used; if you don’t have any, you can use regular paint. If you need to get saturated color chocolate, add a small amount of cocoa. Remember that when the dough dries, it loses its color saturation. Therefore, it is better to transfer the dye than not to transfer it. Coating the finished dough craft with varnish will make it brighter and more practical.
Advantages
- It is one of the cheapest and environmentally friendly materials.
- Doesn't get your hands dirty (although this is a relative statement)
- It is easy to work with, very flexible and allows you to make parts of any complexity.
"Piglet"
Let's look at the easiest way to sculpt.
To work you need:
- Salty dough
- Brush
- Stack
- Paints
- Toothpicks
How to do it
- Roll the dough into a ball and give it an oval shape, this will be the body of the pig.
- Make a second ball (head) and place it on the body using a toothpick.
- Make a small heel for a pig, a flattened ball with holes, you can make holes reverse side pencil.
- Making ears is also not difficult; moisten the triangles with water and carefully attach them to the head.
- Do the legs like this, roll two sausages, make a small cut at one end, and attach the legs to the body with the other end.
- Our piglet will sit in a basin, to do this, roll out a ball of dough and give it the appearance of a basin.
- Place the piglet in a basin and paint your craft.
- Let your masterpiece dry.
Master class on how to make a pig from dough step by step video instructions
Little secrets
Everyone has a garlic squeezer in their house. It can be used in work by passing the dough through it to create long curls. They can be used in the form of hair, wool for your crafts. Having a tea sieve at home will produce thinner vermicelli, for finer details of the craft.
A comb can also be used when sculpting; it will perfectly imprint a ribbed pattern on it.
"Candlestick"
Ingredients
- puff pastry
- eggs (for brushing)
- prunes
- chocolate
Cooking method
- Roll out the dough on the table. The thickness should not exceed 0.5 cm. Using a glass, cut out circles.
- Place in the middle of the prepared circles
filling. It can be prunes, dried apricots, jam, the main thing is that the filling is not liquid. - From each circle we form a star (gathering it up like a bag)
- Cut the edges with pastry scissors. And we bend each strip, turning them to the center.
- We form a flower and coat it with egg.
- Bake in the oven at 180 degrees.
- Decorating our flowers. You can put a little jam in the middle.
- We take a flat dish and, using melted chocolate, draw a stem and leaves for our delicious craft. We distribute the finished flowers into in the right places plates and everything is ours unusual flower ready.
"Delicious squirrel"
To prepare this craft you need to take:

- 500 g flour
- 40 g yeast
- 100 g butter
- 100 g granulated sugar
- 250 ml water (milk)
- 1 yolk
- 60 pcs. nuts almonds peeled
- cardboard template
Cooking method
- Dissolve the yeast in warm water and add sugar and mix everything.
- Knead the dough. Mix the flour with the butter, add the prepared yeast mixture to it. Place in a warm place.
- After 45 minutes, divide the dough into lumps and roll each one 1 cm thick.
- You need to put it on the dough ready-made templates with the image of a squirrel and using a sharp knife, cut out the figure along the contour.
- Beat the yolk and coat the squirrel with a brush.
- Decorate the figurine with almonds, placing them on the tail. We make the eyes using raisins.
- Place the baked goods on a baking sheet and bake at 190 degrees for about half an hour.
From salt dough can be done great amount crafts, for example: flowers, animals, various figures, inscriptions, numbers, toys, paintings and whatever you want! Modeling from salt dough is called bioceramics. The advantage of salt dough is that it is convenient to work with, this material is absolutely harmless and crafts made from it will delight you for several years. In this article we will look at how to make crafts from salt dough with your own hands.
You will need: a glass of wheat flour, a glass of extra salt, half a glass of cold water, a bowl.

Recipe

Ready salty dough should not stick to your hands or crumble. It should be cool and easy to sculpt. I recommend watching the video master class!
There are two most common ways to dry salt dough. The first method: the finished craft will dry on its own. The main thing is that straight lines do not fall on it Sun rays, otherwise it will crack. The craft can be placed on a flat surface and wait a few days. Second method: dry the finished craft in the oven for 3 to 6 hours (depending on the size of the craft). Drying occurs in batches with breaks. One approach is 1-2 hours. For quick drying in one go, set the oven to 75-100 degrees, and then the craft will dry in an hour. At a temperature of 120 degrees, the craft will dry in 30 minutes, but it is better to dry it naturally.
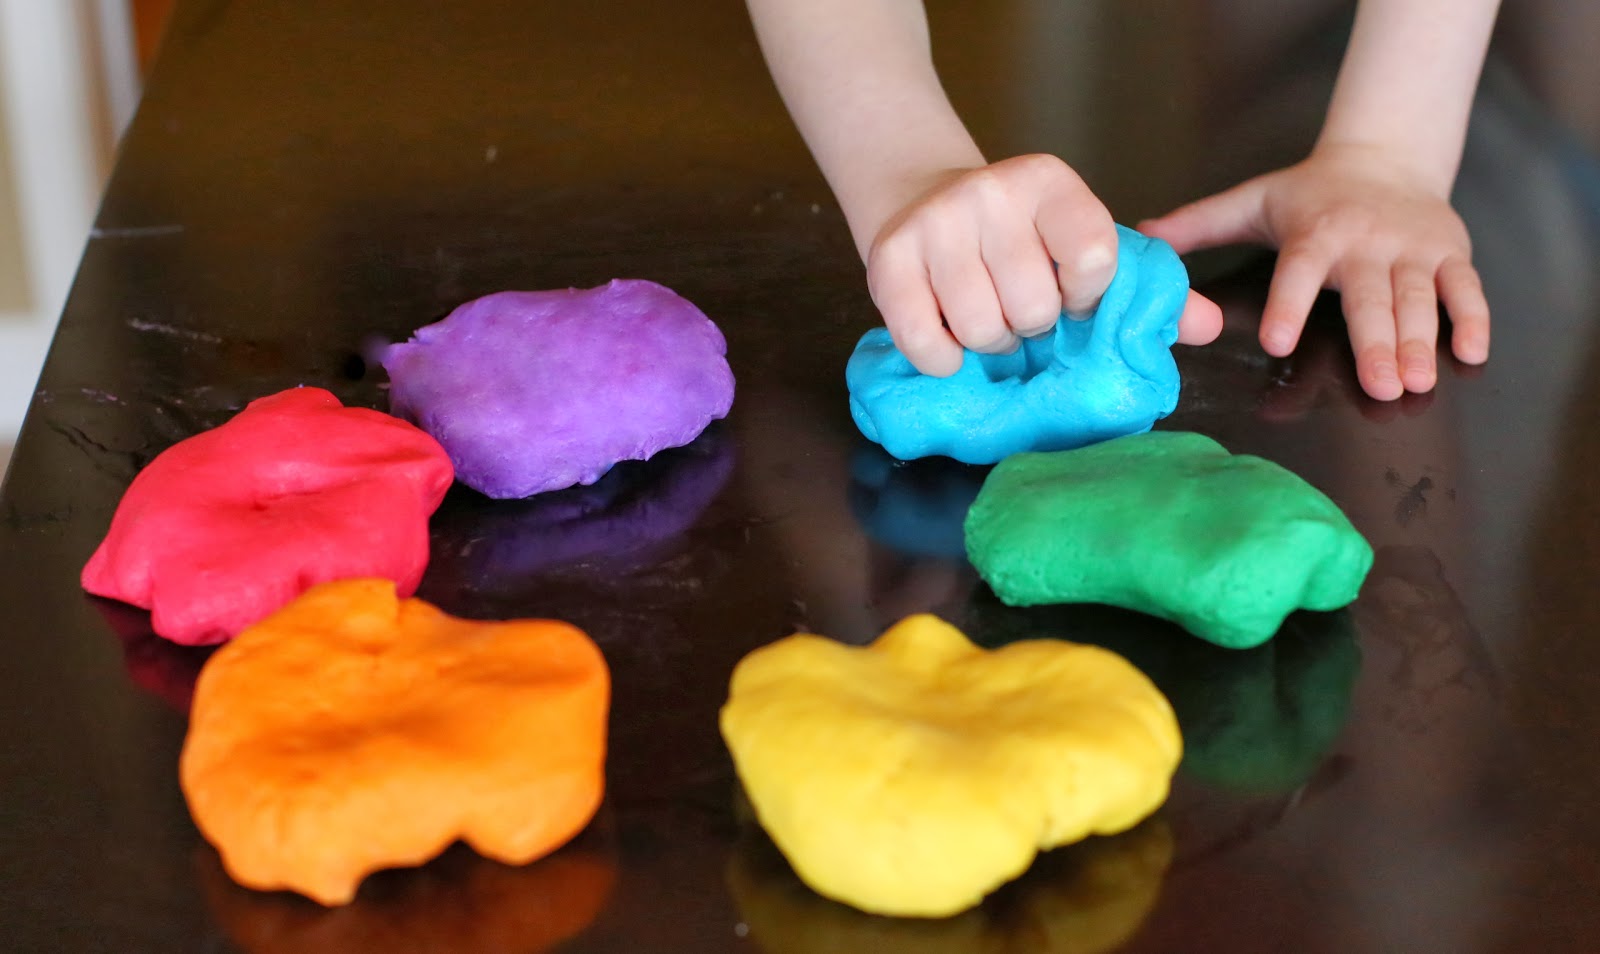
There are two most common ways to color salt dough. The first method: after drying, paint the finished craft with acrylic paints or gouache using a brush. Second method: food coloring is diluted in water, then added while preparing the dough. When the craft is completely painted and dried, it must be coated with transparent manicure or furniture varnish in 2-3 layers. Each layer must dry before applying the next. This way the craft will last for a long time.

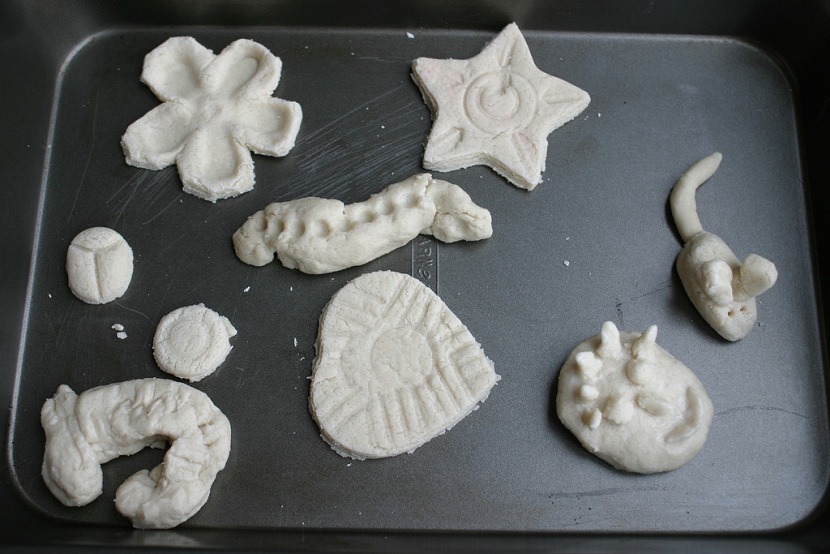
You will need: colored salt dough, stack, clear manicure polish, toothpick.
Master Class

The salt dough star is ready!
Salt dough caterpillar

You will need: colored dough, knife, pva glue, toothpick, pendant, clear manicure polish.
Master Class
- Roll out the sausage.
- Cut it into 6 equal parts.
- Roll into balls.
- Glue 5 balls together.
- Glue the head.
- Make a nose and eyes, then glue them on.
- Poke a toothpick into the hanging area.
- Dry the craft.
- Attach the pendant.
The salt dough caterpillar is ready!
Salt dough apple

You will need:
Master Class
- Make half an apple internal part make it flat by pressing it onto a flat surface.
- Make a thin flat center and glue it to the main part.
- Roll 6 seeds and a stick, then glue to the apple.
- Blind the leaves, then glue them.
- Dry the craft.
- Apply varnish and wait until completely dry.
The salted dough apple is ready!
Salt dough elephant

You will need: colored salt dough, pva glue, clear manicure polish.
Master Class
- Make the elephant's body by rolling an elongated ball.
- Make 4 legs in the shape of plump sausages.
- Make a proboscis.
- Make the elephant's ears in this way: roll out 2 flat cakes, glue flat cakes of the same shape of a smaller size and a different color to them.
- Make a small ponytail.
- Blind your eyes.
- Assemble the elephant in the following sequence: glue the legs to the body, then glue the proboscis, then the ears, eyes and tail.
- Dry the craft.
- Apply varnish and wait until completely dry.
The salt dough elephant is ready!

You will need: salt dough, foil, a candy bowl or similar plastic container, gouache, a brush, clear manicure polish, a modeling board, a knife or a stack.
Master Class


You will need: salt dough, nail scissors, pva glue, acrylic paints or gouache, brush, manicure polish.
Master Class

Salt dough hedgehog is ready!
Owl (eagle owl) made from salt dough
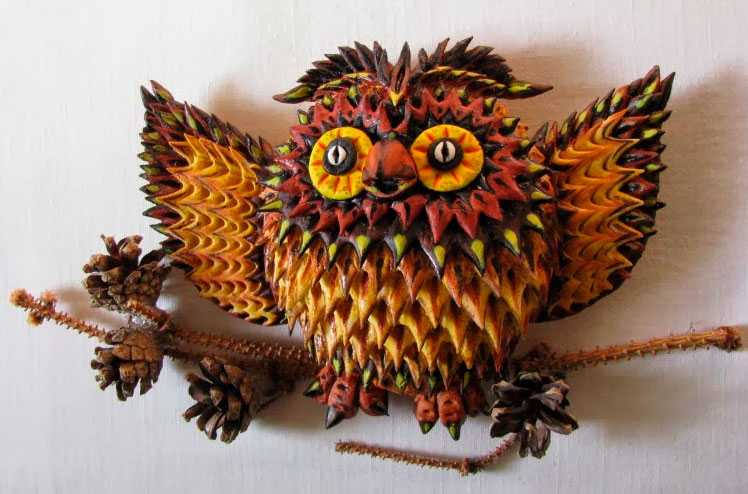
You will need: salt dough, pva glue, nail file, manicure scissors, acrylic paints or gouache, brush, wooden board with a pendant, clear manicure varnish.
Master Class

The salt dough owl is ready!

You will need: salted dough, the base on which the craft will be attached, for example, a board or plate, a glass or a knife, a sheet of paper, a simple pencil, a garlic press, a rolling pin, pva glue, acrylic paints or gouache, a brush, clear manicure polish, cloves.
Master Class

Salted dough fruit basket is ready! I recommend watching the video master class!

You will need: salt dough, knife, rolling pin, pencil, sheet of paper, sandpaper, acrylic paints or gouache, brush, transparent manicure varnish, glue gun or PVA, base for crafts, for example: a board with a frame, transparent manicure varnish.
Master Class

Salt dough pencil

You will need: water, flour, extra salt, cardboard jar for the frame, PVA glue, scissors, a piece of decorative rope or corrugated paper, gouache, brush, button, stacks, acrylic varnish for crafts, toothbrush.
Master Class
- Knead the salted dough in this way: add a glass of flour, a glass of salt, add water, then knead until the desired consistency of the dough. Separate part of the dough, add beige gouache, then knead.
- Roll out the cake to a thickness of 10-15 mm.

- Apply PVA glue to the outer rim of the jar and wrap it with dough. Cut off the excess with a stack and smooth the joints with a damp brush.
- Create a small dotted texture with a toothbrush on the surface of the dough.
- Knead the dough Brown, roll it into a flat cake 10-15mm thick.

- Cut a 5cm wide strip of brown pastry and glue it to the bottom of the jar.
- Make 2 from white dough large bases for the owl's eyes, then glue them on.
- Make a beak out of brown dough and glue it on.
- Make eyes from turquoise dough and glue them on.
- Roll out 8 strips of pink dough, twist them into 4 flagella and make a bow, then leave it to dry for 2 hours.
- Make droplet-shaped owl wings using brown dough, then glue them on.

- Weave ropes of beige dough and glue them onto the neck of the jar.
- Roll out a sausage from white dough, draw the texture of the lace with a stack and glue it as a collar under the beak.
- Place the craft in a warm place for a day.
- Paint the bottom and wings with brown gouache and decorate with white dots.

- Draw the pupils and eyelashes black gouache, wait until the paint dries, then paint white highlights on the eyes.
- Glue pink bow above the wing.
- Glue a button with a bow from a corrugated strip onto the lace.
- Cover the craft with varnish and wait until it dries completely.
The salt dough pencil is ready!
Salt dough dachshund

You will need: salt dough, pencil, scissors, cardboard, paints, brush, rope, toothpick, foam sponge, transparent varnish, PVA glue.
Master Class

The salt dough dachshund is ready!
Boletus mushroom made from salt dough

You will need: salt dough, light bulb, paints, brush, foil, cardboard, masking tape, superglue, PVA glue, paper napkins, clear varnish, stack.
Master Class

Boletus mushroom made from salt dough is ready! I recommend watching this video!
Funny salt dough pigs

You will need: salt dough, paints, brush, foam sponge, stack, thin rope, toothpick, black gel pen, PVA glue.
Master Class

Funny salt dough pigs are ready! I recommend watching this video!

You will need: salt dough, baking sheet, rolling pin, knife, sheet of paper, acrylic paints, brush, ribbon, water, shoehorn, pencil, sandpaper, clear manicure polish.
Master Class

If you want to create a bright souvenir with your own hands - a symbol of 2019, make a pig figurine from salt dough! Such a craft will not only serve as a symbol of the year, bringing good luck, but will also decorate the holiday in the best possible way.
In one MK we brought to life three New Year's ideas for making pigs. Now you can make the same ones with us!
Do-it-yourself piglets and pig magnets made from dough
Our master class will show you step by step how to make a pig from salt dough or other modeling mass.
What you need to create a craft:
- Ingredients for the dough:
- flour: 1 cup;
- salt: 0.5 cups;
- water: 50-80 ml;
- vegetable oil- 2-3 tbsp. spoons.
- paints;
- clear nail polish;
- magnets;
- decorative elements.
Preparing the dough for modeling
The recipe is extremely simple, mix flour with salt, add water and vegetable oil. Mix the mixture well until smooth.

The dough should not stick to your hands or crumble. If the dough is sticky, add a little flour, if it crumbles, add water.
We print out the template and decide on the size of the craft.

- Take a small piece of dough, make a ball-head and a flattened oval-body.
- We create legs from small pieces, attach them to the body, and tuck them behind the back.
- We rub the seams with fingers dipped in water.
- Small cylinders are future legs. You need to make holes in the middle of the workpieces with a match so that you can conveniently fasten the parts together.
- Insert half a match into the lower base of the body on both sides.
- We fasten the legs and smooth the seams with water.

- We form a patch and fasten it in place.
- Draw the contours of the face.
- We fasten the ears in place.
Pig magnet girl made from salt dough: step by step instructions

- Take a small piece of dough and roll it out to a thickness of 0.5-.7 cm.
- Place the template on top and cut along the contour.
- Remove the paper blank and “wash” the edges with water.
- We apply contour drawing- highlight the eyes, mouth, collar and buttons.
- We form and attach a patch to the face.
We sculpt a magnet in the shape of a plump pig

Let's take it new template and repeat all stages of work like the previous MK.

Are the crafts ready? We send them to dry in the oven. We usually dry salt dough products at a temperature of 180°-190°.

The salt dough pigs, intended for creating magnets, dried and browned in 15 minutes; the three-dimensional figure was dried for an additional 10 minutes at a temperature of 150°.
Product tinting
The next step is to paint the products in one tone. For these purposes, you can use black, brown or dark blue paint. Tinting the base is done to make the crafts look more natural due to the play of light and shadow.

It is better to apply paint to the figures with a foam stamp or sponge, and you need to drive the paint into all existing cracks.
Let the paint soak in for 15 minutes and move on to the next stage.
Removing unnecessary things
Now we need to remove excess paint so that it remains only in the recesses and cracks.

To do this, take a kitchen sponge, moisten it with water and begin to wipe off the paint. If you are hesitant to do this, look first.
After this, we send the “three little pigs” to the oven and dry them there at a temperature of 150° for 5-10 minutes.
Coloring the pigs correctly
Are the products dry and cool? Then you can start painting them.
Very rarely do you have the colors you want on hand. Therefore, let's take a palette or a piece of cardboard and mix paints.

In the photo above you can see how you can color the pig. We painted the face with flesh color, mixing white, red and brown paint. Clothes and accessories can be painted in any color you wish.
If you want your pig to be able to stand, make a stand in the form of a square or oval (tubercle) from salt dough.
Opening crafts with varnish
IN modern conditions it's easy to find a special varnish for similar work, but since we are making crafts at home, using only improvised material, we will open the pigs with ordinary colorless nail polish.
Practice has shown that it is no worse than expensive means.


If the paint is completely dry, you can start varnishing the figures. It is enough to open them in one layer and let the varnish dry.
Then you can decorate the pigs with sequins or half-beads. You can sprinkle glitter on top of the varnish.
Now you can attach the three-dimensional pig figurine to the stand, and attach magnets to the rest of the crafts.

We admire the results of our joint work!
Video master class on sculpting the three little pigs


