Drawings on a winter theme. Winter Drawing with Children Compilation
I found an interesting collection on the Internet. (the most interesting, for me, at the end))
1. Winter drawings. "3D Snow Paint"
If you mix PVA glue and shaving foam in equal volumes, you get a wonderful airy snow paint. She can draw snowflakes, snowmen, polar bears or winter landscapes. For beauty, you can add glitter to the paint. When drawing with such paint, it is better to first mark the outlines of the drawing with a simple pencil, and then paint it with paint. After some time, the paint will harden, and you will get a three-dimensional winter picture.


2. Winter drawings of children. The use of electrical tape in children's creativity
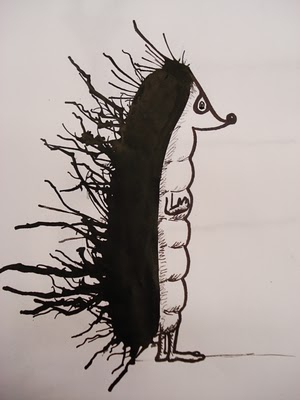
If there is snow outside the window, then you can depict it with a cotton swab.


Or with a brush put snow on each branch.

11. Winter drawings. Drawings on the theme of winter
An interesting idea on the theme of children's winter drawings was proposed by the author of the blog Homeschool Creations. She painted snow on transparent film with putty. Now it can be applied to any winter pattern or appliqué, imitating falling snow. They put a film on the picture - it began to snow, they removed the film - the snow stopped.

12. Winter drawings. "Christmas lights" We want to tell you about one interesting non-traditional drawing technique. To draw a New Year's garland as in the photo, you will need a sheet of dark-colored thick paper (blue, purple or black). You will also need ordinary chalk (the one that is used to draw on asphalt or a blackboard) and another light bulb stencil cut out of cardboard.
On a sheet of paper with a thin felt-tip pen, draw a wire and bulb holders. Now apply the stencil of the light bulb in turn to each cartridge and boldly circle it with chalk. After that, without removing the stencil, smear the chalk on the paper with a piece of cotton wool or directly with your finger to make it look like rays of light. You can replace the chalk with crumbs of colored pencil graphite.

You don't have to use a stencil. You can simply paint over the light bulbs with chalk, and then gently rub the chalk in different directions to make rays.

Using this technique, you can also draw a winter city, for example, or the northern lights.

13. Drawings winter fairy tale. Winter forest drawings
On the site mentioned above maam.ru you will find an interesting master class on drawing winter landscapes using templates. You only need one base color - blue, a coarse bristle brush and a white sheet to paint on. When cutting templates, use the cut-out method from paper folded in half. Look at what a magnificent drawing of a winter forest the author of the picture turned out to be. A real winter fairy tale!


14. Winter drawings. Drawings on the theme of winter
You are probably very eager to find out how the wonderful "marble" Christmas tree was drawn in the photo below? We tell everything in order ... To draw such an original drawing on the theme of winter, you will need:
Cream (foam) for shaving
- watercolors or green food coloring
- a flat dish for mixing shaving foam and paints
- paper
- scraper
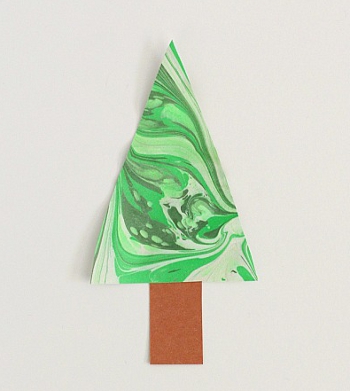
1. Apply shaving cream in an even, thick layer on a plate.
2. Mix paints or food coloring in different shades of green with a little water to make a rich solution.
3. Using a brush or pipette, drip paint onto the surface of the foam in random order.
4. Now, with the same brush or stick, beautifully spread the paint over the surface so that it forms fancy zigzags, wavy lines, etc. This is the most creative stage of the whole work, which will bring pleasure to children.
5. Now take a sheet of paper and carefully place it on the surface of the resulting patterned foam.
6. Put the sheet on the table. All you have to do is scrape off all the foam from the sheet of paper. For these purposes, you can use a piece of cardboard.
Simply amazing! Under a layer of shaving foam, you will find stunning marble patterns. The paint has soaked into the paper quickly, you just need to let it dry for a few hours.
15. How to draw winter. How to draw winter with paints
Finishing our review article on winter drawings for children, we want to tell you about another interesting way to draw winter with paints with your child. To work, you will need any small balls and a plastic cup (or any other cylindrical object with a lid).

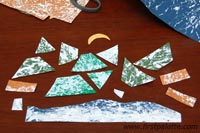
Insert a sheet of colored paper inside the glass. Dip the balls in white paint. Now put them in a glass, close it on top with a lid and shake well. As a result, you will get colored paper with white streaks. Similarly, make colored paper with white streaks of other colors. From these blanks, cut out the details of the appliqué on a winter theme.


Material prepared: Anna Ponomarenko
Draw winter with preschoolers: step by step master classes, collection of ideas.

Drawing winter with preschoolers
In this article you will find step-by-step master classes on drawing with children of preschool age in winter in different techniques:
- winter gouache painting,
- draw winter using scratching technique,
- salt painting.
Master classes will help teachers and parents to conduct drawing classes in kindergarten, children's studio and at home.
Master class 1. Draw winter with gouache with preschoolers
Master class author: Vera Parfentyeva, technology teacher, head of the children's art circle, reader of the Native Path. The article in the photo shows the drawings of children - pupils of Vera's studio.
Drawing materials and tools
To complete the drawing of winter, you need to prepare for the child:
- album sheet,
- paints (watercolor or gouache),
- brush (you need a wide flat brush),
- round brushes No. 1-2, 4-5.
Children's age
This drawing can be drawn by children from 5 years and older (senior preschool and primary school age.
How to draw winter with children: a step by step description
Step 1.Prepare the background. To do this, you need to apply a few strokes of blue, red, yellow, purple (you can also green) paint with a wide brush. Then pick up white paint on the brush and stretch the color. Until the desired background is obtained, in which one tone passes into another.

Step 2 We draw the contours of the trees.
- On a round brush No. 4 or 5, pick up white paint, and holding the brush vertically, first point out the contours of two trees in the center of the sheet (or do it by poking). Trees consist of three tiers in the form of a month-like figure or "cloud". Start drawing from the bottom tier. The middle and upper tiers should be smaller than one another.
- On the sides of the trees, outline the "clouds" of a round shape for the shrub.
- Using the poke method, fill the inside of each "cloud".

Step 3. We draw snow caps on trees.
Mix white and black paint on the palette to get a light gray color and also make a gray tint on the white “clouds” (a shadow on the snow caps).

Step 4 We draw trunks and branches of trees and bushes.
With brush No. 1 or 2, draw tree trunks between crown tiers and shrub trunks with thin lines.
Paint the tree trunks with black paint, being careful not to hurt the crowns.
Draw a branch from the trunk.

Step 5 We draw snow on tree trunks and snowdrifts.
- With white paint, apply thin lines along the trunks of trees and shrubs.
- Under the trees, outline the contours of the snowdrifts with a brush number 5 and fill the "snowdrifts" with white paint.

Step 6 Draw falling snow.
Make a splash with white paint on the finished drawing, drawing a brush over the brush, imitating falling snow. How to draw falling snow with a “spray” You are shown in the photo.

Our drawing is ready. Try to depict winter in a drawing! Good luck with your creativity!

And below is an example of a children's drawing from this master class. It was drawn by Nastya (7, 5 years old).

We draw winter with children using the scratching technique
We draw a winter drawing with salt: execution technique
In the video you will see the technique of drawing on the example of the image of a snowman. But in the same way, you can make an image of a winter tree, a house, a clearing, a forest.
Draw winter with gouache: a step-by-step video for children 6 years and older
The article will tell you about how easy it is to draw a winter landscape on your own.
Drawings depicting winter landscapes have a special attractive magic: you want to look at them and hang them on the wall in a recreation area (hall, bedroom, office). Images of snow-covered trees and roofs of houses instill in the human soul a sense of comfort and tenderness, fairy tales and magic, which is present at New Year's time.
Drawing winter landscapes is not difficult. Main - choose the right paper and colors. Approximately 50% of the success of the entire work depends on the selected paper. When drawing with paints, you will need thick cardboard from the Kraft category. You can also use colored matte cardboard, for example, blue or black, on which white paint, pastels and pencils look particularly contrasting.
Thinking about what you can draw in a winter landscape, the first thing that comes to mind is a house. The house has been present in the human mind since childhood, since the first time a child sees a fairy tale about Morozko or forest animals. It doesn’t matter what kind of house you represent, the main thing is to draw it correctly.
We suggest you depict a cozy forest house:
- Choose a perspective, i.e. approximate location of the house on a piece of paper.
- It is best if the house is in the center of your image, or not far from the center. So it will attract attention and be the main storyline.
- You can use a ruler to draw an even and proportional house with a roof, but then be sure to trace the house template by hand so that the drawing does not look angular.
- After you draw the main lines: walls, roof, windows, threshold, etc., proceed to detailing.
- Do not rush to draw snow. Only when the house is completely drawn, with the help of white paint or chalk, literally “cover” the house with a “snow cap”. If you draw only with a simple pencil, an eraser will come in handy.
Step by step drawing:
House in the forest: drawing in stages 
 House, winter landscape: step one "basic lines"
 Once the main lines are drawn, sketch snow on all surfaces.
 Start detailing the drawing, depict nature: trees, Christmas trees, paths and other little things
 Erase extra lines with an eraser
 Start coloring the picture with paints
How to draw children in winter with a pencil and paints?
To decorate a drawing depicting winter, you can complement the fun children. Such a drawing will certainly evoke pleasant emotions and associations with childhood. This idea is also good for drawing New Year cards and pictures for contests and exhibitions.
How to draw:
- Plan the storyline in advance: how your characters will be depicted, where and what they will do: dance, play snowballs, build a snowman, sled, spin around the Christmas tree, and so on.
- Schematically depict the figures of children. You have to choose a position for everyone: someone raised their hands up, someone sits on a sled, someone covers their ears or tickles a friend.
- After depicting the figures of children, you can begin to detail them and create a winter landscape.
How to portray children:

 Children are sledding
 Snowball games, snowman
 Winter fun: kids
 Making a snowman, playing snowballs
 Finished drawings:
Paint drawing: winter fun
 Sledding: painting with paints
 Drawing of winter with the image of children having fun
 How to draw animals in winter with a pencil and paints?
Winter is a “fabulous time”, which means that even animals at this time of the year enjoy the lush snow, wait for the New Year and have fun. You can draw a landscape depicting any "forest inhabitants": a wolf, a fox, a squirrel, a bear, a hedgehog, a hare and others.
What animals can be drawn:

 Step by step drawing of a wolf
 Step by step drawing of a hedgehog
 Step by step drawing of a squirrel
 Step by step drawing of a woodpecker
 Moose drawing step by step
 Step by step drawing of a hare
 Step by step drawing of a bear
 How to draw a winter landscape with children and animals with a pencil and paints?
In order for the drawing to turn out to be rich, interesting and positive, depict several storylines at once. For example, in the forest or in the clearing, children have fun with winter fun together.
Drawing Ideas:

 Forest animals, kids: "winter" drawing
 Animals: winter fun
 Animals celebrate the New Year
 Children and animals in winter
 New Year's winter drawing Children and animals: winter
 Winter activities for animals Feeding animals in winter
 Drawings about winter with children and animals for beginners and children for sketching: photo
If you are not strong in independent drawing, sketches will always help you. You can draw the template through glass or by attaching a sheet of white paper to a computer monitor (it is advisable to do this in the dark). Adjust the size and location of the pattern yourself.
Winter is a truly magical time of the year. White, crackling snow underfoot, patterns on the windows, warm hats with pom-poms, snowball fights, New Year's holidays - this is not a complete list of all the wonders of the winter season. And if you want to keep a little of this magic for yourself, then learning how to draw a winter landscape is what you need.
 Landscape with mountains and a river |
 Twilight in the forest |
 simple drawing |
Draw a rural winter landscape

Although winter can fill even large cities with the atmosphere of a fairy tale, it is rural views that acquire special charm and comfort at this time of the year. We will demonstrate all the beauty of the snow-covered village houses when we learn how to draw a winter landscape in stages.
First, with a pencil, outline the outlines of one Christmas tree and one house. The Christmas tree will be wide, spreading.

And then - two more houses and another Christmas tree. The houses will have triangular roofs characteristic of many villages.

Let's add more Christmas trees and a palisade. This fence, of course, is rather conditional - in the villages people know each other and do not build high fences.

Now, according to the sketch, we will draw the drawing with paints. The trees will be a juicy green, the houses will give off a warm shade of unpainted wood, and the snow will be a little blue. To make the picture look alive, we will seat three birds on the fence.
That's it, the drawing is finished.
Hills and snowfall - draw a winter landscape

Let's continue the theme of rural beauties. This time we will depict the very outskirts of the village - a forest will be visible in the background. And the snowfall will be in full swing. Don't worry, it's not difficult at all - this example is great for practicing and painting a winter landscape for beginners.
First, let's outline the largest forms - in our case, these are hills.

Then we will depict three spruces in the foreground, and in the background we will make a house, a snowman and the sharp tops of smaller trees. Do not forget about the path leading to the house.

Let's fine-tune all the contours. We will also “give” a snowman and a top hat and depict snowflakes falling from the sky.

Let's color the drawing. Our landscape will be at night, so we will make the sky dark, grayish (after all, it will be covered with clouds). And, of course, you can not do without a gorgeous full moon. The house will be made in warm colors: the walls will be yellow, the roof will be red, and the doors will be brown.
This concludes - we did a great job.
Magic winter night

Despite the fact that untouched snow during the day, the smoke from the chimneys of rural houses and the pointed tops of the Christmas trees look fabulous, the true magic lies in winter nights. This is exactly what we will show when we figure out how to paint a winter landscape with gouache.
We will not immediately take up gouache - first you need to make a pencil sketch. Let's start with the general outlines of a hilly area, a house and three trees near it.

Then we will draw another smaller house, a path leading to it and add more trees, coniferous and deciduous. In the very foreground there will be a birch with thin branches lowered down.

After that, we will start working with paints. First of all, with dark tones, we will depict the sky and the forest in the background. You can also grab three spruces near the big house. Do not forget to make a month in the sky - for now it will be very thin, young.

Now foreground. We will make the snow a little bluish, the trees green, and the walls of the houses light brown.

Small details remained - the light in the windows, smoke pouring from the chimneys, snow on the paws of the Christmas trees, the trunk and branches of a birch. And many stars in the night sky.
Now we can safely say - the drawing is over.
Winter landscape with mountains and river

Winter in the mountains is amazing. The forest, which has become harsh and dark, clean rivers, thick snow - all this looks so pristine, clean, untouched that you can admire this beauty for hours. But you also need to add a touch of comfort - a small, but solid and neat village house is perfect for this purpose. So we will learn how to draw a beautiful winter landscape.
First, let's deal with the first plan - there will be two trees with thin branches.


On the right side of the picture, we will depict a house of a peculiar shape and the tops of the Christmas trees in the background.

And now you can take up pencils or paints. In the background we will make mountains - they will be completely covered with snow. The house will be made of wood, and the bridge will be made of bricks. You also need to draw transverse stripes on nearby trees - these are birches. Pay special attention to the windows - they should glow, because this is a sure sign that someone lives there.
That's it, we've finished the picture.
Twilight in the winter forest

In addition to night, the most interesting time of day in the winter forest is twilight. The stunning shade of the sky and falling asleep nature merge into a marvelous ensemble. Using the example of such a miracle, we will learn how to paint a winter landscape with paints.
First, let's deal with the sky and the general tone of the snow. To do this, we will use watercolor or gouache to get beautiful stains. You need to wet the paper, and then apply paint with plenty of water and tilt the sheet. The paint will flow down, forming these beautiful patterns:

Then we will depict a tree in the foreground. try to make the branches thin enough. Moreover, the brush must be drawn from the base of the branch to its tip.

By the same principle, draw three small bushes.

Then - two Christmas trees. They should be drawn with thick, saturated strokes of a dark green hue.

We sprinkle trees and bushes with snow. And we will also decorate the front bush with juicy red berries.
Now the picture is complete.
Multi-colored house, bunny and snowflakes - fun winter

Winter is the time for fairy tales, which is why it is often depicted in cartoons. In this section, we will also begin to work in a cartoon manner - at the same time we will learn how to draw a winter landscape with a pencil.
First, we outline the house and the bunny looking out the window. All outlines will be very smooth, rounded, without sharp edges.

Then we will finish the Christmas trees (they will be just as smooth and rounded) and the snow falling from the sky.

Now let's paint everything in the brightest colors. But the snow, of course, must be made blue. And the trees are green.
Everything, a cheerful house is ready.
In winter, adults and children spend a lot of time at home, so there are more opportunities to get creative. Winter is a very beautiful time of the year. Try to convey the beauty of this season in winter drawings. We will share with you simple drawing techniques with which you can teach your child to draw beautiful drawings on the theme of winter. From this article you will learn how to make voluminous snow paint, learn how to draw winter drawings using the spatter technique. When drawing drawings on a winter theme, we will use all kinds of additional materials, and not just a brush and paints. You don’t even suspect that you can draw winter with plastic wrap or salt, bubble wrap or shaving foam.
1. Winter drawings. "3D Snow Paint"
If you mix PVA glue and shaving foam in equal volumes, you get a wonderful airy snow paint. She can draw snowflakes, snowmen, polar bears or winter landscapes. For beauty, you can add glitter to the paint. When drawing with such paint, it is better to first mark the outlines of the drawing with a simple pencil, and then paint it with paint. After some time, the paint will harden, and you will get a three-dimensional winter picture.

2. Winter drawings of children. The use of electrical tape in children's creativity
On the English blog Art Projects for Kids shows how you can create beautiful winter landscapes using ordinary electrical tape or adhesive tape. For more information about this technique, see the article."The use of electrical tape in children's creativity" .Note: to create winter drawings in this technique, it is advisable to use thick glossy paper, from which it will later be easy to remove pieces of electrical tape without damaging the paper.

A. First, make a frame of electrical tape around the perimeter of the sheet. After that, cut strips with uneven edges from electrical tape (wide ones for trunks, narrower ones for tree branches). Stick them on paper. Cut and paste the moon.
B. Now apply dark blue paint. While the paint is wet, you can sprinkle it with salt. Then interesting patterns will appear (the glossier the paper, the more beautiful the stains will be).
B. When the paint dries, shake off the salt from the paper, carefully remove the tape.

D. With blue paint, apply narrow stripes of shadow on the trunk and branches of trees, transverse stripes on tree trunks. Using a thin brush or cotton swab, paint falling snow with white paint or putty.
3. Winter drawings. Drawings on the theme of winter

If there is snow outside the window, then you can depict it with a cotton swab.


Or with a brush put snow on each branch.

11. Winter drawings. Drawings on the theme of winter
An interesting idea on the theme of children's winter drawings was proposed by the author of the blog Homeschool Creations . She painted snow on transparent film with putty. Now it can be applied to any winter pattern or appliqué, imitating falling snow. They put a film on the picture - it began to snow, they removed the film - the snow stopped.

12. Winter drawings. "Christmas lights"
We want to tell you about one interesting non-traditional drawing technique. To draw a New Year's garland as in the photo, you will need a sheet of dark-colored thick paper (blue, purple or black). You will also need ordinary chalk (the one that is used to draw on asphalt or a blackboard) and another light bulb stencil cut out of cardboard.
On a sheet of paper with a thin felt-tip pen, draw a wire and bulb holders. Now apply the stencil of the light bulb in turn to each cartridge and boldly circle it with chalk. After that, without removing the stencil, smear the chalk on the paper with a piece of cotton wool or directly with your finger to make it look like rays of light. You can replace the chalk with crumbs of colored pencil graphite.


You don't have to use a stencil. You can simply paint over the light bulbs with chalk, and then gently rub the chalk in different directions to make rays.

Using this technique, you can also draw a winter city, for example, or the northern lights.

13. Drawings winter fairy tale. Winter forest drawings
On the site mentioned above maam.ru you will find an interesting master class on drawing winter landscapes using templates. You only need one base color - blue, a coarse bristle brush and a white sheet to paint on. When cutting templates, use the cut-out method from paper folded in half. Look at what a magnificent drawing of a winter forest the author of the picture turned out to be. A real winter fairy tale!


14. Winter drawings. Drawings on the theme of winter
You are probably very eager to find out how the wonderful "marble" Christmas tree was drawn in the photo below? We tell everything in order ... To draw such an original drawing on the theme of winter, you will need:
Cream (foam) for shaving
- watercolors or green food coloring
- a flat dish for mixing shaving foam and paints
- paper
- scraper

1. Apply shaving cream in an even, thick layer on a plate.
2. Mix paints or food coloring in different shades of green with a little water to make a rich solution.
3. Using a brush or pipette, drip paint onto the surface of the foam in random order.
4. Now, with the same brush or stick, beautifully spread the paint over the surface so that it forms fancy zigzags, wavy lines, etc. This is the most creative stage of the whole work, which will bring pleasure to children.
5. Now take a sheet of paper and carefully place it on the surface of the resulting patterned foam.
6. Put the sheet on the table. All you have to do is scrape off all the foam from the sheet of paper. For these purposes, you can use a piece of cardboard.
Simply amazing! Under a layer of shaving foam, you will find stunning marble patterns. The paint has soaked into the paper quickly, you just need to let it dry for a few hours.
15. How to draw winter. How to draw winter with paints
Finishing our review article on winter drawings for children, we want to tell you about another interesting way to draw winter with paints with your child. To work, you will need any small balls and a plastic cup (or any other cylindrical object with a lid).

