How to create lines in Word. How to draw in Word? Creating Lines and Shapes
Working in Word, everyone sooner or later wonders how to make a subscript or superscript line. This function is especially often in demand when creating templates for documents. Note that there are many methods, and we will consider the most convenient and popular ones.
Lines below and above text in Word 2007
- Place the cursor in the place where the intended text with a line will be located. On the “Home” tab, find the “Paragraph” section and the “Bottom Border” subsection, select the required border type and enter the text. We move to a new line using arrows, not “Enter”.
- A subscript can be created by using the “Underlines” button in the “Fonts” section on “Home”.
- If you need a line without text, place the cursor in the required place and hold down the “Shift” and “-” buttons until the required length is achieved.
Making lines in Word 2003
- Place the cursor in the required place. From the Format menu, select Borders and Shading. We find a suitable line in the types, indicate its upper or lower location. Confirm “Ok”. The line will belong to the entire paragraph.
- If only part of a row is needed, it is better to use inserting a table (its cells), in which invisible and visible lines should be marked.

Don't overuse lines. Use them as needed.
Conquer Word and see you again!
In this article we will not do much educational work on how to draw a line in Word.
The article is intended for both people who are not knowledgeable and those who are already familiar with a personal computer.
Everyone will learn something new from it. After all, the question “How to draw a line in Word?” It occurs very often in people and not everyone will immediately remember what’s what.
Methods will be presented for versions of Word ranging from more outdated ones, for example MS Word 2003, to the newest versions.
If you still have questions, ask them in the comments or send them by email.
By line we mean a horizontal, continuous line (bold, thin).
Let's look at five ways to draw lines.
Using the keyboard
We do this:
- On a regular keyboard there is a key Shift(shift, the button is highlighted in red in the screenshot), it doesn’t matter whether it’s the left or right button;
- the second key we will need is the underscore/dash (highlighted in green in the screenshot);
- the third button for performing an action is Enter (it is present on all keyboards); a more or less experienced user will easily find it.

If you simply press the underline key, the “dash” sign will appear and we will get this broken line “————”
If we type three such dashes and press the Enter key after them, we will get a horizontal line, which you will see below
We print:
- (and after three dashes press “Enter”).
Using a table
Sequencing:
- use the Word menu “Insert” - “Table”;
- select a table from the menu that opens one cells. You will get a rectangle like this;
- now you need to select the “Table with blank cells on three sides” function;
- to do this, return to the “Main” menu and find there a button for selecting the sides of the borders;
- select the table and select in the “Borders” menu, first the “No border” mode, and then the “Upper or Lower border” mode, as it is more convenient for you;
- ready! You now have a horizontal continuous line.
Also, if you don’t want to bother going through the “Insert” menu - “Tables”
You can simply use the "Borders" button and select the bottom or top edge. You will get a regular thin line.
If you need to delete lines created using the table, then first:
- select the table;
- right-click on the selected area;
- select the “Cut” function;
- the table will disappear.
Using shape drawing
Using shape drawing:
- go back to the “Insert” menu;
- "Shapes" button;
- select from the proposed figures – “Lines”;
- the cursor will change to a cross, with which you can draw a line of the length you need and in the desired direction.
Using the “Shapes” function, double-click on the line with the left mouse button. You can choose the color of your line, its thickness, outline and many other add-ons to suit your taste.
If you just need an even straight line, then when drawing from a figure in the desired direction, you must hold down the Shift key. Then no matter which direction you move your mouse, your line will be perfectly straight.
To delete a line, simply select it and press the “Delete” key on your keyboard (or similarly with a table using the cut function, if for some reason you cannot find the Delete key).
Using the on-screen keyboard
This method is for those who do not have a keyboard, but at the same time have a “mouse”. It is either broken or simply missing, or you are simply not looking for easy ways. 
To start…
How to open the on-screen keyboard in Windows 7, 8, 10:
- open the “Start” menu;
- in the “Search” line write “On-screen keyboard”;
- The keyboard application will open;
- through the manipulations described in the very first method. Using the “Shift” and “Dash” keys, draw a horizontal, continuous line.
This is also convenient for owners of tablets on which Word is installed.
Let's look at how to open the on-screen keyboard application for Windows XP owners:
- go back to the Start menu;
- open “All programs”;
- submenu “Standard”;
- folder "Special" possibilities";
- select the “Screen” application. keyboard".
It's simple. By following the same steps, you can easily draw as many lines as you need.
Using Page Borders
What should be done:
- open the “Design” menu;
- select the “Page Borders” function;
- in the settings window that opens, look for the “Page” item;
- At the bottom of the add-ons there will be a button “Horizontal line...” Select it;
- a new menu will open with a choice of lines;
- select the one we need, in my case it is “Horizontal Line”;
- click the “Ok” button
Ready. The line is inserted into the text.
Often, when designing text documents, it becomes necessary to draw a line, for example, in order to separate one part of the text from another. In the Microsoft Word text editor, there are several options for solving this problem.
In this article, we'll look at three of the easiest ways to draw a line in Word. The material will be relevant for all modern versions of Word. Including Word 2007, 2010, 2013 and 2016.
Method No. 1. Inserting a dash or underscore.
Perhaps the easiest way to draw a line in Word is to use a dash or underscore. By inserting a large number of such characters in a row, you will get a horizontal line. For example, to draw a line using a dash sign, simply hold down the CTRL key and, without releasing it, press the minus key on the additional keyboard block. Then hold this key combination until you get the line of the length you need.
In a similar way, you can draw a line using an underscore. To do this, hold down the SHIFT key and the underscore key. Then you need to hold these keys until a line of the desired length is drawn.

This method of creating lines is convenient because such a line is easy to draw and easy to remove. If the line turns out to be unnecessary, then it can be deleted just like any other text.
Method number 2. Inserting a finished line.
Another way to draw a line in Word is to use the button to create borders. This button is located on the “Home” tab and it allows you to quickly draw a line anywhere in the text. All you need to do is place the cursor where you want the line to be, click on the button and select “Horizontal Line”. As a result, a horizontal line will be drawn at the selected location on the page.
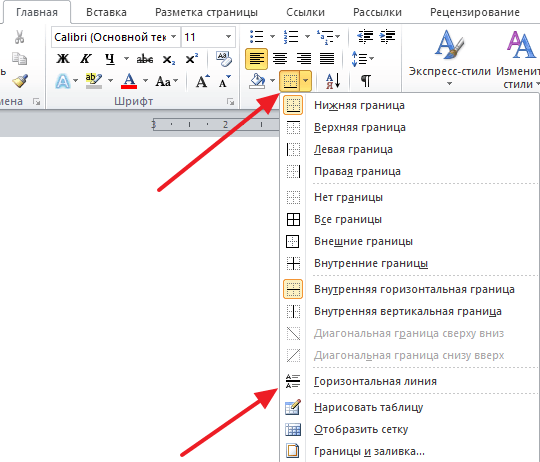
The advantage of this method is that the line drawn in this way can be changed. The line can be made thicker, thinner, longer or shorter. To do this, you need to select the line with the mouse, after which its size can be adjusted by moving its corners. In order to delete such a line, you just need to select it and press the Delete key.
Method number 3. Inserting a shape.
On the Insert tab, there is a Shapes button that allows you to insert various shapes into your document. Among other things, there is a figure in the form of a line. To insert it into the document, click on the “Shapes” button, select the line and draw a line of the length you need in the document.
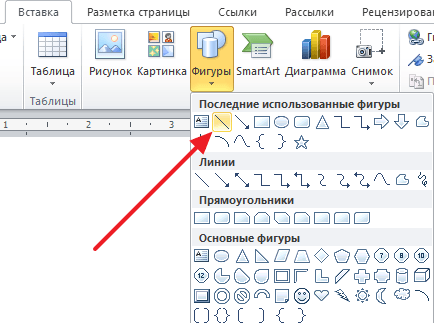
The advantage of this method is that such a line can be placed at any angle. In order to delete such a line, you just need to select it with the mouse and press the Delete key.
In this article we will look at three ways:
- how to make a horizontal line autocorrect;
- how to insert a horizontal line by adding a border;
- and how to draw a horizontal line.
Let's start with the fastest and easiest way, how to make a horizontal line in Word .
The fastest way to make a horizontal line in Word
In order to quickly make a horizontal line, enter three or more special characters on a new line and then press Enter. Word automatically converts these characters to a horizontal line. The style of the horizontal line depends on the characters entered:
How to make a horizontal line in Word - Styles of horizontal lines in Word
- Three or more "*" - dotted horizontal line
- Three or more "=" - double horizontal line
- Three or more "~" - a wavy horizontal line
- Three or more "#" - thick decorative horizontal line
- Three or more "-" or "_" - thick or thin single horizontal line
These horizontal lines are often used in Word documents.
How to make a horizontal line using a border
You can also use paragraph boundaries.
1. To do this, place the cursor where you want .

How to make a horizontal line in Word - Where to insert a horizontal line
- On the “Home” tab, in the “Paragraph” group, click on the “Borders” command arrow.

How to Make a Horizontal Line in Word - Inserting a Horizontal Line
- Horizontal line ».

How to make a horizontal line in Word - Horizontal Line
- will appear at the cursor location horizontal line.

How to make a horizontal line in Word - Horizontal line in Word
- To set up made horizontal line double-click on it with the left mouse button. The dialog box “ Horizontal Line Format».

How to make a horizontal line in Word - Setting up a horizontal line in Word
In this window you can adjust the width, height, color and alignment horizontal line in Word .
More information about boundaries is available in the article.
How to make a horizontal line using a shape
The last way how to make a horizontal line in Word- This draw a horizontal line.
- Go to the “Insert” tab and in the “Illustrations” group, click the “Shapes” command.

How to Make a Horizontal Line in Word - Shapes
- In the list that opens, select " Line ».

How to make a horizontal line in Word - Line
- The mouse pointer turns into a plus sign. Click where you want in the document insert horizontal line, and hold down the Shift key and the mouse button, move the pointer to another location, and then release.

How to draw a horizontal line in Word - Drawing a horizontal line in Word
Here are the ways you can make a horizontal line in Word.
It would seem, why might four methods be needed? After all, almost every person uses one method to which he is accustomed. For example, I pressed Shift and the dash key several times, and so I got a horizontal line.
But what if this results in a dotted line, but you need a solid one?
- Most likely, the Shift key on the keyboard is faulty. Other methods will come to the rescue here.
Perhaps the most common way to make a line in Word is to use a couple of keys on the keyboard.
I Thin, thick, double, dotted line using keyboard
Below is a picture of a keyboard with an English layout, but without a Russian layout, but this does not matter, because we are only interested in three keys: Shift, dash and Enter.

Rice. 1. Three keys on the keyboard: Shift, dash and Enter for a continuous horizontal line in Word
With these three keys you can draw a continuous horizontal line in Word: dotted or solid, thin or thick, long or short.
1) When you press the “-” (dash) key several times in the Word editor, you get a dotted line of any length.
To do thin a long line across the entire width of the page:
- We find the “dash” key on the keyboard (to the right of the “zero” key, in the green frame in Fig. 1).
- From a new (!) line in Word, press this key several times: -
- And then press the “Enter” () key. A few printed dashes will suddenly turn into a continuous horizontal thin line across the entire width of the page.
2) When you simultaneously press Shift and “-” (dash), NOT a dash is printed, but an underscore _________. This way you can make a continuous line of arbitrary length anywhere in the document.

Rice. 2. Thin and thick horizontal line in Word
Now let's print fat horizontal line across the entire width of the page:
- Again we find the same “dash” key, as well as the Shift key (on the left or on the right, as you like). Press Shift, hold and don't let go.
- And now, from a new (!) line, click on the dash several times (for example, 3-4 times) (while not releasing Shift): ___. Release Shift.
- Now press the Enter key. You will see a thick horizontal solid line.
Horizontal thin, thick, dotted and double line in Word using keyboard
II Line in Word using a table
A horizontal line can be obtained by using a table of one cell (1x1), in which only the top or bottom border is colored (will be visible), and the other three sides of the table have uncolored borders (they will be invisible).
Place the cursor in the place where the line should be. In the top menu of Word, click:
- Insert (1 in Fig. 3),
- Table (2 in Fig. 3),
- One cell (3 in Fig. 3).

Rice. 3. How to insert a 1x1 table (from one cell) in Word
The result will be a table of one large cell (1x1):
All that remains is to remove the borders from three sides in the 1x1 table. For this
- go to the “Home” tab (1 in Fig. 4),
- then next to “Font” we find “Paragraph” and borders (2 in Fig. 4),
- remove all borders by clicking “No border” (3 in Fig. 4),
- select “Upper border” or “Lower border” (4 in Fig. 4).

Rice. 4. How to remove border selection from a Word table (make borders invisible)
I show this clearly in the video (at the end of the article).
By the way, in Fig. 3 it is clear that there is an easier way. You can place the cursor at the beginning of the line in Word and click “Horizontal Line” (5 in Fig. 4):
III Line in Word using drawing
Insert (1 in Fig. 5) - Shapes (2 in Fig. 5) - this is another way to get a horizontal line in Word.
To keep the line strictly horizontal, hold down the Shift key and draw the line at the same time.

Rice. 5. How to draw a line in Word
IV Line in Word using the on-screen keyboard
For Windows 10, you can also find the on-screen keyboard by typing “on-screen keyboard” into the Search bar.

Rice. 6. On-screen keyboard
We will create a horizontal line in the same way as in the first option with a regular keyboard. You will need three buttons on the on-screen keyboard: dash, Shift and Enter.
1 Dash and Enter
From a new line in Word, click on the dash (1 in Fig. 6) several times and press Enter. You will get a thin horizontal line.
2 Shift, dash and Enter
From a new line in Word, first click Shift (2 in Fig. 6), then Dash (1 in Fig. 6). You will get an underline. We will repeat this 2 more times, and then press Enter. As a result, we will see a thick horizontal line.