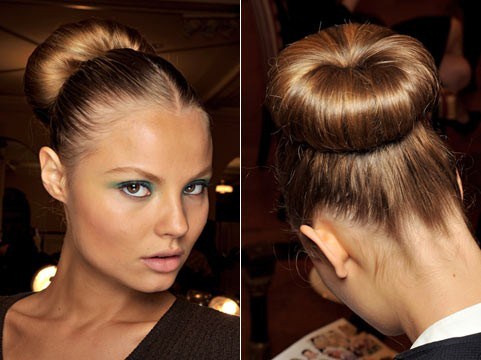
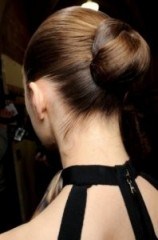
Top bun hairstyle. Volumetric bun - bow. Tall empty bundle with super smooth surface.
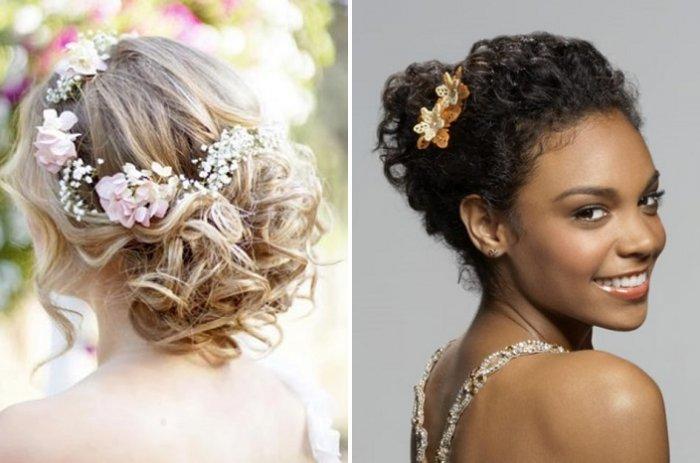
With the onset of warmer weather, every woman tries to get rid of her boring hats as soon as possible and begin bold experiments with her hair. A beautiful bun of curls is just what you need to look beautiful.
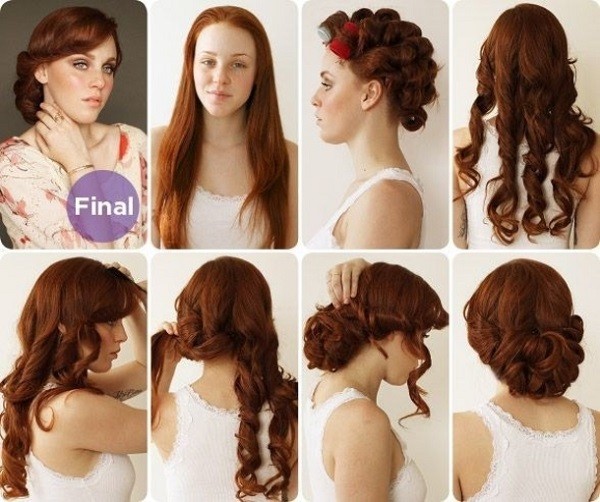
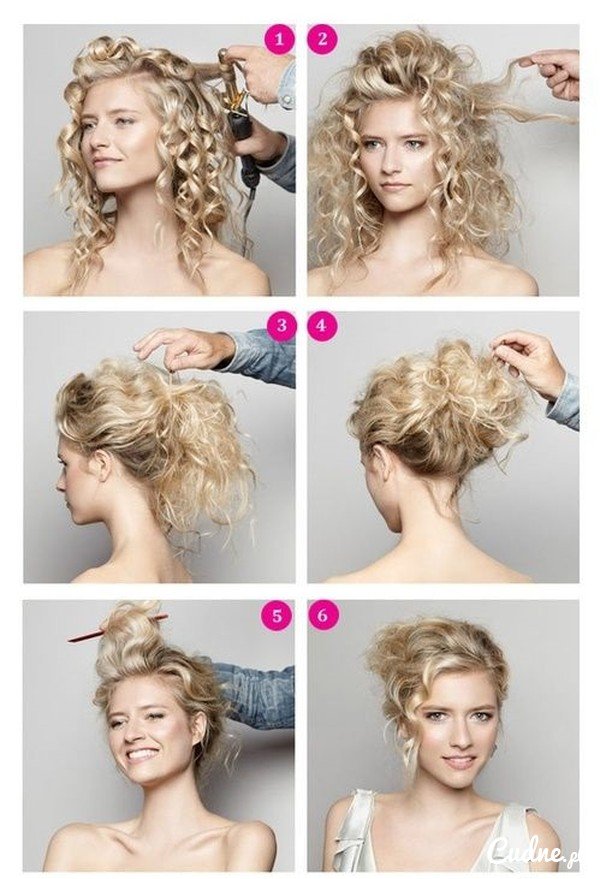
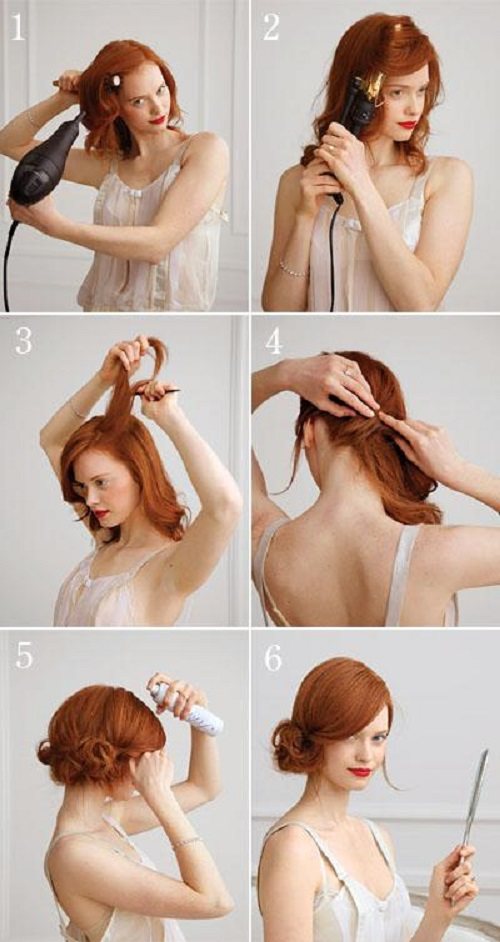
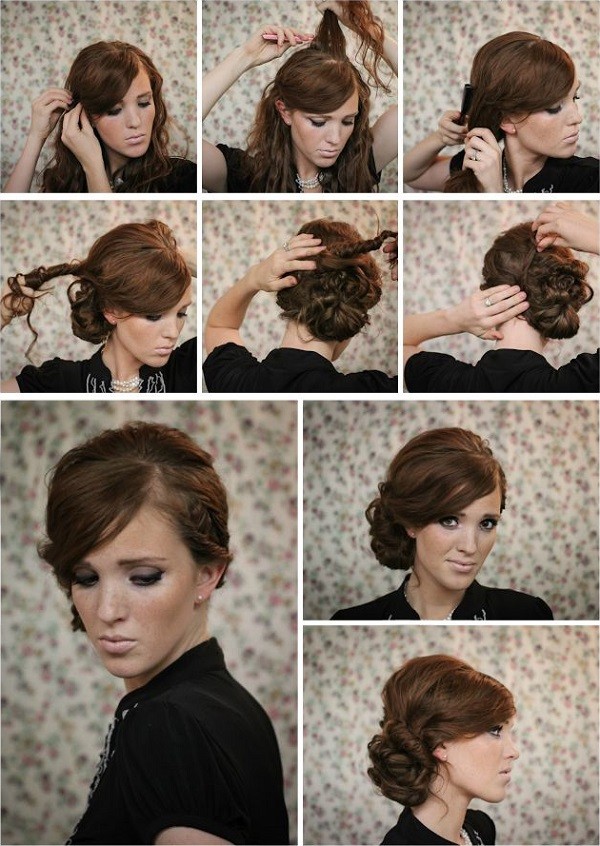
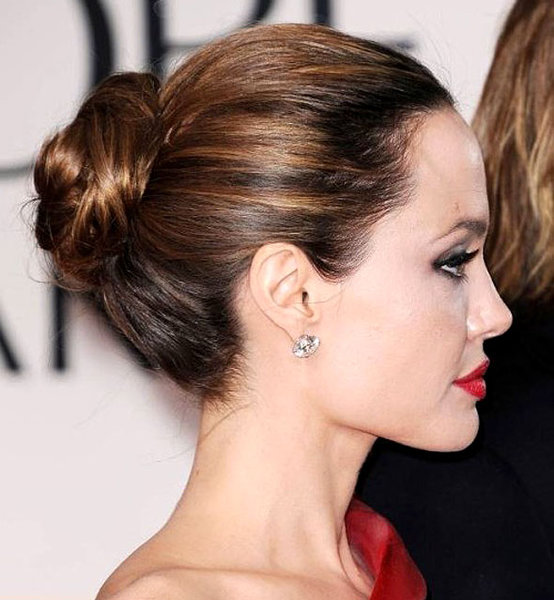
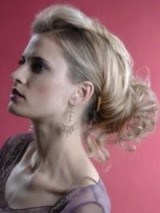
Lush bun in retro style
Exquisite styling, reminiscent of the traditions of the 30s, is suitable for hair of various lengths. It can be combined with luxurious evening dress and even a pantsuit.
- Using the thin tip of a comb, separate the strands of bangs and comb them to the side.
- The rest of the hair needs to be put back.
- Separate a thin strand, curl it with a curling iron or straightener, holding it away from your face.
- Wrap the curl around your finger, then carefully remove it and pin it with a bobby pin.
- Repeat this process with the remaining hair.
- Let the curls cool and remove the bobby pins.
- Gently comb the strands at the very roots.
- The bangs should be separated with an asymmetrical parting.
- Catch the remaining curls with an elastic band approximately in the middle and form a loop, moving it slightly to the side.
- Arrange your curls beautifully around the resulting bun and secure them with hairpins.
- The bangs on the smaller side should be pinned behind the ear, on the larger side they should be left free, sprinkled thoroughly with hairspray.
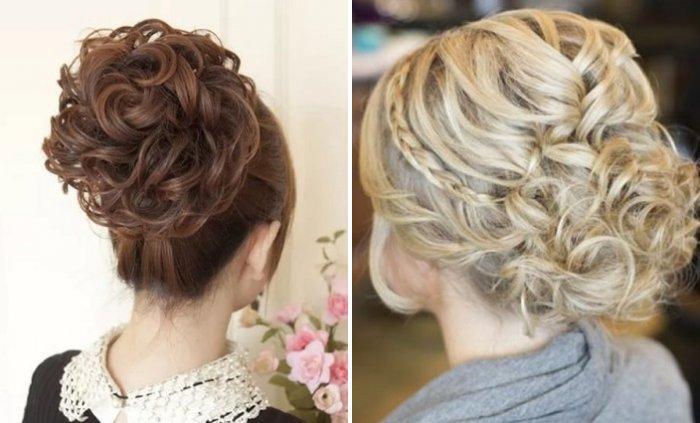
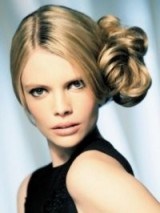
Basket-shaped bun
A bun that resembles a basket of hair looks simply luxurious! With it you will become like a beautiful princess.
- Comb your hair.
- Divide it into thin strands and curl each one with curlers.
- Once they have cooled, unwind the curlers and lightly comb your curls with your hands.
- Make a straight or side parting.
- Separate one thick strand on each side and twist them towards each other.
- Arrange the remaining curls, giving the bun a semicircular shape. Secure with pins.
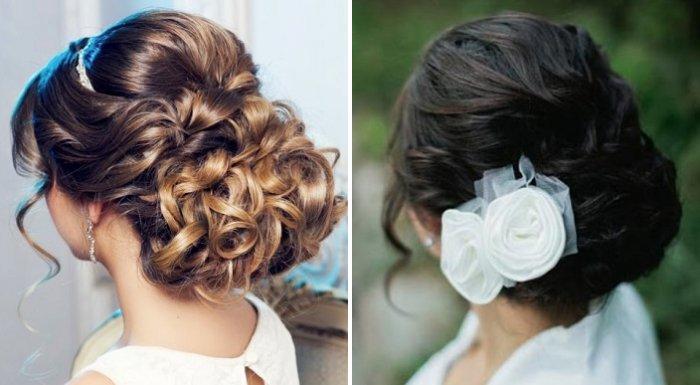
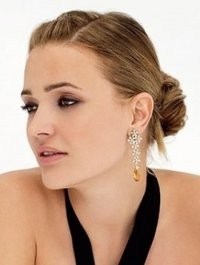
Low bun with clip
This low bun is perfect for those with voluminous hair, twisted by nature.
- Squeeze a small amount of styling foam into your palm.
- Distribute it over your hair and then dry it with a hairdryer.
- If necessary, curl the strands a little with a curling iron.
- Comb them with your hands.
- Separate a small section of hair from your face and pin it up with a crab for a while.
- Separate one of the same strands on the sides.
- Twist them into a light rope, pin it with a hairpin - you get a shell.
- Tie your hair into a ponytail at the very back of your head.
- Wrap your curls around an elastic band to form a fluffy bun. Pin it with hairpins.
- Release the crab from the front of your hair.
- Comb it back and twist the end around the finished bun.
- Spray your hair with hairspray.
- Decorate with a large hairpin.
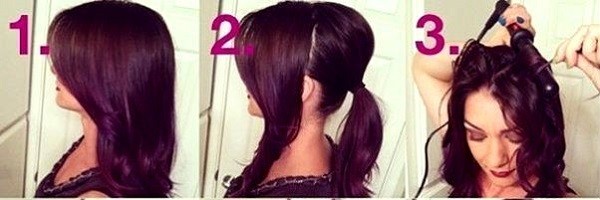
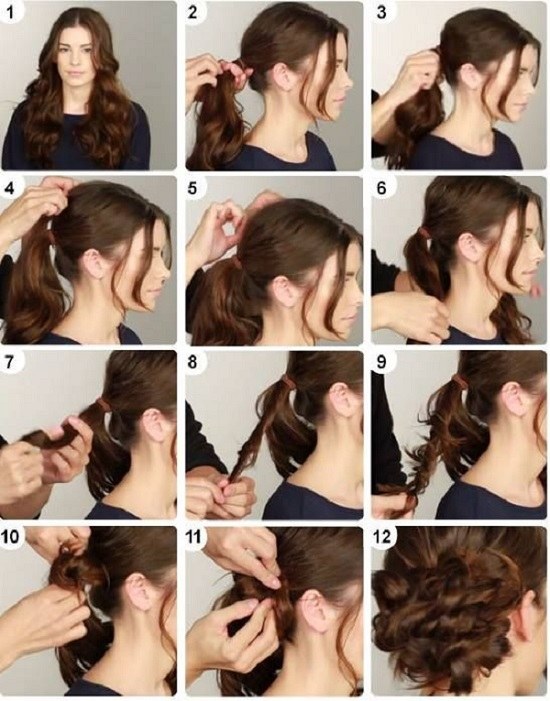
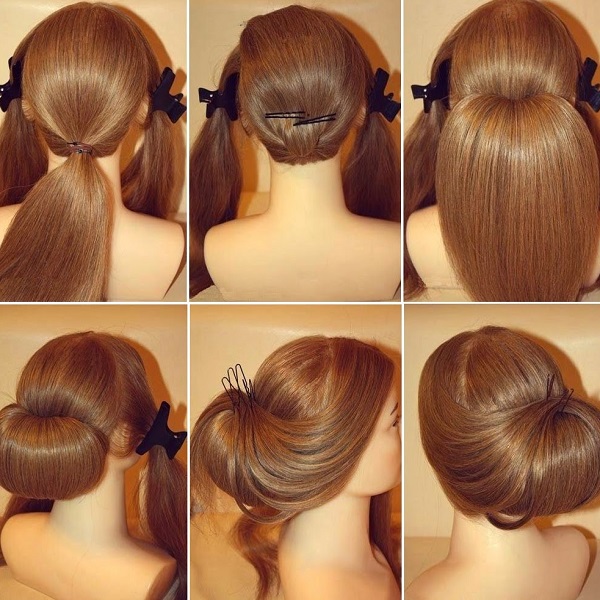
Bun for long hair
This styling will be a real salvation for girls with long but not very thick hair.
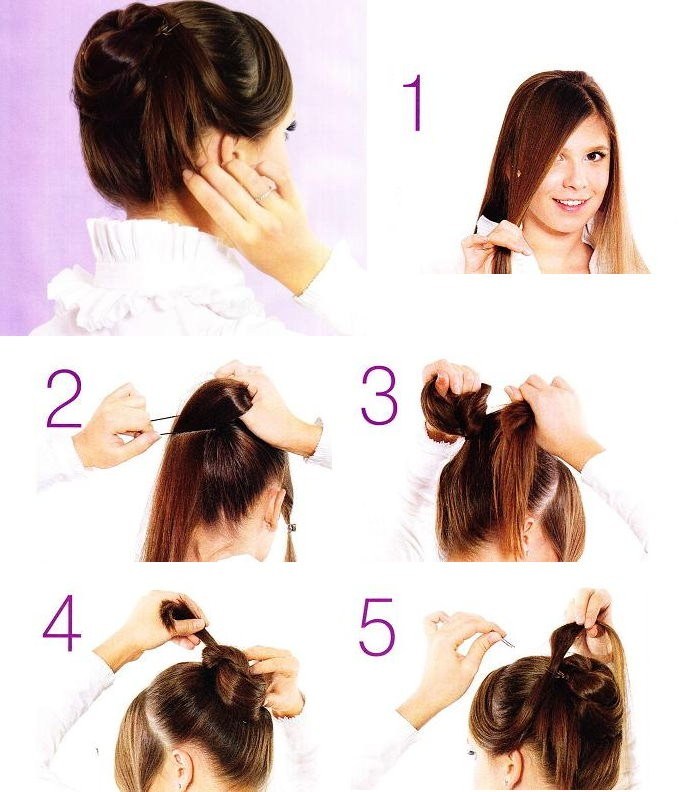
1. Comb it all back.
2. Separate a section of hair at ear level. Leave the front part, tie the back part into a tail. Use the sharp tip of the comb to slightly pull the strands up to make your hair look fuller.
3. Curl the front part of your hair with an iron.
4. Twist the ends of the ponytail around the elastic, forming a messy bun.
5. Stretch it in the center so that it becomes symmetrical.
6. Secure with pins.
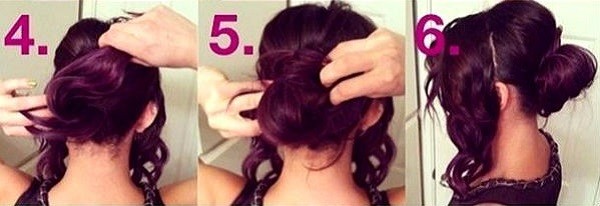
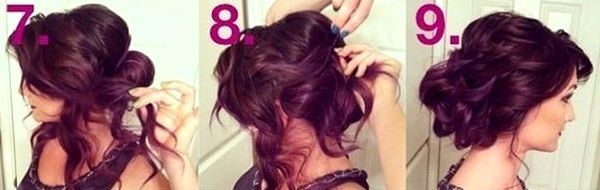
7. Lay the curls from the front one at a time on top of this bun. Pin each one with a hairpin.
8. Using curls, spray your hair with hairspray.
9. Release a couple of thin curls near your face.
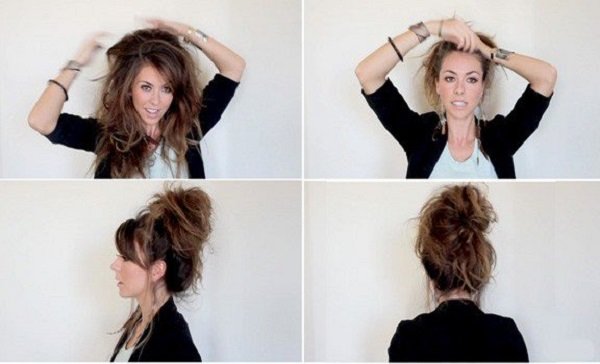
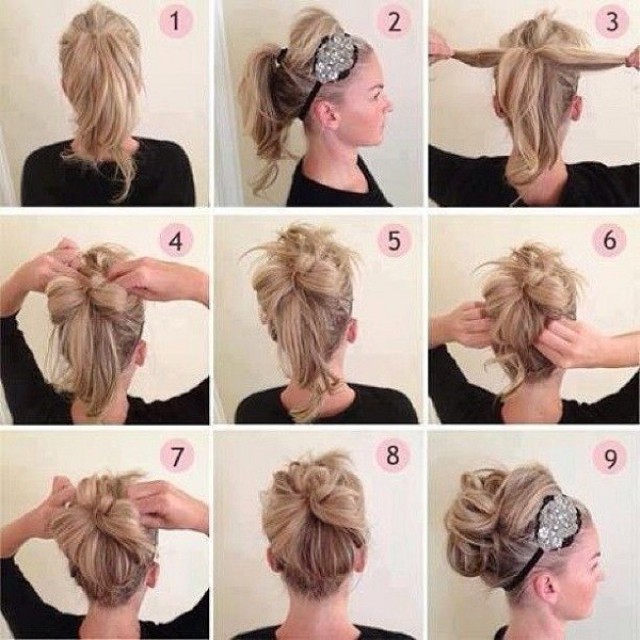
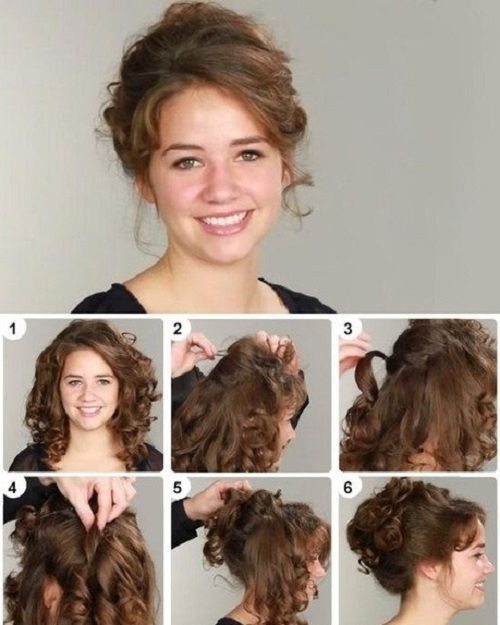
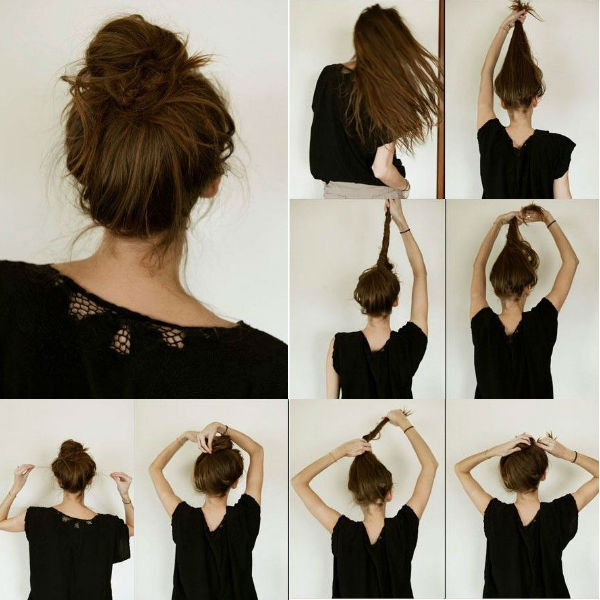
Bun of curls for every day
A high bun of curls can be done not only for holidays or celebrations. Many people prefer to do it daily for school and work. This styling looks quite neat, comfortable and cute.
1. Apply a small amount of foam to washed hair and comb it well.
2. Tie a high ponytail without pulling out the ends on the last turns of the elastic. You should now have a loop.
3. Now try to give the loop as casual a look as possible. To do this, you need to thoroughly ruffle it or lightly comb it.
4. You also need to comb the ends of the tail sticking out from under the elastic band.
5. If the hairstyle doesn’t hold its shape well, spray it with hairspray.
6. Release a few thin strands of hair from your face.
Bun with roller
Beautiful hairstyles can be done in literally 10-15 minutes. You don’t have to go to an expensive salon to do this! All you need is patience and a set of basic equipment.
- Comb it all back.
- Take a small section of hair from the top of your head.
- Place a round roller on it.
- Divide the strand in half and secure both halves with bobby pins. This will help secure the roller.
- Separate a fairly wide curl over the roller. Comb it with a comb.
- Place the backcomb on top and smooth the top layer.
- Gather all your hair into a ponytail, completely covering the roller. Just leave a couple of curls near your face for bangs.
- Curl the ends of your ponytail and place them in a bun. Secure it with pins.
- Separate your bangs with a side parting and style them beautifully.
- Decorate your hair with a ribbon.
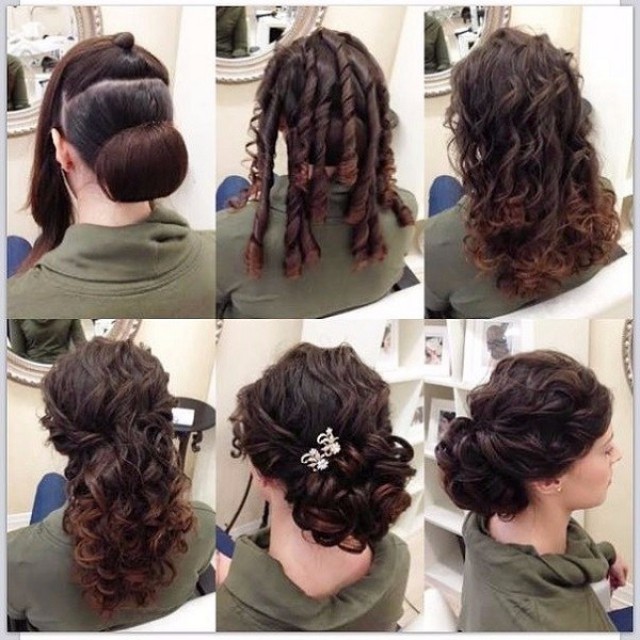
Greek bun with curls
Greek styling for medium hair will make you look like a goddess, and most importantly, it will suit women of all ages! Making it yourself will not be so difficult, and we will help you with this.
- Separate your hair with a horizontal parting running approximately along the top of your head.
- Tie the lower part into a neat low ponytail.
- Wrap it inside and form a bun. Pin it with hairpins.
- Use an iron to curl the upper part into tight curls.
- Separate one strand at a time on the sides and twist them towards the back of the head. Secure with hairpins or bobby pins.
- Twist the remaining curls around the bun, hiding the ends inside.
- Decorate your hair with decorative pins.
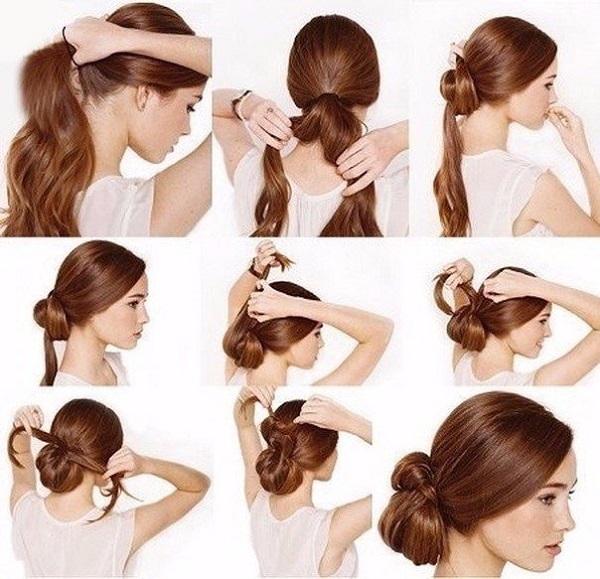
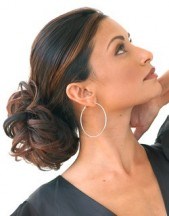
Side bun of curls
This simple hairstyle will allow you to quickly tidy up your long hair. You can safely go with it to a party, a date or even a social event.
- Comb your hair to the side.
- Tie a low ponytail, placing it to the side.
- Curl the strands with a curling iron.
- Take one curl at a time and twist it around several fingers from bottom to top. Secure each one with a pin.
- For lightness, pull a couple of thin curls out of the bun.
Light bun for middle length
A bun right at the back of the head is a traditional option, which is already difficult to surprise anyone with. If you want to be creative and original, try a one-sided hairstyle. It will make you bright and extremely stylish.
- Curl the strands with a curling iron and comb with your hands.
- Comb at the roots with a thin and frequent comb.
- Throw your curls to one side.
- On one side, take a strand near the neck and twist it into a rope.
- Gradually adding loose curls, work your way to the other ear. There is no need to hide the ends - they will become the basis for the side bun.
- Style your curls beautifully, securing them with hairpins.
- Spray your hair with hairspray.
Tips to help you create a romantic hairstyle at home yourself:
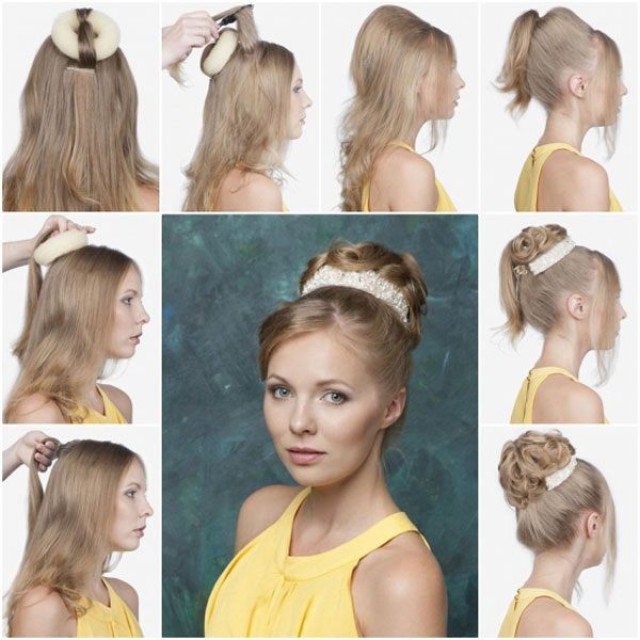
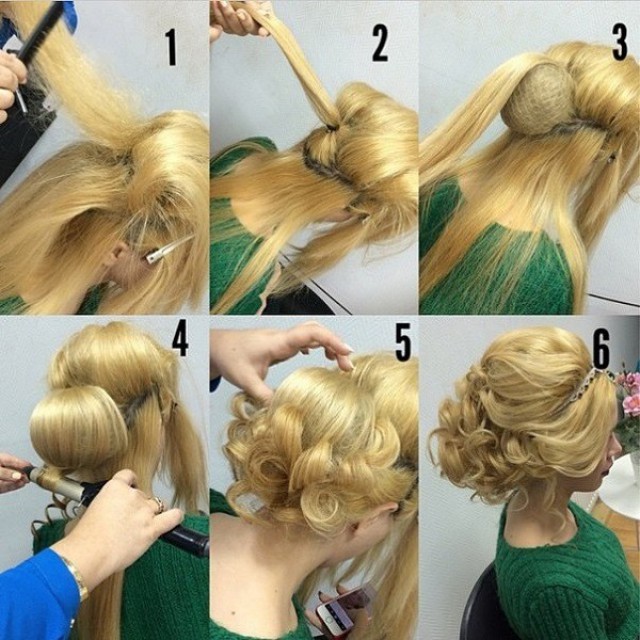
Ceremonial option
How to make a bun for a wedding, graduation or other serious celebration? It's very easy to do, but you have to try!
- Separating layer by layer, comb your hair with a thin and frequent comb.
- Now divide it with a horizontal parting at ear level and tie a not too wide ponytail in the center.
- Attach a roller underneath and lower the ponytail on top.
- Distribute the hair evenly over the roller until it completely covers it. Hide the ends inside and secure with a bobby pin.
- Curl the hair near the neck with an iron and arrange it beautifully around the bottom of the bun.
- Curl top part, lay on top of the bun, trying to create volume.
- Divide the curls near your face in half and pin them on the sides.
- Decorate your hair with a headband or tiara.
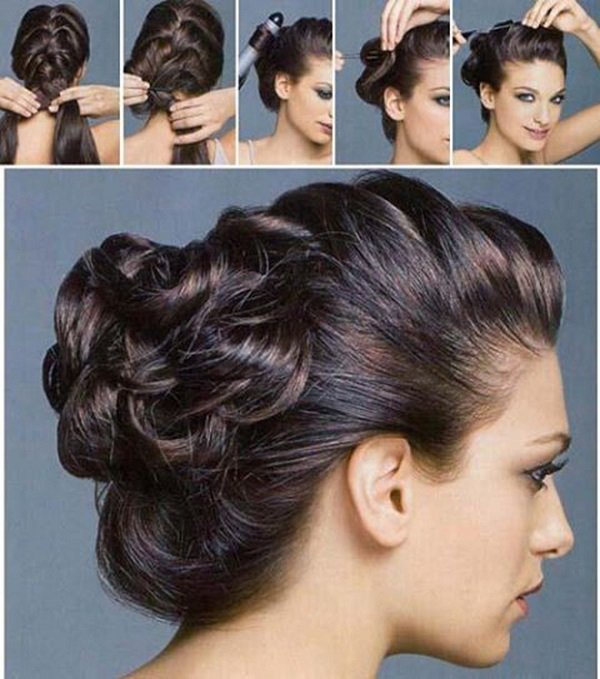
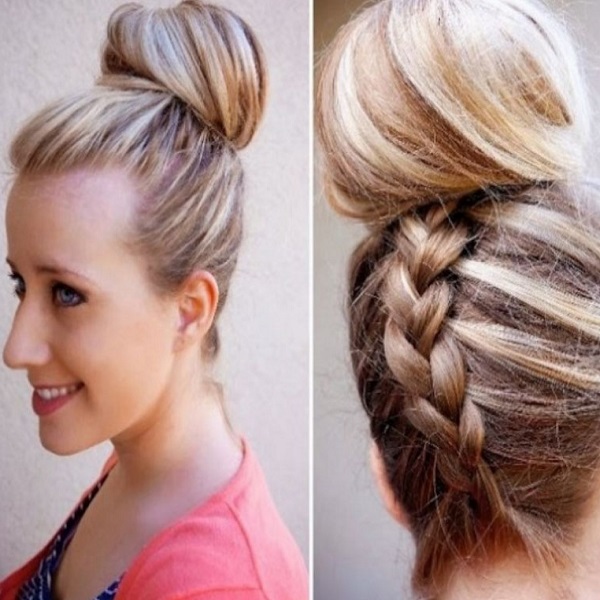
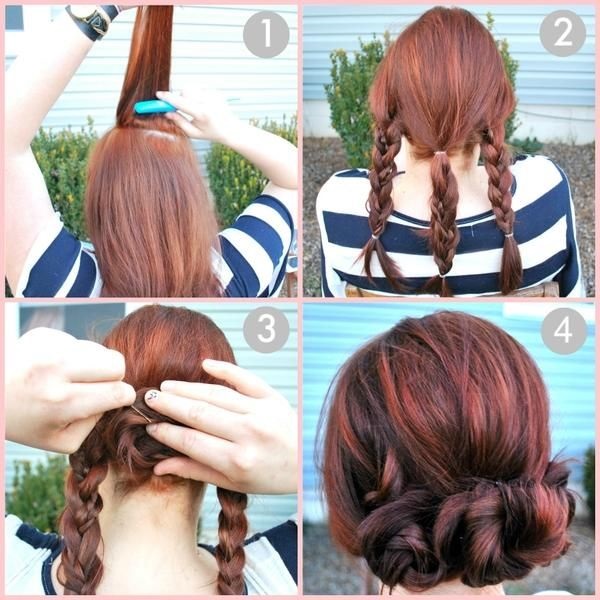
French braid bun
This hairstyle is suitable for every day. You will only spend a few minutes doing it, and you will look your best all day long.
- Comb all your hair back.
- Take three thin strands and intertwine them as in a classic braid.
- Gradually adding loose strands from the sides, continue to braid a light French spikelet.
- Having reached the back of the head, gather the strands into a ponytail.
- Wind the ends onto a curling iron.
- Place your curls in a bun and secure it with hairpins.
Air bun of curls
An airy bun of curls is optimal choice for thin fluffy strands. A girl with such a hairstyle looks very feminine and gentle. Be sure to try it on yourself!
- Comb thoroughly, divide your hair into many thin strands and curl each one.
- Gently comb through curls with your fingers. Throw everything back.
- Take a needle and thread.
- Gather your hair into a ponytail and sew it with thread.
- Crimp the ends of the tail, gathering them into an air bun, and sew them again with thread.
- Comb the strands near your face at the roots and style them beautifully.
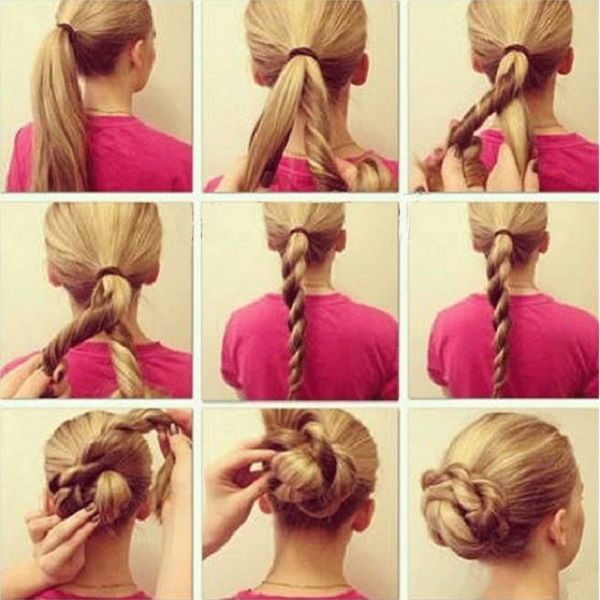
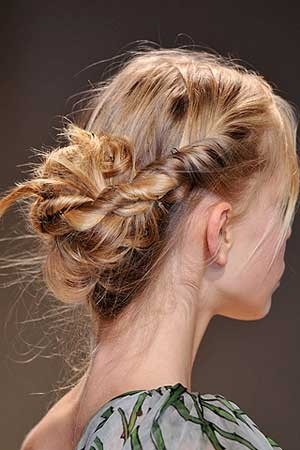
Curls in the form of plaits
To create a luxurious bun of curls, it is not at all necessary to curl your hair with a curling iron. It is enough to twist them into loose strands - the result will be excellent and, moreover, without harm to the health of the hair.
- Part your hair in the middle and comb your hair well.
- Tie a low ponytail, moving it slightly to the side.
- Make two turns of the elastic band.
- Correct any imperfections.
- Lift your strands up to create volume.
- Comb your tail with a comb.
- Separate a strand of medium width from it.
- Twist it into a bundle.
- Lightly fluff it up.
- Twist the tourniquet into a ring.
- Secure it with a hairpin.
- Repeat with the remaining curls, creating a full bun.
Bun all over the head
If you distribute the strands over your entire head, you will get an unusually beautiful evening hairstyle that imitates stylish curls.
- Comb it all back. Divide your hair into several thin strands and curl with a flat iron.
- Comb your hair right next to your forehead with a fine comb.
- Lay them back, twist the ends into a rope and pin with a bobby pin.
- Take a thin strand and twist it into a braid.
- To give the bundle volume, stretch it with your fingers from bottom to top.
- Attach the resulting curl to the place near the bobby pin and secure with a hairpin.
- On the other side, take exactly the same strand, twist it into a strand and stretch it with your fingers.
- Place the braid into your hair and secure it securely.
- Repeat the procedure with the rest of your hair, selecting curls from one side or the other and arranging them in a beautiful hairstyle.
- If necessary, spray it with varnish.
Romantic styling
Girls with medium-length locks can try this stylish hairstyle. She looks light, feminine and romantic.
- Comb your hair, pulling your hair back. Curl them with an iron.
- At the top of the head, separate a small part of the hair and twist it into a rope - this will be the basis for the future bun.
- Take one thin curl right in the center, twist it in a circle and pin it with a bobby pin.
- Gradually pick up the strands on both sides, collecting them with a pinch and securing them securely.
- Finally, lay the ends and spray the styling with varnish.
What do you think of this stylish option?
Cleopatra's hairstyle
Do you have voluminous curly hair that is difficult to manage? We offer a master class that will allow you to literally repeat in 5 minutes the image of one of the most famous and most beautiful women. A Cleopatra-style bun is suitable for both an evening out and a romantic date.
1. Comb with a comb.
2. Lift the strands up and tie a fluffy ponytail.
3. Prepare a long ribbon, braid or a special hoop.
4. Carefully secure your curls with hairpins, tucking the ends underneath. There is no need to round off the bun - it is better to leave the curls for a lush halo.
5. Tie a ribbon or braid around your head, making 2-3 turns, or put on a hoop. For reliability, secure the tape with bobby pins on the sides.
When creating a bun of curly hair, follow these simple but very useful recommendations.
- Tip 1. Like other hairstyles, buns should be done exclusively on clean hair. Although, for unruly strands, it is allowed to “use” second-fresh hair (you washed your hair yesterday and styled it today).
- Tip 2. To keep your bun neat throughout the day, do not forget about styling products - foam, mousse, varnish, spray.
- Tip 3. While doing your hairstyle, do not wet your hair with water - this will complicate the work. Firstly, curls will unwind much faster under the influence of moisture. Secondly, the strands will begin to stick to your fingers and comb.
At first glance, creating low and high buns is not difficult, but, alas, this is not the case. If you have never created a hairstyle before, then the bun may not work out the first time. Be patient and believe that everything will work out for you.
There are still a lot of very beautiful styling. We hope these photos will help you choose the perfect option.
Thanks to laconic, comfortable, elegant or casual bun options, women and girls look stylish and fashionable in any look. This hairstyle is now well-known and popular, because making a bun for medium-length hair is very simple, and the result is impressive and pleasing: both the hostess and those around her.
Hairdressers and stylists call shoulder-length hair medium. Or 2-3 fingers longer. This length is always relevant due to its ease of care, but for the last three years it has been at the peak of fashion.
Bun forever
The history of bun styling goes back to ancient times.
- Surviving ancient frescoes, statues and mosaic drawings confirm its popularity in Europe as an element of hairstyle back in antiquity: during the Minoan civilization and among the ancient Greeks and Romans.
- From the Rococo era, ancient records of advice on how to make a knot decorated with a velvet bag have been preserved. Classicist hairstyles also used a curled roll of hair along with framing the face with curls on the sides. Well, judging by the paintings of the great women, the locks of Renaissance women were also collected in low buns.
- In China and Japan, even men wore similar buns, not to mention women, who could make two “donuts” on the sides at once. Such options are often found in modern Japanese mangas and are very popular among young people. Other peoples also made “horns” from hair, for example, North American Indians, some Slavic tribes.
- Hair gathered high at the back of the head, secured with a net for security, for a long time were created by ballerinas, which is why the hairstyle was at one time called the “ballet bun.”
- In the 50s hair, tied up in a neat bun, along with the “bebette” complemented the new look style. And in the eccentric 80s, false hairpieces also made a splash.
Varieties of buns have always been used by women. But in an eventful modern life this hairstyle has received real recognition. “Bumps” and “ghouls” are done low at the neck, high, almost at the forehead, on the side and somewhere in the middle. There doesn’t have to be one bunch; you can make two, three, or more, combining them into a single composition. Or deliberately separate it, highlighting it with various mischievous accessories. Bunches look unusual when combined with different braids around the hairstyle, and in it itself.
Man buns are also becoming common and fashionable. Brutal men who have grown their hair tie it in a bun, even buy men's hairpieces for this purpose. Artificial extensions are a fun new product for those who don’t have enough hair length, but really want to be on trend.
How to do a high bun
High smooth bun For owners of medium-length hair, this is a great way to style for the summer, because the neck opens up and it doesn’t become so hot. For winter use as an office or evening option. But it’s not suitable for everyday hairstyles, because... frosty days it is difficult to hide under a headdress, and the hood, according to reviews, falls off.
Collected hair on the top of the head emphasizes the oval shape of the face and the elegance of the neck. When the swan-like appearance of the neck is in doubt, it is better to style it lower. If done casually, it becomes appropriate for a casual style. For sports - make it tight and small, or disheveled and careless.
For medium hair high buns you should do this:
- Gather your hair into a ponytail. The higher the better. Twist the strands around the base until smooth, securing each with bobby pins and bobby pins. For a casual effect, lightly tousle the hair, slightly pulling the strands out of the styling. You can pre-comb your hair, then the negligence and pomp will increase. final result. The “guli” option on the very top of the head does not look very good on girls who are too tall.
- A more voluminous bun is very easily obtained using an overhead round roller, which is placed on the tail. Then the curls are evenly distributed in a circle and a loose elastic band of medium thickness is put on. The ends are wrapped clockwise, hiding the accessory, and secured with hairpins. You can also strengthen it with a thick elastic band, an elastic band or a braid woven from a previously left curl. An overly curvy model may not be suitable for fragile and thin women.
- It is convenient to make buns for medium hair using a twister. A foam accessory with a flexible wire inside that allows you to fix parts of your hair in in the right position. If you get used to it, you can make a “doughnut” in a matter of seconds. And unlike a round roller, the “twister” allows you to make the “donut” not only smooth and neat, but also, if necessary, free.
- It is not difficult to create a high original bun with a braid at the back of the head. Throw your hair forward, bending over, and from the bottom up from the neck, braid a French braid to the top of the head. Tie the remaining curls into a ponytail, smoothing them away from the forehead for neatness. Then proceed as usual. Such an adjacent braid, and more than one, can be woven both from the side and from above.
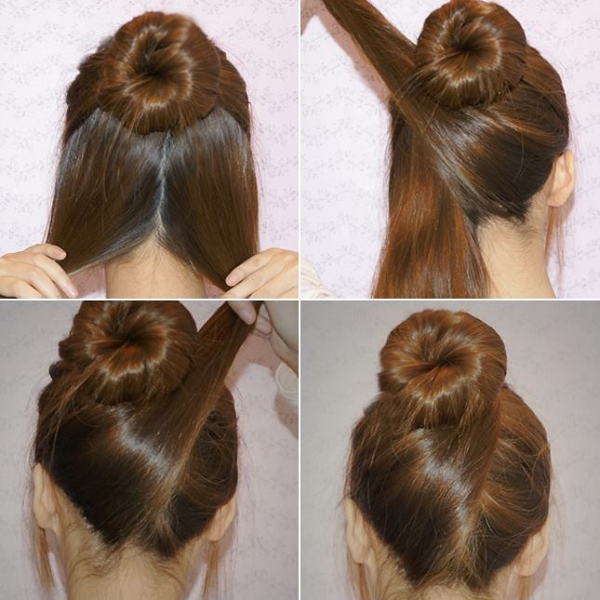
- You can make a bun with an original accent like this: make a “donut” from the upper part of the hair, like a “malvina”, and divide the lower part into two halves. Crossing the ends, “wrap” the bun and secure the ends.
- It is easy to style a lower bun by dividing the hair along the parting, separating and “tying” the strands into knots from top to bottom. From this composition, make a three-dimensional structure, which is secured with pins.
The foam rubber “donut” can be perfectly replaced with the following life hack: take a rolled up nylon stocking without a sock part or a similar “pipe” from a sock. The denser the material, the larger the bun will be.
The use of mousse, gel, foam or varnish adds reliability to the structure and diversifies the result. According to reviews, bobby pins hold tighter than stilettos.
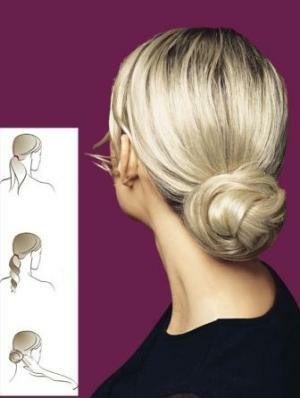
Low bun for medium hair
A low bun is an absolute favorite among similar styles for medium hair. It is suitable for creating a romantic “look”, glamorous and elegant look, as well as everyday. Decorated with curled curls, braids, and accessories, it will look new every time. Suitable for different body types, for any type of face, including oblong and square without bangs, which is a contraindication for highly curled curls.
How to make a low bun for medium hair:
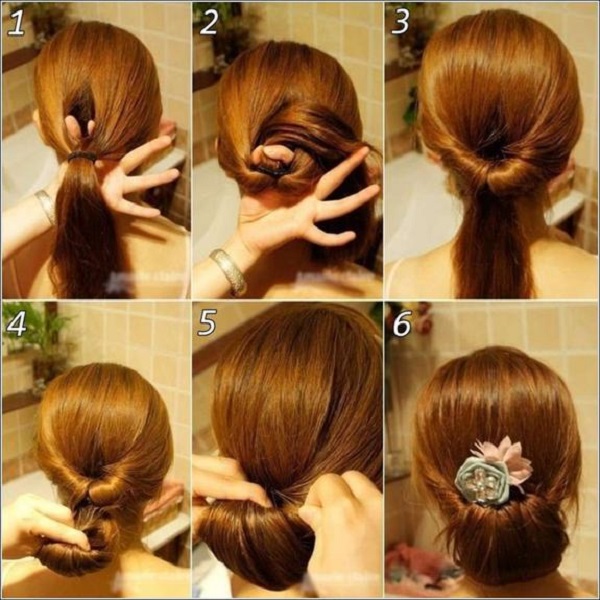
- The simplest option: distribute the upper part of the hair into two parts along the parting and twist each strand symmetrically inward. Secure with an elastic band. By inserting your fingers from below, stretch the end of the resulting tail between the two strands. Straighten the resulting knot and secure it.
- Evening option low beam: Divide your hair into three parts. The temporal part, divided along the parting, is secured with “ducks” so as not to interfere. Make a ponytail from the bottom, lift it and secure it carefully with bobby pins. You will get a voluminous ponytail, the ends of which must be bent, secured with hairpins, and the temporal parts of the hair must be used to emphasize the elegance of the styling. Spray generously with varnish.
- You will get a romantic bun if you divide the curls as in the previous method, but also divide the side ones into two strands. Twist the lower ponytail with a flagellum, wrap it around itself several times, and secure it with bobby pins. Then do the same with each strand.

- Similar to the one discussed above, it is easy to make a low bun from a tail divided into two parts, twisted with a rope. Such a casual, everyday bun can turn into a romantic one if you add ribbons, elastic bands with flowers, or wrap it in a delicate silk scarf.
- Beautiful knots are obtained from voluminous braids. But if you don’t have the time or skills to weave masterpieces, then three simple braids, wrapped in “buns” and styled with hairpins and bobby pins nearby, allow you to get a wonderful multi-part bun, suitable.
Any method of styling your hair in a bun or by pulling out the curls with backcombing. Then each time you can make a slightly different version of the knot, which will add variety and zest to the images.
How to decorate the bunches?
The choice of accessories depends on the event for which the bun is made:
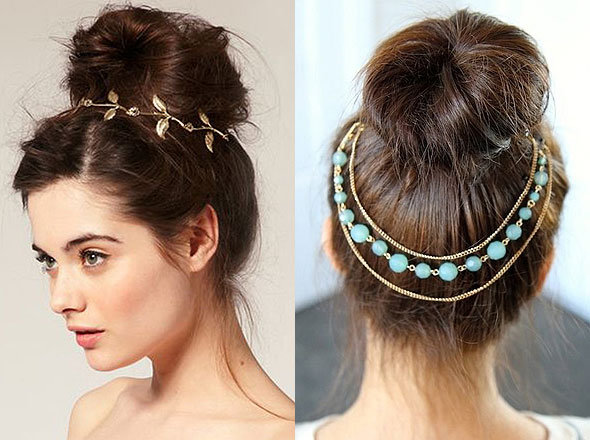
- For an evening out, stilettos and combs with rhinestones, pearl threads, velvet ribbons. It is possible to make a hairstyle with a Greek headband and headbands: with stones, beads, or artificial ones.
- For a casual date, you can decorate your buns with original clips, elastic bands, hairpins, stylish headbands or headbands.
- For everyday look It is convenient to secure the knot with a thick elastic band or a twisted neckerchief. To prevent strands from coming out, flat clapper clips are suitable.
The “correct” decorations for buns will allow you to set the right accent and make your look expressive and memorable.
Anyway Fancy Hairstyle will give charm and confidence. The bun does not require much time to style; skills are acquired quite quickly. It is comfortable and versatile, suitable for children, youth and mature women. The main thing is to choose exactly the individually suitable option. If the owner of medium hair needs something stylish, and is given a limited period of time for this, there is nothing left to do but make a bun.
Do you want to know how to make it yourself? beautiful bun– a hairstyle that never goes out of style? Then you should know that there are different buns: French, high, like a ballerina’s, and even vanilla. Therefore, we will analyze how to properly make a bun on the head, in relation to each type of this hairstyle.
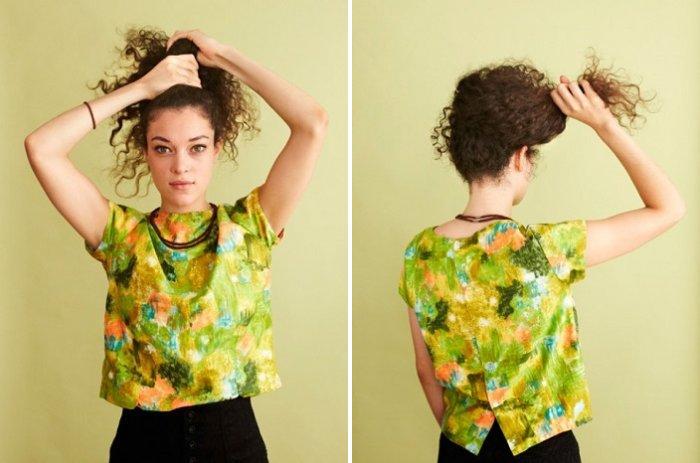
How to do a vanilla bun on your head?
Why is the bundle called vanilla? Because it is worn by soft fairy girls, who are called vanillas, hence the name of the bun. The vanilla bun is loose, soft, adding romance to the girl’s image.
How to make a vanilla, slightly careless, disheveled bun of hair? First you need to get hair ties, hairpins, and, of course, a comb.
- Combing your hair. If they are not particularly obedient and straight, then lightly moisten them with water.
- We collect hair in a high ponytail. Since a vanilla bun should only be done high, a knot on the side or back of the head will not be such a bun.
- Comb the hair in the ponytail again. If the tail is thick, divide it into two halves and intertwine it. We twist the thin tail slightly around its axis.
- Wrap the hair around the base of the ponytail, covering the elastic. We don’t try to make it tight – we want a loose bun. If your hair becomes a little disheveled during the process, great; if not, you can use a little help.
- We hide the tip of the tail under the hair, and secure the bun with several hairpins.
- To finish, lightly spray the hair with hairspray.
How to do a French bun on your head?
- We gather the hair into a ponytail and secure it with an elastic band.
- Comb the hair again and twist it clockwise, making sure that no unevenness appears on the tail.
- Wrap the hair around the base of the ponytail. We hide the ends of the hair under the resulting bump.
- We secure the bun with hairpins and smooth out any hair that has strayed from the hairstyle (the French bun is smooth).
- Spray your hair with hairspray and decorate it with a scarf, net, etc.
How to make a ballerina bun?
There are no strict requirements for a ballerina's bun. It doesn't have to be smooth like French or fall apart like vanilla. A ballerina bun is a simple hairstyle done in a hurry. It is enough to secure the ponytail where it is convenient for you, roll your hair into a bun and secure it with hairpins. If the hair is thin and the tail is not full, then you can comb it slightly.
More often than not, the ballerina’s bun is somewhat careless, as if the hair has already become disheveled, but only slightly. Don't be overzealous with this, the bun should remain tight. The only rule is that a ballerina’s bun will not be funny (on the side) or frilly (decorated with elegant accessories), simplicity is everything.
How to make a lush bun on your head?
Those whose hair is not very voluminous will be interested in learning how to make a fluffy bun.
Method 1
- We collect the hair in a tight high ponytail, but not at the top of the head.
- Separate the hair into strands and comb each section with a fine-toothed comb.
- We gather all the hair back into a ponytail and twist it into a bun. We do this carefully so that the hair does not become crushed and lose volume.
- We fix the hairstyle with hairpins and spray it with hairspray.
Method 2
This method is good if your hair is not long, but showing off a bun, not just a simple one, but a voluminous one, is a passion, as you want. In order to collect your hair in a bun using this method, we will need a regular hair elastic, a comb, hairpins, a voluminous hair elastic and a thin scarf.
- We gather the hair into a tight ponytail and comb it.
- We put a voluminous elastic band on top, wrap a scarf, and create the basis for a voluminous cone.
- We distribute the hair from the tail over this bump. We lay the ends of the hair around the base of the ponytail, hiding the very ends under the elastic band.
- We pin the bun with hairpins and fix the hairstyle with varnish.
A volumetric bun can be done quickly and easily..
There are moments in every girl's life when her hair just doesn't want to give in. Of course, you can give up everything and suffer until the evening, looking at your reflection. Or you can put your hair in an elegant bun and go out or on a date. It is generally accepted that a volumetric beam can only be done on. This is wrong. the site has collected tips on how to quickly and easily make a voluminous bun on.
Volumetric bun using elastic bands and hairpins
This is the easiest way to create a bun. It is also suitable for short hair, but the longer it is, the more voluminous the hairstyle will be.
The result doesn’t have to be very neat, it won’t hurt, so such a bun will help out in those moments when you need to look good, but you don’t have time to wash your hair. This bun option also holds the hair securely, so it’s also perfect. The sequence of its creation is as follows:
- Gather your hair into a ponytail and secure with an elastic band. It is more convenient to use special elastic bands with hooks; they hold best and do not damage the hair. You can find these in professional hairdressing stores. But regular ones are also quite suitable.
- Comb your hair and twist it into a voluminous braid, or braid it. Wrap it around the base of the ponytail.
- Secure the result with several hairpins; the protruding ends can be left as is or secured with bobby pins.
This bun can look both sporty and elegant. For classic look use products to straighten and add shine to your hair, and for a messy option, pre-treat your hair with a texturizing spray and make the strand looser.
 How to make a voluminous bun quickly and easily
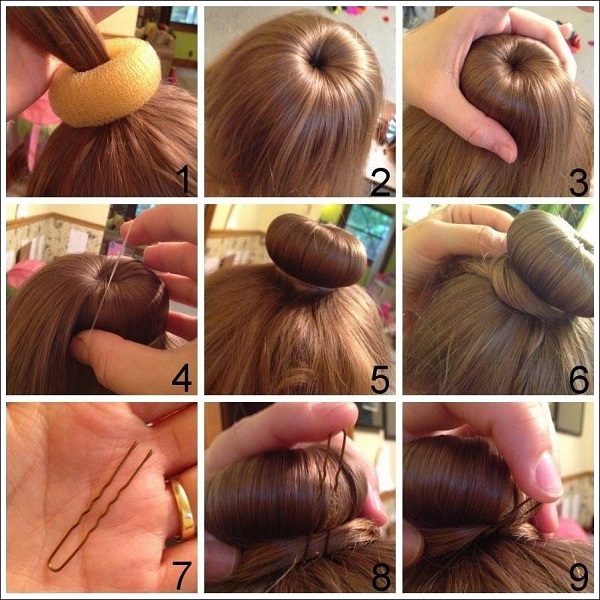
Volumetric bun using a donut
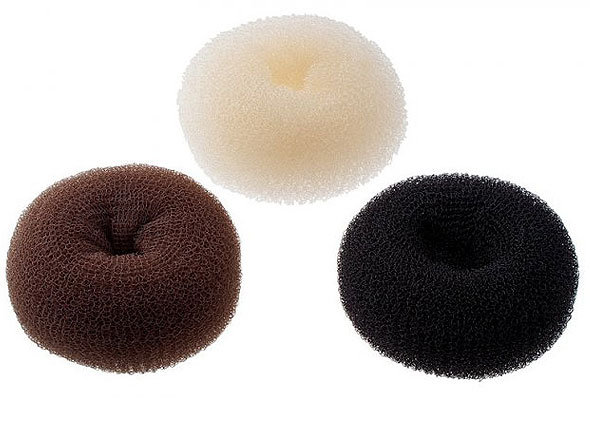
Another simple way is to make a bun using a special “donut” or “donut”, similar to a dishwashing sponge. Finding one is not difficult - they are sold in specialized stores, as well as in departments - for example, H&M.
There are "donuts" different colors and sizes, for more or less voluminous beams. They even exist with a special coating of artificial strands - they will be invisible even on short hair.
 How to make a voluminous bun quickly and easily
  How to make a voluminous bun quickly and easily
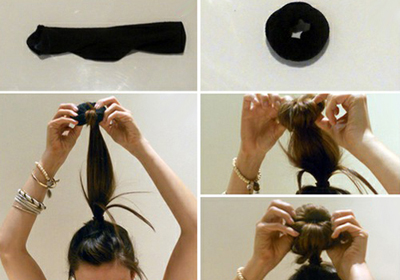
 Making a bun using a “doughnut” or “donut” is very easy:
- Gather your hair into a ponytail and tie with an elastic band. The ponytail can be high or low, depending on what kind of hairstyle you want to achieve.
- Thread the tail through the donut hole as if it were another rubber band.
- Tilt your head so that they are evenly distributed over the entire surface of the “donut”. You can fix their position with another rubber band.
- Tuck the remaining free ends of the strands under the bun. If they are too long, you can wrap them around the base.
- Secure with hairpins and bobby pins. For an even more “glossy” result, use hairspray or hair shine spray.
This sequence of actions is well illustrated in this video tutorial:
By the way, if you can’t find a “donut” in city stores or simply don’t have time to search, you can easily replace it with a very thick elastic band or even a sock. Simply cut off the heel and toe and roll the sock into a donut shape.
Volumetric bun with special hairpins
At the end of the last century, “sophist-twist” hairpins, “heagami” and similar devices for creating buns were extremely popular. They can still be found on store shelves or ordered online. They all operate on the same principle: they are attached to a hairpin, twisted up and fixed into a voluminous bun or hairstyle.
Reviews about such hairpins vary greatly. For some
Everything is quick and easy if you adapt. Some even use ribbons instead of hairpins, tying the end of the ponytail and lifting it up.
Volumetric bun using backcombing
Volumetric beam using rollers
For special occasions You can try making a bun using rollers. This is a more complex procedure and you may need assistance. Detailed story You can find information about creating such a hairstyle here:
To make your hairstyle look elegant, the finished bun can be decorated, for example, with ribbons or a headband.
 How to make a voluminous bun quickly and easily
 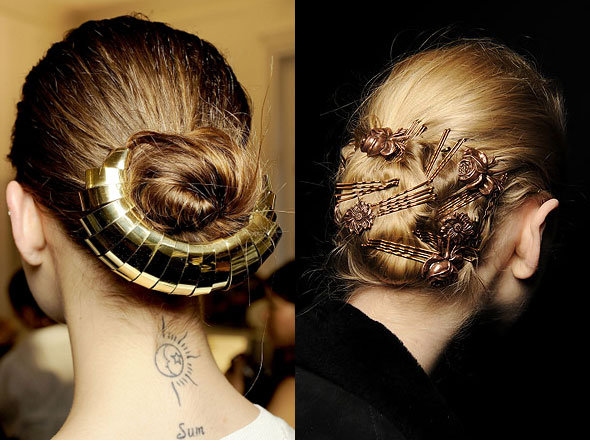 How to make a voluminous bun quickly and easily
 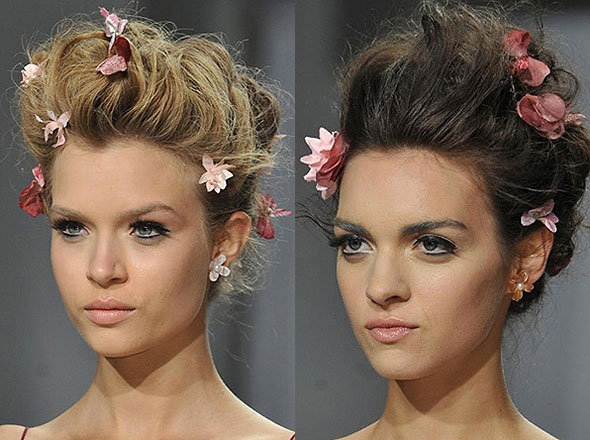 How to make a voluminous bun quickly and easily
 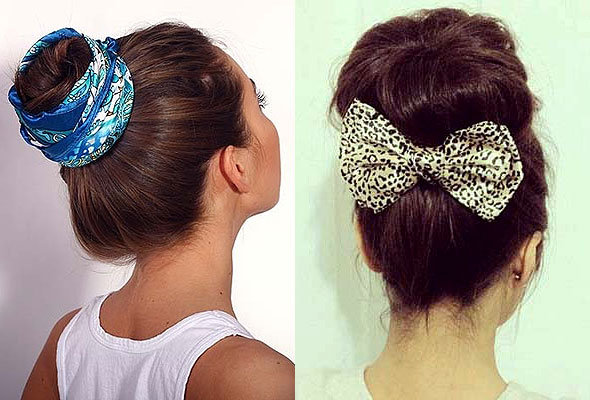 How to make a voluminous bun quickly and easily
 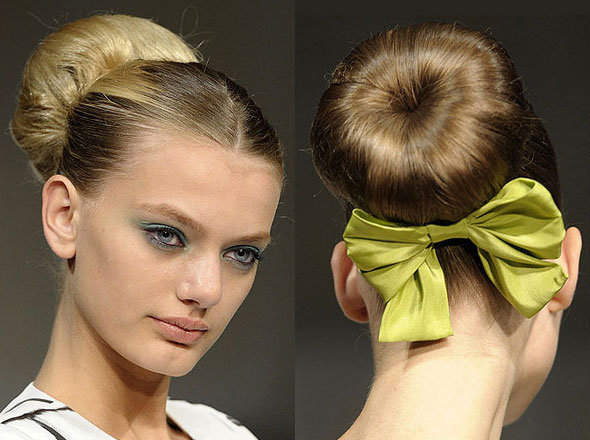 How to make a voluminous bun quickly and easily
 A bun is one of the simplest and most elegant hairstyles for long and medium length hair. A brilliant combination of simplicity, convenience and elegance! How to make a hair bun for everyday life and special occasions? The bun goes perfectly with both sporty, business and casual style, as well as with evening style. The main thing is to choose the right bun and accessories. Creating a bun does not require special skill or effort, so it can be done in absolutely any conditions, even on the road or on a hike. Using various techniques, a modest and unpretentious bun can easily be transformed into a luxurious hairstyle for a gala reception, wedding or romantic date.
A universal solution for any hair
A bun is a win-win option for absolutely any situation and clothing style. Having collected your hair in a bun, it is convenient to do sports (remember famous athletes and dancers) and household chores, shopping or walking the dog, and even at a business meeting or at dinner party you will be just great! The most important thing is that you will not only look great, but also feel comfortable and confident, thanks to the secure fixation of your hairstyle.
Who should do a bun?
There are dozens of variations on the bun theme. Thanks to such diversity, this hairstyle can be called universal, since every woman, if desired, can choose her own ideal bun. However, despite all the diversity and versatility, we should not forget that a bun, like any other hairstyle, can emphasize not only a woman’s advantages, but also her shortcomings. An elegant and sophisticated bun is an ideal hairstyle for slender ladies with swan neck and correct facial features. In this combination, even an untidy and sloppy bun looks royal! If your neck can hardly be called a swan, it is better to make the bun lower, without focusing on the neck.
![]()
Tall girls should also avoid high buns on the top of their heads. A low soft bun will help brighten up a too long and thin neck. For those with a flattened nape, tall, lush buns are perfect: flat, voluminous, curly and figure-eight. Fragile little women are not suitable for massive voluminous buns of long hair, which look at least ridiculous. It is better to make a tight bun, decorated with curls of curls, or two small buns on the sides. For a bun positioned high on the crown, it is important that the hair growing at the neck is not pulled too tightly.
How to make a hair bun
Long hair and medium-length hair is an ideal material for creative hairdressing experiments, from which you can “build” anything. Bunch – great option for creativity, which does not require special skill, effort, expensive funds for styling and sophisticated devices. In addition, it almost never goes out of fashion, and the variety of variations on the theme of the classic bun allows lovers of this hairstyle to always be different and unique.

To make a bun, hair is gathered at the back or crown of the head, where it is twisted and secured with bobby pins to form a knot. If you need to add volume to your hair, you can use various extensions, for example, a foam roller or a chignon. The bun can be made tight or loose, sleek and neat or deliberately careless, high or low.
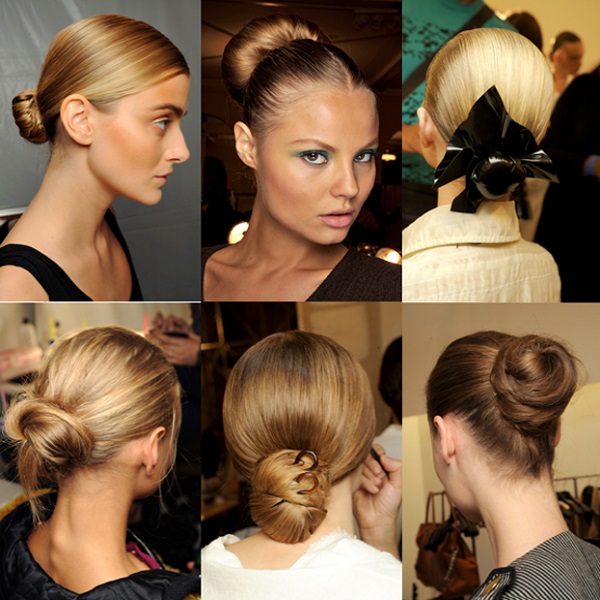
7 popular hairstyle options
to contentsTraditional simple bun
Making a regular bun is as easy as shelling pears: comb your hair, gather it at the back into a high or low ponytail, twist it into a braid, twist it into a knot and secure it with hairpins so that it is invisible. Instead of hairpins, you can use a long hairpin in the form of tongs. To diversify and slightly embellish a regular bun, you can leave a couple of thin strands at the bottom of the bun. Twist them into flagella and place them on top of the bundle. We roll the ends of the flagella into rings and attach them to the hair with bobby pins.
![]()
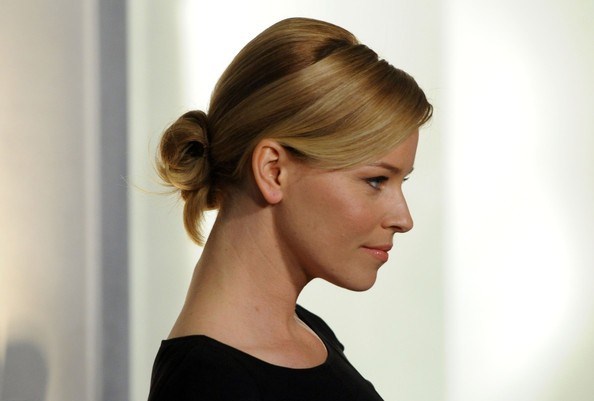
Elegant classic bun
We divide the hair into three parts. We make the occipital part larger than the other two. It is better to separate the two front parts with a side parting. For convenience, we secure the front strands of hair with clips. Carefully comb the main part of the back of the head of the hair, lift it to the top of the head and tie it tightly with an elastic band, making a ponytail. We twist the hair into a loose rope and wrap it around the base of the tail several times. Leave a small loop through which we thread the free tip of the tail. Tighten the knot tightly and hide the ends of the strands in it. We secure the bun with hairpins and spray everything with varnish. Now remove the clips from the two sides of the hair and comb them. We place the left side strand over the bun, placing it beautifully above the ear, and secure it with a bobby pin, leaving the ends of the hair free. We do the same with the right side part. The elegant hair bun is ready! A great option for a business hairstyle for a business woman.
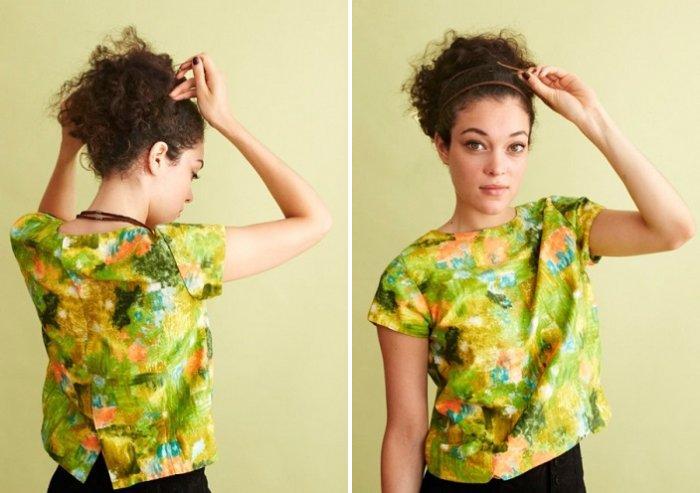
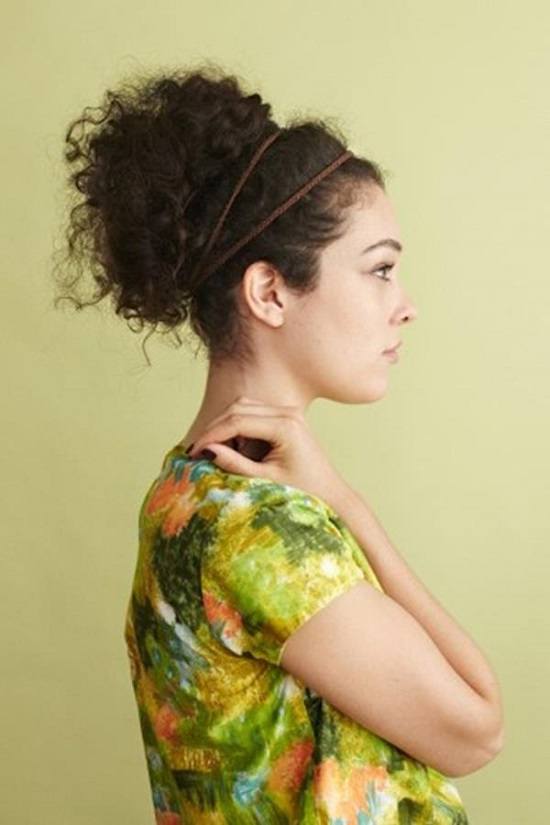
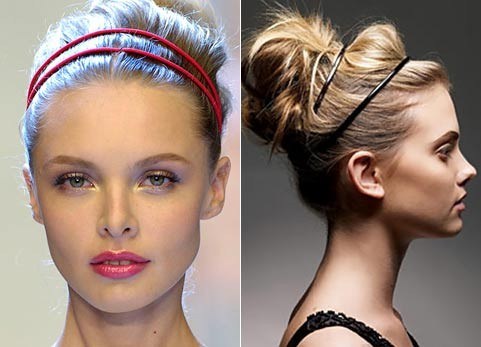
Festive version with headbands
Apply styling product to damp hair so that it can be pulled out perfectly during drying. After drying and straightening your hair with a hairdryer and brush, we gather it into a loose ponytail, using your fingers in the front to slightly loosen the hair tension. We transform the ponytail into a loose bun, securing it not too tightly with bobby pins and hairpins. Then we take two rims. We put one on the head, placing it at a distance of 4-5 cm from the hairline. We place the second rim five centimeters from the first. Spray the finished hairstyle with hairspray where necessary, smoothing the strands.
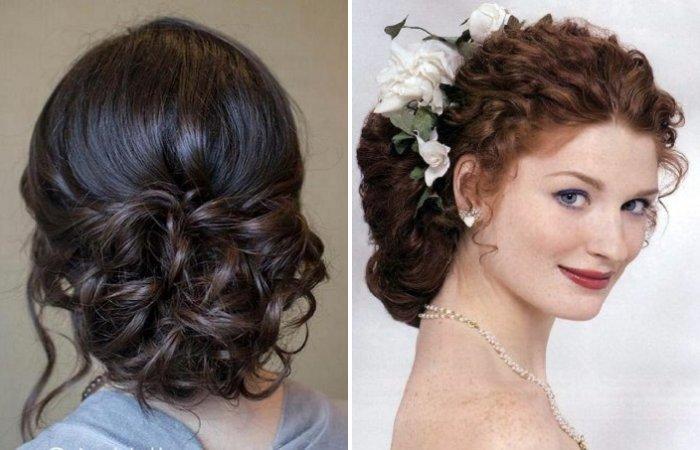
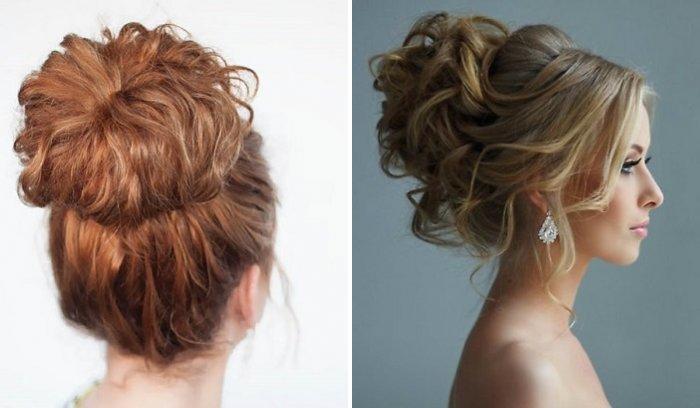
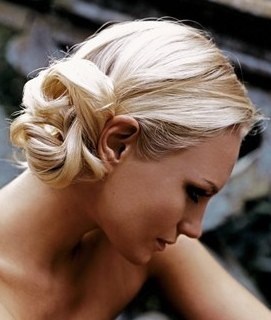
Wavy hair bun
Simple to implement, but very spectacular hairstyle. To make a bun from wavy hair, apply styling foam to damp, washed hair. Using a hair dryer and a round comb, dry and straighten your hair. Take the tongs big size and strand by strand we wrap the hair around them, but do not heal, otherwise we will get rings, and we only need waves. We collect the finished strands into a loose ponytail and tie it with an elastic band. IN last time By passing the hair through the elastic, we leave it to sag freely in the form of a loop. We wrap the resulting loop around the elastic band, pointing it downwards. We fix the hairstyle with hairpins. This version of the bun will look great with varnish hairpins and satin ribbons matched to the shoes and dress.
Exquisite bun with jewelry and accessories
A familiar everyday bun can easily turn into a luxurious one. evening hairstyle using accessories and hair decorations: beautiful original hairpins, flowers, brooches, clips, combs, decorative hairpins. The main thing is not to overdo it, especially with metal hairpins. It will look tasteless, and the abundance of metal “in the head” can cause headaches.