Pattern for a men's small shoulder bag. DIY shoulder bag: techniques for making it from various materials
This small shoulder bag one of my favorites! Especially tender feelings I feel strongly about it in supermarkets or markets, when it is especially important to have both hands free to keep up with the kids. And its dimensions are simply perfect for everything you need. Sewing it is a real pleasure, because... its various variations are simply endless. Another advantage will be its low cost; from the required materials, leftovers or pieces of fabric are quite suitable, which craftswomen always have in abundance. This master class supplied step by step photos the entire sewing process, so even the most beginner can easily sew such shoulder bag. Also, here you will find free pattern this handbags. I will share with you a couple of strap options for such a handbag, in case you do not want to use a chain for the strap.
Fabric requirements:
The thicker the fabric, the better. Canvas, twill or something similar works great. If you decide to use chintz or cotton fabric, I advise you to pre-prepare it by sealing it on one side with non-woven material.
What we need:
- Sewing supplies: sewing machine, scissors, thread, etc.
- Chain (for strap)
- D-rings
- A small piece of bias tape
- Pattern (you can download it).
We print the pattern without adding scale. Cut it out.
As a result, you should have 7 parts (see photo).
Details:
- 1 fabric flap piece for the front side
- 1 base piece
- 1 fabric flap piece for front side
- 1 front fabric piece for front side
- 2 parts for the base of the bag made of fabric for the lining
- 1 flap piece made of fabric for lining
(1 inch = 2.54 cm)
Let's get started.
First we will make the loops for the D-rings of the holders. I used bias tape for this and stitched the edges together.
Making bias tape yourself is not difficult; you can see how it’s done.
If you still decide to use a chain for the strap, then feel free to skip the following steps.
If you decide to make a textile strap for a handbag, then you will need a strip of fabric 2 x 48 inches (in any case, the length of the strap is at your discretion).
Fold the edges towards the center twice, as shown in the photo. Iron.
As a result, you will get a strap 0.5 x 48 inches, sew the edges and put it aside, we will need it later.
Let's start with the valve part. Using a hot iron, iron the edges of the part inward by about 0.5-0.6 cm. Then we sew with a running stitch with inside, as shown in the photo below. Set aside.
Now, take the largest front piece for the front wall of the bag and sew along the top edge with a machine basting stitch. Pull the end of the bobbin thread (thread from the stitching on the wrong side of the fabric) to gather the fabric.
Take the piece for the back of the bag and, placing the front piece on top, gather until both pieces are almost the same size. These two pieces will be the front of the bag.
Then, in the center, pin the part under the flap (it is also made of fabric for the front side of the bag) to the part with the gathers. Make sure again that all parts are the same size.
We take the part that we previously made (the part for the valve) and, placing it in the center of the part with the assemblies, pin it together. We check the dimensions on the part for the back of the bag.
Sew with a regular running stitch along the top edge.
The resulting part with all the assemblies under the valve part will look like this:
Now iron the gathers with a hot iron.
Then we sew the part under the valve to the part with the gathers. If you adjust the stitch length on your sewing machine, increase the stitch length a little. We start sewing from the top on one side and to the tip, then we repeat the procedure only starting from the other side and the same to the tip. Don't forget to sew a locking stitch at the beginning and end.
Now let's add a magnetic button to the front panel. We will place one part of the button in the middle on the part under the valve, closer to the end, but at the same time not too close to the edges. We make marks for attaching the button, make cuts through all layers of fabric.
We push the teeth through the slots made, and applying the washer, lower the teeth to the sides.
Now we take the front and back parts of the base and pin them facing each other. I started carefully chipping the pieces along the top and bottom edges so that the pieces lay flat.
We pin both parts along the entire perimeter, aligning the edges.
Trim off excess fabric.
Then we sew our parts along the entire perimeter, leaving the top open. We make small cuts in the corners, as shown in the photo, so that when turned inside out, everything lies flat and does not bulge. We turn it inside out and iron it thoroughly so that our corners look perfect.
Let's move on to the lining. Having placed both parts facing each other, we sew a stitch leaving the top open, and also leave a small hole of about 3 inches at the bottom. We also make small cuts in the corners, as shown earlier, turn them inside out and iron them.
There's just a little bit left to do. Now we need two parts for the valve of our future bag. We put them facing each other and stitch them, leaving top part untouched. We trim the corners and cut off the corner at the tip of the flap.
Turn it inside out and iron it. You can add decorative stitching along the outer edge if you like.
Now let's add the second part of the magnetic button to the valve. Having placed the valve part in an inverted state on top of the part with the assembly, we make a mark for the second part of the button. Remember the proverb “measure twice, cut once”.
Use a small piece of fabric for greater strength, placing it (you can glue it with a piece of non-woven fabric) on the wrong side of the valve. We make cuts only on the underside of the valve, attach the washer and lower the teeth to the sides.
We take the flap and apply it in the center to the back of the bag with the right sides facing each other, aligning the cuts (see photo below). We pin it with pins.
Let's move on to the main part. We put the front part into the lining part; they should be positioned with their front sides facing each other (see photo). Align the top edges and stitch along the entire top edge.
Turn inside out through the hole left in the lining. Sew it up.
To add a textile strap to your purse, simply insert it through the D-ring and stitch it.
For a chain strap, instead of D-rings, you will need hooks to hook them onto the end links from different sides. ![]()
Congratulations! Yours shoulder bag ready!
Friends, step-by-step photos of the entire sewing process for this product can be found on the website: Themotherhuddle.com
Translation: bonanzAnna
The master class presented in sufficient detail will tell you over your shoulder.
Shoulder bags will also be laid out here, making work more clear and easy. It should be noted that leather ones are provided free of charge by the master class, to use them you just need to enlarge them four times and print them.
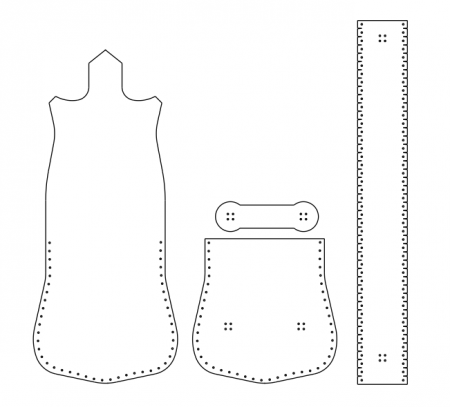
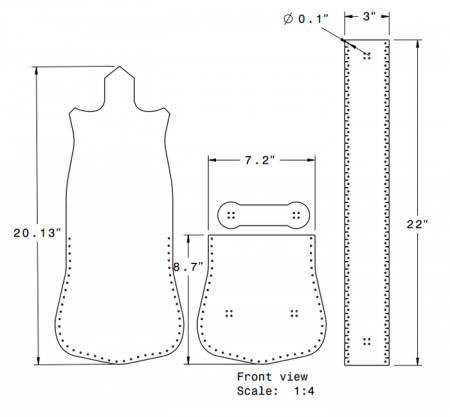
You can use leather from old leather items as the base material, or buy a completely new piece. Another interesting fact, what in in this case The bag is sewn entirely by hand and we don’t need a sewing machine.
All parts are connected with a cord, which adds a certain style and flavor to the finished product.
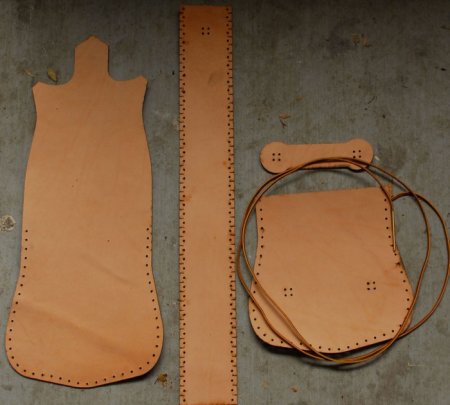
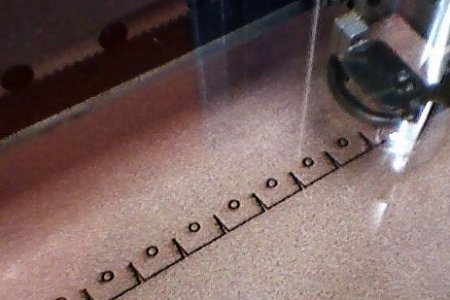
In this case, a laser cutter is used to cut the required number of holes; in the absence of one, you can use a regular awl.
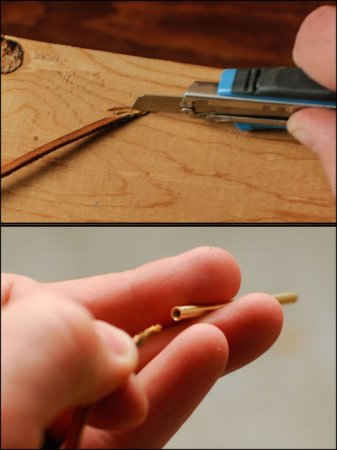
To insert a leather lace into a needle, its tip should be cut diagonally.
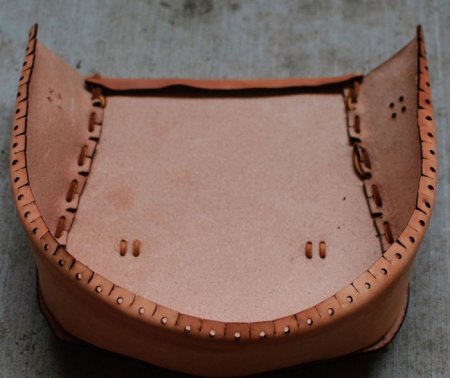
Now the part of the bag with which the work is being done should be moistened with water, which will allow the parts to be accepted the required form.

In this case we're talking about about the bottom and side of the bag, which should be bent into the required shape.
A string is threaded through the holes.
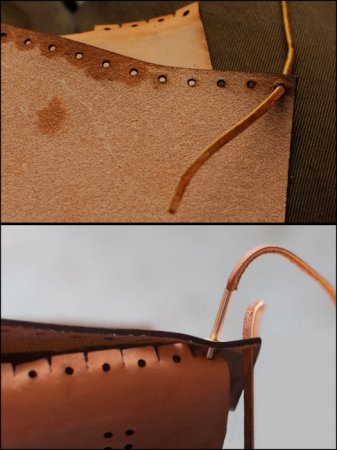
Using a needle and cord, the parts of the bag are connected, as if stitching them through previously made holes.
The seam is made using the classical technique.
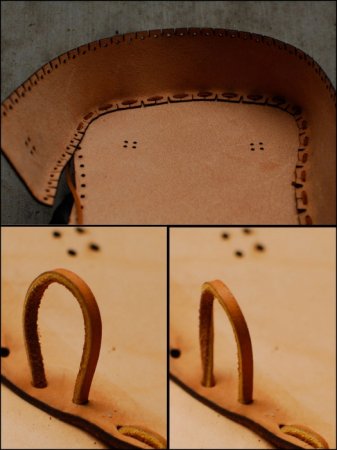
Pay attention to how to close the end of the lace so that the bag is fastened securely. The excess tip can be cut off.

Having cut out a form in advance to fix the strap, we attach the latter in its place. Pay attention to which knot is used.
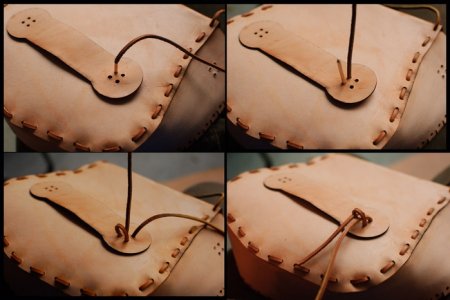
Type of bag with reverse side, when the clamp for the strap is already fixed.
We sew on the next part of the bag, which comes with the strap.
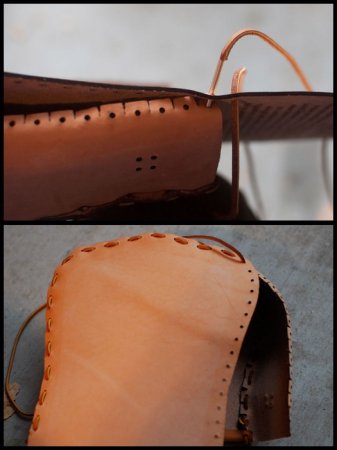
We cut out the handle for the bag to the required length so that it hangs on the shoulder. The ends of the handle should be cut with a corner and four holes should be made on each side. We fix the handle in its place using the same knot.
The most useful and necessary women's accessory is a shoulder bag. The pattern that we will offer you in the article is beautiful fabric, threads, imagination - and you will have a unique thing!
For a walk
So, how to make a crossbody bag with your own hands? The pattern is designed so that ready product It won't be very big. Its size is suitable for storing a phone, wallet and a couple of other necessary things, such as a cosmetic bag or a book. This accessory will be very useful on a walk. What do we have to do:
- Print out the pattern in full size. If you don’t have such an opportunity, then draw it yourself, it’s not difficult, and you can adjust the template to the size that suits you.
- On the fabric, cut out two pieces according to the pattern, leaving room for seams.
- Fold both parts in half and sew together, connecting the edges and creating the bottom of the bag.
- Stepping back 3 centimeters from the corner, sew diagonally, cut off the excess.
- Do all of the above with the fabric that will be used as a lining.
- Cut out the pocket to the required size. Overlock one side and sew the rest to the lining.
- Make a buttonhole to close the bag. To do this, cut a piece of fabric twice the width needed. Fold in half and sew the edges.
- Use safety pins to connect the lining and the bag. Insert the loop between the two layers. Sew everything together, leaving some room to turn the bag inside out.
- Level the product.
- Sew the two ends of the handle together. Sew on a button.
Here it is ready. The pattern is made in a rough form, but is still understandable.
For shopping

A shopping bag should be as comfortable as possible, so it’s good if the strap can be worn not only over your shoulder, but also in your hands. This pattern of a shoulder bag made of fabric is a little more complicated. Progress:
- Use ready-made pattern or, based on it, create your own.
- Transfer the pattern onto the fabric from the wrong side. The seam allowance has already been taken into account.
- Fold in the corners (shown as triangles in the picture). Sew the edges along the dotted lines.
- Cut out the required pocket size. Sew on the outside. Add a lock. To do this, connect one part of the lock to inside pocket, and the second - with a bag.
- Do the same steps with the lining.
- Sew the pocket inside, leaving one side free. Sew in a lock.
- Cut the handle for the bag twice as wide as the required length. Fold the edges to the center, sew on the wrong side. Turn right side out.
- Connect the lining to the main fabric with safety pins. Insert the strap between the two layers from the side.
- Cut out a rectangle that can cover the empty space of the bag, leaving room for seams. Cut it in half and sew in a lock.
- Insert the finished part between the layers.
- Sew everything together.
For this product, choose thick fabric. The shoulder bag is ready. The pattern, by the way, can also be used to create a fashionable clutch if you reduce the size.
Another variant
Look what simple pattern! The shoulder bag on it turns out to be very comfortable. Here's how to do it:
- Understand the pattern. The two largest rectangles are the “body” of the bag. Two small ones lying horizontally - bottom and top. The square is the part with which the product is closed, and the two rectangles located on either side of the “body” are the side parts.
- Transfer the pattern onto the fabric. Sew the sides first to the bottom, then to the “body”.
- Create the lining in the same way, but do not use the bottom two pattern pieces.
- Make a handle. To do this, cut a rectangle of the required length and width twice as large as required. Sew it in half.
- Connect the lining to the bag with safety pins and insert a handle between the layers.
- Sew the parts
- Sew a button on the front of the bag, and a loop for it on the part that closes it.

Conclusion
Choose which pattern you like best. This crossbody bag will become an indispensable accessory for you for any trip out of the house. Good luck!