Pencil drawings of plaster figures. Drawing a plaster head from an antique sample
Constructive drawing - This is a section of the discipline of academic drawing - drawing the external contours of objects, both visible and invisible, made using construction lines. You create a “skeleton” of the object you are going to draw. And in order to create such a frame, you need to analyze the depicted object. Constructive drawing begins with analysis.
Take a closer look, think about what the object consists of? From which geometric solids? What are the simplest geometric bodies? These are cube, ball, cylinder, cone, prism, etc. If you learn to see geometric bodies in the objects around you, then you can easily create a frame, or, more precisely, a constructive drawing.
For example, let's take an ordinary bottle. It contains a cylinder, perhaps a cone (truncated), and also, perhaps, a truncated ball or torus. Or, for example, a cabinet or table - consists of a tetrahedral prism or, perhaps, of cubes and parallelepipeds.
Therefore, the first step is to learn to find geometric bodies in everything that surrounds us. This will help develop three-dimensional thinking.
The second step is the image of the “frame”. You need to learn how to correctly place the geometric bodies that make up the depicted object in space. This requires knowledge of linear perspective.
That is, you need to know what the horizon line is, vanishing points and how to use this knowledge. For example, when we draw an ordinary cube, we draw lines of parallel faces of the cube so that they converge at one point or two points on the horizon line.
The second point is the center line.
It helps to create the design correctly. For example, we need to draw two cylinders of different thickness, that is, different diameters. And one cylinder is located above the other. We make, for example, the design of a bottle. For this we need a centerline. If the bottle is standing, then this line will be vertical.
Draw a vertical line. Draw a rectangle (the main part of the bottle) so that this line runs through the middle. Draw another smaller rectangle (neck) so that the center line runs in the middle. Now you need to draw (construct) 4 ellipses - below and above each of the rectangles.
It's already becoming something more like a bottle. Or here's another design option for you. If you draw a bottle in perspective, look at it from the side and a little from above. How then do we create a constructive drawing? First, we draw not two rectangles, but two tetrahedral prisms, from which we will then get two cylinders.
It is clear, first there is one prism - the main one. Next, we draw diagonals on the lower and upper planes of this prism, obtaining two points. We connect these points - we get the middle axis. This axis will help us build another prism correctly, from which we will create a cylinder for the bottle neck.
By placing one prism on top of another, we build two cylinders. After that, we round the corners, giving this design the plausibility of a bottle. You can create not only designs for simple objects such as dishes and furniture, but also animals and even humans.
Despite the complexity of the structure of a person or animal, we can find simple geometric bodies in them - cylinders, prisms, cubes, balls, etc. Simply, in order to master a constructive drawing, you need to see, as if through and through, what makes up what we let's draw.
Start developing three-dimensional thinking with an ordinary cube. Draw it on a piece of paper, this is, whatever one may say, the basis. This is where the constructive drawing begins. The cube represents the three dimensions of space - width, height and depth.
The latter, that is, depth, is an illusion, since we cannot have depth on the plane of the sheet. Here are some examples of constructive construction.
This is how the frame or wrapping surface for the future object is created. This is constructive construction.
Now let's look at examples of constructive step-by-step drawings from simple geometric shapes to the human figure:
Step by step drawing methodology...

Constructive analysis of the shape of everyday objects.

Studying perspective using cubes of various sizes as an example.

Still life of geometric bodies.

Object still life at the stage of shaping.

Completed object still life.

Simple table still life.

Drawing of a complex object.

Drawing of a plaster palette.

Drawing of a column capital of the Ionic order.

Drapery drawing.

Perspective drawing of the interior.

Constructive analysis of the skull shape with shading.

Drawing of a human head being chopped off.

Drawing of a human head.

The drawing of David's eye is an exercise in understanding the shape of the parts of the human head.

Constructive construction of the human head (front part).

Constructive analysis of a human head with faint shading.

Drawing of the plaster head of the Condaier Gattamelata.

Analysis of the shape of the plaster head of Apollo Belvedere from several angles.

Drawing of the head of Zeus in two angles.

Drawing of the head of Emperor Hadrian's favorite, Antinous.
It is no coincidence that the study of head plastic surgery begins with drawing plaster models of the head. A plaster head is a good model, since it is uniform in texture and motionless, which facilitates the drawing process, conveying proportions and constructing the shape of the head.
Drawing plaster heads is also advisable because forms taken from reality have already been found and generalized in the works of great masters. This simplifies the task for the beginner, allowing him to concentrate all his attention on building the main parts of the model.
When starting to draw a plaster head, it is advisable to conduct a general analysis of its shape and become familiar with the diagram of the main planes that form the volume of the head (Fig. 26).
If you have a choice of plaster casts of ancient heads, then it is better to start drawing with more generalized models, such as Doryphoros, Antinous, Apoxyomenes, etc.
When starting to draw a plaster head, you need to take care of its placement and lighting.
The surfaces that form the head and its volume are best revealed by an artificial light source illuminating the head from above at an angle of 45°. Too dark shadows on the model’s head should be softened by placing white paper or drapery nearby, which gives the necessary reflexes.
For the first drawings, the head should be placed at such a height that the eye level of the person drawing is at the eye level of the plaster model.
Another important condition for the work is to maintain the position of the nature and a constant point of view on it during the drawing process. You should not sit too close or too far from the model. The distance from the painter to the model should be equal to three times its vertical value, which will allow you to clearly see the details and monitor the overall construction.
Rice. 26. Diagram of the main planes forming the volume of the head
Before you start drawing, you need to take a good look at the nature from all sides, note the features of the shape, tilt, and turn of the head. You need to choose a point of view on nature and determine the size of the drawing (usually a little smaller than life).
The head is placed differently on the plane of the sheet, depending on its tilt and rotation. In the drawing, the shape of the head is placed slightly higher than the middle of the sheet, since the lower part of the face exceeds the frontal part in terms of the number and expressiveness of details, which will make the drawing not seem shifted down. The profile image of the head should be positioned, leaving more free space in front of the front part, so that the face does not appear to be “buried” in the cut of the sheet.

Rice. 27. Sequence of drawing a plaster head in an upright position
Let's consider the sequence of drawing a plaster head (Fig. 27).
First stage(Fig. 27, a). We determine the general compositional placement of the drawing on the sheet. Using light lines we outline the total mass of the head and its movement in relation to the neck. By drawing the middle axial lines along the oval of the head and neck, we clarify the tilt and rotation of the head. We draw a horizontal line passing through the tears of the palpebral fissure. The profile line divides the head in half. The intersection of the middle and horizontal lines - the “cross” - gives the position of the head in space and a clear division into the facial and brain sections.
Second phase(Fig. 27, b). We divide the facial part into three equal parts: frontal, nasal and labio-mental. In the upper third we outline the volume of the forehead and the configuration of the hair. In the middle - the location of the eyes, nose, eyebrow line, cheekbones. In the lower third we outline the mouth gap and the groove between the lower lip and chin.
While working, we check the paired planes, identify the shape and volume of the head (temporal lines, frontal tubercles, eye sockets, cheekbones, chin eminence, width of the upper and lower lips). We clarify the boundaries of the transition from the front to the side surfaces of the head volume.
Third stage(Fig. 27, c). We continue the linear constructive construction of the head shape. We move on to working out the shapes of smaller details: eyelids, eyes, nostrils, lips, hair, etc. In this case, you should remember about the interrelation of details and the laws of perspective reduction.
Fourth stage(Fig. 27, d). To give the drawing volume, we begin the cut-off modeling of the shape. We determine the lightest and darkest places and tonal transitions. It is better to initially leave illuminated surfaces untouched by strokes. Gently and gradually work on the halftones during the transition from light to shadow, paying attention to the reflexes in the shadows.
In the process of drawing, it is necessary to strive for the integrity of the drawing and avoid tonal diversity.
We looked at the sequence of drawing a plaster head in a frontal position.

Rice. 28. Stages of drawing a plaster head in rotation
In Fig. Figure 28 shows the stages of drawing a plaster head in rotation. In this case, the same sequence is maintained, only it is necessary to take into account the perspective reductions of the surfaces of the head and its parts: nose, eyes, forehead, cheekbones, mouth.


Neck bones consist of seven cervical vertebrae, which include the upper part of the spine. Large muscles The muscles that influence the shape of the neck are the trapezius muscle in the back and the sternomastoid muscle in the front. They run from the back of the ear down to the inner ends of the collarbones.
Neck capable of movement in all directions: tilt your head forward and back, to the side towards either shoulder, and rotate it from side to side 180 degrees.
Apart from the sound-conducting structures in the ears, only the jaw moves from the joints of the head. All other bones of the skull are rigidly interlocked and immovable.
Facial muscles can be divided into two types:
Proportions of the human head. Simple Construction Method
The face is, of course, the most expressive part of the body. Here simple construction method, which will help you see what simple shapes the head consists of. The average proportions of a human head are shown in the figure below. The height of the head is approximately the same as its width when viewed from the side, so in profile it fits into a square. When viewed from the front, the width of the head is much less than its height.
Start by drawing the head in profile. Draw a circle for the skull and then add two lines on the front of the face to indicate the jaw, as shown in the image above.
The most common rookie mistake when depicting the head is that head seems flat. Therefore, as soon as possible, try to draw three-quarter view of the head, trying to display the roundness and solidity of the forms. Use light reference lines to indicate the center line of the face and the position of the eyes.  The picture shows a rather characterless face, but at this stage the main thing is to understand the basic forms. People's faces differ from the average pattern in many ways, how exactly will be discussed in detail in the following lessons. These drawings represent the first step. If you draw hundreds of these simplified heads, you will come to understand all the subtleties of the relief of the human face and will be able to imbue your drawings with life and character.
The most important thing to understand is that the face is not just a flat surface with details superimposed on it. To draw faces successfully, you must understand the three-dimensional shape of the surface - that's why we started with the featureless average face, which can belong to either a man or a woman. 
If you look at the hazy newspaper photograph of the crowd below, you'll see that each face differs from the others only in the way it displays light and shadow, not in the shape of its eyes or lips. If you can imagine face as a template, in this case you will avoid the common mistake of creating lifeless mechanisms of eyes, noses and mouths, indistinguishable from each other.  That's why practice drawing a face template adding light and shadow until you fully understand its shape.
  The images above show several basic face and head shapes from different angles. Once again, it is important now that you understood the real shape of the surface, not just a plan.
The article used materials from the book “Figure Drawing without a model” by Ron Tiner.

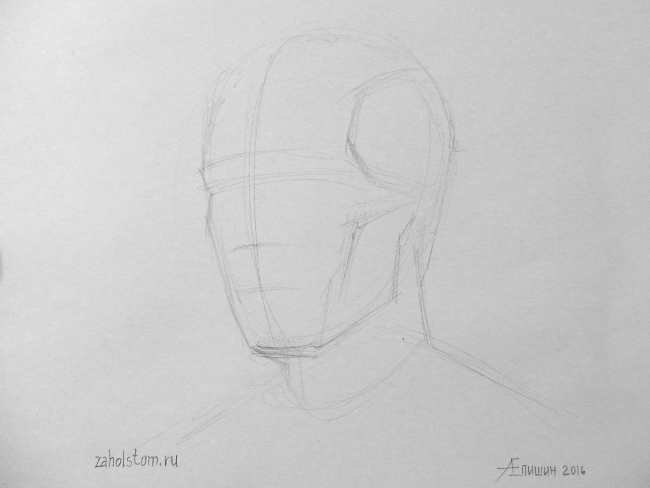
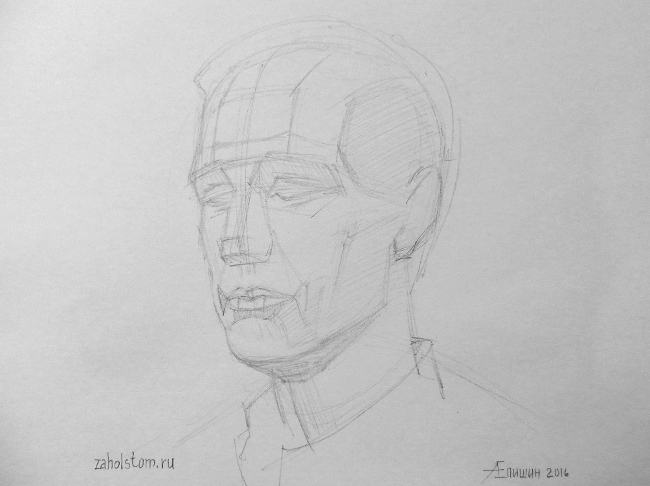
In this drawing lesson, I prepared the material so that the key principles of drawing a human head were visible. To learn how to draw a portrait, you need to understand the shape of the head, and this is possible through simplification and generalization of unnecessary details. For this purpose, I used a schematic representation of a head called “chipping,” an academic drawing of a skull, a step-by-step drawing of a human head, and additional schematic drawings to help understand the features of the anatomical structure.
1. Three-dimensional form. Simplification and generalization.
At the initial stage of learning to draw, people most often see the contours of an object instead of its volume. This is exactly how beginners draw a portrait: they draw the contours of the eyes, nose... But a person’s head, eyes, nose, lips - they all have volume, they are not just contours. In addition, they have a rather complex shape. Therefore, at the beginning of training, you need to be able to generalize the secondary and realize the scope of each form.
First, let's try to draw a person's face with a protruding nose and forehead, presented in the form of rectangular geometric shapes.

2. The skull is the basis of the head shape.
There is one important lesson to learn next. All the main curves and contours of the face are formed from the bulges and bends of the skull. After all, it is the skull that is the basis on which the shape of the head in a portrait is built. Try to trace this relationship by comparing the shape of the skull with the pattern of the head. This is a very important point in learning.
Since the skull has a complex shape, it will not be easy to immediately understand this relationship. Therefore, first we will draw a skull in general.
The skull consists of two main sections: the brain and the face.
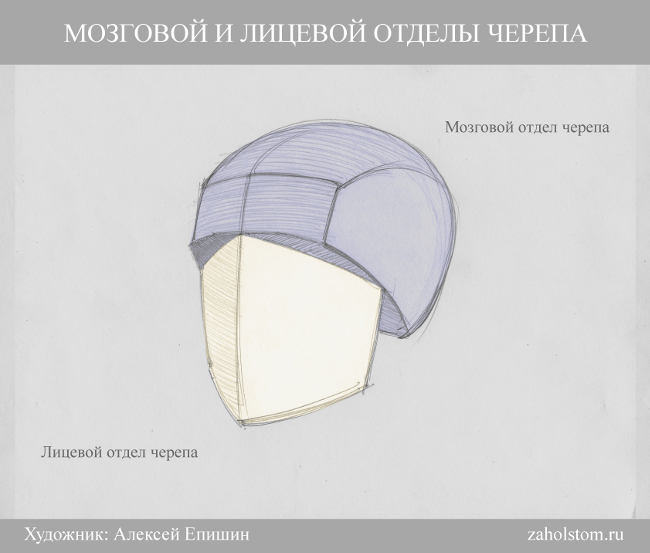
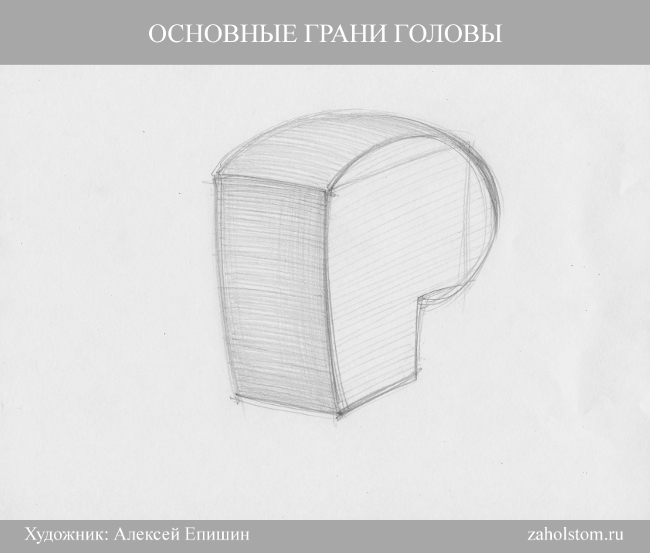
In addition, the shape of the skull can be roughly represented as a cube. The skull has a frontal side, two lateral sides, an occipital side and the so-called cranial vault or roof.
After the conventional, generalized drawings, I give as an example an academic academic drawing of a skull. With many details, you can see the frontal, occipital, lateral sides and arch. You can also see how the details are grouped into two main sections - the brain and the facial.

It should also be noted that the widest part of the skull is located closer to the back of the head. It can be clearly seen in the figure below.

For those learning to draw a portrait, the following anatomical names for the various parts of the skull may be useful:

- brow ridges;
- frontal bone;
- parietal bone;
- occipital bone;
- temporal bone;
- zygomatic process;
- cheekbone;
- maxillary bone;
- mandibular bone;
- nasal bone;
- eye socket or eye socket.
3. “Orubovka” is the key to understanding the shape of the human head.
In addition to the skull, the shape of the head and face is influenced by muscles, cartilage, fat deposits, etc. In order not to get confused in the details, trimming will help you understand the anatomical structure. A cut is a conventional image of a person’s head, consisting of edges. With the help of such planes the volume of the entire head is formed. Thanks to these edges, the main curves of the skull and the main muscle groups of the face are clearly visible. In any portrait, for any person, the shape of the head is built on the basis of these trimming edges. Of course, each person has his own facial features, his own proportions, but the key points in the construction of the head correspond to the cutting. Therefore, when drawing a portrait, the artist always keeps these key facets in mind.
Try to trace the main planes of the cut in the drawing of the skull and in the tonal drawing of the head made in pencil.


4. Formation of volume through light and shade on the front, side and top sides of the head.
To make the head drawing three-dimensional, it needs to be worked out with shading. Hatching creates the desired tone. By changing the tone (lighter-darker) we see volume and shape. According to the law of chiaroscuro, light is distributed on the surface of the form in the following sequence: highlight, light, penumbra, shadow, reflex, falling shadow. If you draw a ball or similar simple geometric shapes, then everything is much simpler. But how to show chiaroscuro in a tonal drawing of a human head? In the portrait, chiaroscuro is also done with shading, as in the drawing of the ball. But with the difference that the artist must trace the light and shadow on each individual fragment of the face in particular and on the entire head as a whole. That is, you need to show light, penumbra, shadow - on the nose, on the forehead, on the eye sockets, on the lips, chin, etc. But besides this, light and shadow need to be shown on the entire head as a whole, that is, on its main large faces or sides. For example, one side of the head may be darker than the other. This is an important point when creating the volume of the head in a portrait.
For a better understanding of this topic, I give as an example visual diagrams and drawings of a plaster stump, a skull and a human head. In them you can clearly see the front, side and top edges of the head. The diagrams and pencil drawings are designed in such a way that they can be used to gradually trace the main edges of the head, which will help novice artists see the chiaroscuro on the surface of the head as a whole.


5. Brain and facial sections of the head.
Above I have already given a schematic drawing in which the brain and facial parts of the skull were visible. But how to practically see these areas in drawing a portrait? A number of drawings and diagrams below can help with this. Here you can trace the boundary between the front and brain parts of the head in the usual pencil drawing, plaster casting and training drawing of the skull.

6. Step-by-step tonal pencil drawing.
After studying the basic anatomical features of the structure of the head, you can begin step-by-step pencil drawing. Here you need to learn this sequence. First we draw in general terms. Then we complicate the drawing by adding details.
A) Since the shape of the head resembles the shape of an egg, we first draw the corresponding figure with a line.

b) After this, we construct a drawing of the head. Draw an axis of symmetry that will run through the middle of the head. This is very important because the axis will allow you to compare the left and right sides, which will help avoid errors and irregularities. Next, we outline the levels at which the eyebrows, eyes, nose, and lips are located. We outline them using light lines. I wrote about how to determine these levels in the lesson

V) At the next stage, you can outline the eye sockets, eyes, nose, lips, as well as the cheekbone, frontal lobes, main muscle groups and folds on the face.
G) Let's clarify the details.
d) I use an eraser to lighten the blackness of the auxiliary lines, which will be erased in the end, however, they are needed at the beginning of constructing the head.

e) Let's start with tonal drawing. Enter shading. We designate shadows and light. We “sculpt” the shape of the head using tone. I did not record the intermediate stages of shading, so I am publishing the final stage of the drawing right away.

7. Different manner and technique of drawing.
At the end of this lesson I would like to add that the manner and technique of drawing can be different. The drawing can be linear or tonal. You can draw with a line, or you can draw with a spot. You can work in a free sketch style, allowing for inaccuracies. Or you can make an accurate academic drawing. You can draw in detail, or you can draw in general terms.
But with all the variety of approaches, literacy should be visible in the drawing. The principles of constructing a head are preserved, whether on paper or in the mind of the artist. A professional artist with experience may not draw auxiliary construction lines. He may work in a different sequence. However, whatever the technique of execution, his drawing will show an understanding of the basics of plastic anatomy. Therefore, if you want to learn how to draw a portrait, you need to understand the essence, and not just copy a nature or picture step by step. When a novice artist gains such an understanding and begins to see nature by analyzing, and not just copying, then he will be much more successful in learning. I hope the drawings and diagrams from this lesson will help beginners with this.
In order to draw a head from any angle, it is necessary to understand its basic structure and make a constructive construction of the human head in stages.
To begin with, we ignore the details and prepare the simplest base of the head.
The diagram (blank) (which we will talk about in the second lesson) helps to construct an image of the shape of the head.
Lesson #1
You will need a piece of paper, pencil or charcoal. And the most important thing is nature.
It is always preferable to draw from life. Place in front of you someone who can give you enough time - your grandmother or grandfather. It’s good if you study together with your friend - you can draw and pose alternately.
If it is not possible to draw from life, then use a photograph, certainly of very good quality. However, know that photography is a bad friend and it is better to use it as a last resort.
Let's begin. Before us is nature. Or a photograph.
We make constructive sketches. We don't worry about cleanliness...


1. Place the person’s head, as well as the neck (shoulders are also possible) on the plane of the sheet. To begin with, we use our eye and at the same time check ourselves.
2. Find the main volume of the head, neck and shoulder girdle. Imagine that in front of you is not a person, or rather not his head, in front of you, first of all, is a shape, a volume. Try to observe this volume. We need to transfer this volume to the plane of the sheet. We start with the image of the main volumes and planes. There are no details, now there are no eyes or eyelashes.
Don't forget about the 3D view of the shape. Try to feel the design of the shape of the front part. Note the protruding parts of the skeleton. At this stage, you need to understand whether you can see the design of this volume.
Still reading?... Draw! Now it is important to understand the process itself. Carefully study the form, notice and capture all your sensations.


So, in order to draw a person’s head, you need to get hooked, find what you need to start working with.
First, we find the main points (which will be discussed later). Secondly, we find the main planes formed by the fractures of the shape.
The points, planes and kinks that we catch are not actually random. This is the structure of the human head, its constructive moments. This is what forms the characteristic volume of the head and the individual characteristics of a person.
Looking at nature, the first thing we find by the highest point on the skull and the protruding point on the chin is the height of the head, then we highlight: the balls of the eyes in the sockets, the pyramid of the nose, the cheekbones, the protruding volume of the chin and the plane of the forehead.
During this exercise, I hope you realized that the head is the same volume that has edges and planes, main points, height, width, depth and light and shade.
Lesson #2
Constructive points make it possible to determine the proportional relationships of all planes of the volume of the human head. They form the shape of the head.
Let us analyze in detail all the design points:

- Eye sockets and orbital sockets
- Zygomatic points
- Frontal tuberosities
- Chin point
- Angle (point) of the lower jaw
- Highest point on the skull
- Temporal points (how they are formed, we will tell below)
- Parietal tubercles on the back of the head
Axes dividing the head into certain parts: 
- The line dividing the head vertically into two symmetrical parts is red.
- The line dividing the head into the upper cranial part and the lower facial part runs along the brow ridges - blue.
- The line dividing the head into the occipital and facial parts passes through the highest point of the skull and the ear openings - green.
- The line that subsequently determines the three-quarter turn of the head passes through the zygomatic and temporal points, as well as the parietal tubercle—yellow in color.
- The line defining the bottom of the nasal pyramid runs through the bottom line of the nose, and the bottom points of the ears are turquoise.

Blanks. Blanks or templates can be rectangular or oval. Rectangular blanks in this case give us the simplest and most understandable idea of the proportions of the human head.
The figure shows three positions at once: three-quarter view, profile and full face.
The main design points and lines allow us to identify some patterns.
Usually The height of the ear is equal to the distance between the line of the superciliary arch and the lower part of the nose.
The mouth is located in line with the point defining the angle of the lower jaw.
The head is conventionally divided into three parts of equal height: from a point on the chin to the bottom of the nose = from the bottom of the nose to the brow ridges = from the brow ridges to a point that is two fingers above the frontal ridges.
Don't forget about the rules of perspective. At three-quarter position The part of the head that is located closer to us will have true dimensions, and the one that is further will be distorted in size downward.
Let's work with the blank matrix and consolidate the knowledge gained.
Operating procedure:


1. Outline the composition on a sheet of paper, draw out the main volumes.
1. Outline the composition on a sheet of paper, draw out the main volumes.
2. Let's determine the basic proportions, shape and character of the head. Perhaps the head will be round or pear-shaped.
3. Let's draw a vertical axis. To do this, you need to decide on the rotation of the head and, accordingly, the position of the nose, since the line will run along it. The axis will divide our workpiece into right and left parts. As a result, we will get the highest point of the skull and the point of the chin.
4. Let’s finally decide on the head turn. This will help us three-quarter turn line. We will first outline the zygomatic point; we will correct its exact location later. And we draw a line through it.
5. Brow line. Visually determine how much space is needed for the skull and how much for the facial part. Draw a line while keeping perspective in mind.


6. Line of the bottom of the nose pyramid. As we noted above - the line of the brow ridge and the line of the lower part of the nose divide the head into three equal parts(ideally). Let's use this pattern, taking into account individual characteristics
nature.
7. The line dividing the head into the occipital and facial parts. We draw it according to the shape of the head, drawing it through the highest point of the skull and ear openings
8.Temporal point- a convex place on the human skull. It will automatically be determined at the intersection of the line dividing the head into the occipital and front parts, and the three-quarter turn line.
9. We outline the nose. The place for it has already been set. The bridge of the nose will be located at the level of the upper eyelid(about the location of the eyes - below)
10. We outline the ear. The height of the ear is equal to the distance between the lines of the brow ridge and the lower part of the nose. 

11. We correct the cheekbones. They are located at the level of the middle of the nose on the three-quarter turn line.
12. Mouth line located at a distance of two thirds from the tip of the chin to the base of the nose. The length of the mouth (ideally) is the distance between the point of the chin and the line of the mouth.
13. Lower jaw point. Lies at the intersection of the line of the mouth and the line dividing the head into the occipital and facial parts.
14. Let's determine the place for the eyes. Line The eye is located approximately halfway between the highest point of the skull and the point of the chin. The dimensions of the palpebral fissures are equal to the distance between the inner corners of the eyes. That is Another exactly the same eye could be placed between the eyes. Don't forget about future reductions in shapes and distances!
15. Frontal tuberosities– two convex protrusions in the upper part of the frontal bone. Determined visually. From the frontal tuberosities to the highest point on the skull, lines can be drawn along the shape of the head (to feel the volume).
16. If this suggests the angle of the head, determine the most convex part on the back of the head - parietal tubercle