What kind of drawing can you draw for March 8th? Master classes for kindergarten and primary school
March 8 is a holiday of flowers and smiles. Women, give your smiles, and let men take care of the flowers for you.
March 8 is International Women's Day of admiration and worship of all the weaker sex. It is a holiday on which people keep pouring in wishes, giving flowers, and sending postcards from morning to evening. Every woman dreams of receiving attention.
Any woman secretly hopes for congratulations from men and awaits them with trepidation. Therefore, representatives of the stronger sex simply do not have the right to deprive someone on this day.
Every girl in your circle needs to be given a small present. But with the hassle and choice of gifts for loved ones - mother, grandmother, beloved, friend, it is not always possible to buy at least a bouquet for others.
But send beautiful cards or funny photos, pictures with poems for March 8 all gentlemen can do it. Moreover, they are very easy to download now and absolutely free.
Perfume in a box,
Shampoo, vodka...
Favorite flowers,
There is spring in my soul...
A hundred times you with ease
You will pass over the abyss,
Let them envy -
Send everyone to...
Leave your doubts
Forget opinions:
Praise or criticism -
Just words...
Believe that you are the best
Believe that you are cooler than everyone else
After all, you are a Woman -
And so right!


The choice is great - official, touching, funny and kind, big and small. Here you will find pictures for every taste that will melt the hearts of even the most fastidious beauties.


How convenient is such a little surprise?
- It is universal, always relevant and loved by everyone.
- Doesn't take much time, quick search, wide selection.
- Provides an opportunity to congratulate even those who are very far away.


Wishes in pictures with beautiful poems
What could be more important than warm words on International Women's Day? Congratulations with wishes of happiness, peace and goodness, describing beauty, expressing gratitude to women - will warm the soul of your beloved mother, will please your best friend, and will make your daughter happy.


Photos and postcards from March 8 with quatrains can be sent out early in the morning to all the ladies you know, thereby providing them with a wonderful mood for the whole day.
Cool congratulations on March 8
Young people do not always understand and accept romance. All these cute cards, bouquets of flowers, gifts tied with a ribbon are boring for them and are relics of the past. But young acquaintances also need to be congratulated somehow. Otherwise you will be on their blacklist forever.There is a way out and it is quite simple - pick up interesting funny pictures and comic wishes. The girls will be delighted with them, appreciate the gift and remember the giver as a creative person who keeps up with the times. They are suitable as a sign of attention for a best friend who loves jokes and practical jokes.


Official congratulations
Beautiful postcards and funny photos are not always appropriate. They can be presented to your mother, friend, or someone you know well. But if you need to congratulate a boss, a children’s teacher, a doctor or an unfamiliar woman on International Women’s Day, they become inappropriate. Something more standard and strict is needed here.Pictures with poems in an official style with universal words that will be appropriate for every lady will come to the rescue. These are not banal wishes that have long been familiar, but specially selected congratulations without frills, interesting and catchy.


All the best to the family
Who does everyone rush to congratulate first? Of course, members of your family. International Women's Day is another opportunity to prove your love to your household. Therefore, preparation for March 8 in the family circle begins long before the holiday. Along with the morning flowers bought for your beloved mother, wife, or daughter, you should definitely please them with heartfelt congratulations in pictures.
Affectionate words, funny images and cool inscriptions are a great way to unite your loved ones and express your feelings. And in the evening at dinner all that remains is to present gifts and take a family photo as a keepsake.


You shouldn’t be irresponsible in your choice of postcards, sending the first ones that catch your eye to your mother, friend, sister, or even just acquaintances. Carefully selected photos, pictures and words on a festive March day will help the female sex feel the care and love with which they were chosen.
This will leave the most wonderful impressions, and will once again allow the woman to understand how valued and respected she is.
In this lesson I will show you how to draw a postcard for March 8th with a pencil step by step. It's very easy, you will definitely get a beautiful drawing if you use the step-by-step drawing lesson on the LessDraw website. This is how we can do it. You can also if you want to give a portrait to your dearest person.
Let's prepare a blank sheet of paper. First, let's mark it like this, drawing a neat circle with a thin or dotted line. Try to draw in such a way that these lines can later be easily erased with an eraser.

We will have flowers drawn on our postcard by March 8th, so I am marking the approximate places where they will be located. There will be tulips and lilacs here, it should be a very beautiful postcard for March 8th.

The base is ready, now you can start drawing flowers on the card. I start with the top tulips.

Let's draw a few more flowers on our card.


Now the flowers need to be connected with stems and leaves. At the bottom we tie our festive flower with a small ribbon. Extra lines will need to be erased.


Good afternoon, dear friends! There are only a few days left until the next holiday, the sun is shining brighter outside, which means spring has come and brought with it a great mood and positive impressions and emotions. On the eve of International Women's Day, I would like to invite you to make cards for March 8th.
We will create them mainly from paper, and of course from what is always at hand, using scrap materials. Let's be original and do all the work with our own hands beautifully and with love. So that everyone to whom you will give such beauty will be delighted with what they see.
Be sure to also make crafts for this holiday, and you can take ideas from this one, I advise you to watch it if you haven’t seen it yet. You can also take advantage of this excellent option and give awesome and cute
It’s no secret to anyone that in order to give or make some nice present to your beloved mother you need to have some kind of superpowers. You can do the work using a sheet of cardboard and colored paper. The symbol of the eighth of March is the number 8, so draw it and stick decorations on it.
The simplest option for a preschooler or schoolchild is presented in front of you.

Do you want to be more extraordinary and do more serious work? Then take this idea to heart. Use the kirigami or protruding technique. Decorate with quilling-style figures.

At first glance, the work may seem quite complicated, but believe me, it is not so. Moreover, you can cheat and do it like this, for example:.

To make such beauty, you need to print out the original template, if you like such a blank, I can send it to you, or find it on the Internet yourself.

Then, using a special cutter or stationery knife, cut out the desired patterns along the lines.

Connect the two parts together using glue, you will get a stylish and voluminous postcard for March 8th.

You can do it differently using this technique.

Using the butterfly and flower template, make the desired work, with the drawing placed in the middle of the A4 sheet, and then insert another sheet to one of the sides.
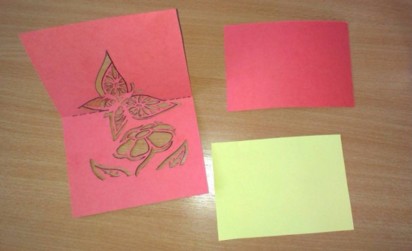

Write your wishes or congratulations. It looks simply wonderful and magnificent.

By the way, this is what happens if you combine two cards for two holidays. We made this boat with you.

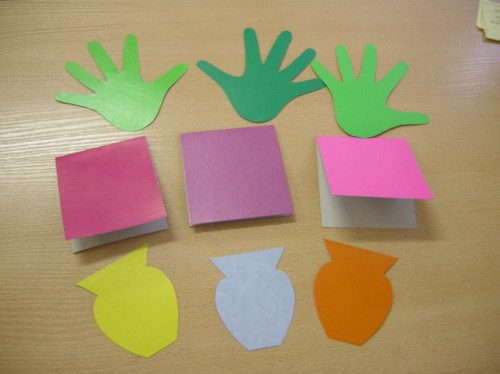
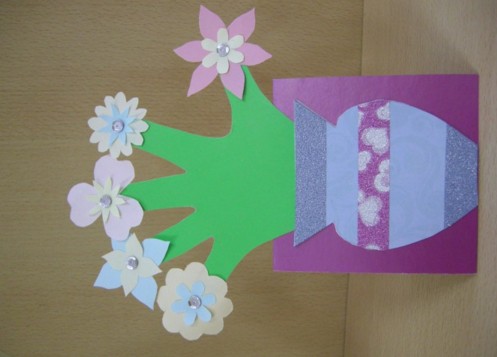
The next version of the greeting card will be like this, let's make a basket of flowers, or rather a pot.

First of all, draw the blanks, this is done with a regular pencil.

You can take the idea from here so that you don’t have to invent or think about it yourself. For the little ones, make cardboard blanks for them to trace on.

The pot itself will be made from wallpaper strips, you can even take fabric.

In general, it’s a matter of your imagination and how old your charges are. Of course, for children 3-5 years old, the simplest version of applique made from ordinary colored paper is suitable, and older children and elementary school children can be offered to use fabric, for example felt, or foamiran.

Cut out all the parts and prepare for work.


Decorate with ribbons and congratulations with wishes.

I recommend giving this card to your mother or grandmother. Who will you give it to?
I also saw this idea yesterday, why don’t we make a card with a surprise, in my opinion this is a great idea, you open it, and there’s a gift there.
We will need:
- cardboard
- toilet paper
- paints
Stages of work:
1. Take a sheet of cardboard and fold it in half. Cut an oval on one side.

2. Then open the sheet and draw a figure eight. And on the other half, draw the same oval, but don’t cut it out, but stick on pieces of toilet paper, draw on the head and legs, you’ll get a turtle. You can draw any other animal. Next, with light movements, depict the grass in green using watercolors or pencils or felt-tip pens.

3. Now take care of the appearance. To do this, cut out eight circles from colored blue paper, one orange circle, three green leaves, three stems and one tulip-shaped flower.

4. After this, fold the circles in half and glue them, as shown here. Do the same with the rest of the details. The result was such a creative and unusual work. In a labor lesson for grades 3-4, I’m sure this look will become a novelty; children will love such a miracle.

Even from plasticine and colored pencils you can make such magnificence with the smallest ones.

If you fold colored paper like an accordion, you can make butterflies.

Or get even more creative and make an application like this.

It looks great! If you like it, please share your thoughts and comment on this post.

Great ideas from paper and cardboard
Have you ever thought that in addition to cardboard and paper, you can use all sorts of things, for example, a real twig. Watch this master class and you will see what can come of it.
Stages of work:
1. First of all, you need to draw your brush mark on a piece of paper, then glue it onto the colored cardstock. The limitation is, do not glue your fingers. Next, place the twig and carefully glue it with tape.

2. Afterwards, make a bunch of flowers.

3. Bend your fingers as if your hand is holding a bouquet. Glue flowers and leaves to the branch. It looks cool and irresistible. I like it, what about you?

The next option will also be based on a palm, only we will plant it in a pot. Prepare all materials according to the list.
We will need:
- colored paper
- scissors
- glue stick
- pencil
- office paper

Stages of work:
1. The basis for the card will be a strip 20 cm long and 9 cm wide. Ask the children to trace their palm and cut it out. Next, draw another vase on colored paper and cut it out.
2. Prepare a bunch of blanks in advance; this is what you will use to decorate the future product.

3. Bend the strip in half, glue the vase and handle. The hand will act as grass or greenery.

4. Glue a flower on each finger.
5. That's all, you have achieved your goal.


Or here’s another new idea that looks wonderful, so you can decorate tulips in children’s hands. Moreover, the flowers can be made to bloom.

You can also give a car with balloons.

Or a bouquet of wildflowers.

We give mothers and grandmothers cards with wishes for March 8
Have you ever taught poems to your female relatives and dedicated them to them? So this very moment has come, you can not only tell, but also present it beautifully and originally in the form of a small present.
We will need:
- cardboard
- colored paper
- scissors

Stages of work:
1. Cut out flower templates with the children.

2. Then you have to make a vase, here you also need to take a model as a basis or draw it yourself. Don't forget to fold the sheet in half and only draw and cut out on one side.

3. On the other side you can write a poem or glue a calendar. It depends on who it is intended for, because if it is for a work colleague, then it is better for them to do it with a calendar, for a mother or aunt with wishes, for a grandmother with advice, etc.
4. Then finish the job by decorating the card with flowers.

5. You can also come up with something inside, for example, write a poem.

6. Quite unusual and original, and most importantly, accessible to everyone.

If you want to please with daisies, the middle can be made from buttons.

Or make a souvenir out of hearts; fold each heart in half. And then glue one of the sides onto the sheet.

It looks simply superb.

Here is a tree from this opera too.

Using , you can easily do something like the following.

Here are the stages of this work, enjoy it for your health.


Take this unusual stencil and make a butterfly.

Unusual card in scrapbooking style
As always, there are a lot of ideas on this topic; if you look at pictures in Yandex or Google, you can see the following. You can take this as a basis.


It certainly looks amazing.


Or make your next creative masterpiece.

We will need:
- cardboard
- double-sided colored paper
- scissors
- decorative napkins
Stages of work:
1. Make such a base from a regular sheet of cardboard, you can make it in a different shape, do it at your discretion.

2. Then fold the sample like this.

3. Cut blanks from colored paper with grass. Flowers will be collected from them.

4. Do you remember making bookmarks like this when you were a child? Take a pencil or you can do it without using anything, the main thing is to twist it in a circle, wind the paper, and then fluff out the fringe.

5. You will get such funny balls. Make leaves from green paper.


Or you can make such an openwork product, reminiscent of vytynanka.


Take this stencil as a basis.

Beautiful three-dimensional version of 3D postcards
I suggest you, together with a blogger, make such a three-dimensional beauty, it will look as if it were 3 D.
You can make such a card quite delicate and attractive using the trimming technique. It is quite simple, I showed you in more detail using the example of valentines. Remember, if not, then go ahead and watch it.
We will need:
- stems made of colored paper in the form of strips
- squares of pink, white and blue colors
- pencil
- pen refill
- scissors

Stages of work:
1. Fold a sheet of white paper in half.

2. Glue rectangular red paper onto one half. After the leaves and stem.

3. Place the square on the pen rod and glue it in this order.

4. Gentle and beautiful at the same time.

I really liked this option.

You can even make it from pasta.

Or using felt or foamiran.

Using colored paper and a suitable background, you can make something that resembles a 3D painting.

Step by step it looks something like this, first make chamomile petals.

Apply the desired background to one half of the base.

And then you decorate it to suit your style and design.

Take a closer look at this view, we also learned how to make these in the last article.


You can use satin ribbons, it looks amazingly light and cute.

Master classes for kindergarten and primary school
If you are still looking for templates for elementary school to make postcards, then first of all you can download them from any Internet resource, but it is better to come up with your own unique and inimitable model. After all, you don’t need a lot of imagination for this. Look, take some sheets of cardboard.

Stages of work:
1. And use one sheet to make a vase shape.

2. Use scissors to cut thin strips of colored paper.

3. Plus more mugs, that’s what happens.

4. Glue each blank, I mean strip, so that you get a petal.

5. Then connect these petals with a circle of paper. You will get a real flower, similar to a chamomile.

6. Make a bunch of them and then get creative.

7. Decorate the cards with them and sign your congratulations on the back.

In the last article, I promised to show you one work, or rather its step-by-step instructions, which you can use for kindergarten or school. How do you like such a cute and yellow mimosa branch?
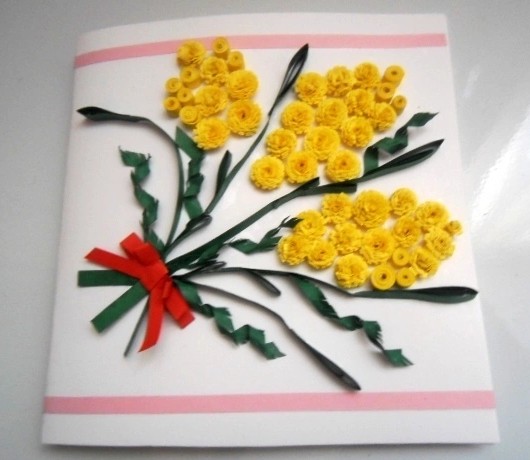
1. Take a sheet of white paper for the base. Make a square out of it, you can fold it in half, depending on how you plan.

2. Cut colored paper into thin strips.

3. Then make a decoration on each strip in the form of grass. And then twist each one in a spiral, that is, in a circle. You will get small mimosas.

4. Glue them onto the sheet.

5. Make twigs from green paper.

6. Twist slightly as shown here.

7. Decorate it approximately so that it looks wonderfully delicate and neat.

8. To make a bow, fold the red strip into an accordion shape.

9. And then crumple it so that it reminds you of a bow.

10. Glue onto the bouquet for finishing. This product looks pretty cool and looks great.
You can also use it to decorate a button, or basically anything.

Look, one of the students brought such interesting and unusual lilies of the valley.

You can also make calla lilies from cotton pads or napkins.

Or this option is quite nice and easy.

I also like this idea, but it is suitable for high school students to congratulate their teachers and girls on this international day.

In fine arts lessons, you can use ready-made blanks that are printed on a printer, and then watercolor is taken and the background is painted over.

Choose any one as a basis and create!

I took all the stories from the free access of the Internet.

You can search for yourself and find the right one for you.

Or use these, they are all cute and quite simple.

So take your pick.

Make your loved ones and relatives happy.

I also came across this picture using gouache.


An interesting topic in my opinion is the iris folding technique, have you ever heard of it?
You will need to print the sample first.

Then cut out the tulip along the contour.

And then the fun begins. Place paper of different colors on the back side along the desired contours of the template. You can glue it with tape.

The result will amaze you with its magnificence. Isn't it beauty?

But you can fold a rose like that.

This is the kind of work you can ask school students to do using plasticine.

Or you can even use disposable tableware, such as cups.

Come up with an image, and then create your masterpiece, which will be folded in half, and there will be wishes inside.

Or something nicer).

That's all for me, dear friends. Write your comments and reviews, I’ll be looking forward to it. I wish you creative success and victories. Bye everyone!
Sincerely, Ekaterina Mantsurova


