How to draw three-dimensional figures and bodies with a pencil. Drawing a human figure
This method is just a tool to help you draw the human figure. This method does not claim to be the best and fastest. The purpose of this drawing method is to determine the shape of a person in three-dimensional space.
Classic animation (and Disney in particular) uses a similar way of developing characters.
Using this method will help you get your ideas down on paper.
Pose
Basic anatomy
Stick figures...
Wait, don't go! Drawing stick figures may be easy... but when was the last time you drew them well...
Do not underestimate the capabilities of such figures and the possibilities of their use at the initial stage.
First of all, they represent a very important element of any object you draw: size proportions. Everyone knows that dimensions determine almost everything in a drawing. Too short a leg or too big a nose can ruin the impression of any, even the best drawing.
Let's look at the stick figures. They have differences in details, but the essence is the same. We'll look at the details later. First, let's look at the proportions of the standing figure.
Stick figure 1. This is the main figure. You see the head, torso, arms and legs. You can't do much with it other than practice with the proportions of the figure's parts.
Stick figure 2.
You can experiment with this little man, determining the proportions of the arms and legs.

Stick figure 3. Added shoulder and pelvis width. Next we will see the need for these components of the figure.

Exercise.
Try to draw such figures and determine their proportions. This is the fastest and easiest way to practice determining proportions.
Using stick figures is also a very quick way to determine how big you can draw people on paper. You don't have to worry about not fitting into the frame of the sheet, since you can clearly see where your legs or arms, etc. end.
Language of the body
Stick figures again.
Now that you know how important it is to determine proportions, we move on to creating poses using the same figures. It’s easier to say: decide what your hero does?
When playing with people, you can experiment with poses before you start drawing the desired pose for the drawing. Yes..., an unassuming little man will help you plan your masterpiece.
People in motion.
Here are some examples of using stick figures to define poses.
Spear throw.
I think this one is dancing...
This one is running...
You see some shift in the position of the pelvis and shoulders because we are looking at it from the outside.
Gladiator
Again some reduction in size (hand with sword). Note the rotation of the body: a very natural position, especially when turning in an effort to see something.
Sadness or searching for contact lenses...
Slacker
Another example of torso curvature. Shoulders and hips are directed at an angle.
At the same time an impossible or extremely uncomfortable position.
Anyway, it looks stupid
Balance When you determine a pose, you should pay attention to the center of gravity. It is located in the lower abdomen of a person, slightly above the perineum. The weight of your legs makes up almost half of your total weight.
The position of the center of gravity in relation to the “rest points” of the body indicates the balance of the body. The following examples demonstrate this.
Red circle - center of gravity
Red arrow – direction of gravity
Green arrow - rest points
Standard gait
As you can see, the center of gravity lies between two rest points. This is a balanced pose.

A fall
Here the center of gravity is close to the rest points. This is an imbalance that causes the body to move sideways to the left.

Balancing
This is possible because the body is positioned quite symmetrically.

Compare with the following...
Here the body leans to the right, causing imbalance. You will notice that the center of gravity moves slightly to the right.

Run, figure run!
When running, the center of gravity is in front of the resting point. As you can see this is an unbalanced pose, ending with a falling movement of the figure. She won't fall, of course, because she runs and puts one foot in front of the other, preventing the figure from hitting the ground.

Incline
The figure is at rest because the center of gravity is between two points of rest: one leg and a shoulder. The second leg is crossed with the first and does not affect stability.

Of course, you don't have to make the pose balanced. An unbalanced pose conveys dynamics, action and movement, while a balanced pose conveys a calm pattern.
All of the above are just aspects of what you should take into account when thinking through a pose. This will give your drawing a very natural look.
Movement and action
The body is a flexible and mobile system, influenced by the center of gravity. It has no natural solid position.
The first picture shows a little man walking. Notice how the pelvic joints move due to gravity. The movement of the shoulders usually occurs in the opposite direction of the movement of the pelvic joints.
The second image shows a person lying down (side view), leaning on one arm. This forces the rest of the body to hang on the free shoulder. Also, since the spine has some flexibility, it may be slightly bent.

Construction
To draw the human body, you should at least know how it is composed.
At the base of the body, of course, lies the skeleton. We've already seen some of this in the stick figure system. Now we will look at the details. The human body consists of the following parts:
head (black)
ribs (blue)
spine (blue)
basin (blue)
connections (red)
hands (green)
palms (green)
legs (green)
]feet (green)
Front view

Side view
Pay attention to the spine (arms are not included as the focus is on the spine).

We can use the simplified skeleton shape when we want to draw a human figure:

Now you have a better idea of your figure.
Body building
Armed with knowledge of the skeletal structure, we can now continue to work on the attachment of “external material”: muscle or fat. To represent these parts we will use ellipses, cylinders and other shapes.
You choose the shape that is most similar to the part you want to draw.
Can't we now continue to draw the real body? Of course we can. But, still, it is better to use stick figures so that at the initial stage you do not get distracted by extraneous details, and focus on the correct proportions, balance and pose.
Three-dimensional representation of body parts.
Red lines are connection lines.
Can you draw? Or maybe you want to try how this is done and learn the basics of this exciting activity? Don't know how to take the first step? It's not so easy, but if you want to try, then read on, and together we'll figure out how to draw a human figure. To work, we will need a sheet of thick, moderately sized paper, several pencils, soft and medium hard, and a white soft eraser for erasing erroneous lines.
General Considerations
The question of that occupies everyone who has picked up a pencil. It is not uncommon for a beginning artist to be disappointed when he looks at the results of his efforts. Usually they are very different from what we would like to achieve. Many people give up trying to learn to draw at this stage. But if you still have not abandoned your intention, you should change your approach to business. The question of full growth should be answered on a systematic basis. First of all, consistency and phasing are important in drawing. For many this will sound unexpected, but before you draw something, you should think carefully. And this applies primarily to such a complex subject as the human figure.
How to draw a full-length person so that it looks convincing?
Any drawing begins with the correct layout, that is, placing the future image on a plane. This is done with light pencil strokes, indicating the extreme points of the depicted figure. In any drawing, a certain semantic compositional center should be highlighted. One of the main rules of composition is that this compositional center should under no circumstances coincide with the geometric one. The image on the plane should occupy approximately three-quarters of the surface, leaving free space around the edges. Further, in order for the answer to the question of how to draw a full-length person to look convincing, his figure must be built in compliance with the proportions and laws of anatomy. And just as important, she must stand firmly on her feet or sit on some kind of support - so that this does not violate the laws of balance. The proportions of the figure vary depending on age; in an adult, the head is about a seventh of the height.

We build a figure step by step
Professional artists have been working on this for many years. In art universities, it is studied in detail. The course is specially adapted for artists, and when studying it, they study in detail all the bones and muscles present in the human body, their articulation and interaction. This knowledge and skills are necessary for competent construction of the human figure. But when faced with the problem of how to draw a person in full height for the first time, it will be enough to correctly take the proportional relationships between individual parts of the body and the figure as a whole. And understand the general structural and muscular systems. When constructing the torso of the figure, we outline the axial lines, shoulder and hip girdle, and joints. When constructing a figure, first of all we remember balance. The figure must stand firmly on its feet. To ensure this requirement, artists have a proven technique - a vertical line from the jugular cavity (the depression between the collarbones under the chin), drawn onto the plane, should not extend beyond the plane of the feet. And then the most important thing - we carefully check the proportions of the limbs, torso and head, gradually building the entire figure.

Generalization of the drawing
When constructing and working out the details, it is very important to stop in time and observe the measure. From the analysis of individual details, one should gradually move on to a generalization of the figure as a whole. As a rule, this is done with wide, sweeping strokes. Nudity does not have to be depicted too often. But basic knowledge of plastic anatomy is necessary for the artist in any case. Without them, it is impossible to correctly figure out how to draw a dressed person. When drawing a figure from any spatial perspective, you need to see and imagine it through and through. Particular attention should be paid to the patterns in which folds form on clothing. This is a very essential element in the depiction of a figure. They can emphasize movement or stability. Having outlined the general contours, we gradually give all the details volume. We model the shape with chiaroscuro. When constructing, special attention should be paid to shading. The stroke is the most important element in the arsenal of a graphic artist. A lot depends on the force of its pressure, length and direction. The culture of shading is developed gradually, with practice.

Perspective
Correct construction of any spatial figure, in particular a person, on a plane is impossible without understanding the laws. You should understand it and understand that all parallel lines and planes have a vanishing point on the horizon. They are absent from the human figure, but she easily fits into them. And in order to convincingly answer the question of how to draw a person in full growth, the perspective construction of the figure should be carried out only after its position in relation to the horizon is understood. The horizon line should be drawn first in the drawing.

Let's sum it up
Let's try to critically analyze our creativity. What happened in the end? It rarely happens that a novice artist is satisfied with the results of his labors. It is possible to achieve something worthwhile only if the correct conclusion is drawn from the almost inevitable first failure and the work is continued. With each new drawing there will be fewer and fewer errors. This is the process of gradual improvement. Everyone who has achieved anything in the art of drawing has passed it before you. You should also carefully and systematically study the heritage of recognized masters of drawing. At your disposal are albums of reproductions and many art sites on the Internet. And in addition to long staged drawings, short sketches should be performed. In them you should catch the movement of the figure and, without fixating on the little things, achieve maximum expressiveness of the lines.
Head:
We draw a figure that resembles an egg turned upside down. This figure is called OVOID.
Divide it vertically and horizontally exactly in half with thin lines.

Vertical
line is the axis of symmetry (it is needed so that the right and left parts
turned out to be equal in size and the image elements were not on
different levels).
Horizontal - the line where the eyes are located. We divide it into five equal parts.
The second and fourth parts contain the eyes. The distance between the eyes is also equal to one eye.
The figure below shows how to draw an eye (the iris and pupil will be
are not completely visible - they are partially covered by the upper eyelid), but we are in no hurry
to do this, first let's finish our sketch. 
Divide the part from the eye line to the chin into two - this is the line on which the nose will be located.
We divide the part from the eye line to the crown into three equal parts. The top mark is the line where the hair grows) 
We also divide the part from the nose to the chin into three parts. The top mark is the lip line.
The distance from the upper eyelid to the tip of the nose is equal to the distance from the upper edge of the ear to the lower. 
Now we make our standard preparation cry in three streams.
Lines,
drawn from the outer edges of the eyes will indicate to us the place where to draw the neck.
The lines from the inner edges of the eyes are the width of the nose. Lines drawn in an arc from
the center of the pupils is the width of the mouth.

When you color the image, notice that the convex parts of it
parts (forehead, cheeks, nose and chin) will be lighter, and the eye sockets, cheekbones,
the contour of the face and the area under the lower lip are darker.

The shape of the face, eyes, eyebrows, lips, nose, ears and
etc. Every person is different. Therefore, when drawing someone's portrait, try
see these features and apply them to a standard workpiece.
Another example of how everyone's facial features are different.

Well, here we see how to draw a face in profile and half a turn - the so-called “three quarters”
At
When drawing a face in half a turn, you need to take into account the rules
perspective - the far eye and the far side of the lip will appear smaller.
Let's go to the image human figures.
In order to depict the body as correctly as possible, you need, as when drawing portraits, to know a few secrets:

The unit of measurement for the human body is “head length”.
- The average height of a person is 7.5 times the length of his head.
- Men, naturally, are usually a little taller than women.
-
We, of course, begin to draw the body from the very head that we will be
measure everything. Did you draw it? Now we put its length down another seven times.
This will be the growth of the person depicted.
- The width of the shoulders is equal to two head lengths for men and one and a half lengths for women.
- At the place where the third head ends :), there will be a navel and the arm will bend at the elbow.
- The fourth is the place where the legs grow.
- Fifth - mid-thigh. This is where the arm length ends.
- Sixth - bottom of the knee.
-
You may not believe me, but the length of the arms is equal to the length of the legs, the length of the arm is from the shoulder
to the elbow will be slightly less than the length from the elbow to the fingertips.
- The length of the hand is equal to the height of the face (note, not the head - the distance from the chin to the top of the forehead), the length of the foot is equal to the length of the head.
Knowing all this, you can quite plausibly depict the human figure.
Taken from a group dedicated to graffiti on VKontakte.

Lip shapes 

nose shape 


Eye shapes 
Women's brochure shapes

(c) Book "How to Draw the Head and Human Figure" by Jack Hamm


The proportions of a child's figure differ from
adult proportions. The fewer times the length of the head interferes with growth
child, the younger he is.

In a children's portrait, everything is a little different.
The child's face is more rounded, the forehead is larger. If we draw a horizontal
line through the middle of the child's face, then this will not be the line of the eyes, as
was in the portrait of an adult.

To learn how to draw a person not only
standing like a pillar, we will temporarily simplify our image. Let's leave
just the head, chest, spine, pelvis and we’ll screw it all together
arms and legs. The main thing is to maintain all proportions.

Having such a simplified version of the human figure, we can easily give him any pose.


When we have decided on the pose, we can
add meat to our simplified skeleton. Do not forget that the body, it is not
angular and does not consist of rectangles - we try to draw smooth ones
lines. The body gradually tapers at the waist, as well as at the knees and elbows.


To make the image more alive, character and expression must be given not only to the face, but also to the pose.
Hands:

The fingers, with their board-like joints, are the widest parts of the bones in the entire skeleton.


(c) book "Anatomy for Artists: It's Simple" Christopher Hart
Hello, dear friends!
Today we will continue the topic of drawing the human figure, and in this lesson we will study proportions. In this lesson we will learn how to learn to draw a person step by step with a full-length pencil. In order for the following information to really be useful to you, I suggest you prepare a sheet of paper and a pencil and immediately draw with me.
First of all, it is necessary to clarify: we will consider, and also learn how to build and draw the figure of a tall man with ideal academic proportions. The figures of most people have their own characteristics, sometimes very far from the standard ones, nevertheless, they are all interesting and beautiful in their own way. In order to learn how to correctly display in a drawing the characteristic features of each person’s figure individually, you first need to remember the ratios and proportions in their ideal version.
If you've never drawn full-length people, start simple:
- First, try to build several proportional skeletons, so that the arms, legs, palms, pelvis, knees and other parts are in place.
- Next, put the human body on these frames, perhaps in a very simplified version, without muscle relief. You can dress your character in simple clothes.
- From such a skeleton you can make a man or a woman, a fat or thin person, everything will be in place. Train!
- If everything works out well, try showing the muscles of your arms, legs, and torso.
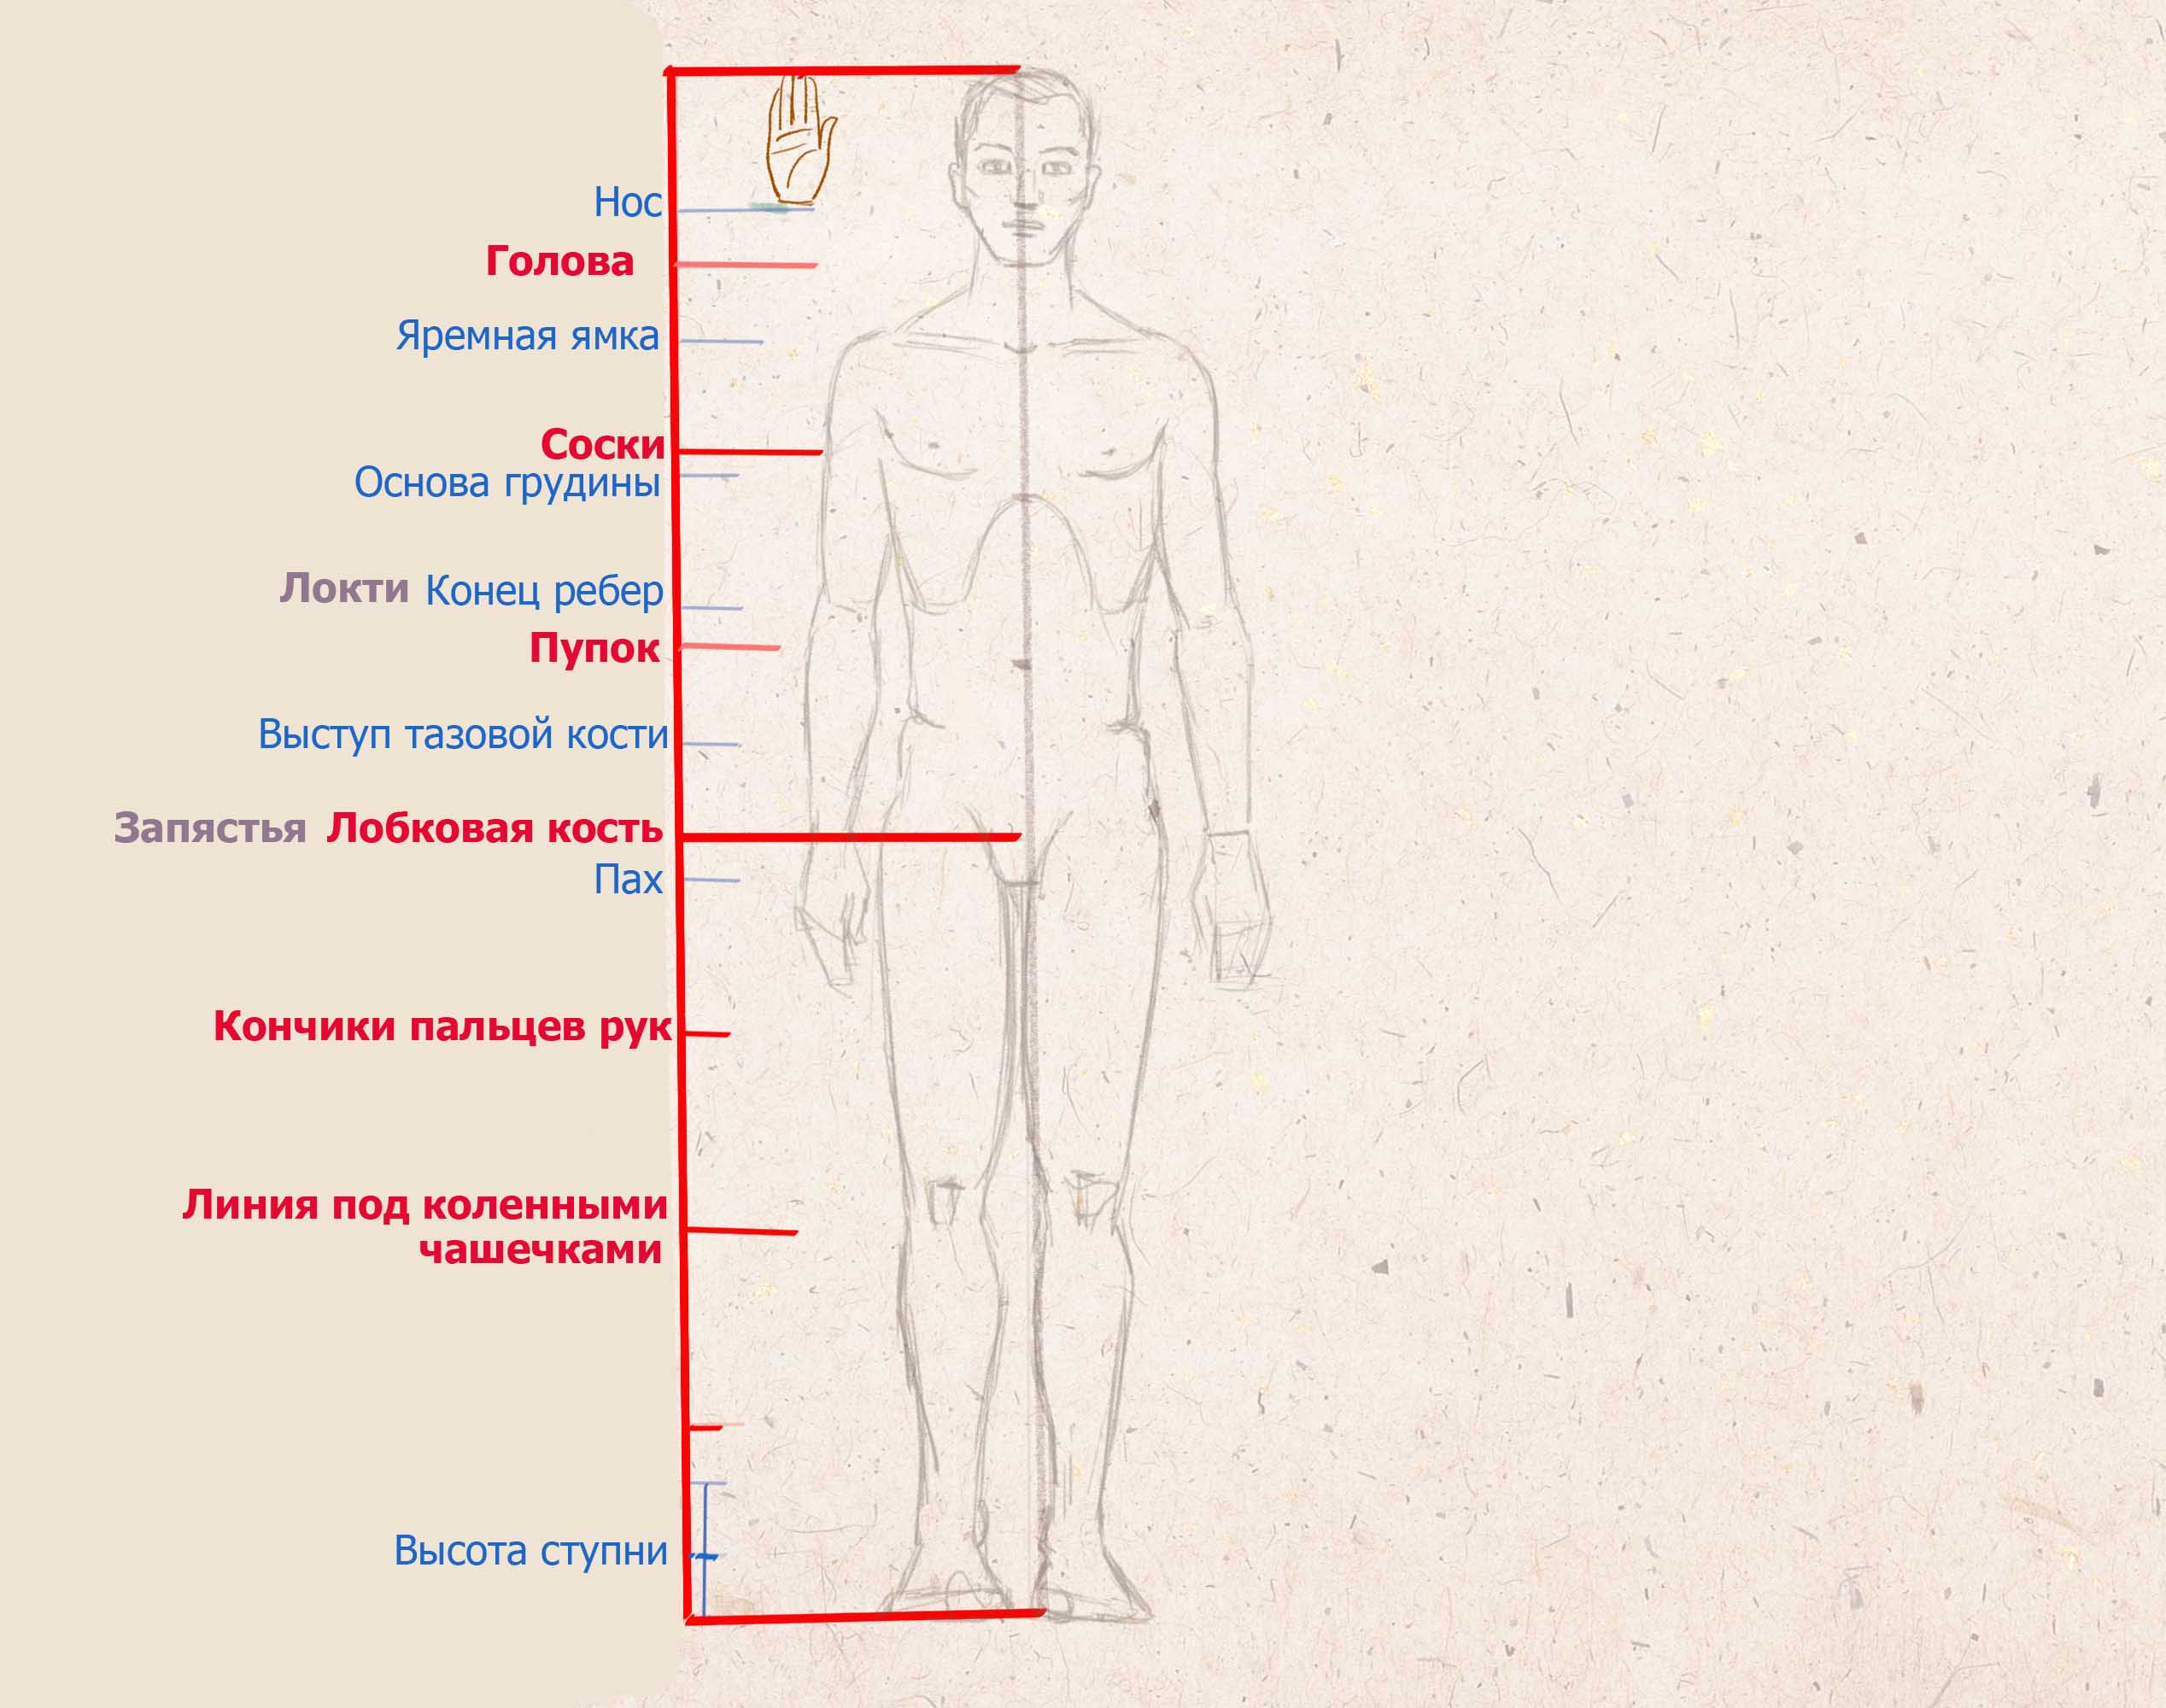
The height from the top of the head to the line of the nose is equal to the size of the palm. This is a very important measurement, mark it for yourself, it will come in handy more than once today.
Torso and pelvis
In order to find important key points of the chest and pelvis, we need to note the size of the palm height somewhere in the corner of the drawing; now we especially need it.

Hands
In order to correctly draw the human figure, it is important to understand the proportions of the arms, elbows, forearm, collarbone and hand.

These are guidelines that almost always coincide with everyone.
Scheme
If it is still too difficult to cope with these measurements and proportions, try printing this image with ready-made markings and practice drawing a person according to this diagram.
I hope this makes things easier and helps you.
Video
In this lesson we have dealt with the basic proportions of the human body and after some training you will be able to draw a full-length human figure without preliminary markings, marking only the main landmarks.
We talked about drawing in Photoshop using a pencil and brush. Freehand lines are great, but it often happens that you need to depict an even geometric figure. Rulers and compasses are a thing of the past, and now you can do this using simple editor tools.
To select one of them, click the Shapes icon on the tool palette.
Regardless of which group tool you select, the following items, common to all shapes, will appear in the Options Bar.
- Select tool mode. Here you can choose one of three.
- Figure. The value is set to the default, and it creates a vector geometric figure on a separate layer, that is, what you expect from the tool happens.
- Circuit. The outline of the figure is drawn without filling.
- Pixels. It creates not a vector, but a raster figure.
- Filling. Allows you to customize the color and type (gradient, shading) of the drawn figure.
- Stroke. Shape outline settings: thickness, type, color.
- Width and height. They allow you to clarify the size of the figure when it is impermissible to do this “by eye”.
As always, create a new document with a white background. The remaining parameters can be left as default or selected at your discretion.
Rectangle
Select the Rectangle shape and, to draw it, click on the canvas and then drag the pointer while holding down the mouse button. The point where you clicked will be the corner of the shape.
On the options bar, click the icon. The geometric settings window will open.

By default, the switch is set to Rectangle. If you set it to Square, then when drawing you will always get a shape with the same length of sides. A similar effect can be achieved without pressing the checkbox: to obtain a square while drawing a rectangle, just hold down the Shift key.

If the parameters of your rectangle are known in advance, set the switch to the Specified size position and specify the required values in the fields. The figure will be completely drawn as soon as you click on the canvas with the mouse button.
After setting the switch to the Set proportions position, in the input fields that become available, you can specify the aspect ratio of the created figure.
The From Center checkbox allows you to draw a rectangle from the center, rather than from the outermost point.
Rectangle with rounded corners
The next item on the list of geometric shapes. It is clear that it differs from the usual one in the rounding of the corners. Accordingly, the settings for this figure and the rectangle are almost identical. The fillet radius can be specified in the corresponding field in the options bar.
Ellipse
The parameters are the same as a rectangle, only instead of a square you can draw a circle. To do this, in the geometry settings window, check the Circle box or hold down the Shift key while drawing.

Polygon
With this tool you can draw a triangle, dodecahedron, icosahedron, star, or any shape that contains from three to one hundred sides. Their number can be set in the Party input field located on the parameters panel.
The geometric settings window is noticeably different from previous figures.

- Radius. This field specifies the radius of the future polygon.
- Smooth outer corners. If the checkbox is checked, then the corners are rounded; if not, the corners are sharp, as in a classic polygon.
- Star. Check the box if you want to receive a star as output.
- Depth of rays. This input field specifies how long the rays will be.
- Smooth the inside corners. Check this box if you want the inside corners to be rounded, as shown in the image below.

Line
Use this tool to create truly straight lines - freehand is simply not practical. To achieve maximum accuracy, configure the geometric parameters in the appropriate window.

- Start. If the checkbox is checked, instead of a line you will get an arrow that will be drawn at the location where you clicked the mouse button.
- End. Select the checkbox to add an arrow to the end of the line.
- Width. Indicated as a percentage relative to the thickness (it can be set in the parameters panel in the field of the same name).
- Length. It is calculated in the same way as width - in relation to thickness, as a percentage.
- Curvature. The value ranges from -50% to 50% and determines how much the widest part of the arrow will be curved. The figure shows arrows with curvature of 0%, 30% and 50% (from top to bottom).

Free figure
In order not to create a separate tool for each of the dozens of remaining shapes, the developers have combined them here. All elements of the parameters panel are already familiar to you, except for the most important one - the Shape button, clicking on which opens the shape selection window.

If you click on the gear located on the right side of the window, a menu of additional options will open, containing categories of shapes.


Thanks to the tools discussed, you can literally draw a huge number of shapes in just two clicks, which would take quite a long time to create manually.


