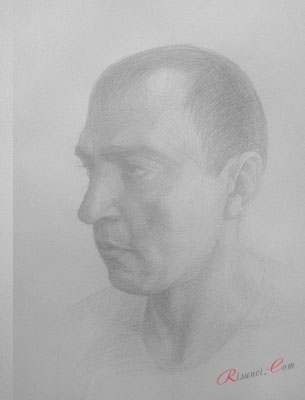
How to draw a portrait from a photograph step by step. How to draw portraits of people with a pencil? Step by step face drawing
This lesson is from a professional artist and you will learn how to draw a female portrait. The lesson is divided into several parts, in which you will look at tools for drawing a portrait and steps for drawing a face, and look at drawing hair in detail. Most artists start by drawing a sketch of the face, but this author has a different approach, he first starts drawing the eye and gradually moves on to other parts of the girl’s face. Click on the images, they all have a large extension.
Tools.
Paper .
I use paper Daler Rowney's Bristol Board 250g/m2- exactly the one in the image, only the sizes vary. It is dense and smooth enough to make the shading on it look softer.

Pencils.
I came across a Rotring pencil, I don’t know if it’s good or bad compared to others, but I’m happy with it. I use pencils with thick leads 0.35mm(the main work on the portrait was done by him), 0.5mm(I usually use it for drawing hair, non-detailed, because a 0.35mm pencil can do it) and 0.7mm pencil.

Electric eraser.
It erases much cleaner than a regular eraser, and it looks neater. My choice fell on Derwent Electric Eraser.

Nag.
I use a nag from Faber-Castell. A very useful tool due to the fact that it takes any shape you need. I usually use it to highlight highlights in the eyes, highlight some strands of hair and other delicate work.

Feathering.
It is a stick made of paper of different thicknesses, pointed at both ends, usually used in places where you need to soften the tone.

How to draw eyes.
I usually start drawing a portrait with the eyes, because relative to it and its size I build the portrait and other parts of the face, I can’t say that I can do it perfectly, but I try to do it more accurately with each portrait, training my eye. I mark the pupil, mark the iris and mark the shape and size of the eye.

The second step is to look for the lightest place on the iris in order to tint the entire iris, do not put pressure on the pencil, try to make monochromatic strokes, as if you were drawing a ring that gradually expands.

The third step is to start doing shading, adding veining, etc. The main thing is not to get carried away and not make your eyes too dark.

This is what the finished eye looks like. Don't forget that the eyelid has volume, so never draw eyelashes as if they are coming straight from the eye.

In the same way we draw the second eye, simultaneously marking the lines where the hair will lie. Don't forget to click on the picture to enlarge it.

How to draw a portrait. We draw the face and skin.
When both eyes are drawn, it is easier to draw the shape of the face and notice if there are distortions somewhere. Along the way, I outline the hair and strand lines on the right side of the drawing.

In this step I draw the nose and mouth. Try to shade carefully, and not randomly. Watch the direction of the strokes. You can gradually add shadows and midtones

At this step I complete the mouth, adding small details, such as highlights on the lips (if makeup is used). After this stage, I usually try to complete the lines of the face so that there are no distortions. And at the next stage, I finally draw the lines of the face, outline the hair, mark the places where the strands and disheveled hair will lie (and it usually doesn’t happen without them).

Then I start painting shadows and midtones on the face to give it some dimension.

And finally, I draw everything else that is next to the face (hair, elements of clothing, skin of the neck and shoulders, jewelry) so as not to return to it again.

How to draw hair with a pencil.
I start drawing hair by noting how the strands lie, where they are dark, where they are light, where the hair reflects light. As a rule, a 0.5mm pencil is used here, because I don’t do much detail in my hair. The exception is single hairs that have escaped from the strands and disheveled strands.

Then I stroke, periodically changing the pressure and angle to make the hair look more varied. When drawing hair, do not move the pencil back and forth, stroke only in one direction, say from top to bottom, so there is less chance that the hair will vary greatly in tone and stand out strongly from the rest. Change the angle sometimes because the hair doesn't lie as straight.

When the light parts of the hair are finished, you can add darker hair, but do not forget to sometimes leave small spaces between them, so the hair does not look like a monochromatic mass and you can highlight individual strands that lie under other strands, or vice versa, above them. And by continuing this way, you will most likely be able to draw hair without spending too much effort and time. To highlight some hair, use a kneader, scrunching it so that it is flat and thin enough to highlight the hair.


In order to master a portrait, we need paper, a pencil and, in extreme cases - in very extreme cases - an eraser. We use it only when we understand that we can no longer help the drawing with a pencil. Then we isolate ourselves from society - we ask those around you not to disturb you - and solemnly Let's start learning how to draw a portrait with a pencil.
To make it more convenient to correctly understand and carry out the drawing, it is better to adhere to a peculiar “ instructions for use».
First we need to do a detailed inspection of our subject of drawing - that is. You need to look at everything very carefully and think over the shape... Or better yet, make a couple of sketches to make it easier to see the structural form.
 It would be very good to draw the nature itself in different positions, with different turns and angles. You can also lightly move a pencil over the subject to get a feel for exactly how the shape is structured.
Now an equally important part in the portrait is yours. place of work. It must be selected taking into account a convenient and acceptable view of nature. To begin with, it is better that the nature itself is in a calm state - that is, no strong or unusual angles.
Composition layout
Now you need to compose the entire composition on paper. At this point, ours works in enhanced mode, because we will need to find places for individual parts of the composition - for heads and torsos.
We recheck the main volumes, detect turns and the main, basic axes of the construction. Now we need to build the shape: first all together, then all in turn and then all together again.
With every change or addition to the drawing, you need to remember about the perspective relationship, the proportionality of the forms and the correspondence of these forms to each other. That is, you need to make sure that everything is harmonious.
Now we need to highlight the eternal opposition - in other words, we need to separate light and shadow. For this, a neat, unhurried approach is used.
Portrait shape modeling
The next step is to model the shape, taking into account what we already have: falling chiaroscuro and spatial vision. In the process of modeling various little things, it is important to remember that this little thing is part of everything, and, therefore, it must fit harmoniously into this “everything”.
As a result, you should get something like this
Like any student, you will make mistakes - don’t doubt it, but don’t get discouraged either. Now let's start analyzing them, and, accordingly, correcting them.
So, one of the most common mistakes, or rather even effects, is that the work is very dark and crossed out. The second effect is the airy forms, they seem like cotton wool, not like real ones. This pattern is also called cast iron. It's all about the violation of proportions. Well, besides, the construction lines can be overly expressed.
The causes of such defects may be artist's problems with chiaroscuro. Or rather, even with chiaroscuro on the volumes. After all, he is trying to correctly convey the volume of the head, but he cannot in any way manage to separate the particular from the general, that is, to apply a shadow not only over the entire drawing, but also over individual parts so that it looks acceptable.
Perhaps the mistake is also that the person who is trying to draw a portrait cannot connect the individual details into an overall picture and the drawing looks... as if torn. The draftsman tries to “erase” this oversight with the help of shading.
In other words, the draftsman should once again work on drawing details.
If the above effects occur in your drawing, then let's move on to methods to avoid this. If, while transferring the shape with shading, you feel that something is wrong, immediately put aside work on the tonality and once again take a closer look at the volume of the head. You can lightly go over the form with a pencil, accurately mark any detail, slopes, turns, indents, etc. Thereby, you will be able to feel the interconnection of all areas with each other.
 Moreover, we turn on our logical thinking - not again, but again - and consider these very details of the head, that is, where it begins and ends, why it is this way and not otherwise. In addition, with the help of this analysis, you can also distribute light and shadow, as well as perspective position (which active object is closer and which is not).
This problem has been resolved. Next, countdown: if you, having started to understand the structural form and volume, suddenly and unexpectedly felt discomfort (a sudden urge to sneeze, go to the toilet or drink water does not count), then choose one of the following options.
We try to mentally divide the subject of drawing (the head in our case) with our eyes according to the curves of the shape on the plane. This way it will be easier to simulate the volume.
Drawing details
We are trying to understand the essence of the form: how exactly it is structured. Then we build the volume using any conditional planes or construction lines (if you mix everything, it’s okay).
Again, it should come out no less good than in the picture:
Below is another drawing, which is slightly redrawn, but it is much more convenient to consider, as an example, work on the volume of the head, tone and details.
It is very difficult to place in the holes intended for them - usually they come out either flat or bulging, like a frog.
So, when drawing eyes, you need to remember about their design - that they have a voluminous eyeball, lower and upper eyelids, brow ridges, which tend to cast a shadow on the eyes.
It is also not easy to distribute chiaroscuro on the hair: for example, the upper part of the hair is lightened, while the temporal part is hidden in partial shade. The hair on the temporal line is worked out especially clearly, because this is where the head goes into the back of the head - this is how we show the volume of the hair.
It is very important to successfully search for the proportions of volumes - both overall and individually, parts, the mutual proportionality of these parts. You will understand that proportionality has not been found or is distorted if you cannot recognize your nature in the painted portrait
 I repeat again: therefore, do not hesitate to work on them first. The most important thing is the basic proportions, volume, all sorts of planes and design points.
You can catch the volume of the head of the passerby you are interested in ( or a passerby 😉), your favorite actor or just a man from an advertisement ( no, so what? a good way to turn long minutes of commercial breaks into an interesting and useful activity).
Today we will draw a person's face. Many people mistakenly believe that only select talents can draw. This is not true: anyone who has the desire and patience can learn to draw correctly. Knowing the basic proportions and rules of construction will help you correctly depict a person’s face. Read the following material and try to draw a face step by step.
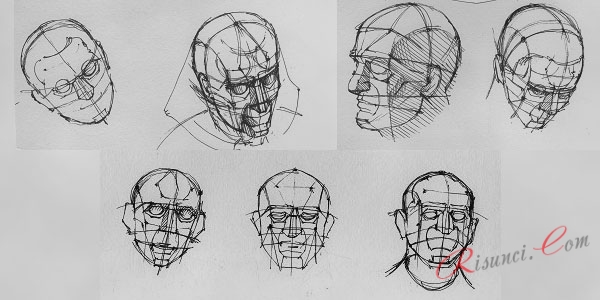
Axes and proportions
When drawing a person's face, it is imperative to study and constantly draw centerlines easily.
With experience, you can get by with one or two guides, or without them at all. You don’t need to think that axes are boring and uninteresting; they will help you quickly and correctly build a face with the correct proportions, identical eyes, and symmetrical parts.
In the future, visually imagining these axes, you will be able to work with human facial expressions and emotions. After all, to show sadness, you need to lower your eyebrows and corners of your mouth, close your eyes, and for this you need to imagine at what level all these parts of the face are in a state of calm.
Eye line
The first and main axes that you definitely need to remember are:
Axis of symmetry and eyesThe eye line of all adults is in the middle of the head.
Divide the oval of the head into two equal parts horizontally - this is where the eyes will be located. We also outline a vertical line of symmetry.
At first it’s difficult to do this by eye, so check yourself by measuring identical lengths with a pencil or ruler.
Eyebrow line nose hair
Next you need divide the oval of the head with horizontal lines into three and a half parts. The upper axis is hair growth, in the middle is the level of the eyebrows, below is the axis of the base of the nose. The distance from the hair to the eyebrows is equal to the height of the forehead. Essentially, the face (if you don't take into account the hair) consists of three equal parts that are equal to the height of the forehead.
Line of mouth and lips
Next we will designate the lips. To do this, the lower part of the face (from the nose to the tip of the chin) needs to be divided in half - this way we will find the line of the edge of the lower lip. To determine the level of the mouth cut, you will have to divide the segment from the lower lip to the nose into four more equal parts. The first quarter will be the line of the mouth.
 Mouth and lips
 The mouth section of most people is at the same level, but the sizes of the upper and lower lips are completely different.
Where to place the ears
No matter how strange it may be, very often, with a more or less successful face structure, the ears are not attached at all in the place where they should be located. Therefore, we will pay special attention to the ears.
 Placing the ears correctly
 At the top, the ears are attached to the axis of the eyes, and at the bottom at the level of the base of the nose. They can be large or small, stand out strongly or lie close to the head, but for all people they are attached to the line of the nose and eyes.
How to place your eyes correctly
How to find out the width of the eyes and the distance between them? To do this, the eye line needs to be divided into 8 equal parts.
 Outlining the eyes
 - Another eye (2/8) should be placed between the eyes.
- Each eye is 2/8 wide.
- From the outer corners of the eyes to the contour of the head, leave 1/8 (the width of half the eye).
These are rough guidelines. These proportions differ slightly for different people. It is not necessary to divide the axis into 8 parts every time, just check yourself.
This photo shows with light lines that:
- the corners of the eyes are level with the wings of the nose
- and the center of the eyes lies in line with the corners of the mouth
Face drawing scheme
Actually, if you outline all the guides, then you should end up with a diagram like this. You can print it out as a sample, since it is difficult to remember everything at once and practice drawing a person’s face with the correct proportions.
 Schematic representation of a person's face
 Later, you will be able to give faces features of specific people and draw portraits of everyone you are interested in.
With this we will finish with axes, proportions and guides and start drawing.
Drawing step by step
Today we will not draw a portrait of a specific person, but will learn to create quick sketches with the correct proportions and placement of all the main parts.
Drawing a face is a skill that improves with experience. If you have never drawn portraits of people, it is important to first simply learn at the level of mechanics and repetition how and at what level to place the eyes, nose, mouth, eyebrows, ears, and the relationship between them. To do this, look at the diagram in the previous section and easily apply the guides.
Repetition is the mother of teaching
We designate the form
The first stage is the simplest, we need to designate the shape of the face; it is easiest to fit it into an oval, ovoid or other round shape. The vertical axis will help create a symmetrical pattern, the horizontal axis will help show the eyes correctly.
Outlining the main elements of the face
All previously outlined lines will help us build our face. These axes must be applied very lightly, barely noticeable, so that later they can be easily and imperceptibly erased. 
It doesn’t really matter where exactly you start drawing facial features, the main thing is that you don’t get stuck and concentrate on one thing: nose, eyes, lips, eyebrows.
At first quickly and easily define all parts of the face without going into detail without trying to be too precise. We apply all the lines very lightly, so that it is easy to correct.
If something turns out crooked or inaccurate, you can fix it at the next stage.
We specify the shapes and sizes
At this stage, we adjust the size and shape of the eyes, ears, eyebrows, nose, lips, and clarify the shape of the face. We correct everything that went wrong at the previous stage. 
Adding details and shadows
Using strokes, we add shadows near the nose, eyes, under the upper lip, and highlight the cheekbones. Drawing hair. Show the neck and shadow on it. 
This portrait is quite primitive and not elaborate, but such a quick sketch is quite enough for learning.
In the following lessons we will definitely consider the nuances of drawing eyes, nose, lips and ears. We will also consider facial expressions and human emotions, but for all this you definitely need to practice well.
Video tutorial
Video on how to draw a person's face:
I hope this lesson was interesting and useful for you.
I wish you success in your creativity!
Write comments and send your works
Today's lesson is devoted to this type of drawing as a portrait. A portrait is an image of a person or group of people who exist (or existed) in reality. The main task of a portrait is to repeat the lines of a living face with an artistic interpretation. I took as an example a photo of the wonderful American singer, actress Debby Ryan. Here is her photo: I will say right away that a portrait is one of the most difficult types of drawing, since we have to convey all the features of a person. If you don’t succeed the first time, don’t be discouraged, people learn from mistakes =). So let's try step by step draw a portrait of this girl with a pencil.
STEP 1. Start drawing a circle that describes the face. Apply light strokes on it where the eyes and nose will be located.  STEP 2. Now, with light strokes, sketch out the contours of the actual shape of the head. Please note that it has a slightly square shape. Let's add bangs, tilted to the right side like .
  STEP 3. Let's move on to outlining the elements of the face. Let's sketch out thin eyebrows, upper eyelids, and eyelashes with strokes. Then start drawing the nose. The nose is a very important part of the portrait, which beginners sometimes do not pay attention to. This element can radically change the entire portrait as a whole. In the following lessons we will look in more detail.
  Let's move on. 4. We just have to finish the sketches of the eyes. Here you need to carefully outline the eyeballs. Let's also add eyelashes and upper and lower eyelids. STEP 5. You are almost there. Now we have to draw the mouth. Look closely at her lips. (Do you want to know how to draw lips correctly? Then read the lesson: How to draw a smile) Draw folds on the skin to show its emotions, a smile. The lips are slightly raised. The edges can be shaded a little with a pencil. STEP 6. The last thing we need to do is the hairstyle. She has long straight hair, slightly wavy. Try to draw with smooth lines, and you can also add some thicker lines to create the effect of voluminous hair. After everything has been done, erase the auxiliary lines with an eraser and refine the edges. We should get a picture like this:
  I hope everything worked out for you. Ask questions about the lesson. Show off your masterpieces! Leave your comments below, write what pencil drawing lessons you still want to see. I recommend taking the following lessons:
A portrait is usually an image of the face, or the face and upper body to the shoulders or to the waist. Sometimes a portrait is painted at full height. It often happens that a child wants to draw someone’s portrait. Your relative or friend, for example. But you need to have some skills in drawing a portrait, otherwise it will turn out clumsy and incorrect. We have already taught you how to draw a portrait of your mother in general terms. Now here we will learn how to draw a portrait of a girl step by step with a pencil. In the same way, following our tips, you can draw anyone’s portrait. The principles of drawing are the same. So, let's get to work!
Stage 1. Draw a sheet of paper into four identical squares. To do this, divide a sheet of paper into equal sections at the top, bottom and sides and connect the points to each other with two straight lines intersecting at right angles. It turned out to be four squares. We will draw parts of the portrait in them.

Stage 2. Then we divide the upper left square with another segment into two identical rectangles. In the two lower squares we draw three straight lines at the same distance from each other: one runs the entire width of the squares, the other two lines are only in the lower left square.

Stage 3. In the two lower squares, starting from the lower middle point, draw upward the contours of the face: left and right. These lines should be completely symmetrical to each other. They follow the bottom left and bottom right squares and cross the midline. It turns out an oval - the lower part of the face - the chin and cheeks.

Stage 4. Now let's mark the line of the nose with two straight lines. We are also starting to style our hair. Draw the hair at the top of the head. On the right we make a parting, from which the hair lies in neat waves on the temples and falls on the cheeks almost to the neck line. We draw the hair with wavy lines.


Stage 6. Under the eyebrows we will show almond-shaped elongated eyes. Draw the upper and lower eyelids. Below between the nostrils we show the tip of the nose. It is in the form of small dashes.

Stage 7. On the upper and lower eyelids we draw frequent eyelashes that are curved up and down. Between the eyelids we show the eyeballs themselves with pupils. Be sure to add reflections of light in the pupils.

Stage 8. Under the nose with two small lines we will show a small recess that reaches the mouth. We draw the mouth between the auxiliary lines. First the upper lip, then the lower lip. We draw a line between them. The mouth is quite plump and beautiful. Please note that here we also noted the tips of the ears peeking out under the strands of hair on the sides of the face.

Stage 9. This is how the black and white version of the portrait should look in general. In this case, a portrait of a young girl. Look carefully again to see if you have erased all the auxiliary lines and left only the necessary lines of the portrait itself. You should get a symmetrical face relative to these same auxiliary lines.


