How to draw a cat with colored pencils. How to draw a cat with a pencil step by step Yellow cat drawn in pencil
/ Pets
Drawing with colored pencils
Let's draw the cat using STABILO Trio colored pencils on regular drawing paper.
Triangular pencils are especially comfortable for a child's hand, so the child can draw for a long time without fatigue.
Thanks to the large surface area of the grip area, they reduce muscle tension when drawing and instill in the child the skill of holding a writing instrument correctly.
For drawing with colored pencils, choose thick paper with the smoothest possible surface. In order for the pencils to lay better and more evenly, we paint the entire sheet - slowly and carefully - with a white pencil from the set. And let's start drawing!
We choose the design of the cat we like and carefully, barely touching it with a pencil, draw the outline of our animal - ears, muzzle, back with tail, paws. We outline the face - eyes and nose with mouth.
We try to draw as accurately and accurately as possible, we don’t press too hard on the pencil - colored pencils don’t erase well, and we want the outline to not be visible in the end. To draw the outline, I chose the lightest pencil of a cool shade - blue.

So, let's start coloring the cat's fur. We work from light to dark: first, using a black pencil and pressing lightly, shade the light stripes in the direction of the cat’s fur, then, increasing the pressure, move on to the dark areas of the fur. Immediately paint over the shadow areas and eye contours with a dark pencil. The strokes should be soft, the pencil should be sharp. Don't forget that it is best to shade the fur in the direction of its growth.

So now we can add colors. Paint the background with an arbitrary color, saturating it near the animal, making it lighter towards the edge of the sheet. We work with a brown pencil in the same way as with a black one - press lightly on light areas, press harder on dark ones. We easily paint over the cat’s nose and mouth with brown, paint over the eyes, and draw in the fur.

Now that the main colors and tones are laid out, the entire sheet is filled, let's start working on it. Now our task is to draw the fur of the cat using sharp pencils in all shades of black, brown, blue and pink. In this matter, the main thing is not to rush, but to carefully and slowly draw the hairs one by one.

Now that we have drawn the fur, we have very little left - let’s place the accents. Brighten the eyes and nose, use a sharp pencil and a sharp eraser to finish off the mustache; We also “draw” white fur with a sharp eraser - we stroke with an eraser on the lightest places of the fur as we did with a pencil - the white sheet will be light fur!


If you have a cat at home, you probably know that a cat is different from a cat. And she is shorter in stature and her muzzle is “neater”, and her look is not as “arrogant” as a cat’s. I already have a lesson on drawing a cat, but I decided to make another lesson dedicated to cats.
Let's try together draw a cat step by step with a simple pencil. The last step is to color the cat drawing with colored pencils or paints. You can copy the coloring from a drawing of “my” cat made on a tablet, or you can color the last step of the drawing at your discretion so that the picture looks like your favorite cat.
If you are unable to draw beautifully yourself, you can print (see point 7) specially prepared and enlarged pictures of the cat.
1. Simple contours of the shape of the torso and head

To make it easier for you draw a cat, you need to first make simple but important contours. They will help you maintain the proportions of the drawing in the future. Draw two free-form intersecting circles for the body and a slightly higher circle for the head. Please note that the contour of the head is narrowed down. A cat's muzzle is usually slightly elongated, while a cat's muzzle is often round, like a saucer. Be sure to draw three small circles at the bottom for the cat’s legs and two circles at the top of the body.
2. We continue to draw the initial contours

It is important to draw the first step accurately; in the future you will only need to add simple details to these contours, and then, by removing them with an eraser, you will get a beautiful drawing of a cat. First of all, draw the vertical lines of the cat's paws. This is not difficult at all, just note that they start from the neck. It is also easy to draw two lines for the tail and triangular ears on the head.
3. Remove extra contour lines from the cat drawing

Now you can remove the extra contour lines from the drawing, and look at our cat, you get a real picture of a cat. All that remains is to draw the details of the muzzle and body. You see how easily we were able to draw a cat using simple outlines.
4. Detailing the drawing

This step is not difficult at all, look at my drawing of the cat and add the necessary strokes. Don't forget to just draw the eyes in detail and the claws on the paws.
5. Finish drawing the cat

If you decide to draw with a simple pencil, then you can use “my” coloring of the cat, using the simple pencil technique. But the picture will look much more beautiful if the cat is colored with colored pencils, of course, provided that your cat has a colorful, variegated color, and not pure white or black.
6. Drawing a cat on a graphics tablet

If you decide to draw a cat first with a simple pencil, and then color it with paints or colored pencils, you can use the coloring of this drawing of a cat, made by me on a graphics tablet.
Children love to draw animals, but most often their favorite cat becomes the object of their drawings. Learn to draw a cat and you will be able to correctly draw many other animals such as tiger, leopard, cheetah and other felines.
The drawing of a rabbit is somewhat reminiscent cat drawing. And if you can draw a cat correctly, drawing a rabbit will not be very difficult for you.
Drawing a cat “from life” is quite difficult, since it will not pose for you for too long, especially a frisky kitten. At best, you will only be able to draw a couple of ears, so it is better to draw a cat from a photograph.
The lion also belongs to the cat family, the structure and proportions of the body are the same, only the mane is what distinguishes the lion from other cats. There is one more difference. Lions live in a pride (in families), and the cat “walks on its own.”
Perhaps the tiger is most similar to a cat. The same proportions of the body and head. There are individual cats that look very similar to a tiger, but not a single cat has a tiger coloring.
Cats are incredibly graceful and beautiful animals, so drawing them is a real pleasure. For beginning artists who have recently begun to master graphics, master classes on how to draw a cat with a pencil step by step are suitable.
Creating such cats does not require skill, talent or artistic taste. If a child asks to draw a cat, and time is short, then you can limit yourself to funny images.
Sleeping kitten
Anyone can easily draw such a sleeping miracle. All you need for this is an A4 sheet, soft and hard pencils, an eraser, a little patience and perseverance.
Stage 1: We start drawing a sleeping cat from the head. To do this, draw a circle with a hard pencil and mark thin auxiliary lines. The vertical divides the muzzle clearly in half, and the horizontal goes so that the upper part accounts for more than half of the circle.
Stage 2: Focusing on the auxiliary lines marked in the first stage, we outline the kitten’s eyes, nose and mouth.
Stage 3: Mark the outline of the head with a soft pencil. We draw the ears, protruding fur, and a funny “whirlwind”.

Stage 4: draw the body of the animal and draw the tail. Please note that the kitten is curled up into a ball, so the tail covers part of the muzzle.

Stage 5: At the last stage, the paws and whiskers are drawn. Use an eraser to carefully erase any excess lines and markings. The kitten is ready. If desired, you can color it with paints or colored pencils, or leave it as is.

Mischievous kitten

Any child will love this naughty baby. You need to start drawing a mischievous kitten from the head. Draw a circle, add triangular ears and draw a muzzle. Then comes the drawing of the torso and paws. Play with the kitten's emotions and show your child that the mood of the cat shown in the picture depends on small details. Surprise can be conveyed through wide-open eyes; a protruding tongue will add mischief, and by moving the pupils slightly to the side, you can make a thoughtful or sad cat.
Kitten made of circles

Even a child can do this drawing of a cat from circles with a pencil, since this is one of the easiest methods for beginners. The animal is drawn from the back, so there is no need to draw features and maintain proportions.
First, two circles are drawn on the sheet so that they slightly intersect each other. In this case, the diameter of the lower one should be approximately twice as large as the upper one. Then the ears are drawn to the upper part, and the tail to the lower part. Then the mustache is drawn and the fur is randomly marked.
One circle, two circle
Another clear example of how you can quickly and easily draw a cat with a pencil.
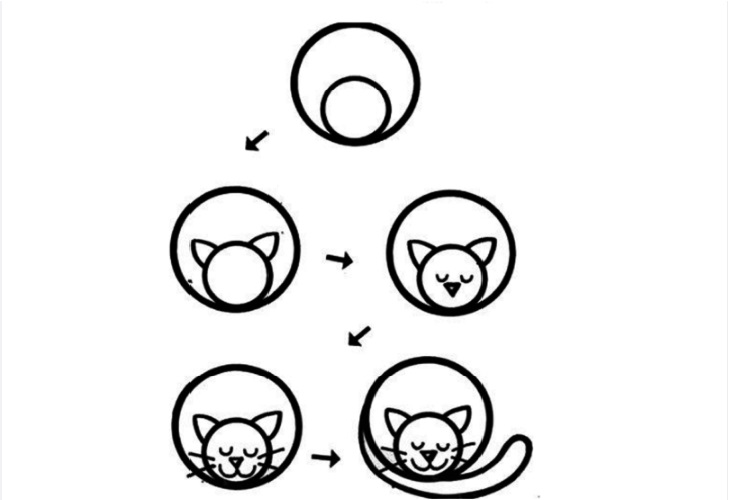
The larger circle is drawn first, and then another, smaller circle is drawn inside it. Add ears, facial features and a tail. Children will love a funny sleeping kitten and can quickly distract a child and cheer him up.
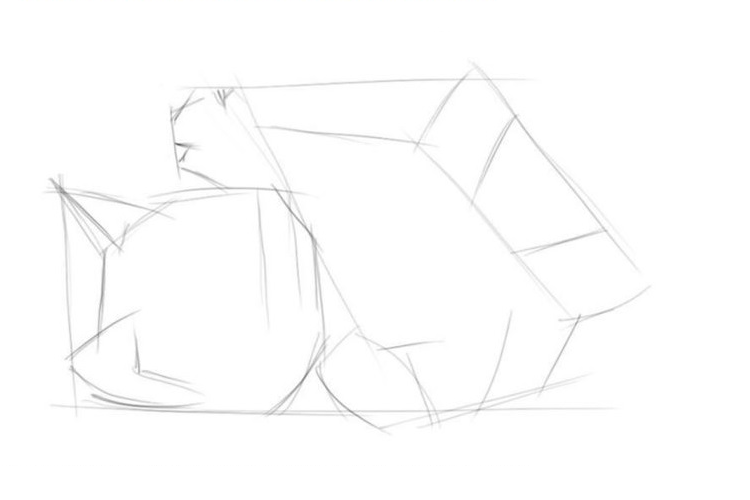
Such a sketch is something between simple schematic images and realistic drawings of animals.
We mark the outline of the animal with thin auxiliary lines made with a hard stylus. The sketch of the head looks like an octagon, the ears are triangles, and the body is a rectangle or cylinder. After this we make markings for the paws.
We draw a horizontal line in the center of the head, thus indicating the level of the eyes. We draw sketches of the mouth and nose, round eyes. We draw a chin and mustache.
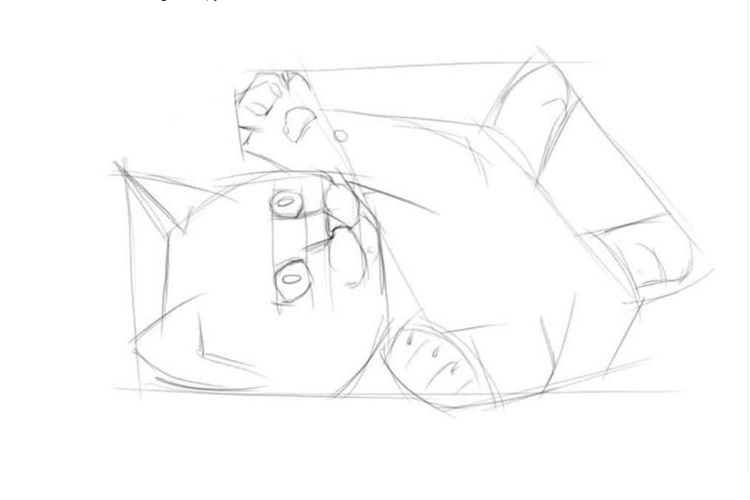
We define the muzzle more clearly. We draw in detail the eyes, nose, mustache and cheeks. Using a soft pencil we draw fibers on the ears, head and muzzle. Then we draw the front paws with claws and pads, and detail the hind paws.


At the final stage, all auxiliary lines are carefully erased. It's time to draw fur. For these purposes, a 2M (or 2B) lead is best suited, but in principle you can use any soft one.

Realistic
Many people think that realistic pet portraits are not the easiest task for beginners, but in fact, not all sketches are difficult. You can verify this using the example of step-by-step instructions for a portrait of a Scottish Fold.
Draw a Scottish fold cat with a pencil
Scottish Folds are loved by many breeders for their disposition and charming appearance. Thanks to the distinctive feature of the breed - ears curved forward and downwards, these cats look so cute that it is impossible to resist squeezing such a mustache. We offer a simple step-by-step lesson for beginners on how to draw a British cat with a pencil step by step.
At the first stage, auxiliary lines are drawn with a hard pencil: 1 vertical and 2 horizontal. The vertical one shows the center of the muzzle, so it needs to be slightly shifted to the right relative to the center of the page, since the cat is sitting slightly turned.
The horizontal ones should be parallel to each other, as they indicate the size of the animal's eyes. After this, you need to start drawing the contour of the muzzle and eyes.
Important! For a cat to be proportional, the distance between the eyes must correspond to the size of the eye.
When drawing a nose, remember that its size should be less (narrower) than the distance between the eyes.

Then, using an M or TM stylus, we darken the eyes and nose. More experienced artists who are confident in their movements can use a black pen for these purposes.
To make the cat’s look “alive”, do not forget to leave unpainted, white areas, as in the picture.

For the third step, you will need a 2M (or B2) pencil. Carefully, using smooth lines, shading the strokes, darken the areas around the pupils. Notice how the color goes from darkest (around the pupils) to lightest. Then, with a hard stylus, arrows are marked in the direction from the nose. They show directions for drawing fur.
Animals of the cat family with a red tint of fur have always attracted a lot of attention. These also include pets – cats and cats.
Therefore, we will learn how to draw a cat with this color easily and simply on a blank sheet of paper from scratch.
Necessary materials:
Drawing steps:
- We draw the main part of the red cat’s body in the form of a rectangular shape.

- 2. Draw an arc in the lower part of the body to draw the abdomen. We outline with simple lines the approximate outline of the pet's head.

- Let's add the outline of the paws, which are in the foreground. Let's add the front part of the muzzle, where the nose and mouth will be located later.

- We draw paws with soft pads. We begin to draw the outline of the cat's tail. Also at this stage you can start drawing the eyes, ear, nose and mouth on the muzzle.

- Let's add the paws that are in the background. We finish drawing the silhouette of the tail, ears and other small details on the face.

- First of all, use an eraser to remove all the auxiliary lines in the step-by-step drawing of a red cat and adjust the overall outline. If necessary, you can add some details to the finished drawing.

- Our cat will eventually have a red color. Therefore, the base color will be a bright yellow shade of the pencil.

- Using orange and yellow pencils with a sand tint, we create volume on the cat’s body, head and legs.

- Using dark burgundy and brown pencils, we create the shadow parts in a step-by-step drawing of a ginger cat.

- At the last stage, we create a stroke of all the lines and draw a long mustache.

So our cute step-by-step drawing of a red cat using warm colored pencils is ready. Such a bright illustration lifts the mood, so it should definitely be placed in a prominent place. 
Cats don't sit still for long periods of time and they certainly don't pose when you want them to. This is why it is important to have a photograph for reference in this work. Before you start, find or take a photo of the cat you want to draw.
A relaxed position, like the portrait we use, is good for any cat. It brings out the animal's personality well and often gives you the most direct and expressive look. Although this cat is gray and tabby, you can apply these techniques to cats of any color or pattern.
Accessories and equipment
The techniques used in this tutorial introduce the basics of drawing with colored pencils. Through careful shading, blending and layering, masking fluid and a drop of gouache, the cat comes to life with lifelike detail.
You will need a set of colored pencils, as well as a graphite pencil and a good eraser. Paper of your choice, cotton swabs, masking fluid and white gouache paint are also needed to complete the tutorial.
Step 1. Sketch the outline
As always, start with a detailed sketch of the cat based on a photograph. A good black pencil is all you need.
Draw simple lines to show where your cat's stripes or other coloring features will be. In addition, outline the size, shape and position of the eyes and indicate the direction of the mustache.
This is also a good time to decide how much of the cat's torso and paws will be shown, and whether you want to make any changes to the pose. Work through all of these preliminary details now because it's easier to fill it in little by little.
Once the pencil sketch is as accurate as you'd like, we'll start introducing color. To do this, erase one small section of the black pencil and cover it with colored pencil.
Step 2: Start with the eyes

A cat's eyes are often the most captivating part of a portrait, so we'll start with this area. It contains small parts in the cat's fur.
Using a black pencil and a few preliminary strokes of colored pencil, we create fur on the cat's head and around the ears. Notice how the strokes move upward. This follows the natural direction of hair growth, which is something to pay attention to when working with any animal.
Outline the eyelids - both top and bottom - with a very sharp pencil. This may take five or six times to get the right intensity, and you may need to sharpen the pencil frequently.
Tip: A pencil sharpener is the most effective option to use while working. It produces less pencil waste and is easy to pick up as needed. This doesn't mean that electric sharpeners are useless. These are great for quickly preparing a new box of pencils.
Step 3: Apply Colors to the Eye Area

It's time to start introducing color. This cat's eyes are emerald green, although yours may be yellow-gold or even blue. Choose the three best colors for your cat's eyes. The example uses bright green and cadmium yellow, as well as turquoise for the darkest areas.
Start by lightly shading the iris. Notice the shadows, which tend to be closest to the pupil and act to brighten the colors around the edges of the eyeball. With proper shading, the eye can look three-dimensional and push the paper out.
The cut, which is the cat's pupil, is made with a rich black pencil. Extend this area using circular black strokes that follow the shape. Keep the white highlight in the center, but move it a little to the left or right depending on the direction of the light. This small element adds realism to the portrait.
Tip: Choose which side of the cat you want to work on first. If you're right-handed, it's easier to work from left to right so you don't smear your work. The opposite is true if you are left-handed. If you decide to start on the opposite side, use a slip sheet (rubber paper) to protect what you have already drawn.
Step 4. Draw more fur on the face

Drawing the fur of any animal requires patience, attention to detail and several layers of pencil. At this stage, the lines radiating from the eyes appear in many shades of black. Some leave only a slight hint of color, while other areas are very pronounced.
Small and light black strokes also extend to the ears. They go along, continuing the direction in which the hair grows and lies. Small light streaks start down the bridge of the cat's nose, these hairs are usually very small and tiny.
Step 5. Shape the nose and mustache

At this point you can go back to the mustache. Use small black marks to indicate where the whiskers originate on either side of the nose. They are usually arranged in very parallel rows.
You will find that artist's masking fluid is very beneficial for the animal's whiskers. While you can simply use dark, fine lines, it doesn't quite capture the glow of that lovely long hair. Draw a thin line of masking fluid along your whiskers so as not to cover too much of the muzzle area. We'll remove the excess and adjust the mustache area later.
The nose consists of shades of pink (pinks), white (whites) and alizarin crimson. Rub them between layers using a cotton ball to create a soft texture and blend them together.
Step 6: Add stripes to your cat

Between each stripe, richer shades of coat color are needed. To create a tabby stripe color, use a mixture of yellow ochre and raw umber. Also, black, white and gray cats can have a few shades of color, so try mixing them up.
At the same time, continue adding black strokes in layers and creating stripes. The deeper you can get into the cat's fur, the more realistic the drawing will be.
Advice. If you make a line too dark - like the one on the left side of the cat's mouth here - use an Exacto knife to scrape out the excess color. This is a more delicate process and will remove less color than an eraser. The result will be small white streaks that you can leave in to add intensity or lightly fill in with a soft touch.
Step 7: Continue Filling in Textures and Details

Using the same shading and strokes, continue working on the cat. Use your colored and black pencils to selectively highlight the hair.
Watch your highlights and shadows as you work. It is not uncommon to require five to seven coats for the darkest areas of the coat.
Step 8: Drawing the Mustache

Whiskers are often the most difficult part of drawing a cat. They are white but also need a soft line to give them shape. It's almost impossible to rub off enough color to make them as white as you want. Likewise, a white colored pencil doesn't have enough overlap to work with.
The solution for a stand-out mustache is the masking fluid we used before and some white paint.
Remove the masking fluid and draw the outlines for the mustache again. Once the fur colors behind the whiskers are almost complete, paint the area with white gouache to keep the whiskers very clean and bright. Do this in a thin layer until your mustache shines.
Step 9: Shut down

To complete the drawing, shade the background by filling large areas with colored pencils in shades of light yellow ochre, burnt sienna and natural umber. Buff the colors using a cloth between each layer.
Notice how the background is darker on the right and lighter on the left. This makes a light source that comes from the same direction as the glare of light in the pupil. This is an easy way to finish off a portrait and make it really visually interesting.


