Drawing a plaster head step by step. Building a plaster head with a pencil step by step
For anyone interested in academic drawing, I highly recommend Oleg Toropygin’s magazine oleg_toropygin , I’ve been paying attention to him for a long time, and periodically watch his video tutorials. Today I came across a video that answers many common questions about academic plaster head drawing.
Original taken from oleg_toropygin
in Learning to draw. Portrait. Episode 12: building the Roman head and general...
I’ve outlined a little for those who perceive text information better, and maybe this summary will encourage someone to watch this hour-long video from beginning to end (watch it, you won’t regret it):
1. We greatly admire when we see a carefully executed academic drawing of a 19th or 20th century plaster head, or a drawing of some other school, for example, American hyperrealism. When the drawing is thorough, it evokes sincere respect and admiration for us, but when we have to draw the plaster head ourselves, it turns out that we show practically no enthusiasm for this...
2. Plaster heads are a classic, and actually very underrated...
3. If we draw a plaster head without seeing the connection with a living head, then we are drawing a plaster head in vain. If we draw a plaster head thinking that we are drawing a plaster head, then we again draw a plaster head in vain...
4. When I studied at Stroganovka, due to poverty or other reasons, directional lighting when placing a plaster head was only available in the first year. The Stroganov school of drawing comes from form, and the plus is that lighting had to be created mentally...
5. When there is directional lighting, it is easier for a person to draw; it is clear where the form is turning, but there are also disadvantages - bright spots of light and shadow are revealed, and if a person is not inclined to think about the form, then he can hide behind it. It can only detect these spots, and this happens often. For beginners, this may not be a bad thing; forcing them to immediately draw correctly and show forms without directional lighting is even cruel with little experience. It is important not to become a hostage to this situation in the future.
6. Hiding behind a hard pencil to make the drawing neat means that you are treating the symptoms, not the disease. If you draw with a hard pencil, and because of this your drawings are clean, then what does this have to do with you? This is the merit of the pencil, not yours...
7. The fine relief of the face of the plaster head gives a sharp chiaroscuro, and it catches the eye of the painter more. By and large, looking at a plaster head we see only a set of wrinkles, but it is not the wrinkles that are important, the wrinkles are only decorations on the way to understanding the form. The question arises, how can I see this form if I don’t see it? And this is the right question! The point of drawing plaster heads is to learn to see a larger form. If you don’t learn to see it, then you will only copy all sorts of nonsense. In this context, the meaning of the chopping becomes more obvious, since the chopping head gives clues to where the shape actually turns...
In the trimming head you can clearly see what is much softer on a plaster head, and even on a living thing. In the plaster head they even say that there the sculptor emphasizes what is almost not noticeable in real life, and this point is very important!
8. There is no point in drawing a plaster head stand. You can draw it only if you really want to. Moreover, it is usually not ideal, since plaster tends to chip...
9. When drawing a plaster head, it is important to develop your eye, and not to draw along designated points and lines, as usually happens in architectural and construction universities. First, load the eye meter well, and only then check with measurements...
10. Try to ignore the individual features of your face at first. Psychologically, they certainly get ahead, mark them, but do not forget that the main thing is the general form!
11. If, when drawing a plaster head, you constantly run away from designating the general form, then you will never know how to approach it. Therefore, you don’t need to run away from designating the form, but you need to immediately try to do something with it, engage in construction...
12. You can draw sections on a plaster head, as on the simplest forms (cubes, jugs, etc.) to get a feel for the shape...
13. You need to follow the rules (not believe your eyes) in the early stages of learning academic drawing. Just so you understand, the war is not about the rules, but about your thinking! As a result, you will begin to display more correctly, more powerfully...
14. It is useful to return to the drawing of a plaster head, even if you have already drawn them at one time. It is interesting to compare how your thinking has changed, whether you began to apply this knowledge in practice, or simply agreed with it by nodding your head.
15. From the point of view of a correct understanding of the form, one can imagine how the sculptor sculpted this head.
16. It is very important to learn to see and construct a form in a drawing, to think about it, because there will never be ideally correct lighting!
17. To get a correct idea of an object, it is not enough to sketch it from one point. All sorts of illusions appear, where the form is not visible, you draw as if it were not there. Therefore, you need to constantly approach nature (the plaster head), touch it, and find out how this form is actually “molded.”
18. Sections are the way to correct shading.
19. When dealing with the architectonics of the head, after we have identified the main forms, we need to regularly check the proportions, because it does not happen that we took them absolutely correctly from the beginning.
20. It is important to first take large shapes, only then move on to small details; if you do not understand this, the drawing will be artificial. This transition should be natural and organic...
21. It’s okay if at the initial stages the drawings of plaster heads make a “brutal” impression. If some lines need to be moved, move them. It’s okay that you couldn’t take them correctly right away. Over time, you will learn to take them more and more correctly, and, if necessary, edit the drawing without regret.
22. Under a falling shadow, it is important to see the shape on which this shadow falls.
23. You can learn to draw from photos and even from videos, but this will never replace the experience of drawing from life (plaster aids or live models).

In this drawing lesson, I prepared the material so that the key principles of drawing a human head were visible. To learn how to draw a portrait, you need to understand the shape of the head, and this is possible through simplification and generalization of unnecessary details. For this purpose, I used a schematic representation of a head called “chipping,” an academic drawing of a skull, a step-by-step drawing of a human head, and additional schematic drawings to help understand the features of the anatomical structure.
1. Three-dimensional form. Simplification and generalization.
At the initial stage of learning to draw, people most often see the contours of an object instead of its volume. This is exactly how beginners draw a portrait: they draw the contours of the eyes, nose... But a person’s head, eyes, nose, lips - they all have volume, they are not just contours. In addition, they have a rather complex shape. Therefore, at the beginning of training, you need to be able to generalize the secondary and realize the scope of each form.
First, let's try to draw a person's face with a protruding nose and forehead, presented in the form of rectangular geometric shapes.

2. The skull is the basis of the head shape.
There is one important lesson to learn next. All the main curves and contours of the face are formed from the bulges and bends of the skull. After all, it is the skull that is the basis on which the shape of the head in a portrait is built. Try to trace this relationship by comparing the shape of the skull with the pattern of the head. This is a very important point in learning.
Since the skull has a complex shape, it will not be easy to immediately understand this relationship. Therefore, first we will draw a skull in general.
The skull consists of two main sections: the brain and the face.
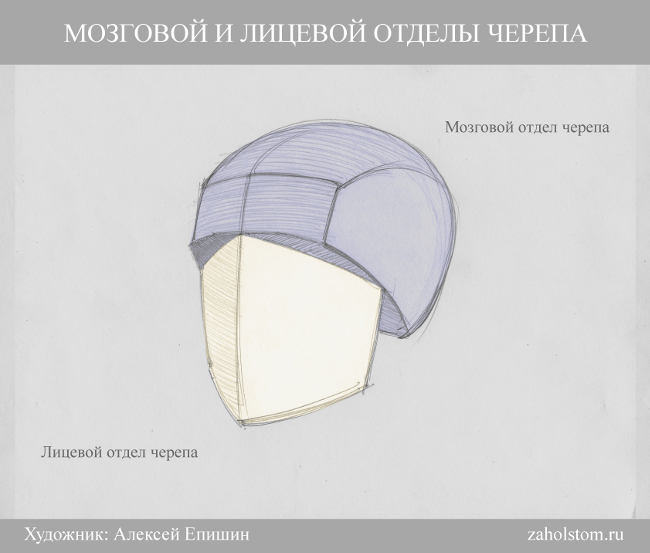
In addition, the shape of the skull can be roughly represented as a cube. The skull has a frontal side, two lateral sides, an occipital side and the so-called cranial vault or roof.

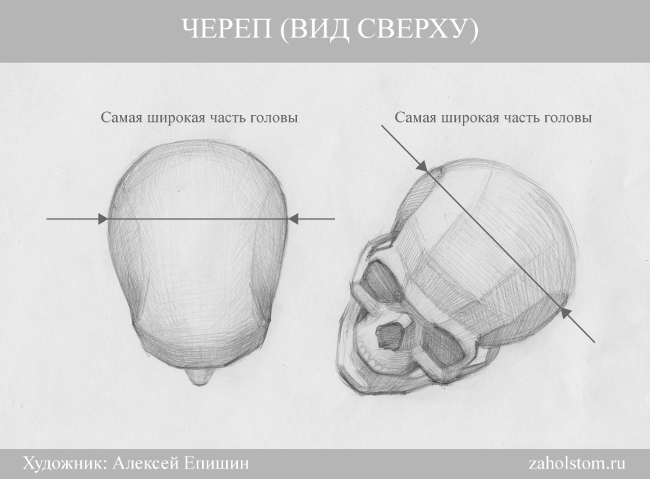
After the conventional, generalized drawings, I give as an example an academic academic drawing of a skull. With many details, you can see the frontal, occipital, lateral sides and arch. You can also see how the details are grouped into two main sections - the brain and the face.

It should also be noted that the widest part of the skull is located closer to the back of the head. It can be clearly seen in the figure below.
For those learning to draw a portrait, the following anatomical names for the various parts of the skull may be useful:

- brow ridges;
- frontal bone;
- parietal bone;
- occipital bone;
- temporal bone;
- zygomatic process;
- cheekbone;
- maxillary bone;
- mandibular bone;
- nasal bone;
- eye socket or eye socket.
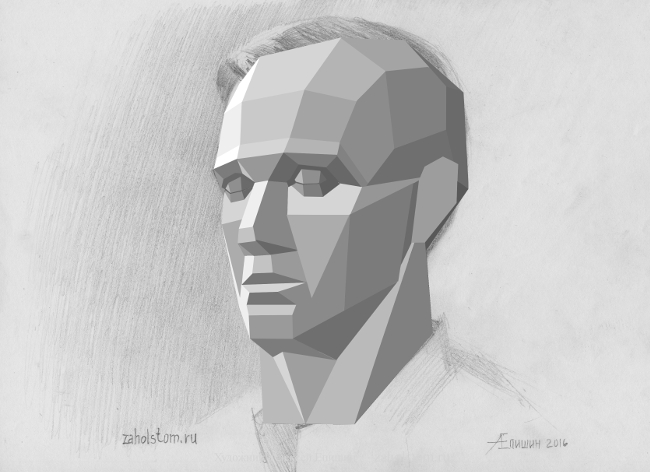
3. “Orubovka” is the key to understanding the shape of the human head.
In addition to the skull, the shape of the head and face is influenced by muscles, cartilage, fat deposits, etc. In order not to get confused in the details, trimming will help you understand the anatomical structure. A cut is a conventional image of a person’s head, consisting of edges. With the help of such planes the volume of the entire head is formed. Thanks to these edges, the main curves of the skull and the main muscle groups of the face are clearly visible. In any portrait, for any person, the shape of the head is built on the basis of these trimming edges. Of course, each person has his own facial features, his own proportions, but the key points in the construction of the head correspond to the cutting. Therefore, when drawing a portrait, the artist always keeps these key facets in mind.
Try to trace the main planes of the cut in the drawing of the skull and in the tonal drawing of the head made in pencil.


4. Formation of volume through light and shade on the front, side and top sides of the head.
To make the head drawing three-dimensional, it needs to be worked out with shading. Hatching creates the desired tone. By changing the tone (lighter-darker) we see volume and shape. According to the law of chiaroscuro, light is distributed on the surface of the form in the following sequence: highlight, light, penumbra, shadow, reflex, falling shadow. If you draw a ball or similar simple geometric shapes, then everything is much simpler. But how to show chiaroscuro in a tonal drawing of a human head? In the portrait, chiaroscuro is also done with shading, as in the drawing of the ball. But with the difference that the artist must trace the light and shadow on each individual fragment of the face in particular and on the entire head as a whole. That is, you need to show light, penumbra, shadow - on the nose, on the forehead, on the eye sockets, on the lips, chin, etc. But besides this, light and shadow need to be shown on the entire head as a whole, that is, on its main large faces or sides. For example, one side of the head may be darker than the other. This is an important point when creating the volume of the head in a portrait.
For a better understanding of this topic, I give as an example visual diagrams and drawings of a plaster stump, a human skull and head. In them you can clearly see the front, side and top edges of the head. The diagrams and pencil drawings are designed in such a way that they can be used to gradually trace the main edges of the head, which will help novice artists see the chiaroscuro on the surface of the head as a whole.


5. Brain and facial sections of the head.
Above I have already given a schematic drawing in which the brain and facial parts of the skull were visible. But how to practically see these areas in drawing a portrait? A number of drawings and diagrams below can help with this. Here you can trace the boundary between the front and brain parts of the head in the usual pencil drawing, plaster casting and training drawing of the skull.

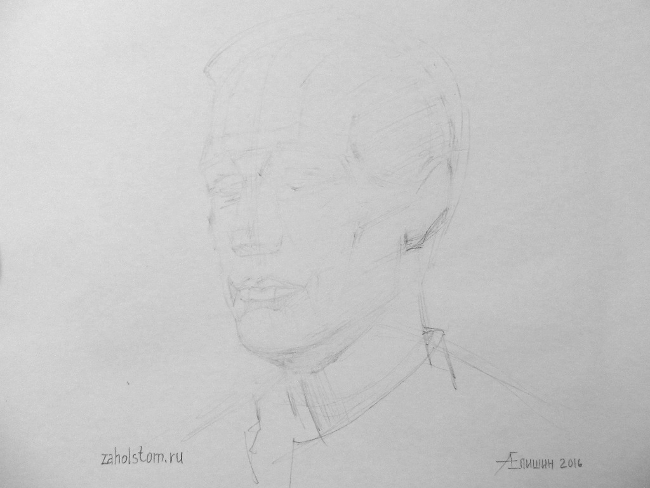
6. Step-by-step tonal pencil drawing.
After studying the basic anatomical features of the structure of the head, you can begin step-by-step pencil drawing. Here you need to learn this sequence. First we draw in general terms. Then we complicate the drawing by adding details.
A) Since the shape of the head resembles the shape of an egg, we first draw the corresponding figure with a line.

b) After this, we construct a drawing of the head. Draw an axis of symmetry that will run through the middle of the head. This is very important because the axis will allow you to compare the left and right sides, which will help to avoid errors and irregularities. Next, we outline the levels at which the eyebrows, eyes, nose, and lips are located. We outline them using light lines. I wrote about how to determine these levels in the lesson

V) At the next stage, you can outline the eye sockets, eyes, nose, lips, as well as the cheekbone, frontal lobes, main muscle groups and folds on the face.

G) Let's clarify the details.

d) I use an eraser to lighten the blackness of the auxiliary lines, which will be erased in the end, however, they are needed at the beginning of constructing the head.
e) Let's start with tonal drawing. Enter shading. We designate shadows and light. We “sculpt” the shape of the head using tone. I did not record the intermediate stages of shading, so I am publishing the final stage of the drawing right away.

7. Different manner and technique of drawing.
At the end of this lesson I would like to add that the manner and technique of drawing can be different. The drawing can be linear or tonal. You can draw with a line, or you can draw with a spot. You can work in a free sketch style, allowing for inaccuracies. Or you can make an accurate academic drawing. You can draw in detail, or you can draw in general terms.
But with all the variety of approaches, literacy should be visible in the drawing. The principles of constructing a head are preserved, whether on paper or in the mind of the artist. A professional artist with experience may not draw auxiliary construction lines. He may work in a different sequence. However, whatever the technique of execution, his drawing will show an understanding of the basics of plastic anatomy. Therefore, if you want to learn how to draw a portrait, you need to understand the essence, and not just copy a nature or picture step by step. When a novice artist gains such an understanding and begins to see nature by analyzing, and not just copying, then he will be much more successful in learning. I hope the drawings and diagrams from this lesson will help beginners with this.
The entire complex of work on a long-term drawing of the head must follow the methodological principle - from the general to the particular and from the particular again to the general, in other words, from the general, through a detailed analysis of nature, to a general figurative expression. This principle is embedded in all drawing curricula and is the leading principle in our art school. It is presented to all students, regardless of their level of preparation, when performing each long drawing.
To make it easier for students to master it and understand its content, the complex complex of work on a drawing is divided into separate stages, which allows the student, while observing the methodological sequence, to clearly understand each stage separately and their relationship.
The process of creating a long drawing is very difficult, and the student who does not have sufficient experience of the work often finds himself in great difficulty. He does not know what to pay attention to first of all, how to use his capabilities more rationally, and does not know how to properly organize his work. Such a student usually begins to conscientiously sketch everything he sees, carefully copies the details of the external form, and gets carried away by the details, thinking that they will give a resemblance to nature.
Many students, when drawing a human head, do not follow methodological consistency in their work and immediately take on solving complex problems, which leads them to failure. Such students believe that since they have mastered the methodological sequence of working on a drawing of a vase or a still life, then there is no need to repeat all this using the example of a drawing of a head. Meanwhile, the methodological sequence of working on a head drawing has its own characteristics and nuances, which the artist should be aware of. To master the educational material, the drawer must clearly understand what exactly he must do at this stage of work, on which moments of constructing the image he needs to focus special attention.
Such students need a clear system both in observations and in the processes of drawing. To understand all the subtleties of the methodological sequence of working on a drawing, let us consider them using the example of drawing the plaster head of Antinous. Revealing the methodological sequence of work on the drawing, we will simultaneously continue to reveal the laws of the structure of the shape of the human head and methods of depiction, including technical methods of work.
First stage- compositional placement of the image on a sheet of paper (Fig. 46).
The work begins with the compositional placement of the image on a sheet of paper. First you need to examine the nature from all sides in order to determine how it is more advantageous (more effective) to place the image on the plane, from which point of view the structural features of the form will be better expressed. Choosing the point of view from which the object of the image looks most expressive helps the artist more successfully solve the compositional problem. The painter must learn to beautifully fill the plane of a sheet of paper. However, you should not think that you need to adhere to any special rule in the composition.
Figure No. 46 - The first stage of work on the head drawing
For example, some people believe that when drawing a head in a three-quarter turn or in profile, it is necessary to leave a larger field in front of the front part. We will not find examples of compliance with such a rule in the works of great masters. Most portraits are composed in the middle of the picture plane. Renaissance artists have a number of portraits where, in front of the front of the head, the edge of the picture is very close to the head. An example of such a composition is the portrait of Beatrice D'Este, made by Leonardo da Vinci, and the portrait of a young girl by Piero della Francesca.
In an educational drawing, the composition should help solve the educational problem, but not complicate it. For example, a student needs to draw a head against a neutral background (i.e. no background) that is lit from the front. As per the above advice, he should leave a larger margin in front of the front of the head. When starting to work out the tonal form, he will see that the shadows on the head have disrupted the composition and the balance (in tone) has disappeared. To avoid this, the painter will have to introduce a dark background near the front part, which will complicate the work and violate the target setting (drawing without a background). Therefore, before you start drawing, you need to make a series of small sketches where the compositional problem will be solved.
The student needs to choose the most favorable point of view, and not sit in the first place available, which we often see in many students. Moreover, the student needs to clearly imagine what his drawing will ultimately look like. Only after this can you take up a pencil and start placing the drawing on a sheet of paper.
Beginning artists often make the mistake of thinking it unnecessary to spend their time learning the academic rules of drawing. An inexperienced portrait painter is confident that he will be able to create a realistic portrait of the person depicted with the help of intuition and diligent sketching alone. At the same time, he acts haphazardly, mechanically copying minor details, which, in his opinion, will give the best resemblance to nature. As a result, the draftsman is unable to competently and convincingly connect all the parts of the face into a single whole, each of which looks as if drawn separately.
Academic drawing of a plaster head will help you learn to draw consciously, with an understanding of the constructive and anatomical structure, since its main task is to lay the foundations of the artist’s professional skill. The teachers of our art studio, during training sessions, strive to acquaint students with the invaluable experience that was accumulated by the great artists of the past. They generously share their own knowledge about anatomy, perspective, and the theory of chiaroscuro. This mandatory amount of acquired knowledge and acquired skills will soon allow the aspiring artist to move from training to independent creative work.
Why it's important to start with plaster casts
The process of academic drawing should become for the student a process of understanding nature and actively studying it. Casts from sculptures of the ancient period are a valuable aid for an artist with insufficient experience. When working on an image of a plaster cast, the draftsman’s task is made easier by the fact that:
- the works of ancient sculptors are valuable to us as a teaching aid, thanks to the generalization of forms and clear elaboration of details;
- the gaze is not distracted by small secondary details, as in the case of drawing living nature;
- the monochromatic color of the plaster helps to more clearly understand the overall shape of the head and understand the relationships between its individual parts.
For students in our art studio, academic performances of plaster heads alternate with the goal of gradually complicating the task. It is proposed to start with drawing the heads of Venus, Hermes, Diadumen, Doryphorus, which are distinguished by the most general forms. Having completed the initial task, students move on to more complex drawings of the heads of Apollo, Hercules, and Laocoon.
Stages of drawing a plaster head

In order to correctly depict a person’s head on paper, it is necessary to observe the principle of methodological consistency in the work. You should not immediately take on solving complex problems; first you need to understand the general characteristics, and only then move on to the details. At the final stage, you need to return again to the generalization of the form, observing the immutable rule: “From the general to the specific and from the specific again to the general.”
- Choose a point of view, outline the composition of the image on the sheet.
- Determine the general nature of the shape of the head, its basic proportions, tilt and rotation in space, draw a vertical profile line, horizontal lines of the forehead, eyebrows, eyes, base of the nose and lip section.
- Identify the design diagram of the gypsum head, check the symmetry of paired forms, taking into account future cuts.
- Gradually move from simplified geometric shapes to refinement and detailing of the design, respecting the anatomical structure of the head.
- Reveal the general volumes of forms by laying out shadows with light shading, eliminating inaccuracies in the construction of the drawing.
- Work out the form in detail, saturating it with details in proportion to the overall mass, modeling the form with tone.
- Check that all the details are subordinated to the whole, that the drawing is not out of place, and that the tonal relationships are correct.
All stages of the training drawing must be performed strictly sequentially, without rushing to move on to detailing and conveying texture when the general characteristics of the shape of the plaster head have not yet been determined.
Practical benefits of drawing classes in our studio

A plaster model of a sculptural image is a complex complex of many interconnected forms. Therefore, in order for an academic drawing of a plaster head to be performed with high quality and skill, a novice artist needs the help of an experienced specialist. Anyone who wants to learn how to turn a piece of paper into a work of art can find such help in our drawing studio. Here, in comfortable classrooms, under the guidance of sensitive mentors, in a short time you will be able to stand on par with professional graphic and painting masters.
Come to us and see that learning the basics of creative work is much more useful in the company of like-minded people than trying to do it on your own!
Neck bones consist of seven cervical vertebrae, which include the upper part of the spine. Large muscles The muscles that influence the shape of the neck are the trapezius muscle in the back and the sternomastoid muscle in the front. They run from the back of the ear down to the inner ends of the collarbones.
Neck capable of movement in all directions: tilt your head forward and backward, to the side towards either shoulder, and rotate it from side to side 180 degrees.
Apart from the sound-conducting structures in the ears, only the jaw moves from the joints of the head. All other bones of the skull are rigidly interlocked and immovable.
Facial muscles can be divided into two types:
Proportions of the human head. Simple construction method
The face is, of course, the most expressive part of the body. Here simple construction method, which will help you see what simple shapes the head consists of. The average proportions of a human head are shown in the figure below. The height of the head is approximately the same as its width when viewed from the side, so in profile it fits into a square. When viewed from the front, the width of the head is much less than its height.
Start by drawing the head in profile. Draw a circle for the skull and then add two lines on the front of the face to indicate the jaw, as shown in the image above.
The most common rookie mistake when depicting the head is that head seems flat. Therefore, as soon as possible, try to draw three-quarter view of the head, trying to display the roundness and solidity of the forms. Use light reference lines to indicate the center line of the face and the position of the eyes.  The picture shows a rather characterless face, but at this stage the main thing is to understand the basic forms. People's faces differ from the average pattern in many ways, how exactly will be discussed in detail in the following lessons. These drawings represent the first step. If you draw hundreds of these simplified heads, you will come to understand all the subtleties of the relief of the human face and will be able to imbue your drawings with life and character.
The most important thing to understand is that the face is not just a flat surface with details superimposed on it. To draw faces successfully, you must understand the three-dimensional shape of the surface - that's why we started with the featureless average face, which can belong to either a man or a woman. 
If you look at the hazy newspaper photograph of the crowd below, you'll see that each face differs from the others only in the way it displays light and shadow, not in the shape of its eyes or lips. If you can imagine face as a template, in this case you will avoid the common mistake of creating lifeless mechanisms of eyes, noses and mouths, indistinguishable from each other.  That's why practice drawing a face template adding light and shadow until you fully understand its shape.
  The images above show several basic face and head shapes from different angles. Once again, it is important now that you understood the real shape of the surface, not just a plan.
The article used materials from the book “Figure Drawing without a model” by Ron Tiner.


