Painting by numbers on canvas and cardboard: review of manufacturers, practical tips for beginners. How to paint beautifully with gouache if you are a beginner artist How to paint pictures for decoration
Most likely, many of you are familiar with the all-consuming feeling that leads to the desire to create and create amazing things with your own hands.
At such moments, you try to express yourself, demonstrate your individuality and uniqueness through creativity. However, very often all creative impulses are stopped and extinguished by the realization that skills and abilities are missing.
In this article we want to introduce you to simple master classes for drawing unusual paintings that even a novice artist can handle.
So, we encourage you to be creative and express yourself! Create! Surprise your loved ones with your creative works! And perhaps, after a very short period of time, one of you will become an outstanding artist.
How to paint with masking tape?

At first glance, you see a painting by a professional abstract artist. In fact, you can make a picture like this with your own hands!

First of all, you will need to cover the canvas with multi-colored paints. You can do this chaotically or follow some pattern. In any case, it's only up to your imagination.


When the canvas is completely painted. Give it time to dry thoroughly.

Now use masking tape to create a pattern on the canvas. Paint the voids not covered with tape with paint of a contrasting color. Carefully remove the tape.

We congratulate you on becoming an abstract artist!
How to draw a picture using openwork napkins?

Do you like soft and romantic shapes? Then use the most ordinary openwork napkins in your work.

Apply napkins to the canvas and draw patterns on the napkin with a brush. The napkins will act as an unusual stencil.
Finished paintings will make a great gift!
How to draw a picture with a sheet of cardboard?

Surely you have an unnecessary empty cardboard box, for example, from shoes. Cut out a small sheet of cardboard and get to work.

Squeeze paints of different colors onto the canvas (make a kind of color paths), and then use a sheet of cardboard to smear the paints on the canvas. You will definitely end up with an unusual pattern that will be very difficult for anyone to repeat.


You can use some scraps of foil as decoration. Apply liquid glue to the canvas with a brush and sprinkle it with finely chopped foil.
How to draw a picture with soap bubbles?

Remember your childhood? What is your favorite childhood pastime: blowing soap bubbles? Did you know that by blowing soap bubbles you can draw amazing pictures?
Dilute gouache, dishwashing detergent and water in separate containers.
In order to get magical drawings, you will need to use straws to blow bubbles in containers with colorful liquids, and then apply a snow-white canvas to the bubbles. Bursting bubbles will leave amazingly beautiful patterns on the canvas.
How to paint a picture with drops of paint?

This option for creating an artistic painting is the simplest. You simply dip your brush into the paint you want, and then with sharp movements you need to blurt it onto the canvas, where a drop forms.

The drops must be dried with a hairdryer so that unsightly drips do not remain.
How to draw a picture with wax pencils?

Glue wax pencils to the canvas in the desired order. Then, using a regular hair dryer, start heating the wax crayons. Under the influence of temperature, they will melt and spread across the canvas, creating unusual patterns.

Painting is a great way to become a creative person. If you want to channel your inner Rembrandt or Pollock, you can learn how to start developing the skills and acquire all the necessary materials that will allow you to paint the paintings you want. Learn how to choose paints and brushes, choose the appropriate theme for what you want to depict on the canvas. See Step 1 for more information.
Steps
Part 1
Selection of paints and brushes- Most watercolor paints are thick and heavy, and to use them, you need to first wet the brush in water and thin the paint with water or mix the paint with water on the palette. It is a thin and light paint, making it very suitable for beginners, although it can be a little difficult to control.
- Start with good quality paint to avoid disappointment when starting out. Sennelier watercolor paints are available in both trays and tubes. These are much higher quality paints than your school watercolors. Try trays to avoid having to buy a lot of paints separately. It is also convenient in terms of keeping all the paints in one place. Schminke, Windsor & Newton are also considered quality brands that are widely available in professional stores.
-
Acrylic paint is quick-drying but just as versatile as oil paint. It is the most common for both amateurs and professional artists. Water-based acrylic paints are easy to use and widely available in professional and specialty art stores, ideal for painting intricate details and abstract masterpieces. They are less expensive than oil paints, but no less professional.
- Acrylic paint is most often found in tubes, like oil paint, and can be mixed on a palette with plain water to dilute and create new colors. Because of this, this paint dries very quickly and is ideal for base tones to bring out depth and detail in landscapes, portraits and other types of paintings.
-
Oil paint. This is the most versatile, professional and bright paint. It is also the most expensive and takes the longest to dry, but offers all sorts of advanced mixing techniques and provides a wide range of options for professional artists. This may not be the best type of paint for beginners, but it's worth considering in the future or experimenting with if you're looking for a challenge.
- Oil paint is often sold in water-soluble blocks, which can be used in the same way as watercolor and can dry a little faster than traditional tube oil paints. To get a variety of primary colors, you need to learn how to mix paints to reduce paint costs.
- Unless you want the paint to be squeezed straight out of the tube onto the canvas in large drops, like in De Kooning's paintings (amazing to look at, but super expensive), then you will need a thinner in addition to the paint.
- If you paint with oil paints, you must first coat the surface with an acrylic primer, otherwise the paint will damage the canvas or paper. Any painting surface, palette or mixing board should also be primed to prolong its life.
-
Make paint from natural ingredients. Who said you have to buy paint? Use berries, tea emulsions or even ashes. These are excellent methods, depending on the story you are trying to create.
- Food-based paints can change color over time (or can rot, depending on how you look at it). This can give your painting a time-based element, changing over the days and weeks after you complete the painting. Fix your egg paint before it starts to stink and finish it on time or go over it with acrylic paint to set it.
-
Choose the right brushes for the job. Depending on the type of paint, you will ultimately have to choose the brushes needed to work with it.
- Use a round tip watercolor brush. Synthetic brushes with a flat tip are best for acrylic paints, while brushes with a walnut tip are best for oil paints. You can experiment with different brush fibers to see what suits your needs.
-
Prepare other necessary materials to start drawing. To keep your clothes clean and your paints organized in one place, you need a few more things besides great paints and brushes.
Part 2
Start-
Prepare a place for painting. Put on some old clothes and have all your supplies ready to get started. Any painting project is likely to result in a bit of a mess, so it's important to prepare for this and avoid paint stains on the carpet or other surfaces that will then be impossible to remove. To get started, find an open area with plenty of light.
- It is common practice to use an easel for painting, but this is not necessary. Find a hard surface, such as an old clipboard, to hold your watercolor paper in place, or set the canvas on a table covered with old paper or newspaper.
- Place newspapers or old paper on the floor and any surface that may come into contact with the paint. You won't have to worry about dripping paint if you've secured everything well, so you can concentrate entirely on creating the painting.
-
Draw a sketch of the painting with a pencil, although this is not a required step. You can always just start drawing, but a sketch can be useful for sketching out the basic shape of an object to use as a guide. If you want to draw a pot of flowers, you shouldn't draw out tiny details, but having a diagram of the petals on paper before adding color may be a good idea.
- Use contour lines to sketch out the basic shape and gestural lines to get a sense of space between objects within subjects. The painting will be made up of many small shapes, as if from many small paintings. Try to focus on the relationship between things.
- Locate the beginning of the line illuminating your subject and begin to look at how the shadow falls, which you will need to highlight with color and line.
-
Mix colors. Spend some time mixing paints on your palette and trying to get the colors you want to use for your painting. Some artists will be really concerned with getting the image as "real life" accurate as possible, while others may want to change things up a bit. There is no specific right way to do this.
- Mix small amounts of colors to make test lines to see how the color looks against a white background. Don't mix a whole tube of white paint and blue paint to get a blue color. Make as much paint as you need.
- Tint your bright colors with a little white to soften them, or add black to create different shades of color. Adding the opposite color of the color wheel to one paint will give you an endless range of possibilities.
- Using different contrasting colors in your painting will help create a more dynamic sense of color. Use many tones and shades if you are serious about color.
-
Practice using brushes. Learn to use, clean and care for your brushes before you start painting. Before you dive into your masterpiece, gain some experience by learning how to pick up just the right amount of paint with your brush and practicing drawing smooth, even lines. Don't worry about what you're painting, just paint something, mixing colors and thinning the paint.
- Use short and long strokes. Use as little paint on your brush as possible to get the result you are going for. Do not saturate the paper with ink. Use different brushes for different types of effects such as blotting, sketching and stippling.
-
First, draw the background. Typically, the background is painted first, working from the back to the face of the painting. This allows you to go from general details to specific ones, adding layers to create small details rather than the other way around. If you start with the petals, the painting may end up looking unbalanced. Experiment to see what works best for you.
- Bob Ross, everyone's favorite TV painter, was excellent at starting with a background and using his imagination to work his way out. He would usually find complementary colors and drybrush a background in pleasant sunset tones, and then begin painting trees and other natural scenes without planning. This is a great way to start painting on canvas.
Part 3
Painting a picture-
Start drawing and let accidents happen. Just start painting carefully, using a small amount of paint on the brush to start forming the shape. If you are guided only by your imagination, let the paint create the shapes and you follow them. If you've already started with a sketch, once you've drawn a nice background on paper or canvas, you can start layering colors on the shapes to create a sense of space.
Add colors from light to dark. Determine your light source and shadows to start adding significance. Start adding the lightest colors and gradually build up darker tones. It's much easier when the darker color layer becomes lighter, rather than the other way around. Don't put yourself in a hopeless situation. Mix small amounts of paint, adding color judiciously and slowly.
-
Use a brush to create texture. Vary the amount of paint on your brushes and the types of strokes you use to create different textures. Short, small strokes can look like fur, while longer, smooth strokes will even out the paint. Using less paint can help to age the piece, while another stroke can thicken it and add density.
- If you ruin part of the painting by adding too much paint, don't panic. Embrace your happy accidents and integrate them into your painting. Don't spend too much extra time adding another layer on top, just let your blemish be there and look back at it at the end to see how it affected the overall composition. Keep moving forward.
-
Watercolor. The most accessible, cheap and easy to use watercolor paint comes either in tubes or small plastic trays with several color palettes. Depending on the quality of the paint, watercolor can be light or quite lively and bright. This is a beautiful and effective way to start, especially for landscapes and whimsical still lifes.
One of the simple ways to create a beautiful and exclusive thing is to paint on transparent glass. It is simply due to the fact that any design can be placed under the glass and transferred to the surface of the glass. The finished picture will please you with its result. And you don’t need any special artistic skills to complete it.
This master class will discuss how to decorate a jewelry box with a built-in photo frame.
To paint glass you will need:
1.Acrylic paints of any favorite colors. You can use 2-3 shades of the same color scheme, or you can decorate the drawing with more colors, at the discretion of the needlewoman.

2.Degreaser (alcohol or nail polish remover).
3.Transparent acrylic varnish for creativity.

4.3 brushes: thin - for applying contour, medium - for applying color, flat wide brush for coating the finished work with varnish.

5.Glass from a photo frame.
6. Favorite drawing.

Before starting work, the surface of the glass on which the design will be applied must be degreased using a special degreaser, alcohol, or simply a nail polish remover so that the design adheres better and lasts longer.
Then prepare a drawing that will be transferred to the glass. In this master class, a drawing from the actress coloring book series was selected. The glass must be applied to the surface of the drawing. You don’t have to secure it with anything, you just need to make sure that it doesn’t move on the paper. Using a thin brush and black acrylic paint, an outline is applied; as a result, the drawing on the glass and on the paper should be as identical as possible.
When the entire pattern is transferred to the glass, it must be allowed to dry in accordance with the instructions for the paints. Because different brands of paint may dry differently. When the circuit is completely dry. You can start decorating using your favorite colors. Since the drawing on the base is black and white, only the artist’s imagination serves as a template for determining the color of each element.

When the pattern is painted, it is necessary to dry it as much as possible, it is better to leave it for several hours. To see the result of the work, you need to turn the glass over and the colored paint will remain under the outline. Once the drawing has dried, you need to cover it with acrylic varnish in 2 layers, allowing each layer to dry. The instructions for the varnish indicate that it is completely dry after 8 hours, so the glass can be left to dry overnight at room temperature.
All that remains is to return the glass to its place - in the frame under the photo on the box and the work is completed.

This individually painted box will make a great addition to your interior or a unique gift, and the process of creating it with such a design will help cope with stress.
Success in creative work!
Every interior should have its own flair, and often the simplest and most elegant option to bring uniqueness to a room is a painting.
But how to find something that will decorate your bedroom, living room or other room? Most likely, you will have to pay a large sum of money for an original work.

But if you don’t expect to spend extra money, but still want to have something original, then it’s quite possible to make an interesting painting with your own hands.

At the same time, it is not at all necessary to be able to draw well. After all, paintings in the usual sense have long replaced three-dimensional images on the walls, abstract ideas embodied in a variety of techniques.

DIY fabric paintings
All high-quality canvases are made on a fabric basis. However, the modern interpretation of such paintings changes our view of art.
Modular fabric paintings have become very popular. But making them yourself is not so difficult. In stores now you can find a lot of fabrics with very beautiful, interesting and bright prints.

If you like one of them, then you can safely buy it and make an original piece of decor.

Modular picture
To create a room decoration such as a modular picture made of fabric, you will need a base in addition to the selected material. It could even be a door from an old cabinet or a piece of chipboard that could easily be lying around somewhere in the garage after renovation.

Cut out several pieces from the base to the size of your fabric and cover the tree with it. Make sure that the fabric is well stretched and does not form wrinkles. Your painting is almost ready. All that remains is to attach the hooks with which it will be attached to the wall.
Most often, such paintings consist of three or more modules, which may be the same size or different. Their shape can also be different.

The most common and easiest to manufacture are square and rectangular elements. But there are round, oval and other forms of modules for paintings. Frames for picture modules are not needed in this case.

Paintings from clothes
Even a T-shirt can decorate your interior. It often happens that stains or holes appear on clothes that you have not worn for very long, and their colors are still bright. You don’t have to throw away a seemingly damaged item, but make an original painting out of it.

Cut out a rectangle with an image from your clothing, glue it onto paper and place it in a frame. The photo shows that such paintings depicting cartoon characters will fit perfectly into the interior of a children's room.

Embroidery
In some ways, embroidery can also be classified as fabric paintings. This method of interior decoration is not new. Even our great-grandmothers had at least one hand-embroidered image in their house.

However, to embroider a picture, you still need some skills and patience. This method is not suitable for everyone, but if you do needlework, then hand-embroidered pictures can say a lot about you as a housewife.
Three-dimensional paintings
Relief images on the wall are also very popular as decorative elements in the interior. Three-dimensional paintings can be made with plaster on the wall even before its finishing.

But such decoration can only take place if there are no plans to stick wallpaper on the wall.
Note!


The method of making such paintings requires training and a considerable amount of time. Therefore, it will not suit everyone.

Paper paintings
There is an easier way to make a three-dimensional image. For this you will need colored paper or cardboard. Cut out several figures of the same or different sizes from it. These could be, for example, butterflies.

Using pins or double-sided tape, attach them to the wall in a chaotic manner or forming some kind of pattern. Your paper painting will look more impressive if you choose a color that contrasts with the tone of the wall itself.
The butterflies themselves can also be of different colors. Such a picture will sparkle with new colors when artificial lighting is turned on, so it will look most advantageous in rooms where the light is turned on most often, for example, in the corridor.

If your house has a staircase to the second floor, then kittens in different poses placed on the wall adjacent to the steps will look original.

Paintings from bushings
Rolls of toilet paper or paper towels will help you create voluminous decor with images of flowers and leaves. It is enough to flatten the cylinder a little and cut it into equal parts approximately 2-3 cm wide.
Note!


To make the flowers brighter and the leaves stand out in color even before work begins, the bushings can be painted in different colors. The individual parts of the sleeve should be placed so that a flower is formed, so it is possible to create entire compositions.

Artificial flower paintings
The easiest to make are paintings made from artificial flowers or other decorative elements. The main thing here is to beautifully glue the finished parts onto the base.

For this technique you will need a frame, a plain material and the image itself. Cover a sheet of paper with fabric, wrapping its edges and gluing it on the back side.

Then, having first removed the glass from the frame, insert the base of your picture into it and glue artificial flowers or other details (shells, dry twigs, etc.) to it. Finally, you can decorate the frame with beads.

If you already have a finished canvas, then there are many master classes on how to decorate a painting that is already boring to you and thereby update the interior.
Note!


A flat image of nature or still life can look completely different if several three-dimensional details are attached to it.

This can be either an image cut out of paper or natural materials in the form of dry leaves or even butterflies.

Photos of paintings with your own hands


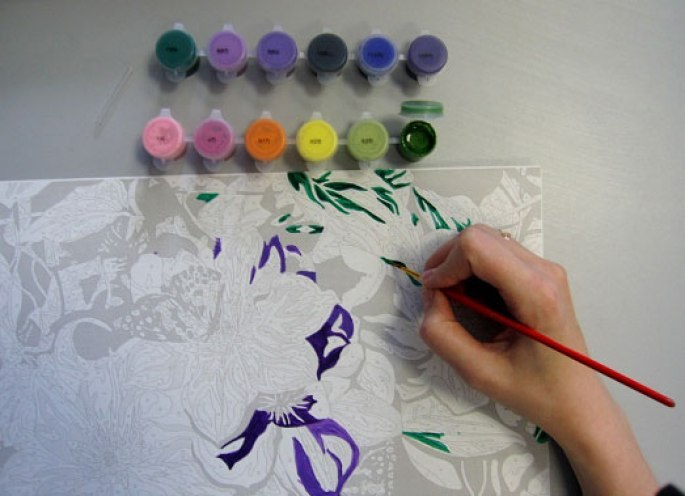
A talented artist who knows how to subtly feel and create real miracles is capable of transferring onto the canvas all the beauty, splendor of the surrounding nature and all its delights. For centuries, people of different generations have frozen in silent admiration in front of the paintings of geniuses. Today everyone can show their artistic creativity. Painting by numbers is an affordable way to create if you don’t have the experience or time for serious painting.
The secret of creativity lies in the fact that the canvas area contains numbered areas, for painting each of which there is a jar of paint with the corresponding number. Painting by numbers with acrylic paints is done in the following sequence:
- You need to find paint whose number corresponds to the number of the fragment on the canvas or cardboard.
- Paint a fragment of the picture with this color.
- After finishing painting, wash and dry the brush.
- Paint by numbers on the canvas step by step.
Paintings by numbers on canvas do not require mixing paints to obtain the desired colors and shades, since each of them corresponds to the required color on the canvas. The color scheme is perfectly matched to the plot of the original painting. The artist is only required to carefully select paints in accordance with the numbering on the canvas.
Bottles must be opened carefully and only the one that needs to be used. You need to have an image of the finished painting, provide good lighting and, first of all, outline the contours of the area to be painted with a thin brush.

Preparation of materials and tools
You need to start by preparing everything that may be needed in the drawing process. Place these items conveniently. You will need brushes and a glass of water, a canvas with outlines marked on it for painting with acrylic paints, a control sheet, a piece of fabric and stirring sticks.
Looking at the finished painting, you can figure out which shades match the image. But that’s why numbers are put on the paints, so that they can be applied to the corresponding area of the canvas. It’s easier to try your hand at cardboard, since the paint lays on it in an even layer and is absorbed perfectly. It’s easy to choose frames for these coloring pages. The drawing turns out quite bright and saturated.
To paint a picture with or without mixing paints, the canvas must be stretched on a stretcher. To make it stretch well, you need to moisten it with a damp cloth and place the stretcher on the unpainted part of the canvas. To secure the material at the corners, you will need four nails or a furniture strip.

Selection of paints and brushes
Brushes should be of different sizes, and their number depends on the complexity of the picture that needs to be painted.

Anyone who has chosen painting by numbers as a hobby is recommended to buy a set of acrylic paints at an artist supply store. The number of paints in this set allows you to apply them to the canvas in two or three layers.
Acrylic paint is quick-drying, so it should be opened immediately before use. The paints are already ready for use, so the artist does not need to work on mixing them while painting the picture. A variety of paints are used: watercolor, gouache, pastel, acrylic and oil.
Considering the fact that acrylic paints dry quickly, you need to tightly close them with a lid immediately after finishing work.

Drawing technique
There are several drawing techniques:
- line by line drawing method;
- "top down";
- "from background to foreground."
Painting by numbers with acrylic paints allows for the use of various techniques in one picture. The painting effect is achieved by applying the coloring material in two layers.
The desired sequence for coloring is from light tones and shades to darker ones. When a paint-by-numbers painting is created, the artist is not limited in the choice of coloring methods. He can paint cardboard or canvas in a way that suits him. Painting by numbers with acrylic paints takes on an attractive appearance as the canvas dries.

What is important to know
In order for the painting to be painted without problems, you need to adhere to the rules for using paintwork materials. This type of drawing requires strict adherence to instructions. There are the following rules for coloring by numbers:
- The jar with the paint it contains must be opened immediately before starting to paint, removing the remaining residue from the lid back.
- You can add a little water to the thickened mixture and stir.
- Once you open the jar, it is advisable to use it to the end.
- If you want to take a break from working, close the paint tightly.
- If the remaining material needs to be preserved, the jar is wrapped in a damp cloth and placed in a plastic bag.
In addition, it is necessary to carefully care for your brushes, not leaving them in a glass of water, not using chemicals for cleaning, and not using them to stir paints. At the end of the work, this artist’s tool must be thoroughly washed, including at the base. While working, you need to hold the brush like a pen.
Oil painting on canvas
Oil painting set includes:
- marked canvas;
- set of brushes;
- numbered jars;
- frame and fasteners;
- user instructions.
It should be noted that painting by numbers with oil paints is much more difficult than painting by numbers with acrylic paints, so this method is more often used by professional artists. But for beginners who are just trying their hand at artistic creativity, it is better to use painting by numbers with acrylic paints.
Oil paints allow you to achieve high image accuracy. A beginner should not buy expensive materials; first you need to learn how to work with them. The basis for applying paint is canvas. But oil paints can be used on any surface.

You need to know that even a child can draw a picture by numbers. A set of acrylic-based paints called “Coloring by Numbers” is sold especially for children. In order to draw such a picture, a child does not need to have artistic talent. Even children with mental retardation can do such needlework.
There is no particular difficulty in this coloring technique - just sit and draw. But a painted picture gives the child real pleasure because he sees the results of his efforts.

On video: how to use paint by numbers correctly?
It is possible to get painting lessons by numbers even online. Coloring by numbers on a prepared canvas only at first glance seems like a difficult task. But such work with painting a certain plot brings great pleasure to the performer.
Mastering the coloring technique is quite simple, like in a children's coloring book, where you just need to learn not to go beyond the intended lines.

If you strictly follow the rules and work carefully, the result will be excellent. The artist’s task is not to go beyond the color contour within the markings, to use the brush correctly and to carefully select paints.
Once you have finished creating a painting on canvas, you can immediately hang it on the wall. If desired, the result of artistic creativity can be framed in a baguette. If you want to make the image in the picture in relief, you need to apply paint in several layers. Having mastered the technique of drawing by numbers, you can create a picture of the famous creator of artistic masterpieces yourself.
All that is required of a beginner taking his first steps in such creativity is to paint over sections of the picture using paints with the corresponding number on the can. To make drawing convenient, it is better to use an easel. Everyone chooses the most convenient method for applying paint to canvas. For a beginning artist, painting by numbers is a great opportunity to plunge into the world of creativity and experience inspiration.

The traditional kit for creating a painting by Frey's numbers includes:
- canvas together with a stretcher with an image printed on it;
- acrylic based paints;
- three brushes of different sizes;
- checklist with diagram.
The attached instructions give advice on how to correctly paint the numbered areas of the picture. The ready-made sets use snow-white polyester canvases, which are particularly durable . To give the canvas additional hardness, a cardboard backing is glued to the stretcher on the inside of the painting.
How else can you use paint by numbers?
You can even paint your refrigerator using painting by numbers! This is not particularly difficult. Even a child can color the refrigerator by numbers. He will be happy when he sees how beautifully the surface is painted.

Many online stores offer a large selection of painting subjects, each of which has its own complexity options. Today, magnets and funny stickers on refrigerators are very popular, which perfectly transform this piece of household appliance. However, the refrigerator is often used as an easel - craftsmen paint it to their taste.
You can transform an old refrigerator by painting it and involve your child in this activity. Having painted it with oil paints, you can then safely wash the surface without washing off the applied pattern. But for this it is necessary to cover the painted surface with varnish.
Painting by numbers is becoming an increasingly popular hobby, so painting kits help fans of this type of creativity better discover their talent. Online stores offer in their catalog sets and paintings for coloring, children's coloring books, which can be ordered with delivery. Using pictures for coloring is not difficult, it just requires perseverance. The result of the work done will pleasantly please the performer.