Making a custom magic candle. Secrets of making candles with your own hands: from wax to gel
Since ancient times, people have known that the element of Fire cleanses and burns all negative energies that defile a person’s aura.
For our Ancestors, fire was one of the Holy Manifestations of Divine Power. Nowadays, as before, all Vedic Rituals take place near bonfires and Holy Lights. If they are held at home, then a candle burns in the red corner. The fire of a stove, the fire of a candle, is a visible and bright image of the Ancestors and Gods, manifesting themselves in the flame of fire.
The special, magical effect of a candle flame on a person’s aura (subtle bodies and shells) is that the flame helps cleanse the body of everything negative that accumulates in us day after day. And if a person living in an urban environment rarely has the opportunity to sit by the fire, then he can always light a candle in front of him.
After sitting near a lit candle for at least 7-10 minutes, watching the vibrations of its flame, we soon begin to notice how the candle throws a small amount of soot into space. As the experience of our Ancestors says, fire burns away mental fatigue, irritation and resentment that have accumulated in a person. Soot is evidence that they have burned.
The fire of a candle calms the mind, thanks to this, we can drive away negative, negative thoughts and feelings, and prevent illness from entering our physical body. Thus, mental pain, gradually dissipating, prevents the pain of the physical body. Along with the crackling of the candle, it goes away, and peace and peace of mind returns to its place.
I propose to revive the traditions of Our Ancestors and make wax candles on our own, both for daily use and for various rites and rituals. In addition, making candles is a very exciting activity.
Do-it-yourself protective wax candle.
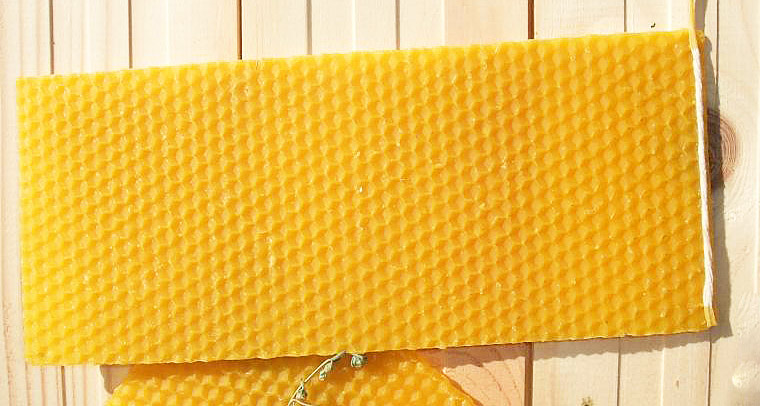
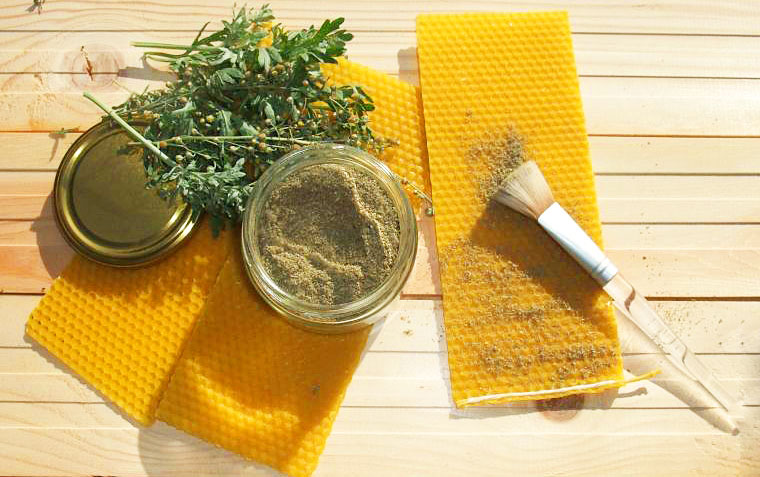
The easiest type of protective candles to make are candles made from wax and herbs. To make a candle we will need:
- foundation sheet,
- wick,
- protective herbs (optional),
- a brush for applying herbal powder (also optional, you can do this with your hands, but with a brush it turns out faster and more evenly),
- scissors for cutting wicks,
- wax cutting knife,
- ruler.
Foundation can be purchased on a specialized website for beekeepers.
When creating a candle, the foundation must be tightly twisted so that there are no voids, otherwise the candle will not burn without a residue.
The wick should be cotton. (3 centimeters of the wick is lowered into molten wax in advance so that when the candle is lit, it does not burn, but melts).
The herbs are dried in advance and crushed in a coffee grinder until almost dusty, so that there are no large pieces, because... When burning, they can flare up and create a loud crackling noise).
You can use different herbal compositions to create candles. It all depends on the goal you are pursuing. For example, if you are making candles for amulet protection, then you can use wormwood, thistle and other non-distillate herbs, which are especially strong for these purposes. If your candle should bring peace and tranquility to your home, then use St. John's wort and mint.

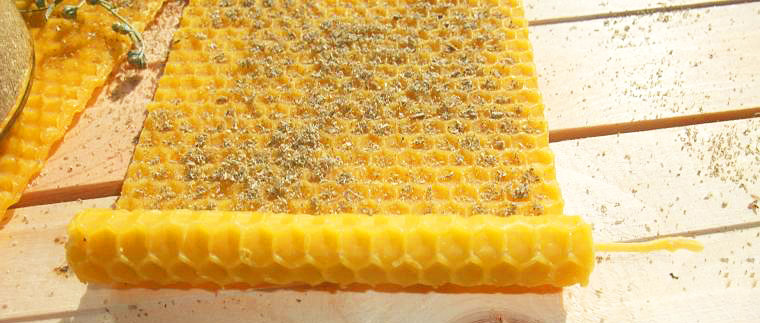
We cut the foundation to the size you need, mine is 21.8 cm x 8.5 cm. This is convenient to do with a knife, but you can also use scissors. We heat it slightly so that it becomes plastic and curls easily. This can be done over the burner or laid out in the Sun in advance.
We cut the wick to the required size, for my candle it is 11.5 cm.
Place the wick on the edge of the foundation, pressing it slightly.
Sprinkle the herbs you have chosen in an even, not very thick layer.
We twist the foundation tightly so that there are no voids, otherwise the candle will not burn without a trace.
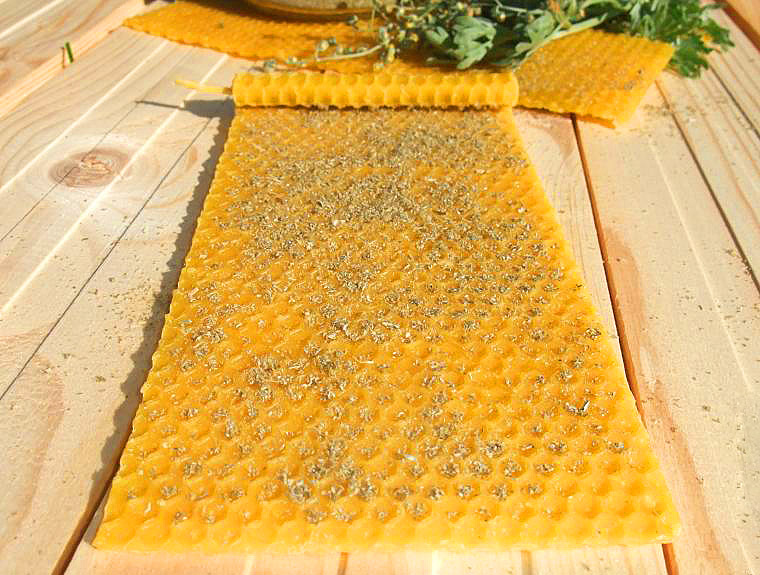

Now the candle is ready!

You can make a small notch at the base of the candle with a knife to distinguish this candle from a simple (without herbs) wax candle. Since the wax smells very strongly of honey, it overpowers the smell of dried herbs, so these candles (without a label) are difficult to distinguish from the outside.
Master class: wax candle in a mold.

- We cut the wax into small pieces, put it in a water bath, on a small fire (two or three on the scale of the gas burner tap).
- We are waiting for the wax to melt. It is important not to leave it unattended; if you overheat, the wax may catch fire (in this case, you just need to cover the pan with a lid or cover the fire with soda, and not extinguish it with water).
- When the wax is completely melted to a homogeneous mass...
- Dip a thread into wax to create a wick. For wax candles, you need to use a thread consisting of many small threads, poorly twisted together.
- Using toothpicks, strengthen the wick in the mold. To make a removable candle, you need to grease the walls of the mold with vegetable oil.
- You can add ground spices to candles - cinnamon, vanilla, etc., as well as very finely ground (powdered) protective herbs - juniper is good as one of the strongest amulets and cleansers of space from bad entities.
- Fill the wax halfway, add what you want to add to the candle and add the remaining wax.
- We wait for the candle to harden - the wax hardens from the edges to the center. Next, remove the toothpicks and trim the wick to the desired length. That's all.
- Please note that on the left is a candle made of ordinary beeswax, and on the right is a candle made from church wax with the addition of juniper.
Dipped wax candles.
Making wax candles is a real mystery! The process itself is fascinating: meditative and relaxing. This candle burns for 3 hours. It cleanses the space very well, calms and pacifies. The most important thing is that its flame is completely different, very different from paraffin flames. In addition, paraffin vapor is harmful to health. Dipping is the oldest method of making candles.
You will need:
- beeswax,
- cotton threads - others will not burn (you can use ready-made wicks from stores selling craft supplies),
- a saucepan that can accommodate a jar (a bottle with a wide neck) - because We will melt the wax in a steam bath.

We put the wax in pieces into a jar, pour water into a saucepan, put the jar in the saucepan, turn on the stove and wait until the wax is completely melted.

When the wax is completely melted, dip the cotton cord into the wax. After the excess wax has drained back into the jar, move the cord to the side and wait for the wax to cool and harden.

Then we dip it again and again wait for the wax to cool. You need to dip in one precise movement, without delaying in the jar, so that the previous layer of wax does not have time to melt in the hot wax.
The better you cool the candle in the air, the more wax it will capture the next time you dip it.

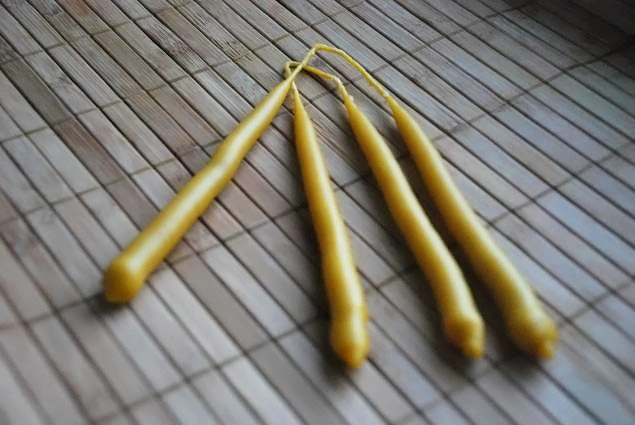
When you are satisfied with the thickness of the candle, cut off the bottom of the candle and trim the wick.
The candles are ready. A similar candle burns for 2.5-3 hours. It has a very beneficial effect on well-being and clears the space of everything unnecessary.
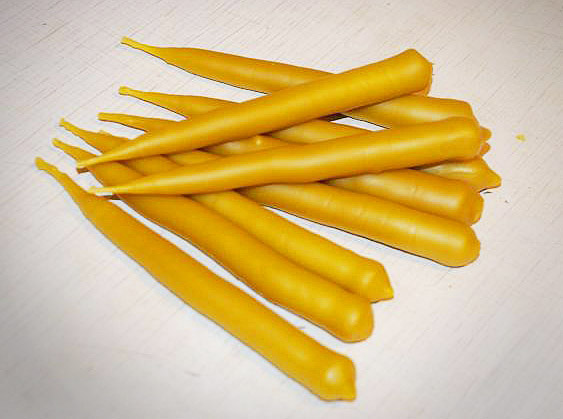
You can make several candles at once (three or four wicks in operation at a time), while some are dipped and others are cooled. The wax cools quickly.
At the end of the candle making process, the remaining wax can be left in the jar if you plan to make such candles often. Or the wax can be poured into a saucepan, directly onto the water. When the water has cooled and the wax has completely hardened, you need to remove the wax circle and store it until the next time.
In the same way, the wax is cleaned of impurities - they settle between the water and the wax, after which they can be easily removed with a knife.
It is important to make candles in a good mood. In order for your candles to be magical, you need to repeat mantras, spells, and praises while making them. You can find mantras and praises in the article
Method of withdrawal from a loved one
layers of negative fields and programs using a candle.
Cleansing with a wax candle must be carried out in the following cases:
At the first symptoms of a cold,
If you or your loved ones are very nervous,
After serious conflict situations,
After visiting hospitals and seriously ill people,
After a conversation with a person who is unpleasant to you, if after this there is a feeling of heaviness in the body, your mood has deteriorated, you feel nauseous,
Children, if someone scared them or a stranger scolded them strongly and viciously on the street in your absence,
If a child went for a walk healthy and in a good mood, and returned, pale, angry, doesn’t want to talk, doesn’t want to eat and doesn’t want anything at all,
In other similar situations.
To remove layers of negative fields and programs from a loved one, ask him to sit on a stool, since the back of the chair blocks the person’s back from the influence of the candle flame, and stand behind him.
You will need a wax candle. Place a small circle of white paper on it with a hole cut in it for the candle to fit into. The paper is necessary to protect your hands from the negative energy that will be absorbed by the melted wax flowing down the candle - it will not flow onto your hand, but onto the paper.
Light a candle. For a while, forget about all everyday thoughts and repeat silently or out loud (depending on the circumstances, if the person agrees, then it’s better out loud) the “Aum” mantra. The patient should begin to “clean” from the tailbone. The hand with the candle should make a rotational movement counterclockwise.
The amplitude of this movement is 10-15 centimeters. The time during which you will perform the ceremony is chosen by you arbitrarily.
If the candle begins to crackle, it means that you have found a “problem” place - an area in which a person has serious disturbances in the functioning of the body. Surely at this moment you will see soot coming out of the flame. Hold the candle near this area until the candle stops smoking! When the flame becomes clear again, continue moving up the spine - to the very top.
We finish cleaning with movements above the head: at a distance of 10-15 centimeters above the head. At this time, one must read the glorification of Lada the Mother of God, so that She will help a person to debug his body, soul and spirit, i.e. bring him into alignment with Mother Nature and the Supreme Progenitor (bring him into harmony with Them).
Praise to Lada the Mother of God: “Oh, Lada Mother! Mother Sva Most Pure! Be glorious and Trislavna! You give us Love and Happiness! Send your grace upon us! Bless your son (daughter) (name) to restore connection with Family and Nature! We honor and glorify Thee, Lada-Mother, to all our people, now and ever, and from Circle to Circle, and at all times, as long as Yarila the Sun shines on us! So be it, so be it, so be it! A-o-u-m!”
Cleaning must be done 3 times, checking whether the candle burns evenly in the place where it previously smoked.
After performing the cleansing ritual, the person you helped needs to burn the paper with the wax dripping on it and scatter the ashes with the words: “As the paper burns and these ashes scatter, so will all my ailments and illnesses burn and dispel.”
Good luck to you in your good deeds.
Aum Tat Sat.
The article is illustrated with a video film:
Individuality in your interior design will always be its winning side. Nothing adds a homely feel to an apartment like things made by the owners’ hands. And if until now you could not boast of such fruits of handicraft, you have a great opportunity to fix it. We invite you to try making candles with your own hands.
Candles are a wonderful souvenir that can brighten the atmosphere of any family holiday. Candles have long been an attribute of celebration, significant dates, and romantic evenings. Yes, just sitting in silence, listening to your favorite music while a gentle light flutters - this is sometimes so lacking.
For some, a candle is nothing more than a cute decorative item. And there is nothing wrong with this either; such products serve as wonderful decorations in the home. But scented candles can become a real psychotherapeutic tool: they will help create the necessary atmosphere for relaxation, taking a person into the world of dreams and pleasant memories.
In addition, a candle is a wonderful gift. The warmth of your hands and the light of a beautiful candle will be the best wish for a loved one. Candles will decorate even the most modest furnishings, highlight the color scheme of your apartment, and become evidence of the excellent taste of the owner.

Needless to say, mothers on maternity leave can even earn extra money from such a pleasant activity. And not only mothers - everyone who is fascinated by the process of creating a candle. And you can be sure that there will be people who want to purchase such hand-made beauty.
So, we have many reasons to finally begin our creative process. But to make a candle, we need to stock up on certain materials and tools.
Materials for making candles
Indeed, how to make candles with your own hands without special materials? We will need the following in our work:
- Wax melting vessel
- Candle molds
- Pan (for water bath)
- Sticks (the first is to attach the wick, the second is to stir the wax)
- Decorative elements for decorating the product
- Wax crayons
- Household candles or stubs of old candles
- Paper threads (100% cotton)
All this will help us create, if not a wax masterpiece, then a beautiful original candle. So let's begin!
Candle wick
Now we have to learn how to make a candle wick with our own hands. Whether we make a gel, paraffin or wax candle, in any case we will need a wick. In order to make it, we need natural cotton thread without any impurities. Alternatively, use colored floss threads as a wick. It looks very cute and unusual.
The thickness and texture of the wick depend, first of all, on the thickness of the part of the candle that should burn out. For example, there are candles that are partially composed of flammable materials. Only the core burns out in them.
For those who are going to cast a candle from wax, you need to take thick threads and weave them not very tightly. Paraffin and gel candles, on the contrary, require a tight weave of threads (otherwise the wick will smoke when burning).

Wick for wax candles

Wick for gel candles
You also need to be attentive to the following detail: if the candle is colored with wax crayons, small shavings can clog the wick without dissolving in the paraffin or wax. In general, there are a lot of nuances in this issue; be prepared for the fact that choosing a wick for a certain type of candle will have to be done by trial and error.
If you use a very thick wick, it is possible that the candle will melt too much, which can lead to soot. If you make a very thin wick, it will constantly go out.
There are several options for designing a wick: it can be crocheted, braided, or twisted with a rope. Before pouring the candle, you can soak the thread with wax, or you can do both pouring and impregnation at the same time.
If you don’t want to waste time making a wick, then use a wick from ready-made household candles.

Candle mold
In this matter, your imagination plays a decisive role. You can use any plastic or metal molds that you think are cute and appropriate for making candles. Don't limit yourself to just ready-made molds: yogurt packaging, cream jars, baking molds, cans, glasses or mugs that can withstand high temperatures can also play an excellent role. Some even use milk tetrapack as a mold for a future candle.

Candles poured into tea cups

Candles made in eggshells
But for your first experience, it’s better not to split hairs: take something simple. For example, a yogurt cup. Be sure to remove the paper label first, as it may catch fire.
We take our glass and pierce a hole in the middle of its bottom with a thick needle - insert the ready-made wick there. The wick must be tied in a knot on the back of the glass. In this very place of the knot there will be the top of our candle, because it will be poured “upside down”: the knot minimizes the flow of paraffin, stearin or wax through the hole we made at the bottom of the glass.

Go ahead. We need to place any stick across the glass - a toothpick, brush or pencil. We need to tie the other end of the wick on it. It should be positioned strictly in the center in a vertical, level position. This way, you guarantee yourself that the candle will burn and melt evenly.
Coloring a candle
You will get really beautiful candles if you don’t forget to color them. The simplest and most acceptable way is to color candles using simple children's wax crayons.

Do you think it would be smarter to use watercolor or gouache? Indeed, the palette of these paints is richer than the color variety of crayons. But the problem is that both gouache and watercolor are made on a water-soluble basis: these dyes are not suitable for working with a candle. They do not mix well with wax or paraffin, they can float in them in strange-colored flakes, and then completely settle to the bottom.
Decorating candles can and should be done only with fat-soluble dyes, and these are our wax crayons.
Often, many craftsmen use lipsticks or shadows to decorate candles. If you don't mind your cosmetics, please feel free to follow their example. But rest assured that the aroma of lipstick will linger throughout the house, which is not always pleasant. Many people may find this smell intrusive.
If you decide to make decorative candles with your own hands, it is better to use less aggressive materials. When choosing wax crayons, we focus on soft types of this dye. Candles made using mother-of-pearl wax crayons are especially good.
If you come across hard crayons, melting them will be difficult. Yes, and planing them is quite problematic. So, we chose a piece of chalk, sharpened it using a grater, and added these shavings to the wax cinders. Mix the shavings and cinders thoroughly with a stick.
However, there is another coloring option. In specialty stores it is easy to find tableted pigments of different colors. They can be mixed with each other and dosed. Using such pigments, you will be able to make a truly unusual, bright or delicate candle. Pigments in tablets significantly expand the possibility of obtaining interesting shades.

You should not refuse to use dyes: they give the candle a unique look and create a unique pattern.
Pouring a candle
Now that the wick is ready, it’s time to fill it. We will need a regular tin can. It has to be flattened a little to form a kind of nose. This is necessary to make the process of pouring out the molten material easier.
It is better to lubricate the pre-prepared form with a thin layer of dishwashing liquid or simple vegetable oil. Both remedies are equally good.
We need to put the fragments of candles in a jar (candles must be of the same quality). If we are going to make a paraffin or wax candle, we can take a saucepan or ladle for melting, which is not too much of a waste. In any case, this container should be placed in the pan that will be used as a water bath. In principle, you can use whatever you want, except glassware.
So, we fill the pan with water, boil the water, and then immerse the container with wax or paraffin. This is how our material will melt.

When the material and shavings are completely melted, you can begin pouring the candle.
Fill the bottom of our mold with wax and let it cool. Do not rush to fill the entire mold at once, otherwise a lot of wax or paraffin may leak out through the hole in the bottom. We pour the wax in layers, and what has flowed out is re-sent for re-melting. When the candle is completely filled, it needs to be cooled. The temperature should be room temperature.

Many people make a mistake at this point: they try to speed up the cooling process by placing the candle in the freezer. In this case, it may spread unevenly.
This is not critical if we fill the candle upside down. If you use another method, then you should leave a little wax in order to fill the depressions next to the wick. And after drying they will definitely appear.
When the temperature of the candle becomes equal to the temperature of the room, you need to untie the knot at the bottom of the mold. At this moment, we remove the product itself by carefully pulling the wick.
If you can’t do this, you can cut the mold. Or put it in the refrigerator for a minute, and then put it under hot water for a few seconds.
After this, we cut off the excess part of the wick, leaving a tip of 1 cm. If there are unsightly seams left from the mold, they can be removed with hot water. But with these manipulations, the candle may become cloudy, its shine may fade. Therefore, the optimal solution would be to choose a candle mold that does not contain seams.
DIY aroma candles
Making scented candles with your own hands is quite possible. In particular, this is worth doing for those who are true fans of aromatherapy. In order for you to get exactly the aroma candles, you need to add some essential oils before pouring them into wax. The choice of oil depends on your taste: you can add any oil, except perhaps rose oil. After all, its smell when burning will be suffocating and heavy.
It would be great if the decor of the aroma candle matches the plant whose oil we use. For example, using lavender oil as the basis for the aroma, pink or lilac dyes should predominate in the decor of the candle.

Using laurel or mint oil, it is better to decorate a candle with green shades.

Vanilla or cinnamon will be organic in warm, beige-brown tones of a candle.

It's not just oils that can make your candle scented; regular coffee is a strong and pleasant scent.
In principle, achieving the scent of a candle is not so difficult. Aromatic oils are added to paraffin, wax or gel. And then the process of making a scented candle is no different from creating a regular candle.
We advise experimenters to mix oils: you are guaranteed an unusual bouquet of aromas. If you are afraid of “doing something weird” and synthesizing incompatible smells, look at perfume recipes. Follow their instructions, just don't add rose oil.
Gel candles
Now let's talk about how to make gel candles with your own hands. In order to make gel candles, it is better to use ready-made gel wax. The recipes for making candles are often written on the packaging with it, and you can use it.
For those who are used to doing everything themselves, the following recipe can help:
- 5 g gelatin
- 2 g tannin
- 20 ml water
- 35 ml glycerin
First we need to dissolve the tannin in the glycerin through the heating process. We continue to heat, adding the remaining glycerin and gelatin to the composition. Add water to the resulting clear solution. Bring the mixture to a boil. Some cloudiness of the solution should not scare you: it will soon disappear. Until the water completely evaporates, you need to boil the solution.

You can also add essential oil to gel candles; this does not contradict the recipe. A separate, especially pleasant process is decorating gel candles. At the bottom of any transparent container we freely place decorative elements: beads, beads, pebbles, shells, sequins, coffee beans, dry plant stems or flowers. Then fill everything with gel transparent wax. This candle looks simply incredible: transparent, delicate, with a magical pattern inside.

Coffee candles
Making decorative candles is also not difficult. For example, you can make an original coffee candle. The decor is, of course, coffee beans. The principle of operation is this: a small one is inserted into a large mold. Between the walls of the two molds you need to pour coffee beans, and then fill them with candle mass.

As soon as the mass with coffee beans has frozen, the walls need to be blown with a hot hairdryer. Thanks to this, excess paraffin will drain and the coffee beans will be clearly visible.

Now the outer layer with coffee beans is ready. We put it back into the mold, fill the inside with paraffin/wax of a different color.

Coffee candles can be like this:

You can make sea candles in the same way: instead of grains, they will contain pebbles or sea shells. As an option - transparent gel candles with small pebbles or coffee beans.
Candle decoration options
How else can you decorate a candle you created with your own hands? The first way to add originality to your candle is to use unusual, unexpected shapes. Sometimes an interesting shape can be more advantageous than even the most skillful decor. A wonderful decorative element for candles is various types of glass stands.
In a specialized store you can find special stickers for decoration. Or decoupage is a great way to decorate candles. By the way, it is very fashionable among professional candle makers. Most often, napkins are used as the basis for decoupage. Don't forget about safety precautions: use special varnish for candles.

For lovers of original decor, the following option is suitable:
Before pouring, place shells, pieces of dried fruit, cinnamon, seeds, and dried flowers around the edges of the mold. Or let it be coffee beans in an ensemble with rhinestones and beads. But in the latter case, it would be more appropriate to talk about the decor of the finished product: we insert decorative elements into melted paraffin/wax.
An already frozen candle can be covered with bamboo or cinnamon sticks. You can add star anise or the same coffee beans to them. This will be a beautiful decoration for aromatherapy candles.

If you are using dried plants (or any other decorative items that can become flammable), the candle wick should be thin so that the candle only melts in the middle.

In principle, if you have the opportunity to go to specialized stores for materials, you will get a lot of useful tools there. For example, markers and outlines are sold there; they do not burn, but during the smoldering of the wick they melt along with wax/paraffin.
If you don't want to collect old candle cinders, use paraffin beads or candle gel. In specialized stores you can even find ready-made wicks (with a metal holder). For floating candles, you can purchase specially formulated wax.

Today, the imagination of a creative person is practically unfettered by anything: prices for materials for making candles are not high, the process is exciting and not as long as it might seem. Having once created a beautiful candle with your own hands, you are unlikely to deny yourself the pleasure of experimenting again.
And for inspiration, we invite you to watch a wonderful video master class on creating carved candles
Categories
Since ancient times, people have looked at fire and felt safe. Many centuries have passed, but even now, when looking at the hearth, the same feeling arises. But today we don’t sit by the fires; wax candles replace them. They give any room an atmosphere of intimacy, and the smooth vibration of the flame fascinates people, just as it did hundreds of thousands of years ago.
Nowadays, with so many different materials available, you can make wax houses to create your own masterpieces. They can come in various shapes, sizes and colors.
Materials needed to create paraffin candles
You will need:
- cotton threads;
- wax crayons;
- ordinary candles.
These materials are inexpensive and available.
Auxiliary materials for candle production
You will also need:
- old saucepan;
- a container where the wax will melt;
- two plastic or wooden sticks to stir the wax and attach the wick;
- molds for creating candles, these can be children's toys or plastic cups;
- decorative embellishments for future creations.
In this case, you can select materials at your own discretion.

Nuances in choosing a wick
Any candles: church, wax, gel, paraffin - have a wick. It must be made from 100% cotton. This could be a strip of fabric or string. The main thing is that the composition does not contain synthetics. Multi-colored wicks made from floss threads look especially good on transparent candles.
For each candle, the wick is selected individually. Its rigidity and thickness depend on the part of the candle that will have to burn out. Also from her material. For wax candles, it is worth making thick wicks, the threads of which are not woven very tightly. For paraffin or gel, on the contrary, you need to tightly intertwine thin threads. Such a wick will not smoke when burning. It must be remembered that if used for coloring, their shavings may not dissolve in the candle material and clog the wick.
In a word, there are many nuances here that can only be understood in practice. If the wick is thick, the wax candles will smoke and burn out too quickly. And very thin ones will often go out. In general, you need to try and experiment.
The wick can be twisted (like a rope), braided or crocheted. Immediately before pouring, it is better to soak the threads with wax, but many people think that this is useless and simply fill them with wax, paraffin or gel.

The principle of creating a candle
To make wax candles with your own hands, you need to find a suitable shape. You can use any plastic cups, children's toys, that is, anything where you can pour paraffin. However, this container must withstand temperatures of 100°. For the first time, it is better to take a simple form to understand the principle of creating a candle.
A knot is tied at the end of the cotton rope. After this, a hole is made in the center at the bottom of the mold. This cotton wick is inserted into it so that its knot is on the outside. It will subsequently be the top of the candle, and will also prevent wax or paraffin from flowing out of the mold when creating it. Next you need to secure the second end of the wick, which will be at the bottom of the finished product. It should be in the middle of the form. To do this, take any stick, you can take a toothpick or a match. It is placed across the mold, and the second end of the wick is tied to its center. It needs to be centered and tight. Once everything is secured, you can start creating the candle.
We need material to fill out the form. Therefore, they take church candles, wax, paraffin, in general, everything that is available. It is better to chop them finely to make shavings. It is folded into a tin can and placed in a water bath. That is, take a pan of water, put it on the fire, and after it boils, immerse a container with material for the candle there. It becomes liquid under the influence of temperature, and then you can pour it into a candle mold. In the process, you can use any container, the main thing is not glass.

Materials for coloring candles
In order for the product to be the desired color, for example, you want to get green, red, blue, or even multi-colored wax candles, then you need to add dye to the composition. The most widely used material for this is children's wax crayons. In general, you can use any fat-soluble dye. If you take gouache or watercolor, they will not be suitable, because they will not be able to dissolve in the material, and will simply float in pieces, and subsequently settle to the bottom.
Some artists use lipstick and eye shadow to color their masterpieces. However, as the candle burns, the lipstick releases a scent. If it is pleasant, then this is an excellent option not only in terms of color, but also in terms of aromatic effect.
Special dyes for candles are also sold, where there are many colors and shades. Using them, you can make both snow-white and black candles (wax or paraffin). By adding them in different proportions, you will achieve both delicate pastel tones and bright, saturated colors.

Pouring material into mold
If everything is prepared, we proceed to the main stage. The inside of the mold is lubricated with vegetable oil or liquid that is used when washing dishes. This is necessary to make it easier to remove the frozen candle. First, a little material is poured onto the bottom to close the hole with the wick. After all, if you fill the entire space at once, the wax or paraffin will leak out a lot. But this is inconvenient and will take much more time.
After the bottom has hardened, pour in the rest of the wax or paraffin until the entire container is filled. When it's ready, wait for the wax to cool at room temperature. This way the wax candles will cool down gradually and evenly. If you try to speed up the process and put the product in the freezer, the surface of the candle may crack, which will ruin its appearance.

Removing the candle from the mold
You need to untie the knot on the wick, where the top of the product will be, then pull it on the other side. The spark plug should come loose. If the product cannot be removed, there are two solutions: the first is to cut the mold, the second is to place everything in the freezer for two minutes. After this, the candle is immediately doused with hot water. Thanks to the sharp temperature change, it can be easily removed.
After this, the wick is shortened to the required size, and the seams that remain from the mold must be doused with hot water - then they will disappear. However, the product loses its original shine. Therefore, when you create wax candles, you should select molds without seams, so that there are no problems with removing them later.
Aroma candles
They are made in the same way as wax ones, but with the addition of essential oils. When burned, they will fill the room with a pleasant aroma. You can use any essential oil, just not rose. When burned, it emits a suffocating odor. You need to add the required flavoring to the liquid wax, then mix everything thoroughly. After everything becomes homogeneous, the wax is poured into the mold. Further actions are identical to those stated above.
Homemade wax candles burn and look very beautiful. However, you can make such accessories absolutely transparent, as if it were water. They are made from a gel that is specially prepared for this purpose.

Gel candles
To create such a lovely miracle, you can buy gel wax in the store. But if you wish, it can be easily done at home. For this you will need:
- water;
- tannin;
- glycerol;
- gelatin.
Take 5 parts of gelatin (necessarily colorless) and dissolve it in 20 parts of water. After this, you need to add 25 parts of glycerin and stir everything thoroughly, after which a transparent essence will begin to appear. 2 parts of tannin are added to it, which are pre-dissolved in 10 parts of glycerin. Immediately after combining, a dirty precipitate forms, which disappears when boiled. After creating a transparent mixture, it is poured into a mold, like ordinary wax candles, the production of which we discussed above.
The appearance of such candles can be made even more spectacular by adding dyes to them. Thus, they can be given delicate tones of any color. Or you can pour different colors into the uncured mixture to get fancy abstractions.
- 1. A little about the benefits
- 2. Possible types of processing
- 3. What you need to know about wax and safety
- 4. Tools and everything you need
- 5. How to make your first candle
Together with honey, bees bring a little turmoil and pleasant troubles into our lives. After all, an apiary requires work, time and attention. Often, having an apiary is so exciting that any creative beekeeper also becomes a craftsman. Beeswax candles - what could be more pleasant on a chilly winter evening. They will make life brighter, saturate the air with summer aromas and warmth, and handmade ones will not only be an excellent gift for loved ones, but also a good reserve for the budget.
A little about the benefits
Convincing the beekeeper of the benefits of his own products is perhaps unnecessary. However, not everyone knows why beeswax candles are preferable to, for example, paraffin candles. Last when burning:
- release carcinogens into the air;
- promote the formation of soot;
- industrial unnatural wicks may emit toxic fumes;
- when using dyes and flavors, they become a source of health problems.
Is it possible to compare all these side effects, which can cause not only allergies, but also more serious diseases, for example, lungs and mucous membranes, with the possibilities from using wax.
After all, when wax burns:
- no soot is formed;
- in the absence of additives, the candle burns for a long time and burns out completely, without residue;
- More than 50 essential compounds and substances are released into the air;
- We must not forget about propolis impurities in the composition of unrefined wax: this is how it directly enters the lungs.
In addition, natural raw materials are a guarantee of interest from urban residents. Megacities and urbanization contribute to enormous interest in origins. And such a craft has existed as long as beekeeping.
Possible types of processing
In fact, there are several ways to make candles. Each of them is good in its own way and resonates with potential users:
- the lightest and requires virtually no additional processing: a sheet of foundation is simply rolled around the wick. There are not many opportunities for creativity, but this method is one of the oldest;
- to use the second one, minimal heat treatment is required: the wick is dipped into a container with liquid wax, increasing the volume of the candle over and over again. It is clear that there is no question of the form meeting modern requirements - this is a purely utilitarian thing;
- pouring into molds. Perhaps this method provides a lot of opportunities for realizing ideas. Even if you pour the wax into a simple cylindrical mold and then cut out the designs, it will still be a molded candle.
Casting into molds has a huge reserve for a creative person: you can purchase any of them to choose from, or you can create them with your own hands.
What you need to know about wax and safety
Before you start executing the plan for your own candle factory, you should familiarize yourself with the physical properties of wax:
- Building material from bee hives melts when the temperature rises to 60-70 degrees.
- At 100 degrees you will understand whether there is water in the raw material - it boils and forms a kind of foam.
- The foundation will begin to steam or smoke at 120 degrees.
- At 204 degrees you need to be extremely careful: its vapors ignite.
These are characteristics common to each type of raw material. Meanwhile, it can also be different:
- technical or production. Actually, this is a mixture of wax with additions, sometimes they are paraffin, such raw materials have already been subjected to industrial processing;
- raw or apiary has the most natural origin. It is obtained directly from honeycombs using wax melters or melting pots. It can be standard, provided that the bees have not had any diseases or excessive chemical treatments, or vice versa - substandard;
- bleached. This is a natural, natural building material of bees, only without the inevitable impurities in the composition. Otherwise it is called cosmetic.
When working with it there are rules that must be followed:
- The slower the wax heats up, the easier it is to work with. When heating, it is recommended to use a water bath. This is the easiest way to regulate the temperature. The process needs constant monitoring: you cannot leave.
- It is necessary to completely avoid contact with water: it is dangerous. Hot wax will cause rapid evaporation and splashing of boiling water.
- Flammable materials must be extinguished using dry methods: limiting the access of air.
- When working, you must avoid contact with open flame: an accidental drop can cause a fire.
It would be useful to remind you that children and animals are prohibited from entering the work area. This way you will create a risk of injury for them with your own hands.

Tools and everything you need
In addition to wax, you need to stock up on some equipment. At first, ordinary dishes and accessories found in the house will suffice, but then you may need your own workplace. So, you need:
- gloves, sleeves and apron - it is unlikely that you will be able to never drip on your clothes;
- a table, constant access to water, a stove for heating and a hairdryer for leveling surfaces;
- cutting board, hammer, knives and chisel for grinding wax, scissors for wick;
- two containers for a water bath: large diameter for water, pebbles or a metal stand for hot water are placed on its bottom, and a smaller diameter saucepan is placed on top for melting wax. It must be either enameled or ceramic: otherwise the wax darkens;
- napkins. Preferably paper, not textile, there should be a lot of them. At first, without skill, they help out well;
- nylon for filtration;
- natural wick: from 1 to 4 mm. The choice is proportional to the diameter of the future candle;
- wire for fixing the wick.
And most importantly: forms. They come in aluminum, polycarbonate and polyurethane. The first two materials provide reusability and heat resistance, but are inelastic, which means they don’t leave much room for creativity. The latter assumes safe use at temperatures up to 80 degrees, then it becomes toxic.
The most common are silicone. They imply accessibility and a huge selection, high temperature of use (up to 200 degrees), elasticity, and even if they are short-lived, they will help make up to 200 candles. Subsequently, you can even make it yourself. There is a trick to using any split mold - you need rubber bands: while the wax hardens, the halves need to be firmly fixed.

How to make your first candle
We must immediately warn you: the first one may not become a candle in the literal sense of the word. You may not have enough patience or skill, but you need to prepare for the fact that you will have to redo it and not give up if it fails.
The process can be represented in the form of several stages. Their sequence in the future depends on your experience:
- Preparing the mold and filling the wick. To do this, there is a hole in the bottom - the future wick is tucked into it. If it is much smaller in diameter, then you can use a small piece of a toothpick - this way there will definitely be no wax leakage. Then the form is tightly fixed in several places with rubber bands. And the end of the wick is brought right into the center of the mold and secured there with a wire loop.
- Preparation of wax: it must be crushed. If the volume of the mold is, for example, 1 glass, then you will need approximately 250 g of wax. It’s easy to determine - just first measure the volume of the mold with water, its ratio to wax is almost the same. The required volume of wax can be immediately placed in a water bath and started heating, or it can be added as it melts.
- When the water in the lower pan has boiled, you can begin the process of casting into molds. True, if the wax is unrefined, then it can first be poured through nylon into a separate container and only poured into the molds from there. If filtration is required, the process must be quick so that the wax does not form clumps.
- When the molds are filled to the edges, after 10-15 minutes it is necessary to make several control punctures to the bottom of the mold with a knitting needle or wooden stick and these voids are filled additionally.
The wax cools quickly, but you shouldn’t rush the process. Soft and flexible, it may simply not take shape. Therefore, it will be possible to remove beeswax candles after 2-6 hours, depending on the volume of the workpiece.
DIY wax candles
Actually, the bulk of the work has been completed, all that remains is to bring the candle to an acceptable form:
- It is carefully removed, separating the halves of the form in different directions. To do this, you need to remove the rubber bands and wire.
- Cut the wick completely off the base.
- Level the base over a hairdryer or at the bottom of a water bath.
- Leave the wick itself approximately 1 cm long on top. For convenience and beauty, it can be dipped in wax.
That's the whole process of making a great gift with your own hands. Who knows, perhaps this is the beginning of a new era in the life of a beekeeper and a candle factory will appear next to some apiary.
Many people know that most magical rituals are usually performed with candles. You can also perform rituals with a candle to attract money. But not with an ordinary one, but using a green candle for this.
Why is a green candle so magical, and how to use it in money magic?
Green is the color of material and monetary magic. Green candles are used in magical rituals to improve well-being, as well as for healing, as they protect health and physical fitness, complementing other candles. Green candles are great for all kinds of new beginnings. An abundance of green candles in the house is a good program for your world; fire and earth in a harmonious relationship contribute to success and wonderful results, both in terms of successful decisions and material gain.
These candles may well be your daily friends, helping to consolidate the results of fulfilled desires or magical rituals performed. Green is the color of fertility, abundance and wealth. Symbolizes nature and material gain. Promotes well-being, fertility and success. Corresponds to the 4th chakra.
Green candles are best lit on Fridays. When green candles are used in rituals to enhance wealth, they help to gradually increase income or capital.
As the color of fairies, green is also very useful in spells that invoke good fortune or increase magical abilities. Green candles are used to attract the energy of money, prosperity, as well as to improve health and help in new endeavors.
It is also used in spells aimed at positive changes in circumstances, repetition or renewal of desires or intentions and consolidation of the result. Green candles are widely used in money magic rituals. With their help, money and monetary success are attracted, and material benefits are obtained.
It is great to use green candles in rituals aimed at career growth, achieving personal goals or personal material gain. In addition, green candles are used as an additional factor of growth and activity in rituals related to various issues of the material world - such as employment, business development, and the opening of new development prospects.
How to make a money candle
How to choose a green candle for money rituals? The ideal option is if the candle is made of wax, but regular stearic or paraffin is also suitable. The main thing is that it is thick enough and can burn for 2-3 hours.
A purchased green candle will serve as the basis for creating a money one. Now it’s time to start preparing the energy mixture that will accomplish the transformation. To make the mixture you will need a glass bowl, olive oil and aromatic oil, which can now be bought at any gift shop.
We need pine oil, cedar oil, eucalyptus oil - essential oils to attract money, and an ordinary brush for painting. You need to cut off the lower part (about two centimeters) from a previously purchased candle. Just cut carefully so that the candle remains stable later.
Now pour half a tea cup of olive oil into a glass bowl and add three drops for each bottle of aromatic oil. Stir the mixture clockwise and place in a water bath. Place a finely chopped piece from the candle there. Stir with a wooden spoon or spatula until the wax softens. You should get a homogeneous mass.
Then remove the bowl from the water bath and cool, stirring gradually. As it cools, the mass will begin to thicken little by little, but until it has completely frozen, you need to charge it with monetary energy. You need to do it like this. Place the bowl on a wooden table. If you don’t have a wooden table in your house, you can place the dishes on a wooden board (for example, a cutting board).
Look closely at the surface of the mixture and concentrate. Think about the wishes and hopes that you can fulfill with the help of a green money candle. Close your eyes and try to imagine in great detail the moment you get what you want.
After this, all that remains is to turn the purchased candle into a green money candle. And here’s how: take a simple candle in your left hand (vice versa for left-handers), and with your right hand dip the brush into the mixture that you apply to the candle. The direction of hand movement is from top to bottom.
As you apply the mixture, try again to imagine how you will succeed in achieving your goal. When you finish applying the mixture, leave the candle to dry for a day.
After this period, the green money candle will be completely ready and can be used in various ceremonies, spells and rituals. When you make such a candle, you can immediately get down to business.
How to make a ritual with a green candle for money
Well, do you want to raise funds? Then light a green candle at midnight, place it in the middle of the table, first lay a clean tablecloth on the table (it is recommended to take a green or white tablecloth).
Now carefully watch the burning wick of the candle (a few seconds will be enough). You need to catch the moment when the green candle does not smoke, does not smoke heavily, or crackles. Got caught? Then look directly at the fire and say:
“The green flame is flaring up, money is coming to me. Amen!".
Did you say these words? Please note that they must be pronounced three times.
Did the candle smoke or crackle during the ceremony? Then your wish will certainly come true - you will soon have money. If it didn’t work out, and the green candle began to crackle and smoke, then the ritual can be repeated the next day.
How to make a money talisman from a green candle?
This is a simple money ritual with a green candle, as a result of which you will get a small talisman that you need to put where you keep your money or in your wallet, wrapped in a white cotton cloth. It’s better to do it on the waxing Moon, accompanied by colorful visualizations.
For the ritual you will need a clean white sheet of paper, 7 10-kopeck coins, 2 green candles, cinnamon and cloves. Light two green candles and, crossing them together so that the wax flows down more actively, hold them over the coins. The wax gradually fills the coins.


