Leaf panel template. Crafts from flowers and leaves: in summer and all year round
An autumn girl was walking, teasing with her outfit,
Warming in the velvet light.
And with that girl, having met the gaze,
We suddenly forget about summer...Svetlana Efimova 2
D Good afternoon, my dear friends!
Today, I share with you my new experience in needlework. It will be a picture of autumn leaves, I wanted to call it: girl - autumn. Actually, I didn't plan to do this job. But at work, there was an annual competition of crafts made from autumn materials. The manager asked me to make some kind of craft from natural materials. As a boss, would you refuse a request? And I wasn’t going to refuse this request, it’s handicraft! And I really like handicrafts. This is what I ended up with.
Painting of autumn leaves: girl – autumn.
For work I took:
- Fibreboard – 50 x 40 cm;
- Natural materials - ears of wheat, a bunch of autumn leaves, twigs, acorns, rowan berries, flowers, grass, millet;
- PVA glue;
- Acrylic matte varnish;
- Acrylic paints - gold, bronze and white;
- Watercolor paint – yellow.
As a basis for the picture, I took a piece of fiberboard measuring 40 x 50 cm. For the front side of the picture, I chose the back side of the fiberboard, i.e. not smooth))) There was a scratch right in the middle, but it doesn’t matter, I’ll decorate it.

I decided to decorate the picture frame using the terra technique. For this, I needed a mixture into which I would press ears of wheat and millet. Usually putty is used for this, and I was sure that I had it. But during the whole break, I didn’t find it, it turned out that it was over, but I didn’t want to go to the store... But I had dry glue for tiles and I decided to experiment. Let the glue be the basis of the mixture. I needed to get a medium-thick mass into which wheat and millet could be pressed. In this case, the mixture should eventually harden and stick firmly to the frame. And I did this, mixed: tile glue (6 parts) + flour (3 parts) + PVA glue. I actually used PVA instead of water. That is, as soon as the mass became the consistency I needed, I stopped adding it.

Frame mix
First, I generously coated the canvas with PVA glue along the entire perimeter, in the place of the future frame. After letting the PVA dry a little, I began to apply the experimental mass, in a layer of about 1 cm, in advance.

Applied the base for the frame
And she immediately began to press ears of wheat into this mass, and then sprinkled it generously with millet. She pressed everything in so that the wheat and millet were pressed in, but at the same time were clearly visible.

Pressed wheat and millet

Pressed wheat and millet
Then, she put the picture on its edge and shook off the excess millet.
After about 30 minutes, I mixed PVA glue and acrylic varnish in equal proportions and covered the wheat and millet with this composition. When you apply this composition, it is white, but after drying it becomes transparent.


Covered with a mixture of PVA glue and acrylic varnish
When the mixture of glue and varnish had dried, I painted the frame generously with gold paint. I painted with a wide brush. And after drying, I went over the ears of wheat with bronze paint.
Now, finally, the picture itself of autumn leaves. I want to say right away: I am not friendly with drawing, and especially with painting with paints! I painted it as I thought.))) I poured white acrylic paint into a separate container and diluted it lightly with water, so the paint would be applied more evenly. Then, I painted the surface of the fiberboard (without touching the frame). Thus, I prepared the canvas by lightly priming it. By the way, in the end, it looked like the painting was made on canvas. Once the white paint had dried, I began painting the background of the painting. I made all the strokes smooth, semicircular or something (I don’t know what artists call it). In the middle, closer to the top, I painted it with white paint again. Then she began to darken the background, bringing it closer to the edges. To do this, I gradually began to add gold to the container with white acrylic paint. The further to the edges, the more gold I added, making the tone darker.

Painted the fiberboard while making the background
After looking at the result, I wanted to add a yellow tone. I didn’t have yellow acrylic paint, so I took watercolor paints. Mixing white and yellow watercolor paints, I went right behind the edge of the white background. That's it, I put the painting aside until the paints were completely dry.
For this work, I collected a few different autumn leaves, thin birch branches, and grass. Also, twigs with rowan berries, acorns, flowers from narwhal flower beds (luckily they weren’t fined))). But my husband found the highlight for me. While helping to collect acorns, I found a sleeping dragonfly (it’s good that it was no longer alive).
I placed the leaves and flower petals between the pages of the books, so they stayed with me for about two days. I had them in my work, only slightly dried out.
But first, I drew a silhouette of a girl on paper (I found it on the internet) and applied it to the picture to determine the size.

I drew a silhouette of a girl
Then she cut off the skirt and painted the girl with gold paint. It could have been acrylic, but I had gold spray paint))). From the waist, I cut off a small pointed piece, these will be eyelashes.

Painted the “girl” with gold paint
Then, she glued the girl to the place that she had decided on in advance. I didn’t take pictures of my further steps, because... I'll tell you in words.
She formed a wreath for the girl from grass, leaves and twigs with rowan berries. Everything was glued using a mixture of PVA glue and acrylic varnish (in proportions 1/1). In the future I used this composition. Let me explain why I used exactly this composition. Before I started making the painting, I scoured the Internet in search of how to preserve the color of autumn leaves. And I found information that the color and elasticity of autumn leaves can be preserved, including with the help of this composition. Other options did not suit me (I won’t write about them).
I continue. The skirt was made from leaves. I glued it in rows, starting from the hem, going higher.
The bodice of the dress was made from flower petals.
Since, initially, there was a scratch on the fiberboard, I glued a twig with leaves in its place. And she glued the dragonfly, spreading its wings. I really liked this dragonfly.

I made a girl, glued a dragonfly and a twig
On both sides of the girl, I glued twigs and leaves, trying to imitate trees. I started gluing from the top level, then, going lower, I glued the next branches and leaves.
And in the lower left corner I glued panicles, small twigs of flowers and a few acorns.
And further! While examining the work, I discovered that there were unpainted areas on the frame. Therefore, I once again went over the frame with gold paint.

Glued grass and acorns
Then, I went over all the leaves, twigs and flowers again with a mixture of glue and varnish.
That's all. My painting of autumn leaves is ready. Of course, this is most likely not a painting, but a panel... But let it be a painting, I want it so bad)))

Friends, if you found my master class useful, share it with your friends!
Interior decor is a fun activity, especially if you know how to do something with your own hands. The wall panel will become a real decoration of the living room, kitchen or bedroom. Depending on the time of year, you can change the subject of your painting. In this article you will learn how to make a leaf panel on an autumn theme.
Materials:
- leaves of different trees;
- foil;
— aerosol paint;
— a base for a panel made of laminated chipboard or canvas stretched over a frame;
Panel of autumn leaves, step-by-step master class
Collect fallen leaves from the street and clean them of dirt and dust. After this, wipe them well from moisture with a napkin. Prepare the base for the panel and attach the leaves to it. Immediately figure out what your composition should look like.


Take some black spray paint and apply it on top of the foil. After the paint has dried, you can begin to create shades. To do this, start wiping off the paint with a scraper. Try not to damage the foil itself, but don’t worry too much, you can fix everything with a black felt-tip pen or marker. The autumn panel is ready.

See photo of the leaf panel:


An autumn panel of leaves will harmoniously fit into any interior and will become an original gift for loved ones. Using the same principle, you can try to make a winter panel using Christmas tree needles. Modern needlewomen create real masterpieces with their own hands, but why are you worse? Experiment and you too will get beautiful handmade decorative items.
If in the summer or early autumn you were not too lazy to collect and, then in a free minute you can make with your own hands amazing ones in their beauty, ease of execution, and flowers on a transparent background.
You can also attract children to your creativity, because making such paintings is no more difficult than the ones they are already familiar with. For most of the “transparent” paintings from our selection, you will only need dried leaves and flowers, double glass and a frame or canvas.
But even if you didn’t have time to dry the leaves and flowers, don’t worry, you still have a chance to make one of these stylish paintings with your own hands. Use the leaves of any house plants and, of course, your imagination!
15 paintings of leaves and flowers that you can make with your own hands
Tropical leaf painting
.jpeg)
Photos of paintings made from leaves and flowers with your own hands nodenhome

Photos of paintings from dried flowers Studio Maarten Kolk & Guus Kusters

DIY paintings of leaves and flowers

Photos of paintings from dry leaves and flowers interiorsbystudiom

DIY paintings of leaves and flowers. Photo


DIY leaf paintings. Photo

Paintings from dry leaves and flowers

Picture of dried flowers. Canvas

Dried flower painting
.jpg)
DIY paintings from dried leaves and flowers

DIY paintings from dry autumn leaves
Simple Autumn Decoration: Dry Leaves Painting

In order to make such a picture from dried autumn leaves, you will need a color printer.
While walking in the park, collect your favorite autumn leaves. Dry them between the pages of books, then make a copy on a color printer.
Glue copies of dry leaves to the canvas and hang the finished paintings on the wall.
DIY leaf paintings

DIY leaf painting.

You will need:
- frame;
- double glass;
- leaf of your favorite plant;
How to make a painting from leaves with your own hands

Fold the thin leaves at a 45º angle and weave them together as you see in the picture below. Everything is very simple. You can also figure out on your own how to arrange or weave the sheet in your future painting. It all depends on your personal taste.


And, voila, you have a unique, original, and most importantly, hand-made painting of leaves. All that remains is to find a place to hang it.
As you can see, paintings from leaves and flowers are not so difficult to make with your own hands. Even a child can cope with this task.

 My daughter Katya, wearing this wreath, became the “Queen of Autumn” in 2007!
In my deep conviction, our education, starting from Soviet times, has been built on the following principle:
“If you didn’t complete the teacher’s assignment as a child, you will still do it when you help your child” :-).
So, dear mothers, since we met on this page, it means your child has been given the task of bringing an autumn craft. Did you guess right?
I have no doubt that you will now breathe a sigh of relief! I've collected a bunch of ideas, and your fall leaf craft will definitely delight your teacher! 🙂
In order not to confuse the entire experience of mankind in this matter, I tried to combine collages and applications that were similar in meaning.
Let's begin!
Portrait of autumn leaves

 I didn't find many examples of people using natural materials, but there are enough for inspiration. The face can be glued together from several fragments and an oval of the desired shape can be cut out.
For a hairstyle or a hat, we choose coarser plants. You can use spikelets or stems of dried herbs.

Here are some more very cute characters with “mood.” Mommies. Don't try to find the right shape of leaves. To make the head, simply cut out a circle or oval from any sheet of paper. If you don't have dried narrow blades of grass for your hair, cut a large leaf into thin strips.
I also found babies for them, though not from leaves, but from acorns. To make them quickly, you will need a glue gun and a permanent marker. The scarf can be made from scraps of felt or any other bright fabric. Incomparable kids!

Birds-butterflies-animals
This is the most common type of autumn creativity. We make cute animals and insects from dry leaves of different colors and shapes. The hardest part to find is leaves in contrasting colors, as almost everything turns yellowish-brown once they dry out.
To have a choice, dry not only autumn ones, but also green leaves too, then the color palette will be much wider and you will definitely get something from this. By the way, dry rose petals look great on a peacock's tail, take note:


Here are simple and expressive birds. By the way, leaves with small flaws look quite harmonious; there are always many unexpected spots in the plumage of birds. a couple of lines with a pen, and the beak becomes like a beak. Chickens are made in a minute, you can make a whole brood.

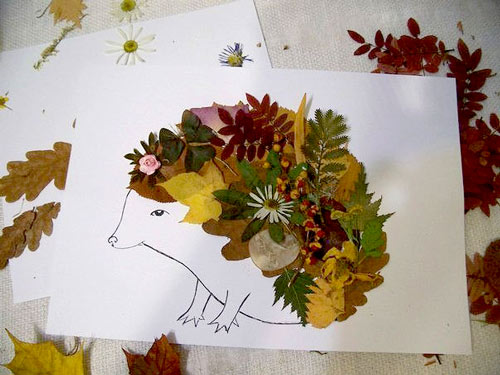
Impossibly handsome... He bit off an apple :-). This collage is made using colored cardboard pieces. My version of the hedgehog is on the right in the frame. We also sprinkled semolina porridge on PVA glue here and there. I hope the teacher likes it...

Here is another option for those who can draw these simple drawings. Draw the lion's head and fish large - on the entire landscape sheet. Cardboard is preferable. The rest is clear from the illustration!


Information for educators and teachers! , there is a lot of useful and accessible stuff there!
 More from ash seeds...
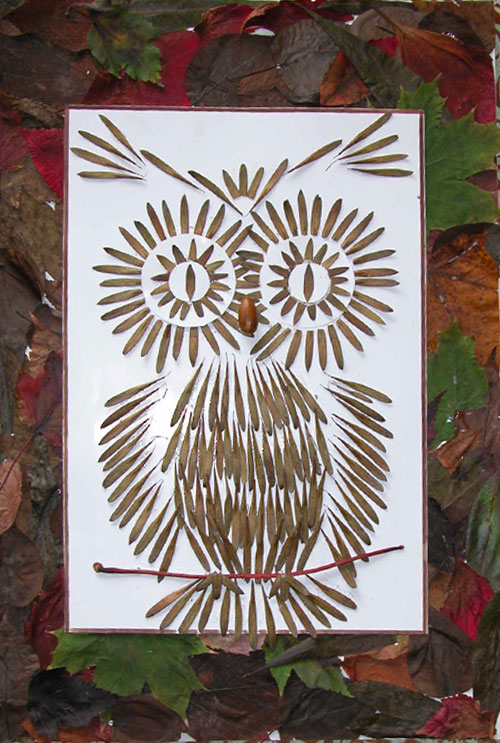
Here's our latest craft. This is a beautiful owl in a frame of autumn leaves. Leaves were glued onto a sheet of A3 cardboard around the perimeter with an overlap using PVA. They didn’t try very hard, because then the excess was cut off along the edge, and another sheet was glued to the inside with an owl applique made from ash seeds, so there’s no need to try too hard along the line. Our beak is made from half an acorn. I think it's good...
From these seeds you can come up with a lot of interesting things (application) - roofs of houses, a field of dry grass, animal skin or bird feathers. The work is long and painstaking, but if you did not have time to collect and dry the leaves, there is a way out. They tore it from the tree and immediately glued it on.
Here are some more examples for inspiration.

A mosaic of dried leaves and flowers can be used to complement the design. This looks very nice:


Dry leaf hairstyle
In these pictures of their leaves, lips, eyes and even eyelashes are cut out, but the face can simply be drawn, without laying out thin twigs, but we make a mop of hair not just from individual leaves, but from whole twigs with dry leaves. The fact that they are dried not in one plane, but in volume, gives our work a special charm. Well, what a beauty... I found it on my favorite social networks and decided to post it here so that the idea wouldn’t get lost.

Cutting figures from fallen leaves
I highlighted these collages separately because autumn leaves are used a little differently - they are just material for cutting out simple shapes and letters. This needs to be done BEFORE the sheet dries, otherwise it will crumble . First we cut it out, then dry it in the usual way in an old book or between sheets of newspaper. This way you can cut out entire words and phrases.
To ensure that the letters are neat, print them on a printer of the desired size.
Now we put copy paper on the autumn sheet, with your printout on top. We outline so that the drawing remains on the yellow sheet. All that's left to do is cut!
This way you can make not only letters of the alphabet, but also simple silhouettes (animals, houses, clouds).


Interesting examples of paintings from autumn leaves:
Thuja twigs are used here, and the desired shape for the applique is cut out of dry leaves. For the house you will need thin dry twigs, but you can also assemble them from matches.


You can get an idea from this picture. The woman's profile is simply drawn, but the leaves in her hair could be not paper ones, but real ones ! Is it difficult to find them in different sizes and shapes to make such a beauty?
Here are some cute owls. A silhouette is cut out of paper, then we glue the leaves, as shown in the figure, and at the end of the work, we trim all the protruding excess along the contour of the cardboard blank. We make the eyes from paper of a contrasting color. 
Multicolored collages
Autumn leaves are so beautiful on their own that they look great framed and without any plot. Look how beautiful it is! The first layer is dark leaves, then put the contrasting and most beautiful ones, so you will feel the volume. Everything is framed.
I also liked the idea: on a collage of leaves we put a sheet of thick cardboard, in which a letter or a simple figure is cut out with a stationery knife.


Another unusual technique, which for some reason is called "iris folding"
, I discovered on the “Country of Masters” website. A detailed master class is here: http://stranamasterov.ru/node/99098


Photo frame
For the autumn exhibition, you can make frames for photographs and for the design of essays and poems on the theme of autumn. Here are the options I found. In my opinion, it is very simple and effective. 
Interior decoration
Crafts made from autumn leaves can be very romantic.
To get such a tree, you need to dry the leaves in advance, and then reattach them to a beautiful branch with transparent adhesive tape.

We work with a hammer...
Unusual technique. I saw it on an American website, translation and . The idea is that fallen leaves are placed between watercolor paper and a napkin and carefully tapped over the entire surface with a hammer so that the coloring pigment remains on the paper.


Roses from autumn leaves - master class
Among the traditional crafts made from leaves are wall panels. Depending on the level of their execution and the materials used, the panels can become an interesting craft for a school exhibition or designer decor for a living space. Watch and read how to make an original panel of autumn leaves with your own hands in the master class.
Materials
To make a panel you will need:
- autumn leaves of different shapes and sizes;
- thin aluminum foil;
- spray adhesive;
- hard brush;
- black spray paint;
- metal scraper;
- wooden panel base or canvas stretched over a frame.
Step 1. First, you need to clean the collected leaves from dust and dirt. To do this, wipe them with a damp cloth or soft cloth and leave until completely dry. Place the leaves on a wooden base or canvas for arrangement.
Step 2. Spray glue onto the base of your panel and apply a thin layer of it to the front side of the leaves collected for the panel.
Step 3. Place the leaves on the wood or canvas and gently press them into the surface with your fingers. Be sure to smooth the leaves so that there are no creases. Please note that all the veins should be turned towards you. This is necessary to give the panel texture.
Step 4. Spray glue on top of the already glued parts and carefully place a piece of aluminum foil on top. Smooth it with a brush so that the outlines of the leaves and veins are visible.
Step 5. Apply a thin layer of black paint over the foil. Let it dry completely.
Step 6. Wipe the surface of the panel with a metal scraper. This action will give the desired texture and emphasize the depth of color. If, in addition to the top layer of paint, you have torn off the foil in places, do not worry, this defect can be easily eliminated with a black marker.


