Diagnostics of RAM. Testing RAM using programs
Malfunctioning RAM is a common cause of . If your computer begins to regularly display such a blue screen, then it makes sense to check the RAM for performance. Fortunately, this is done very simply. In this material we will look at two ways to test memory, using the built-in mdsched utility and using the third-party program Memtest86+.
Checking the health of RAM using mdsched
The simplest option for checking RAM functionality is to check it using the mdsched utility. This utility is built into the Windows operating system and is present in all its modern versions, including Windows 7, Windows 8 and Windows 10.
In order to check RAM using mdsched, you must first. To do this, press the Windows + R key combination. Next you need to enter the command “mdsched” and press the Enter key.
This will launch the mdsched utility. This utility will offer you two options for checking RAM. If you select the first option, the computer will restart and the scan will begin immediately, and if you select the second, the scan will be scheduled the next time you turn on the computer. You can choose any of these options, there is not much difference between them.

One way or another, after the next boot of the computer, the “Windows Memory Diagnostic Tool” will launch. By default, memory will be checked in Basic mode.

If you want to conduct a more detailed check of the performance of the RAM, then you can interrupt the current test using the F1 key and select a different test mode. In total, the “Windows Memory Diagnostic Tool” offers three modes for checking RAM performance, these are:
- Basic mode - the simplest and fastest test, includes checking MATS+, INVC, SCHCKR;
- Normal mode - a more detailed check, including checks for LRAND, Stride6, SCHCKR3, WMATS+ and WINVC;
- Wide mode – the most detailed test of RAM, which includes tests MATS+, Stride38, WSCHCKR, CHCKR4, WSride-6, ERAND, WCHCKR3, Stride6 and CHCKR8.
In addition, while running the Windows Memory Diagnostic Tool, you can disable or enable the memory cache check. To do this, you must first press the F1 key, then the Tab key, and then select from three options:
- Included;
- Turned off;
- Default;
Please note that the more detailed verification method you choose, the longer it will take.
Checking the performance of RAM using Memtest86+
You can also check the performance of RAM using third-party programs. One of the most famous programs of this kind is the Memtest86+ program. Memtest86+ runs exclusively from the boot disk, so it can be used even when the operating system is not installed or is not running.
You can download an ISO image of a boot disk with this program on the website. You can also download Hiren’s boot CD (), which includes Memtest86+. You can read about how to burn a bootable ISO image to disk.
Memtest86+ is very easy to use. Boot from the boot disk and run Memtest86+. Immediately after launch, the program begins to check your RAM for functionality.

If any errors or malfunctions are found, red messages will appear on the screen. If there are no errors, the message “Pass complete, no error” will appear.

To access the Memtest86+ program settings, you need to press the “C” key on your keyboard. To complete the test, press the “Esc” key.
Random access memory or RAM is one of the most important components of a personal computer. Malfunction of modules can lead to critical errors in system operation and cause BSODs (blue screens of death).
In this article, we will look at several programs that can analyze RAM and identify faulty modules.
GoldMemory is a program supplied as a bootable image with the distribution. Works without the participation of the operating system when booting from a disk or other media.

The software includes several memory test modes, can test performance, and saves test data to a special file on the hard drive.
MemTest86
Another utility that is distributed already written into an image and works without loading the OS. Allows you to select test options and displays information about the size of the processor cache and memory. The main difference from GoldMemory is that there is no way to save test history for later analysis.

MemTest86+
MemTest86+ is a revised edition of the previous program, created by enthusiasts. It features higher testing speed and support for the latest hardware.
Windows Memory Diagnostic Utility
Another representative of console utilities that work without the participation of the operating system. Developed by Microsoft, Windows Memory Diagnostic Utility is one of the most effective solutions for identifying RAM errors and is guaranteed to be compatible with Windows 7, as well as newer and older systems from MS.

RightMark Memory Analyzer
This software already has its own graphical interface and runs on Windows. The main distinguishing feature of RightMark Memory Analyzer is the priority setting, which makes it possible to check RAM without loading the system.

MEMTEST
A very small program. The free version can only check the specified amount of memory. In paid editions, it has advanced functions for displaying information, as well as the ability to create bootable media.

MemTach
MemTach is professional-level memory testing software. Conducts many tests of RAM performance in various operations. Due to some features, it is not suitable for the average user, since the purpose of some tests is known only to specialists or advanced users.

SuperRam
This program is multifunctional. It includes a RAM performance testing module and a resource monitor. The main function of SuperRam is RAM optimization. The software scans memory in real time and frees up space not currently being used by the processor. In the settings you can set the limits at which this option will be enabled.

Errors in RAM can and should cause problems with the operating system and the computer as a whole. If you suspect that the cause of the failure is the RAM, then you need to test using one of the programs given above. If errors are detected, sadly, you will have to replace the faulty modules.
Problems with random access (physical) memory (hereinafter referred to as RAM) can cause many problems. If your personal computer often freezes, a blue screen appears - this may be due to internal errors in the RAM. In this case it is recommended test. For this purpose in Windows there is special utility, which will be discussed in this article.
As a rule, when problems are suspected, the operating system independently launches the necessary check. However, users can run the test manually.
Running testing through the Start menu
In standard " Control panels» Windows 7 does not have sections dedicated to testing RAM. However, users can run the test using the built-in search in the " Start" To do this, do the following:
After these steps, your personal computer will immediately restart and RAM testing will begin.
Launch using the Run dialog
An alternative option is to run RAM diagnostics for errors. Allows you to start testing RAM without having access to a mouse or touchpad.
Follow the instructions:

Running an error test manually
If, on the contrary, you do not have access to a keyboard, you can launch this application through Windows Explorer:

After rebooting the computer
After your PC is rebooted, the " RAM Diagnostic Tool" You don't have to press anything - the scan will start immediately.

For experienced users! If you understand how RAM works and understand how the test is carried out, you can call up the settings menu and set your own parameters. To do this, use the F1 key. Here you can change the following configurations:

Control here is only using the keyboard: using shooter You can select the desired value and use the Tab key to move to the next characteristic. When you're done with your settings, press F10 to start checking for errors.
Report
When testing is complete, the computer will restart again. Windows will generate a report of all errors found. You can familiarize yourself with it and show it to service center employees or computer specialists.
Additional software
In addition to the standard solution from Microsoft, users can download other testing programs from third-party developers. The most popular such application is Memtest. It can be downloaded for free from the official website http://memtest86.com/.
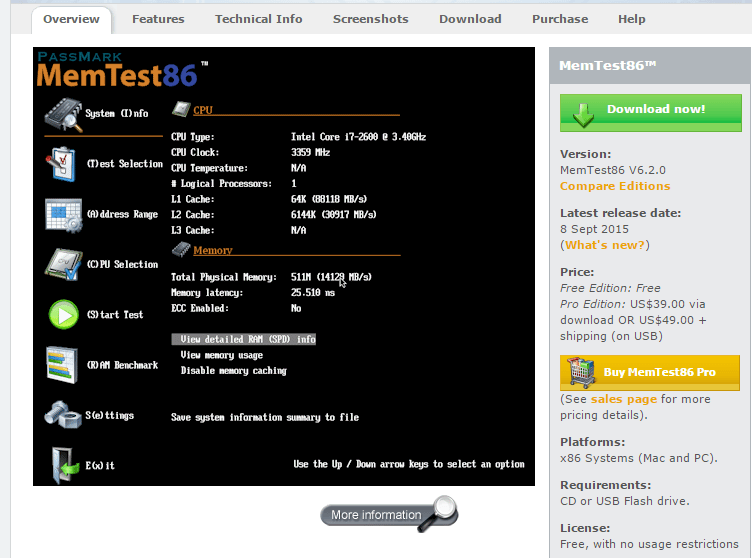
Upload the image using the " Download now!" and create a bootable USB flash drive. After this you can run the utility MemTest86 on any personal computer (even one on which the operating system does not run) and perform all the necessary checks.
Video on the topic
Probably every PC user has encountered the problem of RAM failure; as a rule, this problem manifests itself in the form of “Blue Screens of Death”. In order for your “axis” to leave its working state, just one faulty RAM stick is enough.
I often encountered this problem, and my friends often did, below I will provide several methods by using which you can diagnose your RAM for its working condition. Let's look at the most popular programs for testing RAM. You can download the program for testing RAM below. We won’t consider how to test RAM using these programs; I think you’ll figure it out yourself; there’s nothing complicated there. If you have any questions, write in the comments and I will try to answer!
Programs for testing RAM
1 Memtest
The operating principle of this software is based on the fact that certain information is written to each sector of RAM, which is then checked for errors by the program. Testing RAM using Memtest is carried out in several stages, which makes it possible to conduct high-quality testing and identify damaged blocks as lists in BadRAM format. The program can be used either using a regular CD or a flash card. Naturally, before testing your RAM, you need to set the BIOS to boot from the device on which Memtest was installed. You can read about how to create a bootable USB flash drive.
Download Memtest from the official website— http://www.memtest.org/
2 HeapMemView
This is a kind of small software that provides the ability to control the use of RAM, as well as test “broken” blocks using various techniques. As for me, such small software provides maximum detailed information regarding the performance and functionality of your RAM. I would include the following points as the key features:
Simple and intuitive interface;
Works on OS starting from Windows 2000;
“Weighs” no more than 70 KB;
No installation required and can be launched from removable media;
Provides maximum information;
Free to access;
It will be useful for software developers, since it is possible to monitor the use of RAM by several processes.

Download HeapMemView from the official website a - http://www.nirsoft.net/utils/heap_memory_view.html
3 Geekbench
This is a unique and powerful program, with the help of which it is possible to conduct high-quality and highly accurate testing of not only your RAM, but also your processor. Testing conducted by Geekbench falls into the reference category. The only drawback of the program is the fact that it can only be used on Windows operating systems starting from version 7. The Geekbench program is very simple and straightforward to use; there is no need to install additional software. A significant positive quality of Geekbench is the speed of its operation, since after launching the program, it scans the health and performance of the CPU and RAM, and this process is completed in no more than 1 minute. It is possible to compare your tests with the results of other users using the global network.

Download Geekbench from the official website— http://www.primatelabs.com/geekbench/download/windows/
If we can find out on a computer that the hard drive needs defragmentation, then we will not identify significant problems in the RAM of the computer or laptop. RAM-related errors are difficult to fix. A more detailed analysis can be obtained using third-party programs, but do not underestimate Windows 10, which develops instantly. In this guide, we will look at ways to diagnose and check RAM for errors, both in the standard way and check for errors using the popular MemTest86 utility.
Possible computer RAM errors:
Before throwing sins at RAM, we need to know approximate errors and symptoms that will help us move in the right direction. We will analyze the most popular symptoms of computer or laptop RAM errors.
- Your computer beeps several times during startup.
- Crash or under heavy load in 3D games.
- The computer keeps rebooting.
- Problem accessing and working with files.
How to check RAM in Windows 10 and Windows 7
- Enter in search mdsched.exe, in later Windows systems, press or the combination of Windows + R buttons.
- In the next window, select the mode that is currently suitable. (The tool also offers the option to schedule a test on the next reboot if you are unable to close your applications and restart immediately).

- As soon as the computer restarts, it will start in the Windows Memory Diagnostics environment, and tests will immediately begin running in standard mode. In this mode, the tool will run all the checks available in the main mode, in addition to LRAND, Stride6 (with cache), CHCKR3, WMATS+ and WINVC. You can also select scanning parameters by pressing the key F1.

- After clicking F1, the test selection will appear: basic, regular, wide. Below you can enable the cache and number of passes. In the expanded "Wide" test mode, more tools will be available, which will allow you to thoroughly diagnose RAM performance. Disabling the “cache” will allow direct access to RAM, which will improve the quality of diagnostics. When you have configured the settings for scanning, click F10 and it will start checking the RAM.

Checking test results
While you can see the status during the scanning process, once the test is completed, your computer will restart automatically and you will need to use Event Viewer to see test results to see if you have a bad RAM module.
- Press a combination of buttons Win+R and enter eventvwr.exe to open Event Viewer.

- Expand the folder " Windows logs" and right click " System", select from the menu " Find"
- Enter "Find" in the search field MemoryDiagnostics-Results.


- In Event Viewer, double-click the source MemoryDiagnostics-Results and look at the result, if there are no errors, then you can not blame the RAM of your laptop or computer.

What to do if there are errors when diagnosing RAM?
- Your best bet is to replace the RAM stick.
- You can try cleaning the contacts from dust on the bar and in the connector.
- Try inserting one strip into different slots to identify the problem in the module or slot itself.
How to test RAM with MemTest86
If you checked the RAM using Windows and did not find any errors, but you are sure that there are errors in the RAM, then use the MemTest86 program. Select on the website, download a bootable CD image or for a USB flash drive to run the program from under BIOS.

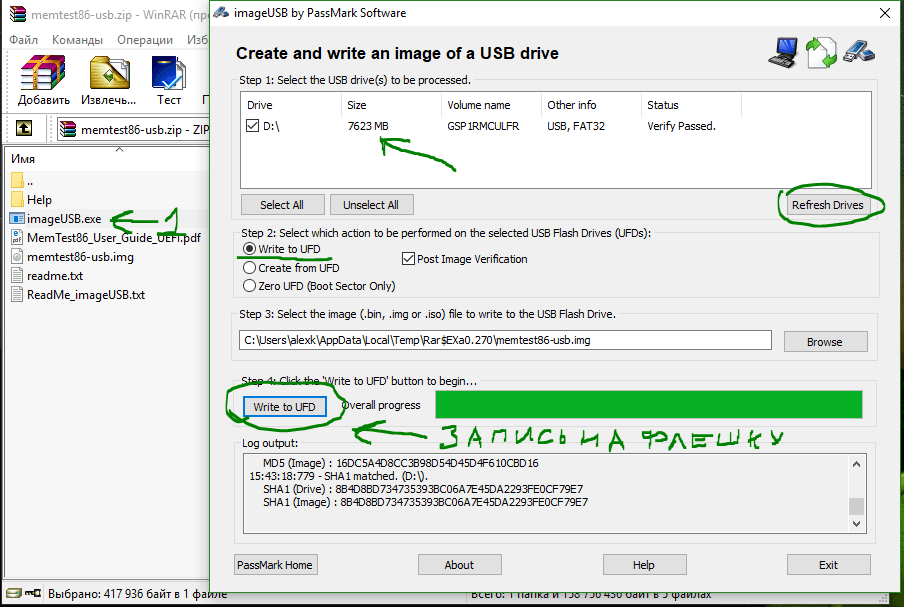
After downloading, open the archive" zip" and run the file " imageUSB.exe" to start the program.
- Insert the formatted flash drive into your computer and click " Refresh drives", so that the program sees the drive.
- Select mode " Write to UFD".
- This is the image in the archive folder" MemTest86", which will be written to the flash drive.
- Click " Write to UFD" to write to a USB flash drive. After everything has been done, you can restart the computer and it will start under bios with the MemTest86 program and begin diagnostics.
- When you restart your computer, your computer's RAM will be checked.

- If errors appear, they will appear in red at the bottom, like in the picture.

The guide was covered on Windows 10, but the RAM Checker has been available for years, which means you can also use it on previous versions, including Windows 8.1 and Windows 7.


