Beautiful crafts made from dough with your own hands. Ideas for simple DIY puff pastry crafts
Modeling is a great way to develop fine motor skills in children. However, kids love to taste everything, so traditional modeling materials such as clay or plasticine are often not suitable for activities. There is an excellent alternative - salt dough: it is very easy to sculpt from it, it is much softer and more pliable than plasticine, and at the same time, it is absolutely safe for the child.
Any product can be made from this material. Young children (from one and a half years old) can, under your guidance, try to create simple figures from salt dough, and an older child can try to create any crafts, souvenirs or toys that their imagination and skill are capable of.
How to make salt dough?
To top off all the advantages of this modeling material, it is also very affordable, as you can quickly make it in your kitchen.
There are many recipes for making salt dough, so everyone has the opportunity to choose the most convenient and simple one for themselves.
Here's one way:
- take a glass of salt (about 200 g), add 2 glasses of flour, and diluting with water (more than half a glass), knead the dough;
- You will determine the degree of its readiness as you go: if the dough sticks to your hands and stretches too much, add a little more flour, and if it crumbles, it means there is not enough water;
- try rolling a ball and making several indentations in it (the finished dough will hold its shape well without spreading);
- when kneading, it is recommended to add a little (tablespoon) vegetable oil;
- for sculpting relief figures, add 2 tablespoons of starch;
- Wrap the well-kneaded mass in plastic and put it in the refrigerator for several hours;
- toys made from salt dough can be painted ready-made, or you can prepare colored dough at once (make it in several separate containers and add food coloring, instant coffee, beet or carrot juice, acrylic or gouache paints, etc. when kneading.
You can watch special master classes if you are going to sculpt for the first time.
The goal of modeling classes for children should be to develop an interest in this art, to become familiar with all the properties and capabilities of the material: the dough can be torn, crushed, flattened, rolled, crumbled, and dried. Teach your child to come up with stories, make toys or figurines of current characters for them, and combine them into whole large compositions. This will help you not only develop and improve your children’s fine motor skills, but will also develop their imagination, imagination, and speech.
Making simple crafts with kids
You should sculpt on a special modeling board or baking sheet. Also prepare a small rolling pin for rolling out the dough, a brush (you will sometimes have to moisten the dough with water), stacks - sticks for working with plasticine or dough, other details, depending on the direction of your work (paints, molds, decorations, etc.).


If you are just starting to work with a small child, choose the simplest patterns and master classes so that it is easy and interesting for children to sculpt products.
First, you can do something yourself, demonstrating it to the child, then perform the actions with his hand, and then let him try to create a toy from salt dough with his own hands.

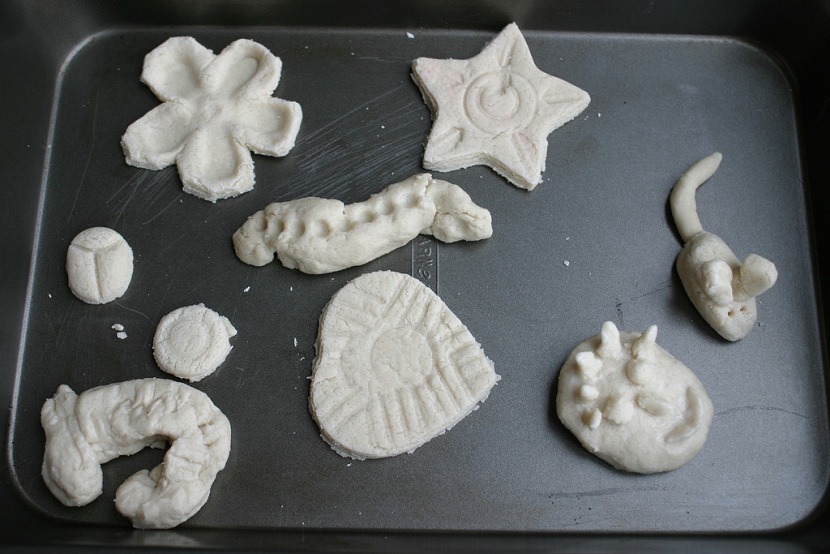
Together with your child, create a fairy tale about your character. For example, it is very easy to make a small cute caterpillar or even its whole family, and then play with them.
In the same way, other toys are very easily created - octopuses, snakes, cats, fish, birds, vegetables and fruits. You can cut out blanks from cardboard, and then trace them on the dough.
A very simple master class on making salt dough figurines as Christmas tree decorations will also be available for little children.
As a memorable home souvenir, you can make prints of the child's feet and hands, and on the back side sign how old the baby was.

Making more complex toys
There are master classes that show that you can create more complex toys, figurines, or even entire compositions with your own hands. For example, try with older children to make a cute hedgehog or the whole hedgehog family.
In the same way you can make a sheep, an owl, and any other three-dimensional toy.
Master classes will help you create even entire paintings from salt dough, which will become not only an excellent decoration for your home, but also a wonderful original souvenir as a gift. It is better to sculpt pictures on fabric, foil or painted cardboard. When the craft is completely dry, paint it and varnish it.
One of children's favorite activities that helps develop imagination and fine motor skills is modeling with salt dough. This material allows you to sculpt both simple figures and create complex paintings. With children, while working with the test, you can easily and playfully learn the alphabet, shapes and colors. But not only children love to sculpt; for many adults, this activity has become a favorite hobby that helps them realize their creative abilities or simply take a break from the everyday hustle and bustle.
How to properly organize the work process
It is necessary to determine in advance what product you plan to sculpt and prepare all the necessary materials. If a child will participate in the creative process, then you should remember that children are rarely distinguished by long-term perseverance. Make sure that a program is prepared for the child in advance: salt dough modeling can alternate with five-minute musical exercises, as well as finger gymnastics. It is important to remember that sculpting figures from salt dough is a creative process and cannot be rushed.
Before you start creating, you need to arrange your workplace: it’s a good idea to cover the area where you plan to sculpt with film or paper. You need to prepare a board, rolling pin, vegetable oil or starch for your hands in advance so that the dough does not stick. To create various reliefs, additional equipment is needed: various objects with which you can make a design on salt dough, for example, buttons, pasta, scissors. Threads can also be useful in the work to make braids for dolls or a mane for a horse, and needles are used to translate pictures. Also, after the product has dried, you will need a brush for painting, varnish or glaze.
How to choose the right ingredients and make the dough
To make the dough you will need flour, salt and water. It is better to choose premium wheat flour; it contains gluten in the required quantity so that the dough is plastic and does not crumble. Salt is added so that the dough holds its shape well; it is advisable to find the finest salt - extra class. The water must first be boiled and filtered. To make a voluminous and high-quality sculpt from salt dough, the following recipe is used: flour, salt and water are taken in a 2:1:1 ratio, first salt is poured into the flour, mixed well, and only then water is gradually added. If desired, you can add a couple of tablespoons of vegetable oil or PVA glue.
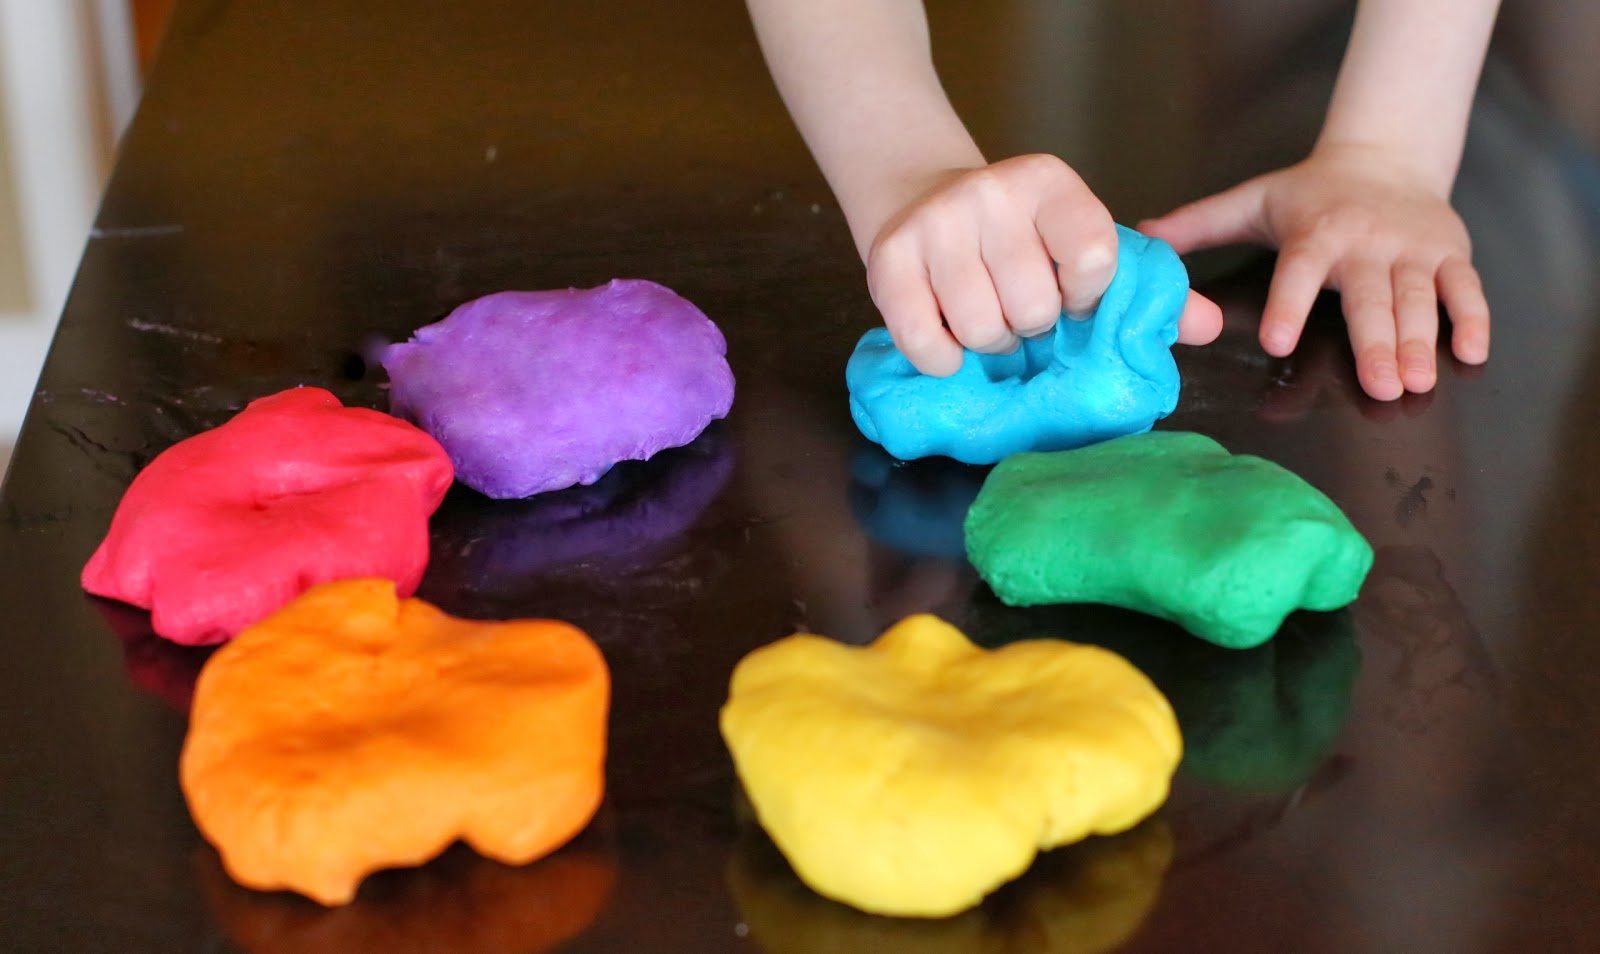
How to make colored dough
To make colored fakes, you can first mold them and then paint them. But modeling from salt dough is much more interesting and easier if it is initially colored. You can color it by mixing it using both food and natural dyes. The brown color comes from cocoa. Using beetroot juice adds many shades to the dough: from pink to burgundy depending on its concentration, orange will give the dough carrot juice, and red - cherry or pomegranate. Green can be made by pureing spinach or broccoli, while yellow can be achieved by using lemon or saffron. When coloring the dough, it should be taken into account that when it dries, the color becomes less saturated, especially for red shades.
Adding shine and fixing the color of the product
After the craft has dried, it is covered with glaze. It's easy to prepare it yourself. You can use a salt solution for coating; for this, 2 tablespoons must be completely dissolved in 50 grams of water. The resulting glaze is applied with a soft brush in several layers gradually, allowing each layer to dry thoroughly. Another way: take two egg whites and stir in 100 grams of water. Apply also with a brush. After glazing, the product acquires a pleasant beige-brown color. It should be remembered that it is not recommended to glaze colored works; it is better to coat them with varnish to fix the color. It is better to use liquid varnish, since thick ones tend to crack over time, and the easiest way is to use aerosol varnish.
Simple step-by-step salt dough modeling for children and beginners
Cats are among the most beloved pets by adults and children. Figurines with their image are strong amulets that attract good luck and harmony to the house. Modeling cats from salt dough can be done very easily and quickly, even by children, if you use the following instructions.
Making the dough
For the dough, you need to take flour and salt in equal quantities of 150 grams, pour into a cup and mix thoroughly. Then add about 50 grams of water. It needs to be poured carefully in small portions, stirred after each addition and monitor the resulting consistency; if you overdo it, it will be very difficult to work with the dough, and it will also take a lot of time for it to dry out. The dough should not stick to your hands or crumble; after obtaining the desired consistency, as in the picture, there is no need to add more water.
Creating a figurine
Modeling, although a creative activity, is not chaotic, so making crafts requires a well-thought-out program: modeling from salt dough usually starts with large parts, and then smaller ones are made.
To make a cat figurine, you need to divide the dough into several parts: for the head, body, tail and a few other small parts that can be made from small pieces.

To prevent the dough from sticking and keep its shape, it is best to sculpt on cardboard, wood or plastic. First, the head and body are laid out, and then smaller details: ears, muzzle, eyes and tail. Each participant in the process can make their cat look the way they want, the following image is just an example of a typical cat's appearance.

Drying and product design
After the sculpting of the figurine is completed, it needs to be dried, this will take two to three days. To speed up the process, the craft can be placed in an open oven at minimum temperature for a couple of hours, and then allowed to dry completely naturally. The final stage: adding color to the finished figurine. Any paint is suitable for this, but gouache is preferable, due to its consistency, it fits better on the product. You can color the cat to your taste, or as shown in the picture. In order to fix the color, the product must be varnished. The picture is ready, it can be framed and hung on the wall.

Modeling pictures using translation
For those who are just about to learn how to make crafts from dough or are not confident in their artistic abilities, the best option is to sculpt pictures from salt dough using translation. First you need to take any image you like, print it and cut it out along the outline. Then wrap thick cardboard with foil; if you don’t have it, a cutting board will do. Next, roll out the dough on foil to about 1 cm thick. Then, attaching the picture, you need to remove all excess dough along the contour. To transfer the image itself, it is best to use a needle. In order not to wrinkle or spoil the dough, you first need to make a stencil from the picture and only then transfer it. When the picture is transferred, the product needs to be dried, it is best to do this using an oven: at a temperature of 100 degrees it will take 5 hours, and in the fresh air for more than two weeks. You cannot dry crafts on a radiator: they may crack. You can check whether the product is dry using a microwave by placing it for 40 seconds at low power; the raw craft will become hot or warm. The dried work is painted and varnished.
Another option for translating a picture
When choosing patterns for modeling salt dough, you need to remember: the more small details, the more difficult it is to complete. At the initial level, it is better to choose images with large drawings. After you find a picture you like, you need to print it in two copies. The first one is secured with tape under the glass on which the modeling will be done. It is convenient to look at the second one so as not to accidentally miss small details that may disappear during work. You can sculpt directly on the glass or under a thick transparent film, then you will not need to cut off the picture. When making a drawing, the parts are sculpted sequentially, starting with the largest. If necessary, you must first create effects before the dough dries, and only then proceed to the next fragment. After the picture is completed, it should be left to dry in a dry, warm place for several days.
If modeling from salt dough was done directly on glass, then it must be cut off. Turning the glass over, you can see the dried crust. The product can be cut off when it is more than 1.5 mm. This work is very painstaking and careful. You can use a utility knife or a linoleum knife blade. It is necessary to pry all the edges around the perimeter, choosing the thinnest fragments first. You need to hold the product with the glass facing down, regularly checking for accuracy. While working, it is important to press the sharp edge of the blade firmly against the glass. Dried crafts may come off the glass. To prevent it from breaking, it is not advisable to do the work on something hard, preferably on a blanket or blanket. Then the cut craft is painted and sent back to dry in an open oven.
Useful crafts made from salt dough
If you use your imagination, then crafts are not limited to figures and paintings. Modeling from salt dough allows you to make many other useful decorative things, such as magnets, candlesticks, vases, New Year's toys, keychains, pendants and photo frames. Also, due to its plasticity, the dough perfectly retains prints; everyone uses this ability in their own way: some like to make casts of their children’s little hands and feet, others - prints of flowers and herbs in memory of summer.
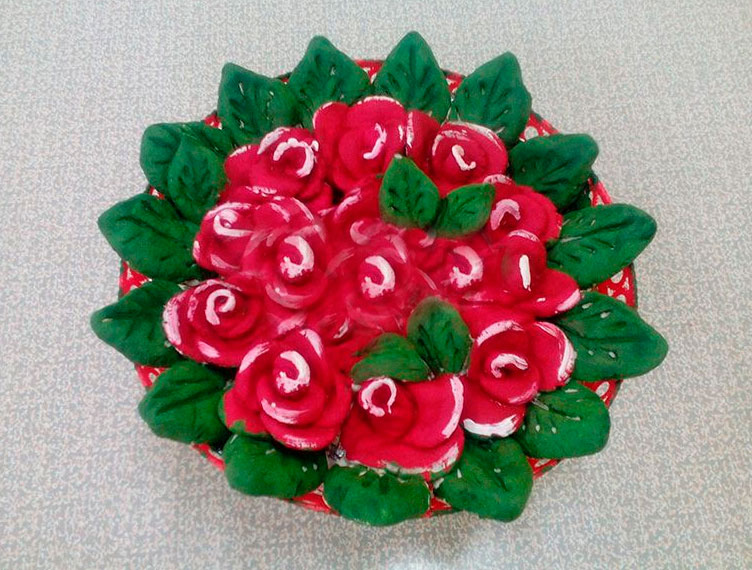
How to make a beautiful candlestick decorated with roses
Those who are just learning what salt dough modeling is most often use flowers to decorate their crafts. To make a candlestick, you first need to make a base; you can use the option in the picture or come up with your own.

To make leaves, you first need to mold a small ball, pressing on it, you can get an oval that is pointed at one edge and remains rounded at the other. Using a knife or modeling tool, depressions are made in the form of veins and points along the perimeter, then the sheet is attached to the base. Before making flowers, you need to sculpt the planned number of leaves and place them all on the candlestick.
To make a rose, you need to make balls. One of the balls is rolled into a cylinder and serves as the base of the flower. The rest are used to make thin petals into which the cylinder is wrapped. After the flowers are ready, they need to be placed on the base between the leaves.

To make Christmas tree decorations, you can use cookie cutters, cardboard stencils, or sculpt them yourself. It is important to remember to make a hole for the string before the product is dried. You can decorate the resulting forms in the following ways:
If you make holes using a cocktail straw, you will get delicate decorations;
You can use beads for decoration, but they cannot be dried in the oven, they melt at high temperatures;
Instead of beads, you can use cereals, small pasta, shells, glass, buttons and even broken colored dishes;
You can decorate toys by threading beautiful colored threads or ribbons into pre-made holes;
Glitter will give the decorations a festive look; they should be applied to already dried items using glue;
You can paint crafts not only with paints, but also with permanent markers;
You can decorate toys with prints of buttons, shells, twigs, lace and any other objects with an interesting texture; you can also use purchased stamps with ink.

The resulting decorations can be hung separately on the Christmas tree or made into a garland.
You need to sculpt from dough while in a good mood and enjoying the process, then the created products will retain positive energy. In order to enjoy crafts for a long time, it is important to store them correctly: dough products are afraid of moisture, so it is better to place them in a dry and ventilated room.
You can make a huge number of crafts from salt dough, for example: flowers, animals, various figures, inscriptions, numbers, toys, paintings and whatever you want! Modeling from salt dough is called bioceramics. The advantage of salt dough is that it is convenient to work with, this material is absolutely harmless and crafts made from it will delight you for several years. In this article we will look at how to make crafts from salt dough with your own hands.
You will need: a glass of wheat flour, a glass of extra salt, half a glass of cold water, a bowl.

Recipe

The finished salted dough should not stick to your hands or crumble. It should be cool and easy to sculpt. I recommend watching the video master class!
There are two most common ways to dry salt dough. The first method: the finished craft will dry on its own. The main thing is that it should not be exposed to direct sunlight, otherwise it will crack. The craft can be placed on a flat surface and wait a few days. Second method: dry the finished craft in the oven for 3 to 6 hours (depending on the size of the craft). Drying occurs in batches with breaks. One approach is 1-2 hours. For quick drying in one go, set the oven to 75-100 degrees, and then the craft will dry in an hour. At a temperature of 120 degrees, the craft will dry in 30 minutes, but it is better to dry it naturally.
There are two most common ways to color salt dough. The first method: after drying, paint the finished craft with acrylic paints or gouache using a brush. Second method: food coloring is diluted in water, then added while preparing the dough. When the craft is completely painted and dried, it must be coated with transparent manicure or furniture varnish in 2-3 layers. Each layer must dry before applying the next. This way the craft will last for a long time.

You will need: colored salt dough, stack, clear manicure polish, toothpick.
Master Class

The salt dough star is ready!
Salt dough caterpillar
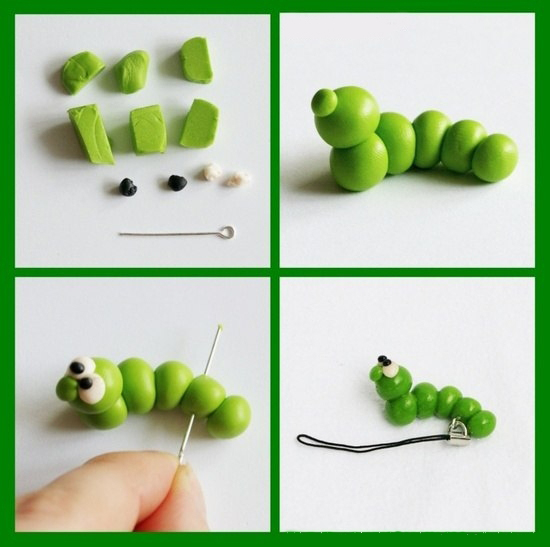
You will need: colored dough, knife, pva glue, toothpick, pendant, clear manicure polish.
Master Class
- Roll out the sausage.
- Cut it into 6 equal parts.
- Roll into balls.
- Glue 5 balls together.
- Glue the head.
- Make a nose and eyes, then glue them on.
- Poke a toothpick into the hanging area.
- Dry the craft.
- Attach the pendant.
The salt dough caterpillar is ready!
Salt dough apple

You will need:
Master Class
- Make half an apple, make the inside flat, pressing it onto a flat surface.
- Make a thin flat center and glue it to the main part.
- Roll 6 seeds and a stick, then glue to the apple.
- Blind the leaves, then glue them.
- Dry the craft.
- Apply varnish and wait until completely dry.
The salted dough apple is ready!
Salt dough elephant

You will need: colored salt dough, pva glue, clear manicure polish.
Master Class
- Make the elephant's body by rolling an elongated ball.
- Make 4 legs in the shape of plump sausages.
- Make a proboscis.
- Make the elephant's ears in this way: roll out 2 flat cakes, glue flat cakes of the same shape of a smaller size and a different color to them.
- Make a small ponytail.
- Blind your eyes.
- Assemble the elephant in the following sequence: glue the legs to the body, then glue the proboscis, then the ears, eyes and tail.
- Dry the craft.
- Apply varnish and wait until completely dry.
The salt dough elephant is ready!
You will need: salt dough, foil, a candy bowl or similar plastic container, gouache, a brush, clear manicure polish, a modeling board, a knife or a stack.
Master Class


You will need: salt dough, nail scissors, PVA glue, acrylic paints or gouache, manicure brush.
Master Class
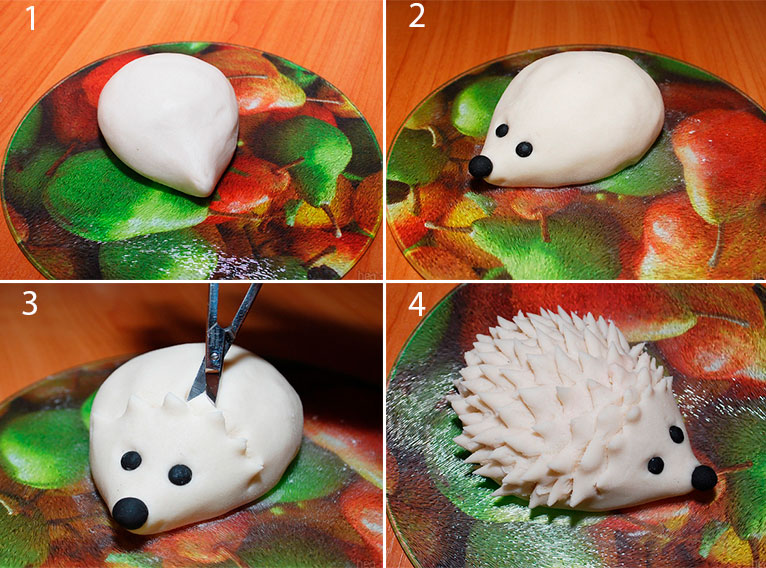
Salt dough hedgehog is ready!
Owl (eagle owl) made from salt dough

You will need: salt dough, pva glue, nail file, manicure scissors, acrylic paints or gouache, brush, wooden board with a pendant, clear manicure varnish.
Master Class

The salt dough owl is ready!

You will need: salted dough, the base on which the craft will be attached, for example, a board or plate, a glass or a knife, a sheet of paper, a simple pencil, a garlic press, a rolling pin, pva glue, acrylic paints or gouache, a brush, clear manicure polish, cloves.
Master Class

Salted dough fruit basket is ready! I recommend watching the video master class!

You will need: salt dough, knife, rolling pin, simple pencil, sheet of paper, sandpaper, acrylic paints or gouache, brush, transparent manicure varnish, glue gun or pva, base for crafts, for example: a board with a frame, transparent manicure varnish.
Master Class

Salt dough pencil

You will need: water, flour, extra salt, cardboard jar for the frame, PVA glue, scissors, a piece of decorative rope or corrugated paper, gouache, brush, button, stacks, acrylic varnish for crafts, toothbrush.
Master Class
- Knead the salted dough in this way: add a glass of flour, a glass of salt, add water, then knead until the desired consistency of the dough. Separate part of the dough, add beige gouache, then knead.
- Roll out the cake to a thickness of 10-15 mm.

- Apply PVA glue to the outer rim of the jar and wrap it with dough. Cut off the excess with a stack and smooth the joints with a damp brush.
- Create a small dotted texture with a toothbrush on the surface of the dough.
- Knead the brown dough, roll it into a flat cake 10-15mm thick.

- Cut a 5cm wide strip of brown pastry and glue it to the bottom of the jar.
- Make 2 large owl eye bases from white dough, then glue them on.
- Make a beak out of brown dough and glue it on.
- Make eyes from turquoise dough and glue them on.
- Roll out 8 strips of pink dough, twist them into 4 flagella and make a bow, then leave it to dry for 2 hours.
- Make droplet-shaped owl wings using brown dough, then glue them on.

- Weave ropes of beige dough and glue them onto the neck of the jar.
- Roll out a sausage from white dough, draw the texture of the lace with a stack and glue it as a collar under the beak.
- Place the craft in a warm place for a day.
- Paint the bottom and wings with brown gouache and decorate with white dots.

- Draw the pupils and eyelashes with black gouache, wait until the paint dries, then paint white highlights on the eyes.
- Glue a pink bow above the wing.
- Glue a button with a bow from a corrugated strip onto the lace.
- Cover the craft with varnish and wait until it dries completely.
The salt dough pencil is ready!
Salt dough dachshund

You will need: salt dough, simple pencil, scissors, cardboard, paints, brush, rope, toothpick, foam sponge, clear varnish, PVA glue.
Master Class

The salt dough dachshund is ready!
Boletus mushroom made from salt dough

You will need: salt dough, light bulb, paints, brush, foil, cardboard, masking tape, superglue, PVA glue, paper napkins, clear varnish, stack.
Master Class

Boletus mushroom made from salt dough is ready! I recommend watching this video!
Funny salt dough pigs

You will need: salt dough, paints, brush, foam sponge, stack, thin rope, toothpick, black gel pen, PVA glue.
Master Class

Funny salt dough pigs are ready! I recommend watching this video!

You will need: salt dough, baking sheet, rolling pin, knife, sheet of paper, acrylic paints, brush, ribbon, water, shoehorn, pencil, sandpaper, clear manicure polish.
Master Class

Modeling is a great activity for young children. The little girl simply loves to create something new with her own hands. However, modeling from plasticine or clay is unsafe for children 1-2 years old, since they will certainly put everything new and interesting in their mouth.
Let's make our favorite activity safe and enjoyable and prepare salt dough. Modeling from salt dough is accessible even to very little ones - such a material is soft and pliable. It is also very salty, which will quickly stop your baby from putting colored lumps into his mouth.
Why such an activity is useful, how to prepare dough for modeling, what figures you can offer to make for children - everything in order.
The benefits of modeling dough for children
First of all, sculpting from salt dough is safe - if the baby swallows a piece, nothing will happen. And the benefits of such an activity are enormous:
- Development of fine motor skills. Kneading the dough, the baby trains his fingers. According to pediatricians and teachers, a child's speech is at his fingertips. By developing fine motor skills, you help your child easily master buttoning and tying shoelaces in the future.
- Speech development. The fine motor center in the cerebral cortex is located near the speech center. By stimulating finger motor skills, you also influence the speech center. Babies whose mothers pay a lot of attention to their hands learn to speak faster, and they are better able to form sentences and even small texts from words. According to speech therapists, their pronunciation of words is much better than that of their peers who “didn’t stick together.”
- Perseverance. Getting a child to sit still at a young age is not so easy. And this skill will become indispensable in school and university classes. Modeling from dough can captivate a child so much that he will sit without looking up from the process and create more and more new figures until he gets bored or the dough runs out.
- Hard work. The child will understand from an early age that to get the desired result you need to work hard. He will learn this lesson even better if the baby’s crafts are dried and painted. This way he will understand that the fruit of his work is lasting, and you appreciate his efforts.
- Logical thinking. When making dough figures with your baby, you can ask him problems: here is an apple, what is he missing? Leaves. And in that spirit. So the lesson on developing fine motor skills will also turn into a logic puzzle.
- Attentiveness. Make a figure and let the child repeat it. Starting with simple ones, complement such figures with details. The child will carefully study the proposed sample, recreating it with his own hands.
- Fantasy. If the baby is tired of “repeating”, invite him to sculpt anything. And let the elephant have two trunks, and the dog have three legs. A child’s imagination is limitless, you will see this very soon.
Modeling from salt dough is a very useful and necessary, and most importantly, safe activity for children. But in order to satisfy all the demands of such an activity and get the maximum benefit from it, you need to be properly prepared.
How to make play dough for kids with your own hands
To start making salt dough with children, you first need to prepare the dough, and first of all you need to choose a recipe for such a dough.
We offer you several recipe options, and you choose based on what you have on hand. Any of the test options is safe, just different housewives do it differently.
Recipe 2:
- flour – 2 tbsp;
- salt – 1 tbsp.;
- soda – 1 tbsp.;
- starch - 2 tbsp. l.
From this dough you can make figures with thin relief
Recipe 1
- flour – 2 tbsp;
- salt – 1 tbsp.;
- soda – 1 tbsp.
Suitable for simple modeling.
Recipe 3
- water – 1 tbsp.;
- vegetable oil – 2-3 tbsp. l.
- flour – 1.5 tbsp;
- salt – 1.5 tbsp;
Doesn't dry out your hands so much, you can sculpt anything.
Did you know? All recipes contain salt. Take a small one, and the mixture will be homogeneous, and the crystals of a large one will shine beautifully in the light.

And now about the secrets of cooking:
- Take all the dry ingredients you prepared for the dough.
- Using your hands, mix them together in a large bowl.
- Pour in water and knead the dough. It should be soft, elastic and not stick to your hands.
- If you decide to make it with vegetable oil, pour it in after kneading the dough and knead again. Well-known confectioners use butter in this way to knead dough - even the stickiest dough immediately stops being stretched by the hands.
The dough is kneaded, that's okay. The pale figures that come out of it are an excellent reason to start drawing with children aged 4-6 years.
It's more difficult with kids. We figured out how to prepare play dough for children, but how to make it attractive?
Did you know? This dough can be stored in the refrigerator for up to 7 days.
You will need one of the following items:
- food coloring;
- dye for cotton fabrics;
- gouache;
- kitchen set (cocoa, turmeric, paprika).
And here is a recipe for how to color salted play dough for young children:
- Take your dye, dilute it in a small amount of water.
- Divide the finished dough into as many pieces as you want colors.
- Make holes in the dough balls, pour in the dyes and knead the dough again so that the paint is distributed evenly throughout the ball.

If you are against artificial dyes, or your baby is very small, and you are afraid that it is unsafe, use a “kitchen set”.
Cocoa will give a brown color, turmeric will give a bright yellow, paprika will give orange to red. If you want green dough, go to the pharmacy and buy spirulina. The nasty stuff is rare, but they say it’s healthy, and the test is guaranteed to be green.
When we already have a whole palette of colors, and our hands are itching to sculpt, we should not rush, but think carefully about what else we haven’t taken for work.
Equipment and materials
To make various crafts from play dough, take into account the characteristics and wishes of children and stock up on tools for creating real works of art:

- working surface;
- stand for finished products;
- rolling pin;
- cookie cutters or ;
- dough knife;
- matches and toothpicks (do not give them to children under 3 years old; it is better to make the texture of the craft yourself);
- pen paste (for creating dots);
- everything that is embossed and safe - lace, caps from felt-tip pens, forks, shells (for creating impressions on dough);
- decorations (cereals, pasta, etc.).
With a rolling pin you will roll out the dough into the molds; with a knife you can cut out those figures whose shapes you do not have enough. With matches, toothpicks and three-dimensional objects you can make impressions and texture of the craft, and with decorations you can bring the craft to perfection.
Did you know? You can dry such crafts in the oven at 50-80°C with the door ajar for about an hour. But it is best to leave them to air dry for 3-4 days.
When the crafts are dry, they can be painted, if they are plain, and opened with ordinary furniture varnish. This way the colors will become brighter and the crafts will last a long time.
Ideas for modeling dough
There are no limits to children's imagination, but at first you can use sample figures to sculpt from dough. There are a great many of them, we will list only a few of them.
From uncolored dough
You can make a cast of your palm.


You can make a variety of figures: stars or hearts.

From colored dough
You can make a Christmas tree. or any shapes using cookie cutters.

Making dough with children - video
This short video shows in detail, accessiblely and clearly how to prepare salted play dough with a small child. The young dad enthusiastically reveals the advantages of such a dough and demonstrates how to knead it correctly.
This video clearly shows how you can mix different shades of basic colors. In the video, the little one independently sculpts a bear and a bunny using imprints of the lids. The children are delighted to sculpt various animals. It tells what recipe the dough was made from and how it was colored.
Conclusion
- Dough modeling is a useful activity for kids and their parents. The whole family can participate in the process of making salted figurines, or, as they are also called, mukosolek.
- For kids it is better to use simple figures, and older children can be encouraged to make real things - beads for bracelets and necklaces, pendants, small boxes or vases, dishes for dolls. At the same time, both girls will be happy to sculpt jewelry for themselves, and boys - as a gift to their mother or grandmother.
- Have you already tried sculpting with salt dough with your baby?
What figures have you already made? What recipe did you use to prepare the dough? Which one did you like best? How did you color the dough? If you have your own recipe for such a dough or ideas for making all kinds of figures, share them with us in the comments!
Salt dough is a unique educational material for children, because with its help you can not only make beautiful crafts, but also develop fine motor skills in a 5-6 year old child. If you want to spend your leisure time interestingly, we suggest you find out what you can do crafts made from salt dough for children 4-7 years old.
How to make salted play dough
To make salt dough at home, you don't need expensive tools. All you need is:
- A glass of wheat flour
- 1/2 cup table salt
- 1/3 glass of water.
If you mix all the ingredients, you will get a soft and pliable dough for sculpting crafts. If the salted dough sticks to your hands, we recommend adding salt or flour to it; if it falls apart into pieces, then there is not enough water. To increase the plasticity of salted modeling dough, vegetable oil or cream is often added to it; the strength of crafts can be increased by adding a little PVA to the mixture.
Photo of a vase made of salt dough
If you want to make colored crafts from salt dough with children 5-6 years old, then buy regular food coloring, dilute it with 1/3 cup of water and pour the colored liquid into the mixture instead of regular water. Salt dough keeps well in the refrigerator, so don't worry if you have any leftover pieces, set them aside for crafting another day.
How to make simple crafts from salt dough for children 5-6 years old
First, you will need to teach your child how to make simple preparations:
- Show how to make sausages.
- Help make balls.
- Try flattening the tortillas.
- Learn to make cubes from a ball.
- Make triangular blanks.
These are the basics of salt dough modeling for beginners, thanks to which a 5-6 year old child will quickly master this type of needlework. From simple blanks you can make dolls, houses, animals, trees and other crafts.
Ideas for crafts made from salt dough for children 5-6 years old
The simplest idea is to make a thick cake and let the child leave a deep imprint of his palm on it. After that, trust him to decorate your creation and let the craft dry. You can make a hole in it so that you can then stretch the ribbon and hang it on a nail.

To develop finger motor skills and, accordingly, improve speech, you can offer a 5-6 year old child to make a craft with grains. To do this, you need to roll out the salted dough thinly, cut out figures using the shape, and then entrust the child to decorate the craft with different grains.

Children 6-7 years old can make a vase from salt dough. To do this you will need to prepare:
- Plastic bottle
- Scissors
- Salt dough of different colors
- Glue gun
- Plasticine
- Toothpicks.

First prepare salt dough of suitable color, you can even use multiple colors to make a vase. After this, cut off the neck of the plastic bottle and begin decorating it. To do this, you need to completely roll the bottle with dough. To make this easy and convenient, take a bottle of cosmetics, not a water bottle.

After that, start decorating the craft. To do this, take brown and black plasticine and toothpicks. Make small bees, which will then stick well to the dried salt dough. Wings can be made from a plastic bottle or lace.


Salt dough modeling for children 5-6 years old- this is a fun and interesting activity, because you can make not only simple, but also complex ones for a gift or for interior decoration.


