How to draw a village street. Master class by Maria Belikova: drawing a house in the village
In this lesson we will look at how to draw a Russian izba (hut) with a pencil step by step. Izba (hut) is a Russian wooden house that is made of wooden logs. The drawing is easy and suitable for children.
So, we’ll draw from this picture, but in the end it turned out a little wrong.
Draw a figure like this, a base and a triangle on top.

We make the roof from wooden crossbars, they are thick.

We finish drawing another part of the crossbar on top, then we draw two windows and circles from the logs on the sides, which are not visible to us, but only this round part is visible.

Then we draw shutters on the windows.

Draw a pipe and what the hut consists of, draw horizontal lines.

Draw fence sticks on the sides of the hut. Shade areas where logs overlap each other.

Now we draw horizontal sticks and the fence is ready. Draw more pronounced lines - the joints between the logs and make a transition of shadows, where the joints have darker shadows, in the middle of the log - lighter ones.

Paint the roof, windows with darker shades, and shutters that are barely visible. In front of the hut, draw grass, on the sides you can draw bushes and trees. In this case it is one. I couldn’t resist yet and drew
Help your child draw his summer: a river, sea, meadow or house in the village. Learn to draw a girl who symbolizes summer.
Summer is a fertile time, a vacation time that children spend walking in the streets and parks, relaxing at the sea or by the river, being close to nature in the village with their grandparents. When they return to school in September, they have a story to tell. Sometimes there are so many emotions that you want to create - draw a picture on the theme “Summer”.
What can you draw on the theme of summer for children? How to draw a picture for children - “How I spent my summer”?
What is summer in a child’s understanding? What can he depict in his drawing?
Summer means bright, hot sun, green trees, blooming flowers, butterflies and bees. A child can draw a meadow or clearing - summer nature.

Children's drawing "Summer".
If a child spends his summer holidays in the city, he can depict a playground with slides and swings, children playing in the sandbox, riding bicycles, rollerblades and scooters.

Children's drawing "Summer on the playground."
Another popular theme for children's drawings about summer is the river bank. The child draws sand, reeds, running water, the sky and the sun, birds in the sky and, of course, himself and his family, swimming and sunbathing.

Children's drawing "Summer on the river."
Did your child go to visit his grandparents living in the village in the summer? He will draw their house, vegetable garden, a friendly dog in the yard and domestic animals: goats, cows and horses grazing in the meadow, geese and chickens running in the yard, a pig and piglets eating from a trough.

Children's drawing "Summer in the village."
Summer holidays at sea for a child are very diverse. He will draw what impressed him most: dolphins, sailboats and ships, a lunar path on the surface of the sea, people relaxing on the beach and swimming in the sea.

Children's drawing “Summer at the sea”.
How to draw summer with a pencil step by step for beginners and children?

Summer is a blooming meadow.
In the drawing on the theme “Summer”, the child draws a sunlit clearing with grass, flowers and green trees. In this clearing he can depict himself.
- The child takes a sheet of paper, a pencil and an eraser. First, he needs to mark the sheet - draw a line - the “horizon” dividing heaven and earth.
- He is faced with the task of drawing a meadow. He should use thin pencil lines to mark where the grass bushes will be.
- Each blade of grass should be drawn.
- At the next stage, you can complement the image of the meadow with several colors and erase the auxiliary lines.

Summer meadow: step 1.

Summer meadow: step 2.

Summer meadow.

Ways to draw grass.
You can draw summer flowers, for example, daisies and cornflowers.

Cornflower step by step.

Chamomile step by step.
Now the child moves on to drawing himself, for example, a girl picking summer flowers.
- You should start by designating the girl’s head, torso and arms; they are designated as ovals.
- The line of the hips (the girl will be in a summer dress) is drawn in a semicircle.
- On the face, lines of symmetry should be drawn for the eyes, nose and lips. Next, the face is detailed.
- The girl's hair is drawn with smooth, light pencil movements.
- Draw the girl's dress and her hands. A flower is being drawn in her hands.
- Erase auxiliary lines. Using pencil shading, the figure of the girl in the drawing is made three-dimensional.

Girl in the meadow: step 1.

Girl in the meadow: step 2.

Girl in the meadow: step 3.

Girl in the meadow: step 4.

Girl in the meadow: step 5.

Girl in the meadow.
Let the child bring the drawing to life - complement it with images of insects: butterflies and ladybugs.

Addition to the “Summer” landscape: ladybug in stages.

Addition to the “Summer” landscape: butterfly in stages.
VIDEO: Drawing a summer meadow
How to draw summer in the village?

In a drawing on the theme “Summer”, the child often draws a house in the village.
- On the sheet, first mark the horizon line, subtly, so that it can be easily erased where it is not needed.
- The sun and floating clouds are depicted in the sky (several of them to make the weather look sunny).
- Trees will grow near the house; draw their trunks.
- The trees are detailed - their branches and crowns are drawn.
- They draw a house. To prevent it from looking flat, it is looked at as if from an angle. The house is marked with two rectangles.
- It will be easier for a child to draw a roof if he looks at the drawing for instructions on how to do it.
- A pipe is drawn on the roof. An attic is being painted above the future entrance to the house.
They draw the windows and the entrance to the house. - It's time to add bright details to the drawing - a fence, grass, a path leading to the house, flowers.

Summer in the village in pencil: step 1.

Summer in the village in pencil: step 2.

Summer in the village in pencil: step 3.

Summer in the village in pencil: step 4.

Summer in the village in pencil: step 5.

Summer in the village in pencil: step 6.

Summer in the village in pencil: step 7.

Summer in the village in pencil: step 8.

Summer in the village in pencil: step 9.

Summer in the village in pencil: step 10.

Summer in the village in pencil.
You can also add animals to the drawing - a dog in a booth, a cat on a fence, or even a goat nibbling grass.

Addition to the “Summer in the Village” landscape: a doghouse.

Addition to the landscape “Summer in the Village”: a dog.

Addition to the landscape “Summer in the Village”: a cat sitting on the fence.

Addition to the “Summer in the Village” landscape: goat.
VIDEO: How to draw a house in the village?
How to draw a summer landscape step by step with pencil and paints?
For many children, the summer landscape is associated with the sea, the beach and sand castles.
The simplest version of the drawing “Summer holidays at sea” is an image of the water surface, the shore, a sailboat floating on the water and seagulls flying in the sky.

Sea in summer.
You can also draw an exotic beach with palm trees.
- Mark the sheet: draw the horizon line and the line where the land meets the water with thin lines, determine the places where palm trees, a beach umbrella, and a deck chair will be depicted.
- The trees are drawn and shaded, the umbrella and deck chair are detailed.

Beach: step 1.

Beach: step 2.

Beach: step 3.

Pencil drawing "Beach".
The picture with children building sand castles on the seashore looks very summery.
- Draw a horizon line, as well as a line dividing the coast and the sea.
- On the shore they draw figures of children, a boy and a girl, as well as the outline of a sand castle.
- Draw children's faces, hairstyles and clothes. They draw shovels in their hands, and a bucket on the sand.
- They detail the sand and decorate the sand castle with shells and starfish.

Children on the beach in summer: step 1.

Children on the beach in summer: step 2.

Children on the beach in summer.
VIDEO: How to paint a summer beach in watercolor?
How to draw summer nature step by step with pencil and paints?
The beauty of nature in summer can be conveyed by drawing a river bank. It's so fun to have picnics with the whole family!
- Have your child sketch out the shore line with a thin pencil line. It is also necessary to outline the horizon. There will be a fishing boat on the shore. You need to outline its contours, and then detail it.
- The river will be surrounded by forests, so the outlines of trees are first drawn against the background, then the trees are detailed.
- The hills overgrown with grass and bushes framing the river are also visible.
- The reflection of trees on the water is indicated by shading.

River bank in summer in pencil: step 1.

River bank in summer in pencil: step 2.

River bank in summer in pencil: step 3.

River bank in summer in pencil.
In the foreground of such a picture you can depict a picnic scene - a girl sitting on a wicker basket, a mat, a fire.
First, the contours of the girl’s figure are drawn, under her hips - a rectangle, which will later turn into a basket.
- Draw the girl's ears and hair. The shoulders and arms are detailed, drawn with smooth lines.
- Drawing a girl's face.
- Then they decorate the wicker basket.
- They draw clothes and a wide-brimmed hat with a bow for the girl. Folds are depicted on clothes with light strokes.
- Auxiliary lines are removed.

Girl on a picnic: sketches.

Girl on a picnic: detailing of the drawing.
The fire is drawn according to the following diagram.

Bonfire in stages.

Summer: picnic in nature.
How to draw a girl Summer?
A girl, symbolizing summer, sun and warmth, is usually depicted in a light sundress, with her hair flowing in the wind, surrounded by greenery and flowers.
You can depict summer in a feminine likeness as a little girl, a teenage girl, or a young girl.
You can draw a girl – Summer according to the scheme as in the picture below.

For drawing: summer on the river.

VIDEO: Quick Drawing | Her Name is Summer | Watercolor
Today we will try to depict a landscape using an unusual technique - architectural graphics. Don't be scared, it's not difficult at all. This lesson will allow your child to master a ruler, develop hand strength and eye strength.
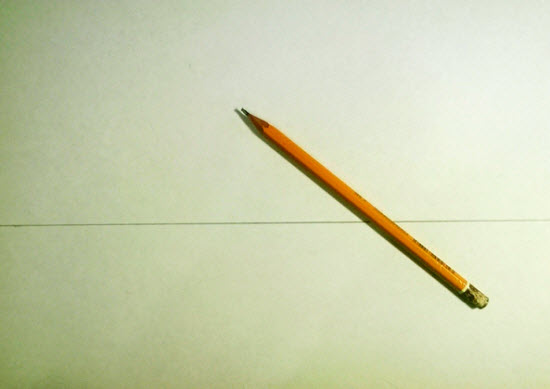
For the lesson we will need:
A sheet of plain A4 paper;
a simple pencil;
eraser;
ruler no less than 30 cm;
felt-tip pens of different thicknesses and different colors (or colored pencils);
circle-template, if the child does not yet know how to draw this geometric figure.
Place the sheet horizontally. Mark about 8 cm from the bottom edge and draw a line.
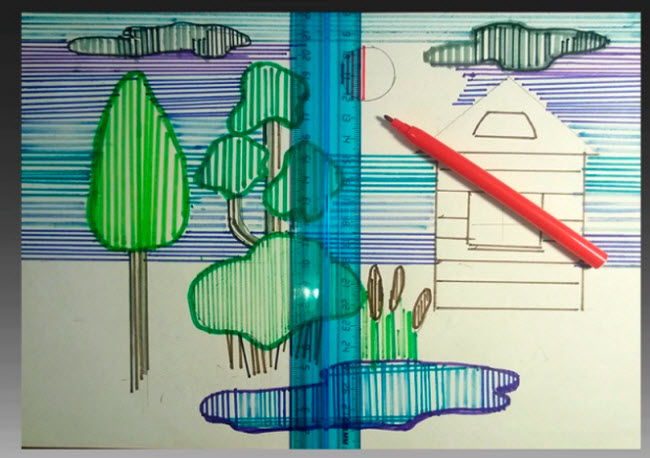
We randomly outline the objects of the future landscape on the sheet: a triangle with rounded vertices - a pyramidal poplar. Using a broken oval line we outline the future bush and pine crown. Do not forget that near objects will be larger, distant objects will be smaller.

We draw the trunks using a ruler, as shown in the figure.

Since our trunks are quite wide, we draw several vertical lines by moving the ruler approximately 2-3 mm to the right, each time drawing the next line with a pencil. The ruler needs to be pressed against the paper as hard as possible so that it does not move back and forth, and the lines turn out parallel. This is a very difficult job for a child, but the sooner he masters this technique, the easier it will be for him to study at school, including developing writing skills.
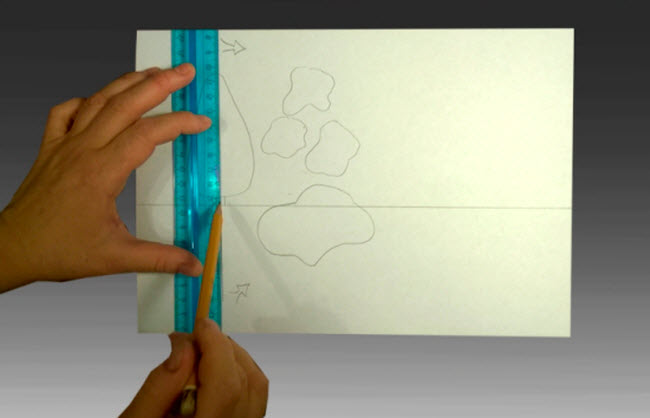
Now in the same way we draw the trunk of a pine tree and the branches of a bush. The latter may be a little unparalleled

The arrows show how to move the ruler to the right (2-3 mm). You can even start by doing 4 mm or more.

We outline the pond and clouds with a pencil.

On the right, boldly draw a rectangle along the ruler. This will be a village house.

Don't forget to draw the roof and windows. We mark the reeds near the pond.

Using a lid or jar, draw the sun. If your child is confident in his abilities, he can draw it without the use of improvised means.
So, we have prepared the drawing for coloring. The work is challenging, so if your child complains of fatigue, you can take a break and return to it later.

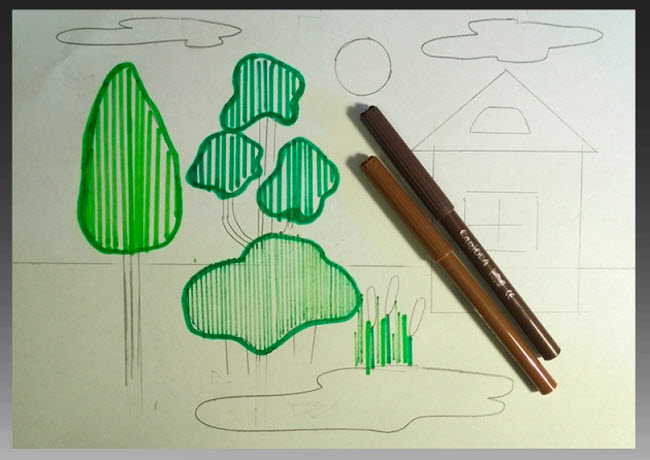
Choose different shades of green. We will use them to draw the crowns of trees, bushes, stems and leaves of reeds, and grass. We apply the ruler vertically to the paper and, using the method described earlier, draw parallel lines of tree crowns with a green felt-tip pen, without going beyond the pencil line.

Move the ruler slightly to the right and draw a line again. We continue to work until we have lined the entire crown. It’s okay if at first the lines are at different distances from each other. The main thing is that the child is not afraid to use the ruler.
Green colors can be changed. For example, a bush will be lighter than a pine. We use the same technique all the time.

And then the bushes appeared. You can outline your greenery as shown in the picture.
We take shades of brown for tree trunks, houses and reeds.
We use the same technique. Only we will draw the house differently - placing the ruler horizontally. However, in the future we will also draw the sky and grass horizontally.

Here comes the turn of shades of blue and cyan. We use them to draw the pond and the sky.

We place the sheet vertically, as shown in the figure. We apply a ruler to the sheet in the place where the sky begins. Now we will move the ruler from right to left, drawing lines in different shades of blue or blue. You can even add lilac or purple.
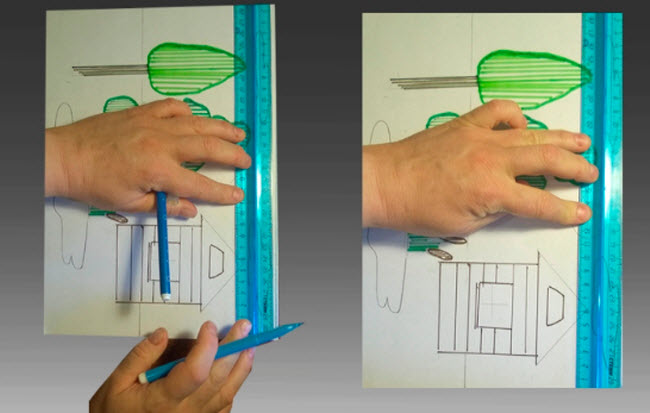
Using the same method, we draw the water of the pond.

Let's make the clouds gray and, so that they don't get lost against the sky, draw them with vertical lines.

We draw the sun with red vertical lines.
And this is what the rays should look like

Now let's take shades of yellow. They can “revive” the sun and light in the windows.

Now you can start weeding. Turn the sheet over vertically. And in the same way as we painted the sky, we outline the grass with different shades of green.

All that remains is to paint the house. I decided to make the body of the house itself with pink and lilac horizontal lines. And the triangular roof is orange vertical.

Using brown or purple felt-tip pens, carefully trace the outlines of the windows along a ruler.
Applying a ruler to the cloud diagonally, we use gray and blue felt-tip pens to imagine rain. But you can do without rain.

If desired, you can turn the poplar into an apple tree by “hanging” red apples along the crown using template lids. You can “let a gray-brown duck swim” in the pond. But I just added a reflection of greenery and a house in the water, as shown in the picture.

Good luck in mastering the new technique.
How to draw a landscape step by step with photos for beginners
Master class on drawing "Rural landscape"
Author: Elizaveta Ilyina 10 years old, studying at the “Children’s Art School named after A.A. Bolshakov”, Velikiye Luki, Pskov regionTeacher: Natalya Aleksandrovna Ermakova, Teacher, Municipal budgetary educational institution of additional education for children “Children’s Art School named after A.A. Bolshakov”, Velikiye Luki, Pskov region.
Description: The work can be done with children of primary school age. The material can be useful to teachers, children and their parents, and anyone who is interested in creativity.
Purpose: creative exhibitions, interior decoration.
Target: creating a rural landscape
Tasks:
-continue acquaintance with the genre of fine art “landscape”, its variety “rural landscape”;
-improve the skills of constructing a composition of a drawing: arranging the objects of the image, observing the rules of perspective, balance in the composition;
- train in the ability to work with various visual media: a simple pencil, wax crayons, colored pencils;
- to develop an interest in fine arts.
Come to the village for the summer
Find your corner there
A modest house left by someone
There is a stove in the kitchen, the ceiling is low,
Three windows, simple porch
You will always be sheltered with love,
To your tree with a thick crown
Your birds will arrive in the spring.
Their trills will wake you up in the morning,
Sweet air will rush through the window.
You have never eaten such delicious porridge,
We haven't breathed so easily for a long time.
Draw some water from the well,
Stand barefoot on the grass
You can heal here with silence,
In a wooden Russian hut,
Chop wood, warm up in Russian,
And putting on a simple shirt,
Take a walk in the nearby forest to pick mushrooms,
Listen to the nightingale's tune,
To wash in the Russian bathhouse in the evening,
Sit on the porch, breathe,
Drink samovar tea
And go to the stove to sleep.
Everything here is warm, everything here is simple,
The heart does not beat here, but sings,
Everything here is Russian, ours, dear,
Our homeland is still waiting for us.
-sheet of A3 paper
-simple pencil, eraser
-wax crayons
-colour pencils

Progress of the master class:
We begin work with a pencil sketch of the drawing. First we draw the houses: in the foreground there is a large house, in the background there is a smaller one.

Next, we build a landscape composition around our houses. In the background we draw a fence and bushes.

Let's move to the foreground of the picture, there will be a river with a bridge.

We draw lines of hills (ground), fence and bushes, horizon line.

Next we start working with wax crayons. We draw a spruce forest on the horizon line.

Then we draw the sky with the edge of a blue chalk, leaving areas (clouds) not filled with color. Using a purple pencil we apply shadows to the sky, making it more picturesque.

In the foreground we work with wax crayons. We shade the earth and the river in the direction of the lines of the hills and the river.

We decorate the background fields with light green wax chalk. In front of the small house, we add touches of swamp green to the light green color.

Using the edge of a brown chalk (side), we decorate the walls of the house, then traditionally draw the contours of the walls and logs. Next is the roof and windows.


Then the background house, we work with crayons.

We outline the contours of the bushes with black chalk.

We decorate the bridge with brown chalk, outline its contours with black and draw out the boards.

Next, draw with the side of a brown chalk and paint over the fence. Then we outline in bright brown the contours of the boards that make up the fence.

We draw wavy blue lines-waves (crayons) on the river. We draw the leaves of the reeds in different shades of green (pencils), and the cones on the reeds in brown.

Our rural landscape is complete.


Thank you for your attention!
Let's take a little break from the Olympics and draw a beautiful house in the village with a pencil. And the step-by-step instructions that are attached to this lesson will help us with this. This lesson is designed for children, so even a novice artist will not feel uncomfortable trying to draw this beautiful house in the village.
Well, now let's move on to the lesson. Pencil and paper ready, let's go.
Step 1. We will start drawing the house from the roof. To do this, draw a trapezoid at the top of the sheet, which will subsequently define the roof. By the way, for convenience you can use a ruler, because... There will be many straight lines in our drawing.

Step 2. Add a triangle vertex in the middle of the roof. Here we will then draw an attic window. We will make one more additional line on the sides of the trapezoid and connect it to the main drawing.

Step 3. Now let's draw the base of the window on the roof. We add the bottom part of the square, and on top we draw additional lines for the small roof that will be above the window. Let's move on to the next stage.

Step 4. Now let’s draw the window itself in the attic of the house. Let the window be round. We draw two intersecting segments through the center of the window. And at the bottom of the main roof we draw another horizontal line.

Step 5. Now we will draw the shape of the house itself. We depict a large rectangle under the roof. Now inside the picture on the wall of the house we draw a rectangle for the outline of the window and move on.

Step 6. We continue to draw the facade of the house. For the window we make another rectangle to show the frame. Draw vertical and horizontal lines through the center of the rectangles. Additionally, you can look at a separate one. But the house is missing a door, this needs to be fixed. For the start, we draw a low horizontal rectangle, and on it we add a large vertical one, and the door is ready. All that remains is to indicate the handle on the door - draw a small circle.

Step 7 Let me remind you that we are drawing a house in the village. In the village, various bushes and trees usually grow near the house. Therefore, we will also add bushes to the drawing. We will also draw another step to enter the house.

Step 8 We look at our drawing, if there are inaccuracies or extra lines somewhere, then it’s time to correct it. We adjust the contours if necessary. The end result should be a drawing similar to the one below.

And according to our tradition, we will color the drawing to make it look more picturesque. Here we have drawn such a beautiful house.

Check out this short video tutorial. The video shows how children can draw a beautiful and simple house with colored pencils.
Write in the comments what kind of house you got.


