Program for Toshiba laptop battery. Laptop battery calibration
Battery calibration- This is an important step for portable laptop users who monitor the condition of their devices.
Due to the peculiarities of their functioning, they currently require periodic adjustment before use so that the current charge is correctly determined
Contents:
When is the setup done?
The procedure is required to be performed on new devices, which will give the user up-to-date information about the battery status.
The procedure will not eliminate physical wear and defects in the structure of batteries, but it may increase the battery life. At a certain charge level, usually 30%, the device goes into standby mode.
And if the controller shows that there is 30% of it left (and in reality this value is higher) and transfers it to , then the current state of the capacity will be displayed.
Newer nickel-based cells exhibit what is called a “memory effect.”
It seems to remember the charge level when there is power from the mains and does not discharge below this value, considering that this level corresponds to a complete discharge.
Determining the battery capacity of a laptop computer
Before calibrating the battery, you should make sure that the operation is necessary, especially if there are no problems in determining the amount of charge.
- We launch it with administrator privileges, for example, by entering “cmd” in the “Run” window (Win + R) or through search in Windows 10.
- We execute the code in it "powercfg.exe -energy –output disk:\path\filename.html".

- We are waiting for the operation to complete (indicated by the closing of the window).
- We go to the specified directory and open the one created in the .
To do this, you will need a browser, and the functionality of IE or the built-in “ten” is quite sufficient.

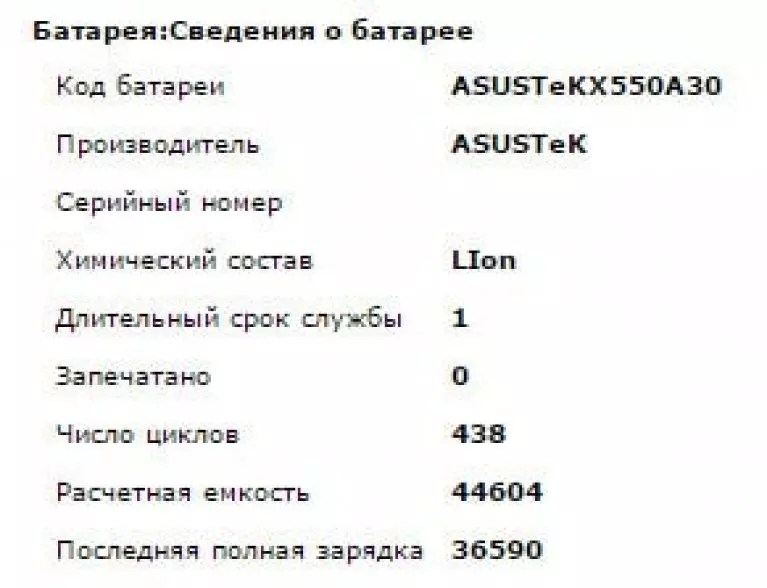
- We look through the report and find the capacity calculated by the controller and its value after the last full charge.
Calibration is carried out when the peak capacity of the battery is tens or more percent higher than the actual capacity obtained as a result of its last charge.
Battery tuning techniques
There are two ways to make the controller work correctly:
Manual setting
It is completed in three simple steps and does not require any third-party software.
1 Charge to the maximum value of 100%.
2 Disconnect the cable from the network and wait until its charge drops to zero.
3 Connecting again(as soon as possible) and charge to maximum.
It seems simple, but there is one nuance: when it decreases to a certain level (about 30%), it goes into sleep mode, and therefore it will not be possible to achieve the desired effect in this way.
The following chain of actions will help to avoid such a situation (relevant for any Windows):
- Calling the applet Power supply .
This is done through a search in Windows 10 or the control panel when its elements are visualized in the form of large icons.

- Click on the menu on the left "Create a power plan".

Here you can edit the current plan or create a new one. Let's take the second route, so as not to distort the standard settings of standard plans.
- We create a new power supply scheme, set its name and set high performance.

Entering a name and plan for the diagram

Afterwards the scheme will be automatically activated.
If it suits you, after charging and disconnecting from the network, you can restart and wait for the device to turn off by entering the BIOS menu, but you will have to wait longer, because the processor load in this case is minimal.
Automatic setup
Many developers ship their laptops with power management utilities. , for example, come with an Energy Management utility.
- Launch the software and click on the icon with the image of a gear to start the process.

- Click “Start”, closing all third-party programs.
- We connect the power cord to the network if it is not connected, and click “Continue”.

The battery will charge, discharge to zero and be charged again. There is no need to remove and connect the cable, and interrupting the process is strictly not recommended, nor is it recommended to use the device.
Only in this case is success guaranteed.
BIOS
Those laptops that use the Phoenix BIOS I/O system have an integrated test and calibration function.
Advice! It is important that during the calibration process the battery is fully charged and the laptop is unplugged, otherwise an error will be displayed.
Third party software
If you don’t have the desire/opportunity to perform manipulations in , download applications like Battery Care or Battery Eater or Battery Mark if there is no standard software to solve the problem.
The last program, after charging, loads the CPU with the task of calculating the infinite value of Pi.
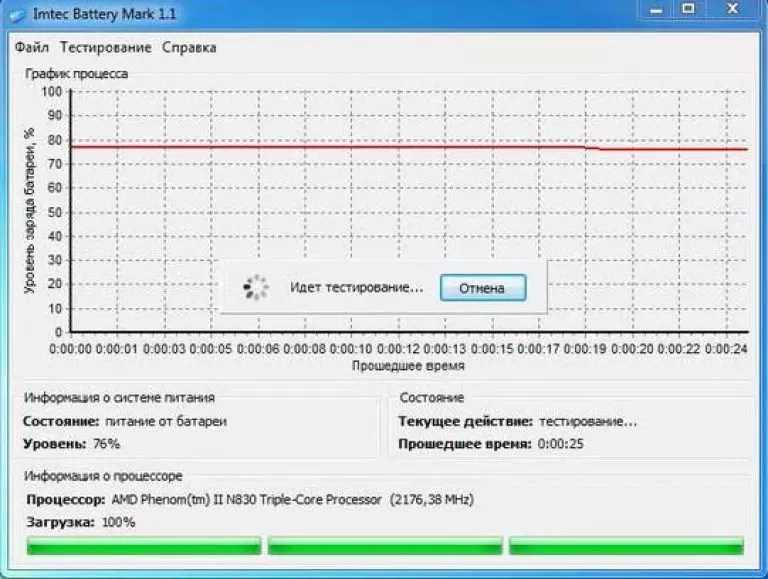
The utility will additionally allow you to conduct comprehensive testing of the battery both during and in the event of its downtime.
A special algorithm will allow you to perform a couple of discharge-charge cycles for about an hour (the time depends on the capacity and degree of wear).
Hewlett-Packard ships laptops with HP Support Assistant.
The “My Computer” subsection contains tools for testing and debugging a laptop PC.
Review the following frequently asked questions about battery testing and calibration.
What if my computer does not contain HP PC Hardware Diagnostics for Windows?
Some computers may not have the HP PC Hardware Diagnostics Windows tool. HP provides diagnostic programs that you can use to check your computer's hardware components. HP PC Hardware Diagnostics for Windows is a utility for the Windows operating system that allows you to run diagnostic tests to determine whether your computer hardware is functioning properly. The tool runs on the Windows operating system and is used to diagnose hardware failures.
For more information about using HP PC Hardware Diagnostics for Windows, see .
How do I run the HP Hardware Diagnostics tool if it won't boot from my hard drive?
You can install HP PC Hardware Diagnostics for Windows on a blank USB drive with the FAT or FAT32 file system for use if the primary storage device fails or the UEFI files are corrupted.
For more information about using HP PC Hardware Diagnostics for Windows on a USB drive, see Testing with HP PC Hardware Diagnostics on an External USB Drive HP PCs - Checking Hardware for Problems.
What should I do if my computer does not have HP Support Assistant?
How to interpret the results of the extended battery test report?
Review the following list for more information about the results that appear under Battery Information or More Information.

Charged or Discharging: Displays how close the battery is to full as a percentage. "Charging" appears when the power cord is connected to the computer, and "Lowing" appears when it is disconnected.
Main battery: Provides a summary of the main battery test results.
Warranty type: Describes the battery warranty.
Cycle counter: number of times the battery can be completely discharged and recharged. In this example, the battery was charged and discharged 38 times out of 1000.
Manufacturer: The code shown shows the manufacturer of the battery.
Battery age: Indicates how many days the battery has been used.
Serial number: Battery serial number.
Temperature: Battery temperature.
Design capacity: Shows the design capacity of the battery.
Capacity at full charge: Shows the capacity of a fully charged battery.
Remaining capacity: Shows the remaining battery capacity in milliamp-hours (mAh), rather than as a percentage.
Current: Shows the discharge current, represented in milliamperes (mA). If the computer is using AC power, the current displays as "0 mA".
Contact voltage: Output voltage at the battery terminals.
Design voltage: Shows the design voltage of the battery.
Element voltage (1-4): Each battery contains a certain number of cells, such as 3, 4, 6 or 8 cells per battery. In this example, the battery contains 4 cells. One element shows "0 mV" because it is static. The remaining elements display the capacity of each individual element.
State: Contains a code that provides additional information about the battery status that technical support may need to know.
Alternating current: Displays "Yes" when the power cord is connected, and "No" when the power cord is disconnected from the computer.
CT number: This number is the identification number printed on the battery barcode.
Extra battery: Indicates the presence of an optional battery.
Why does the battery status show as "Charged" when the battery is not 100% charged?
To protect the battery from multiple short charging sessions when the power cord is connected, the battery does not begin charging until the charge level drops below 94%.

How to maximize battery life?
Recommendations for using and storing batteries are provided in the user manuals for each HP notebook computer model. Additional recommendations for proper handling of batteries:
Store lithium-ion batteries at 20-25°C with a charge level of 30-50%.
Do not disassemble, crush or puncture the battery; Do not short-circuit the battery terminals; Do not throw the battery into fire or water.
Do not leave batteries exposed to high temperatures for long periods of time. Prolonged exposure to heat (such as inside a car parked in the sun) will accelerate the aging process of a lithium-ion battery.
Remove the battery from the compartment if the laptop will not be used for more than 2 weeks (will be without power and will not be connected to AC power).
Remove the battery from the compartment if the laptop will be connected to AC power (via the power supply or docking station) for more than 2 weeks.
To run high-performance applications on a battery-powered laptop, install a high-capacity battery (amp-hour rating).
Calibrate the battery according to your operating conditions. During normal use, lithium-ion batteries should be calibrated at least once every 3 months; A battery that rarely discharges completely should be calibrated about once a month
Keep batteries out of the reach of children.
Use only the batteries that came with your computer, replacement batteries supplied by HP, or compatible replacement batteries purchased as accessories.
How to reduce energy consumption?
To save energy, set your laptop's power saving mode manually.
Reduce screen brightness to the minimum acceptable value. Adjust the brightness using the Fn and F7 or F8 keys.
Disconnect unused peripherals. External hard drives, CD-ROM drives, Zip drives, PC cards, and other peripherals also drain power, even when used passively. Disconnect these devices when you are finished using them.
Reduce the processor clock speed. The faster the computer runs, the sooner it uses all the battery power. By reducing the processor speed, you can extend battery life. Methods for reducing performance vary by model and are described in the accompanying manuals.
Turn off your wireless connection when not in use. If your laptop has a wireless on/off button, press it until the corresponding light turns off.
Check programs running in the background. Some programs automatically install the Quick Launch utility and begin running in the background after you turn on your computer. Energy consumption can be reduced by periodically searching for unnecessary programs and removing them.
What should I do if the original battery charges slowly, but the replacement battery charges at normal speed?
If the original battery charges too slowly but the replacement battery charges properly, the problem may not be with the battery. Before replacing a faulty or worn battery, follow these instructions to determine whether the battery needs to be replaced.
To find the product number printed on the product label on your laptop, turn off your laptop. Turn the laptop over, then look for the HP product label on the underside of the laptop. On this sticker you will find code of product.
Note.On some models, the product label may be located inside the battery compartment or under the access panel.
Battery capacity and operating time on a single charge are some of the important parameters of a laptop. They influence the final price and the buyer’s choice. No matter how high-quality these characteristics are, any battery is designed for 300–400 charge-discharge cycles. It is important to try to discharge the battery before recharging it again. The period of normal operation of the battery can be shortened by overheating, hypothermia, or leaving the laptop on until the battery is completely discharged. If the charging quality deteriorates, the battery should be restored.
What is a laptop battery
The battery serves as the power supply for all functional elements of the laptop. To increase the duration of operation in the absence of electricity, you need to reduce the number of working components to a minimum, turn off Bluetooth, Wi-Fi, and close unnecessary applications. The battery can have an elongated rectangular or square shape. The battery is located on the back of the laptop and has a spring latch for easy installation and removal. This element is sensitive to overheating, so you should not store your laptop near heating devices.
Restoring a laptop battery
If the operating time of the computer after charging the battery rapidly decreases or the computer does not turn on, this indicates that the battery has failed and the laptop battery needs to be restored. Self-recovery of a battery is a process that requires tools and skills for such work. If both of these components are missing, the best choice would be to purchase a new battery or contact a service company that repairs laptop batteries. Restoration is possible by completely disassembling / replacing the battery cells with new ones.
Tools
If you decide to repair the battery yourself, you will need the following tools:
- multimeter – a dial or electronic device for measuring DC voltage is suitable;
- knife or thin screwdriver - for disassembling or opening non-separable battery models;
- soldering iron, solder, flux - for disassembling and joining new cans together;
- multifunctional charger type iMAX B6, necessary for checking the charge level, firmware, and balancing batteries;
- glue, electrical tape - will be needed when assembling the battery.
Laptop battery recovery program
Software products that, when installed on a computer, begin monitoring charge-discharge cycles and are able to determine the quality of the battery and the degree of wear and tear will help you make a decision about the need to restore your laptop battery. The most popular utilities for these purposes are:
- BatteryMon;
- BatteryCare.
BatteryMon is a free Windows program for monitoring laptop batteries, determines battery performance and tendency to breakdown. The program will provide the user with the following information:
- battery charging schedule in real time;
- battery level log file for analysis;
- information about the status of each battery;
- results of the BurnInTest test produced by this software - testing battery performance under load.
BatteryCare is a utility that, based on monitoring results, will provide:
- statistics of charge-discharge cycles;
- calculate the percentage of wear;
- battery capacity;
- voltage and battery charge/discharge power;
- current temperature of the processor, hard drive;
- message about critical charge level;
- information about the need to calibrate batteries.

DIY laptop battery repair
If you decide to balance or repair your laptop battery yourself, you will need to do the following:
- Disassembling the battery - some models require screwdriver disassembly; in most cases, the batteries have a glued structure, for disassembling which you will need a knife or a sharp screwdriver.
- Balancing is carried out when there are imbalances in the residual voltage or its value when individual banks are fully charged.
- Replacement of batteries can be done partially or all batteries. When purchasing new elements, pay attention to the voltage, capacity and date of manufacture.
- Assembly - it will be easier if you have screws, otherwise you will need instant glue for plastic.
Disassembling a laptop battery
The easiest way is to disassemble the screwed battery. To do this you will need a small Phillips screwdriver. It is more difficult to disassemble a glued structure - for this you will need a sharp knife, with which you need to find the glued place under a bright light, cut a gap, and remove the battery cover. This should be done carefully so as not to damage the cans, temperature sensor or controller board on which the connector is often installed. A standard laptop battery kit consists of 8 cells. To balance, do not rush and disassemble the banks - they can be recharged separately.
Replacing batteries
The batteries of laptops from popular brands Samsung and Lenovo use cylindrical lithium batteries 18650 with a nominal voltage of 3.7 volts, a capacity of 2200 mAh, connected in a series circuit. After 1-2 years of operation, the properties of battery banks begin to differ from the nominal values. The maximum battery charge (MCC) and capacity change, and self-discharge appears. The multimeter will be able to identify jars that need replacement - they will have:
- minimum residual voltage (less than 3.6 V) in the discharged state;
- high voltage when charged.
If you purchase the necessary batteries, you can replace the batteries in your laptop battery. You can revive a battery with working banks if you push each of them using a charger or a car battery. At the same time, it is possible to repair the battery without buying new cans. Having connected the negative side of the can to the positive side of the battery, you need to short-circuit its plus to the negative side of the car battery for 1-3 seconds, and then measure the voltage on the can. In this way, it is advisable to check all the banks and bring the potential to nominal on each one.
Battery assembly
The factory connection of battery cans is made with thin busbars and resistance spot welding, which can be replaced by soldering at home. To disassemble, heat the welding spots with a soldering iron and use a knife to disconnect the cans. When repackaging, the heated busbar is treated with flux to remove the oxide film, then solder or tin with rosin is applied to the contact point on the can and the busbar. Connect them and heat the joint with a soldering iron. After the solder has melted on both joining elements, remove the soldering iron, but keep pressure on the joint until the solder hardens.
Often problems in the functioning of a laptop arise due to poor battery performance. If the battery does not charge, the cause of the failure should be identified. You should start by checking the cord and voltage in the electrical network, then pay attention to the drivers, which play an important role in the functioning of the device.
It may also be due to damage to the power circuit or connector. If the problem lies here, it is necessary to restore the board tracks, it may also require a complete replacement - this cannot be done without diagnostics.
If you don’t find a problem here, then the problem is directly in the laptop battery.
The battery on the laptop does not charge: reasons
Let's note standard battery problems.
- Probably the most common cause of problems is simple physical wear and tear. Batteries on modern laptop models can withstand no more than 800 charge cycles. Thus, the device is designed to last for 2 years, after which in most cases the battery will need to be replaced. That is, the battery life is on average two years, sometimes three. After each charge cycle, the battery capacity is reduced; over the course of a year, this capacity decreases by about fifteen percent. The battery is a consumable item, so this process is quite predictable and often this breakdown is not even included in the warranty card. However, you can extend the life of the battery by following simple rules of use: the battery cannot be kept in the device all the time if the laptop is powered by an external power source - you must remove it and store it in a cool, dark place;
Important! Carry out a full discharge/charge cycle at least several times a week, otherwise the battery will fail quite unexpectedly and faster than you might expect.
- Also, the reason may lie in the failure of one battery in the battery, due to which the entire battery does not function. In this case, the battery must be restored;
- The next reason is a short circuit;
- If the laptop does not see the battery, but is charging, most likely the reason is the failure of the controller itself - and in this case it is necessary to change the battery;
- If the laptop sees the battery, but does not charge, there are a number of possible reasons:
- The issue is the battery contacts, they may be damaged and may need to be cleaned to prevent oxidation;
- The battery is not inserted correctly, remove it and reinsert it;
- The battery life is exhausted;
- It's a matter of the motherboard's power supply;
- Drivers do not work;
- The cord is damaged;
- The battery is inoperative and needs to be replaced.
Of course, after discovering the cause of the problem, it is better to contact a specialist to fix it. But you can try to rehabilitate the battery yourself.
To get started, we perform a number of simple steps:
- Turn off the device through the Start menu;
- Pull out the power cord;
- Remove the battery from the device;
- Press the power button and hold for 20 seconds;
- We put the battery back in and boot the computer;
If the charge in the tray is at a minimum level, connect an external power source.
We carry out battery diagnostics
Wondering how to check the battery on a laptop? To diagnose battery performance and determine its level of performance, there are many different utilities. By the way, they sometimes help to increase the service life of the battery.
Let's look at several popular and quite effective programs. But it is worth remembering that the causes of problems are quite varied, and the program will not always be able to fix them. Often these utilities can extend battery life by reducing the load.

Monitors the battery status, is quite easy to use, and does not slow down the system. Shows detailed information about battery performance, for example, by what percentage the capacity has decreased. Based on the initial characteristics. You can also find out the number of complete battery charge cycles and the calibration date. The utility also shares tips on reducing battery consumption. The program is free and updates automatically. I think it's worth downloading if you haven't already.

Also a fairly well-known program for optimizing battery performance and maximizing its service life. The utility differs from similar ones in a convenient function - it can tell you by what percentage the battery life can be increased if you change some of the system's services. Changed settings are saved in your personal profile, after which you can easily open them at any time. The utility does advanced monitoring of battery performance, making an assessment of the loss, comparing it with the rated power of the battery. It has a fairly simple and user-friendly interface and does not require special knowledge to use. 
Tests the battery condition, indicates the actual capacity. The program is useful when buying a used laptop; in a few minutes you can find out what condition the battery is in and how long it will last.

Another similar utility. Reduces energy consumption by disabling unnecessary processes, allowing the computer to work up to two times longer.
How to troubleshoot battery problems
If you have problems with the battery, do not immediately go to the store for a new one. It is quite possible to restore it. Of course, the battery capacity is not designed for a certain number of cycles, but there are recovery methods.
Let's look at solutions to the most common problems.
Battery won't charge
Sometimes the battery simply stops receiving a charge. The laptop sees the battery, the charge level is shown in the tray, but when connected to an external power source, nothing changes.
What to do?
Let's return the battery settings in the BIOS to their original values. To do this, perform the following steps:
- Disconnect the laptop from external power;
- Carefully remove the battery;
- Press the computer's power button and hold it for at least a minute;
- We connect the device to the power supply, do not insert the battery;
- We go into bios: when loading the system, press the key combinations that are indicated in the user manual. Often this is Del, F12 or F2;
- Reset the settings to the initial value (Restore Defauts), save (Save), exit (Exit);

- Turn off the device by holding the power button for 5 seconds;
- Pull out the cord, insert the battery;
- Insert the plug and connect the laptop to an external power source;
- Loading.
The method worked if you see a system notification that the battery is charging.
The charge is on, but not 100%
The charge continues, but does not reach its logical conclusion; the battery is not fully charged. Another symptom of the “disease” is that the battery life of the device per charge is greatly reduced. The laptop holds a charge several times less than before.
What to do?
The utilities that we discussed earlier will come in handy here. We check the condition of the battery of one of them. We need to know the following characteristics: the declared power of the battery (also known as the nominal power), the maximum power level that the battery reaches today and the percentage of battery wear. Accordingly, the higher the number, the higher the need to replace the battery. If the percentage is insignificant, most likely the battery is not the main reason for the decrease in battery life. Go ahead.

The problem may lie in some program that you recently installed. It can work quietly in the background and significantly increase the performance of the processor and Wi-Fi, thus closing the transition to saving mode. To check the presence of such utilities, call the dispatcher by pressing Ctrl+Shift+Esc and analyze the operation of background programs. Deactivating unnecessary utilities can improve battery life.
The purchased battery does not function
The reason may lie in the incompatibility of the purchased battery with the charging controller. Batteries may be the same size, but differ in other characteristics. Try resetting the BIOS settings. If this does not help, compare the markings of the old and new batteries - they should not be different.

Thus, there is no need to panic at the first battery failure. Moreover, you shouldn’t immediately look for money for a new battery; by the way, it costs a lot. Try our recommendations and follow the steps described. Try to diagnose and restore the battery using special utilities or by resetting the system settings. Check various options and analyze the causes of the breakdown. Perhaps it's not so scary. If you do not neglect the rules of operation of the device, the battery will last a long time. By the way, batteries rarely fail so suddenly; more often problems arise in the software or the cause is the power supply/connector. Try all the methods, and only then replace the battery with a new one.
Note! When buying a battery, it is better to take with you an old battery or a laptop, so it is more likely that you will be offered exactly the element that you need.
Often, due to improper charging, the laptop battery fails. At best, it will show the wrong percentage of charge; calibrating the battery will help here. In the worst case, the battery will completely fail, where only its replacement will help. Therefore, to improve its performance, today’s article will talk about how to calibrate a laptop battery.
I once talked about how to properly charge a laptop battery, be sure to read it, following the rules listed in that article will help your battery last longer.
When is it necessary to calibrate the battery?
Battery calibration should be done when your laptop begins to show an incorrect charging percentage, for example, it shows 90 percent, and turns off very quickly, like after 20%.
This happens due to the “memory effect” of the battery, it remembers the charge level and it appears as if the battery is fully charged, but in fact, the charging was turned off much earlier than its end, and the battery remembered this as a full charge. Nickel batteries (NiMh, NiCd) have always had problems with memory, but as practice shows, lithium-ion (Li-Ion) also suffer from this, although not so much. I remember that many claimed that lithium-ion batteries are not subject to the memory effect, apparently not true. Excerpt from Wikipedia:
Researchers from the Swiss Paul Scherrer Institute, together with colleagues from Toyota Research in Japan, have discovered that a widely used type of lithium-ion battery is still susceptible to a negative “memory effect.”.
In general, calibration should be done approximately once every three months, for preventive purposes; this is quite enough for the normal operation of your laptop’s battery.
How to calibrate a laptop battery.
In principle, there is nothing complicated, the only thing is that the process itself can be very long.
Some laptops, such as Asus, have built-in utilities in the Bios to calibrate the battery. But in this article we will talk about another method that is suitable for any device. Now let's take a closer look at how to calibrate the battery.
Before starting the process, you will need to disable the automatic shutdown of the laptop and the transition to sleep mode (hibernation), which is carried out at a certain percentage of the remaining charge. Let's say this is 10%, then the battery will not be completely discharged, in our case we need a complete discharge, down to 0%. You can disable this by going to Start > Control Panel >
Hardware and Sound > Power Options and set it to “Never”.
The next step is to fully charge the battery, up to 100%.
After this, you need to disconnect the laptop from the network and discharge the battery. You can do this quickly, for example, by playing some computer game, you can also increase the brightness of the screen, which will help drain the battery faster.
And now, the battery is discharged, the laptop has turned off, now you need to fully charge it immediately, you should not leave the battery discharged for a long time, this can damage it. While charging, the laptop must be turned off.
Here it is, simple battery calibration process laptop. Everything should work out for you if you did everything exactly like this. But, if your battery has not been calibrated, then it may already have to be replaced.
A few more tips for using the battery:
Avoid direct sunlight. The optimal temperature for storing the battery is +10°C - +35°C.
I repeat once again that you should not store the battery completely discharged - this will lead to the death of your battery. Also, you should not leave it for storage outside the laptop when its charge is 100%; the optimal charging percentage for storing the battery is approximately 50%. So you can easily forget about it for several months.
Proper operation and timely calibration will prevent your battery from failing ahead of schedule.
That's all for now. If you still have questions, feel free to write to me at,


