Construction of winter overalls for children. Building the base of a children's overalls.
I will sew online, that is, together with everyone, taking my time, gradually laying out the sewing process, and answering questions along the way. I will post each stage in a new post, leaving links to previous and subsequent stages. Girls, you can do the same on your blog (magazine, topic, or just in my comments), post your steps with explanations or questions, clarifications, etc.
I warn you that there will be a lot of writings and photos. That’s why, most likely, I leaned towards step-by-step sewing rather than immediately ready-made volumetric MK. I don’t promise to photograph everything beautifully and colorfully, but I’ll try to make it clear and not completely dirty and blurry)))))
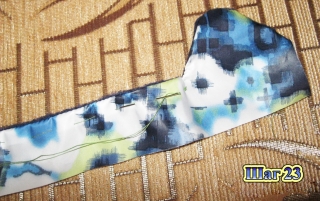
In general, I will sew a jumpsuit in the same image and likeness for my Ksyusha. I’m not sure about the fur yet, but if there are a lot of people who want to attach the fur, I’ll show you.
There are few details in it. Quite a simple model. There will be no inserts or decor. All from the same printed fabric. I have this jacket fabric with a membrane coating with the image of rainbow zyobers))))
The lining will be fleece and omnikhite. You can take a regular lining, or you can make one lining for the entire height. But full-length fleece will not be very comfortable, I think. That's why I only put it on the front and back up to the butt. Below will be the Slidsky Omnihit, and it will also be in the sleeves. There will be fleece on the collar and hood. I took the TricotBrush, which I had previously put in my other overalls, but it’s out of stock, unfortunately.
And so, my list necessary materials for insulated overalls size 98-104.
Raincoat - 1.5m
fleece - 0.5m
omnihit (lining) - approximately 1m
insulation (I have Alpolux 200 for winter) - approximately 1m
zippers:
- main - 1 PC
- on the pockets - 2 pcs
- on the fastened hood - 1 PC
wide elastic band 3cm for cuffs - 80cm is enough
decorative elastic band for straps - approximately 1m
hat elastic for tightening - approximately 1m
Velcro
threads
fasteners for drawstring - I have found two things that match the color so far, maybe I’ll take others and make a drawstring on the hood, I don’t know yet...
In my photo I also have an additional gray raincoat fabric for the pocket and frames. Perhaps it won’t be needed, it’s just that the pattern of my main fabric is directed, you can’t turn it anyhow, in case it’s not enough, so I played it safe. But it should be enough for the main details.
I take the pattern from Ottobre magazine 2014-4, model 14. For my daughter’s height of 94 cm, I take the size of this pattern 104. As the practice of sewing this pattern has shown, for winter insulation it is good to take a size one larger than the child’s own. That is, Ksyusha’s native size is 98, one more - 104. This is quite enough, the pattern is good, in my opinion, the width is sufficient.
The changes I make to it are very minor: for reserve for growth, and in general for some convenience I increase the length of the legs and sleeves by 4cm! How larger size, the greater the increase. Well, you also need to look at what is planned for the legs and sleeves. I have cuffs, my formula is +4cm. The growth margin turns out to be exactly 10 centimeters. That is, a child with a height of 92 to 102 cm can fit well in this size.
I make the collar 1.5 cm higher. I measured this clearly today. Before that I somehow added it by eye))
Well I'm converting the hood into a two-seam one. This is my personal preference. Not necessary.
I don’t touch the armhole, sleeves or neckline. But perhaps someone will need to lower the armhole a little and widen the sleeve. Girls, look at your children. These narrow sleeves suit me quite well. And, unfortunately, I can’t tell you how to change the armhole...
Greetings to all craftswomen and mothers of babies! I know that among my readers there are young mothers who want their children to be comfortable in the clothes that are chosen for them. I want to offer you overalls pattern for baby. With its help, you can sew such a necessary and practical thing yourself. Your child will feel very comfortable in it.
A similar wardrobe item for children is now very popular and everyone probably has it. But if you wish, you can have as many of them as you want. It is enough to buy a beautiful, bright fleece and sew several overalls for your baby with your own hands and change them at least every day.
The pattern is designed for the following sizes:
Bust circumference – 55-56 cm
Waist circumference – 51-52 cm
Hip circumference – 56-58 cm
Back length – 22-23 cm
Sleeve length – 28-31 cm
Neck circumference – 26-27 cm
TO WORK ON THE OVERALLS YOU WILL NEED
Fleece 1.15 cm with a width of 150 cm
Elastic band (elastic band) 1.10 cm wide 1 cm
Nonwoven
The pattern is given without seam allowances. They will need to be made when cutting: along the cuts - 1.5 cm, along the bottoms - 2.5 cm.
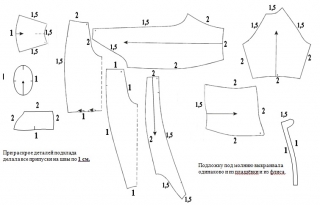
1 – front half (2 parts)
2 – back (2 parts)
3 – sleeve (2 parts)
4 – hood (2 parts)
5 – middle part of the hood (1 part with a fold)
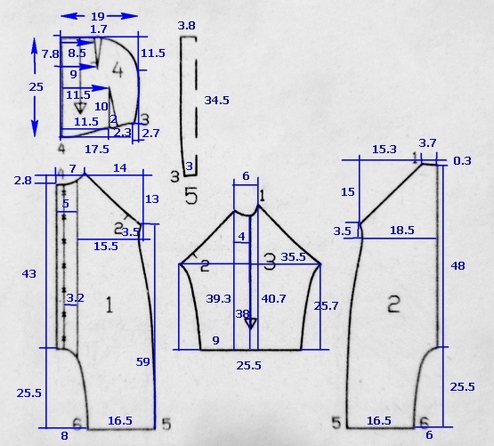
On pattern number 1, there is a 5 cm wide placket along the middle of the front. This is a selvedge. It needs to be re-shot as a separate additional detail.
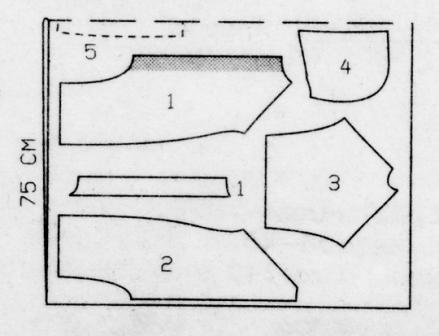
To finish the edge of the placket and hood, you will need bias binding 1.5 cm wide (full width 3 cm). You will find information on how to make it yourself. On the layout plan, the shaded areas must be covered with non-woven material.
The picture shows the most appropriate arrangement of parts.
DESCRIPTION OF WORK
1. Sew the back seam
2. Sew the sleeves to the back and front halves of the overalls along the raglan line
3. Sew darts on the hood
4. Middle part Sew the hood to the side parts
5. Sew the hem along the edge of the front, having previously glued it with non-woven fabric.
6. Sew the hood into the neck of the overalls
7. Apply bias tape to the front and hood sections
8. Add buttons
9. Sew side and crotch seams on the overalls
10. Fold the hem on the sleeves and legs
11. Insert elastic bands
That's all! The baby's overalls are ready! As always, we got it done quickly enough. In such an outfit any child will feel comfortable and warm.
If you wish, you can dream up and come up with a model that will combine different fabrics, different colors and textures. For example, the front and back are made of multi-colored fur, and the sleeves are made of plain fleece or thick knitwear. Come up with your own original combinations.
I hope you liked this proposal. Check out the section. There you will find many more interesting and useful things for you and your family members.
Sew with pleasure and to the delight of your loved ones!
Leave your comments and ask questions if you have any.
Authors of the article:
Hello, Zimushka-winter!
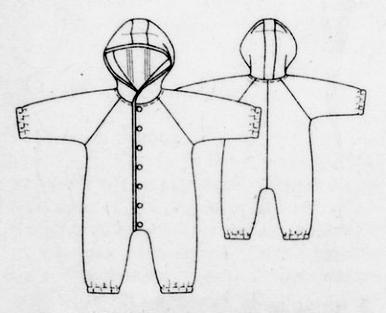
For children, the new arrival of winter means new fun, new experiences! The quality of these childhood experiences is directly proportional to parental responsibility. In order for a child to have a successful walk, first of all, he needs appropriate clothing. The most suitable option for winter games snowball fights, sledding or skiing - this, of course, overalls.
Overalls will reliably protect the child from the winter cold, provide comfort and freedom of movement.
We offer you pattern, according to which you can sew a jumpsuit like for girl, so and for boy.
Ready-made pattern for children's winter overalls
Height 110cm
Bust circumference 56cm.
Authors of the article: Valentina Nivina Alexander Nivin
Rompers. Finished pattern.
Winter is the time for country skiing, ice skating, sledding, fun games snowballs. For children to feel comfortable outside, they need appropriate clothing - comfortable, functional, and not restricting movement.
Ready-made pattern for children's winter overalls, offered to your attention is designed for height 110cm, chest circumference 56cm.
Jumpsuit (with insulation) straight silhouette, optimally voluminous, with hood, with leaf pockets, with elastic or drawstring at the waist, zipper fastening. The sleeves and legs at the bottom are also gathered with elastic or cuffs.
Winter is coming - time for fun winter fun and games on fresh air. What can cause more emotion in parents than the sight of children squealing joyfully, running races along snow-covered alleys and playing snowballs? However, do not forget that winter is also a cold season, when the likelihood of colds is increased. Therefore, for caring and wise parents, winter is an occasion for renewal and replenishment. children's wardrobe, because it often happens that children have already outgrown their winter clothes from last year.
Children's overalls with a hood - we meet winter fully armed
Today we will talk about how to sew a children's jumpsuit with a hood with your own hands. After all, a child who fearlessly faces the winter not in something bought somewhere in a store or at the market, but in something sewn by mother’s hands, providing the maximum level of comfort and warmth, will certainly be a reason for special pride and tenderness for any mother.
Contrary to popular belief, you do not need to be a professional in this field to sew children's clothes yourself. The main thing you will need is a pattern baby onesie with a hood, inexpensive materials now sold in every fabric store, some cutting and sewing skills and a little free time.
Cutting and preparation of material
As for the material that we will use, its choice depends entirely on your desires and imagination. The main thing when choosing is to take into account that we are sewing for children, so the following requirements for the material are mandatory: it must be practical, strong and, if possible, wrinkle-free, and at the same time it must repel dirt, dust and moisture.
The main fabric should be approximately 60 by 100 centimeters in size; the lining is best made from quilted material of the same size. It is clear that we choose the dimensions of the lining approximately the same. Also, for decoration you may need a little decorative fabric, we believe that there should be no problems at all; various scraps and strips of such fabrics can probably be found in the storage rooms of any housewife. You will also need an elastic band about 30 centimeters long, a cord about 70 centimeters long, a flat zipper about 20 centimeters long and a spool of strong thread.
You can download the finished pattern at the end of the publication. It is best to print it on a printer in one to one size, cut it out, and then paper templates line the fabric. When cutting the material, keep in mind that it is necessary to leave allowances of one centimeter.
Let's start sewing
When assembling the overalls, you first need to sew the middle and shoulder seams on the back. After this, the seam allowances must be ironed. Then we sew in the hood along the neck line. Now the sleeves are next - we sew them into the armholes. After this, you need to sew the middle front seam.
Next, we repeat all these operations for the lining - in fact, we assemble another jumpsuit from it. When the lining is ready, we put it inside the overalls, carefully align all the seams, sections of the sleeves and bottom, then attach the lining and measure. At this stage, it will still be possible to change something if it doesn’t turn out quite as it should (afterwards, of course, you can also fix something, but it will take much more time and labor).
Now you need to sew the side seams into the sleeve seams and crotch seams. After this, the allowances in the middle of the front on the front parts of the main and lining fabrics will need to be turned inside out and ironed. At this stage we sew in the zipper, and now we turn in the upper edges of the braid.
As for the neckline, it should be turned on the wrong side, basted and stitched. Now all that remains is to thread the cord into the drawstring and secure the stops at its ends. We thread the elastic through the bottom of the sleeves, tighten them and then sew up the hole.
Now our turn is the hood. On the front and lining fabric you need to sew the middle seam, align and iron the seam allowances. After this, attach the front fabric and the lining to each other, stitch the edges, iron the hood, turning it to the right side.
All that remains is to decorate our jumpsuit. An applique made from the decorative fabric that we have prepared is well suited for this. It all depends on your artistic taste and craftsmanship, we sew the applique onto the front and our overalls children's ready. Now little fidgets are not afraid of winter with its cold weather!
| Size (GOST) | Height, cm | Chest circumference, cm | Waist circumference, cm | Download the pattern |
| 28
Age 2 years |
92-98 | 54-56 | 51-53 | (downloads: 4064) |
| 30
Age 4 years |
104-110 | 55-57 | 53-55 | (downloads: 1551) |
| 32
Age 6 years |
116-122 | 58-62 | 55-58 | (downloads: 1209) |
Reviews (1)
To sew the overalls I needed:
- (we are 6.5 months old, but I sewed a size 74 overalls for growth);
- 1.2 m of main fabric (I used raincoat fabric);
- 1.2 m of fabric for lining (I used fleece as lining fabric);
- 2 m of insulation (our winters are cold, so I made two layers of double synthetic padding);
- 2 permanent zippers 50 cm long;
- 1 cord 80 cm;
- elastic cord 1.5 m;
- 6 clamps and 6 cord ends.
I added boots and mittens to the overalls pattern (patterns are given in actual size):

![]()
I also changed the edging of the hood and the backing for the zipper (see below)

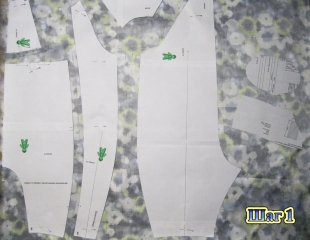
Step 1. When cutting parts from the main fabric, I made the following seam allowances (allowances are given in cm)
When cutting out the lining parts, I made all seam allowances according to 1 cm
I cut out the backing for the zipper the same way from both raincoat fabric and fleece.
Step 2. At the next step, I placed the cut out parts (both from the main fabric and the lining parts) onto the padding polyester and cut them out exactly along the contour. Each detail was insulated with synthetic padding. For the convenience of sewing in the zipper, I did not cut out the backing for the zipper from padding polyester; it is better to fill it with padding polyester later.


Step 3. Since I used raincoat fabric as the main fabric, and it slides over the padding polyester, it is necessary to baste all the parts from the raincoat fabric along the edge so that the padding polyester doesn’t get lost when sewing.
![]()
Step 4. Now you need to cut off the excess padding polyester on each part.

Step 5. We lay and baste the folds on the central lower part of the front with a fold, connect this part with the front yoke.
Step 6. We attach strips of fleece to the resulting central front part to the edges (where the zipper will be located) (the length of the strip is slightly longer than the length of the zipper, the width is 3.5 -4 cm). I did this for the convenience of inserting the zipper, and then to close the zipper so that the heat does not escape from the overalls.
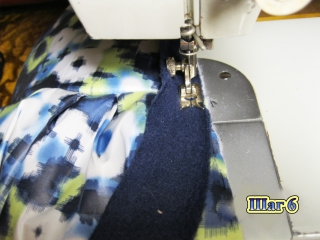
Step 7 Similarly, we attach the same strips of fleece to the sides of the front to the edges (where the zipper will be located)

Step 8 Now we connect the sides of the front and the central front part (along the seams that are located below the cut for the zipper, they are marked in red in the photo). Here's what happens:

Step 9 We make cuts for the zipper. In the photo I put a zipper into the cut to show how it will be sewn in.

Step 10 Sew the back pieces along the middle seam. I stitched an elastic band to the back, stepping back from the edge of the armhole about 2-2.5 cm. The length of the elastic is 25 cm. Then you can connect the front and back parts of the overalls along the middle seam between the legs.

Step 11 We sew the sleeves to the front and back parts of the overalls. We fold the overalls and sew the sleeve seam and the side seam of the overalls (in one seam). Unfortunately, I didn’t take a photo of this stage.
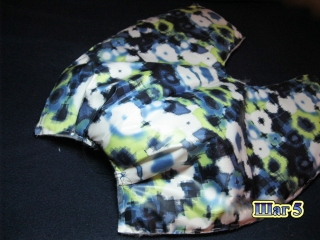
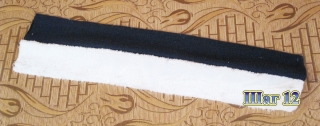
Step 12 Let's start sewing the hood. We cut out the edging of the hood (the pattern is given above). I cut it out of faux white fur and used fleece for the lining.
Step 13 We sew out the edging of the hood.

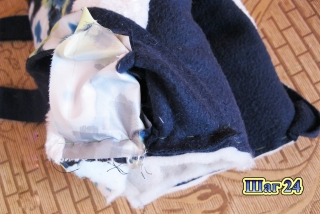
Step 14 We sew up the seam of the hood and attach the edging to it (as shown in the photo).

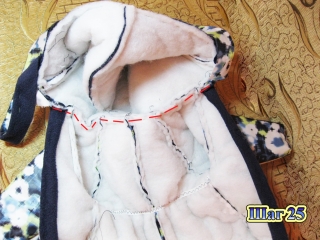
Step 15 We lay a machine seam, but not where we just basted, but at a distance of about 1.5 cm from the basting seam. This is necessary in order to then insert a cord into this drawstring to tighten the hood. You can make the drawstring for the lace in a different way, as it will be more convenient for you or as you think will be more rational.
Step 16 We sew down the details of the hood, cut from fleece. We place the hoods from the main fabric and from the lining one into the other with the right side inward (as shown in the photo).

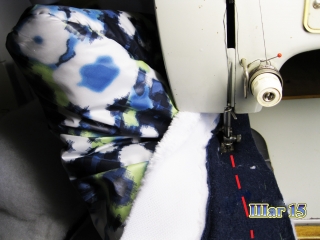
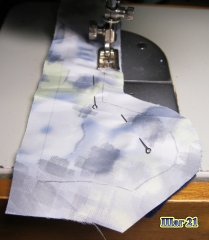
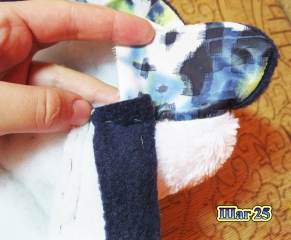
Step 17 We sweep away the details of the hood along the front edge (in the photo I am holding this place with my hand).

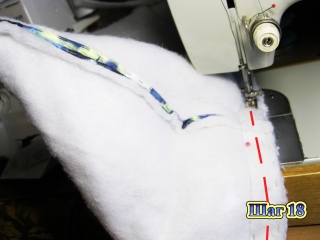
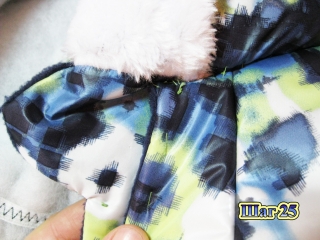
Step 18 Then you need to stitch this seam (shown in the photo with a red dotted line).
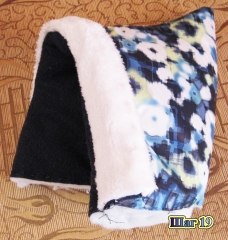
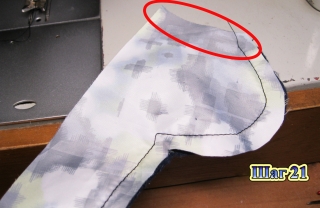
Step 19 We turn the hood inside out and this is what we got.
Step 20. Place the zipper backing pieces right sides together.


Step 21 We sew the backing for the zipper. Just don’t put a seam at the junction with the neckline; we will sew the hood there (in the photo this place is circled in red).
Step 22 We cut the seam allowance so that we can carefully turn it inside out.
Step 23 Turn the backing right side out and baste the edge.
Step 24 We combine the backing for the zipper with the hood: the front side of the backing is to the front side of the hood, the hood lining is to the backing lining. We baste the backing to the hood and stitch it together.
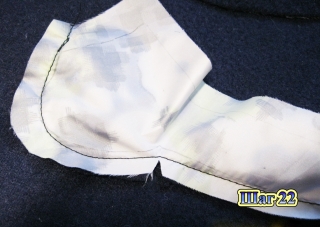
The result should be:

Step 25 Now we apply the front side of the hood to the front side of the overalls and baste them, then stitch them together (in the photo the seam is indicated by a red dotted line).
The junction of the hood, zipper backing and overalls:
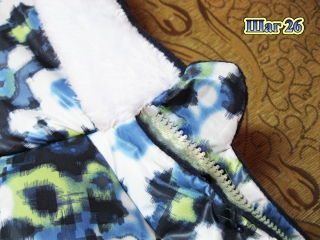
Step 26 At this step the overalls look like this:
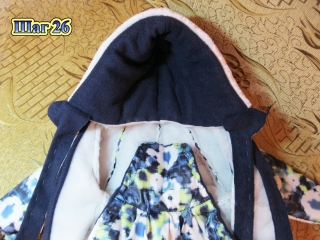
This is how the zipper will be sewn:
Step 27 Let's start sewing down the details of the lining of the overalls. I did not baste the fleece parts along the edges, since the fleece does not slip on the padding polyester.
The grinding algorithm is similar:
- 1. We connect the front side panels and the central front part.
- 2. We cover the cuts for the zipper.
- 3. Sew the back pieces along the middle seam. There is no need to sharpen the elastic!
- 4. We connect the front and back parts of the lining along the middle seam between the legs. There is no need to sew the side seams yet, they will be sewn together with the sleeve!
- 5. We sew the sleeves to the front and back parts of the lining. Fold the lining and sew the sleeve seam and the side seam of the lining (in one seam).
This is what happens at this step:
![]()
Step 28 I made drawstrings for elastic on the sleeves and legs. To do this, you need to cut out strips from the main fabric, the width of the strip is 4-5 cm, to determine the length, measure the length of the cut of the sleeve and trouser leg with a centimeter tape and add an increase for the seam (I hope I expressed myself clearly, maybe it will be clearer in the photo). We sew it on the sides so that there are neat edges at the drawstring.


