How to draw a stained glass window on paper with a pencil step by step. Stained glass on paper: mastering an unconventional technique
If you want to understand how to make stained glass on paper, then this article is for you. Stained glass on paper is also called squiggle design - this is an unconventional technique for making stained glass. This is mainly a children's activity. Making a wonderful picture using this technique is quite simple and interesting. Cardboard, glass, plastic, plywood are suitable for the base of the picture. For wall paintings, it is better to use opaque materials.
It’s up to you to decide which subject to choose for the picture. The image affects the atmosphere of the room. For a nursery, of course, it is better to choose children's drawings, for the kitchen - geometric drawings or abstraction. For the remaining rooms, you can choose a variety of ideas that will fit well into your interior and will look stunningly beautiful. Stained glass has been known for several centuries and is an element of luxury and a sign of wealth.


What is needed for the job? The basic list of required materials and tools may include:
- Paper – sheet A4;
- Simple pencil;
- Marker or black felt-tip pen;
- Cardboard;
- Eraser;
- Watercolor paints;
- Frame.
Let's go to the lesson
Stained glass always starts with an idea. In order to make a picture out of paper using watercolors, you will need: a pencil, scissors, half a sheet of white Whatman paper.
How to draw a stained glass window and make such a beautiful picture with your own hands?
Step-by-step work:
Stage 1: determine the size of your stained glass window.

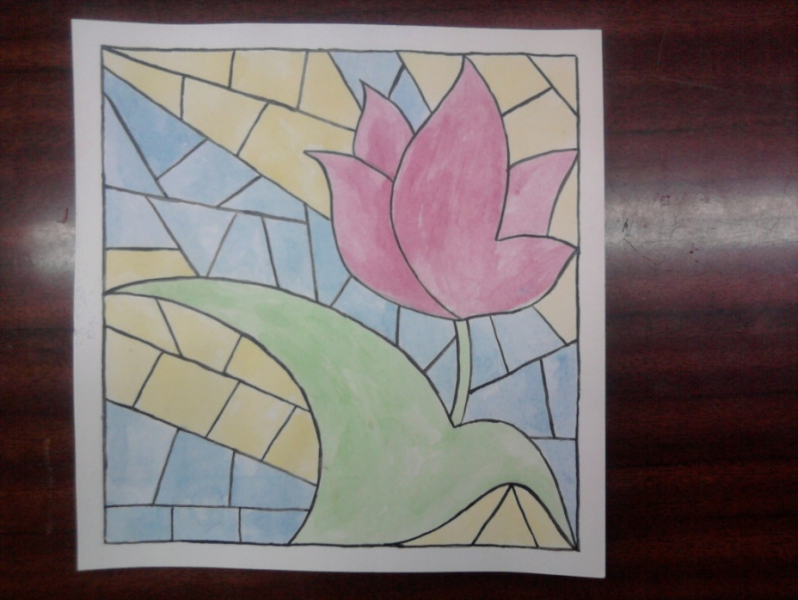
Stage 2: draw a stained glass pattern with a pencil. You can draw a sketch for a future painting yourself or download a ready-made template.

Stage 3: paint the remaining stained glass colors. First, paint all the fragments of the pattern with the same color. Let the paint dry to avoid mixing colors, then apply another color, etc. Having painted all the fragments, leave the picture until completely dry.


Stage 4: fill the space around the main pattern.


Stage 5: draw the outline in black. You can also paint it black with a thin brush or use a black felt-tip pen. It is better to start drawing from the upper left corner so as not to smudge the drawing.

A little about other types
There are many types of stained glass. The technology for making stained glass from colored paper is almost the same as using paints.

First we make a sketch. On a sheet of paper we draw a frame of 3-4 cm and transfer the drawing to it in full size. The contours should be wide. We color the outline with a black felt-tip pen. Cut out fragments of the design using a sharp knife. Then you need to cut out the parts from colored paper and glue them to the back of the work. Trim off excess. Your stained glass window is ready!
You can make a stained glass window with your own hands.


Filled stained glass- This is a unique process of imitation of stained glass, which is performed on a whole sheet of glass using self-made paints. To do this, place a large sheet of paper on the table, with a working glass on top. Trace the outline of the glass. Transfer the sketch to paper and trace all the contour lines of the sketch well and place the glass on top. Use the prepared paint to draw all the contour lines. Now prepare the fill paint and fill the fragments between the contours with paint. Fill in 3-4 layers, and the varnish should dry for 10-15 minutes after each pour. Then cover the top of the drawing with clear varnish and leave to dry completely. In 2-3 hours your stained glass window will be ready.

Little tricks
Stained glass is a decorative picture that can be made in any style.


Masters often keep silent about some, in their opinion, insignificant details. Here are some tips to help you make stained glass:
- Never start learning with the most complex, start with the simplest. Never take on a large drawing with many small details at once. Try a simple pattern first, and when you master the technique a little, you can take on complex designs.
- use different types of paints for your work, they all also apply to the drawing differently. The brightness and light transmission of the design depends on the number of layers of paint.
- To carefully adjust the pattern, use ear sticks and cotton pads.
- Use a sharp knife or blade to remove defective lines.
- Use wet alcohol wipes on your hands.
- The lighting should be good both from below and from above the work in order to immediately reveal the shade of color and the density of the coating.
- One of the main components of beautiful and neat work is its quick completion. For example, if you apply the contour paint too slowly, it will vary in both color and thickness. If poured slowly, the paint will lay down in an uneven layer and this will affect the quality of its surface.
Video on the topic of the article
Stained glass on paper is called a squiggle pattern - this is an unconventional technique for making stained glass. This technique is mainly used to develop drawing skills in children. The purpose of creating stained glass is to teach children to create a drawing in a stained glass style, increase the level of self-esteem, and develop originality. How to draw a bright stained glass window and its design yourself? This is very easy to do - just follow our instructions!
How to draw a stained glass window with step-by-step instructions and photos
To work you will need:- Sheet of paper A 4.
- A simple pencil.
- Eraser.
- Tassels.
- Water.
- Watercolor.
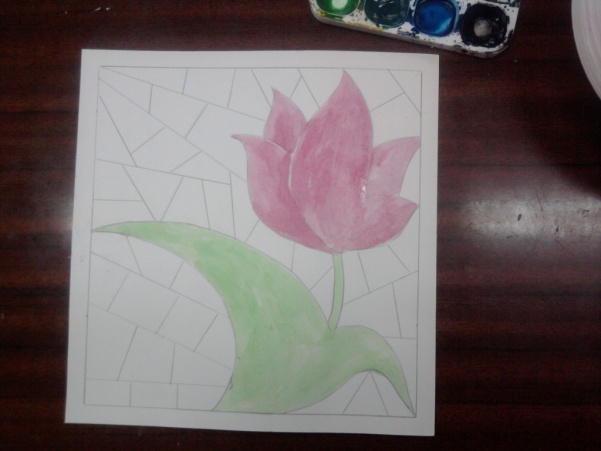
- Draw a rose on paper with a simple pencil.
- Draw random lines on the bud, leaves and stem.
- Paint over the bud fragments with red paint without going beyond the contours
- In the same way, step by step, paint over the remaining fragments of the bud with two more halftones.
- Do the same with the leaves and stem.
- After the paint has dried, outline all the contour lines with black paint.
In this way you can draw any flowers or berries.
 Learning little tricks for big work: nuances for beginners
A few secrets about painting on glass, when a colorless glass surface turns into a work of art in just a few hours.
How to correctly depict a picture on windows, glass doors of kitchen cabinets, bottles, flowerpots and other interior items? Often, masters are silent about some, in their opinion, insignificant details. Although for many inexperienced beginners, many nuances are valuable in learning the correct technique for making stained glass.
- Never start learning with the most complex, start with the simplest. Those. If you decide to take up stained glass painting for the first time, then never immediately take on a large drawing with many small details. First, try your hand at small glass with a simple template, and when you master the technique a little, you will be able to take more complex drawings.
- Also try using different types of paints, they also apply differently. Stained glass paints are thicker, and they are applied pointwise, followed by distribution over the surface of the fragment being performed. Varnishes are liquid in consistency and spread quickly, so they are usually applied in several layers, drying in between. The brightness and light transmission of the pattern depends on the number of layers.
- Cotton pads and ear swabs are needed to carefully adjust the pattern.
- Several sewing pins, for different colors, in case a bubble appears on the surface covered with paint, you should puncture it.
- Toothpicks are necessary to fill the outline evenly.
- A sharp knife or blade to remove defective lines.
- Wet wipes, alcohol-impregnated, for hands.
- Good lighting from below and above the work to immediately reveal the density of the coating and the shade of color.
- The working glass must be in a strictly horizontal position so that the paint does not flow to one side.
- Try to work quickly - this is one of the main components of beautiful and neat work. For example, if contour paint is applied too slowly, it will vary in both thickness and color. And if the pouring is done slowly, the paint will lay down in an uneven layer, which will affect the quality of its surface. When applying paint to a point, clear and fast movements are needed, the uniformity of the size of the dots and their density - the distance between them - depends on this.
If you take into account all the nuances, your work will be of higher quality.

- If you decide to make a stained glass window with your own hands, you must immediately decide what design you want to see on the window and make a sketch on whatman paper.
- Then you should carefully prepare the glass by first removing it from the window frame or door. Wash the surface with detergents or degrease with an alcohol solution.
- Attach the sketch to the back of the glass with tape and place it on a flat table.
- Draw all the contour lines of the design on the glass with contour paint. Make sure all lines are closed. Otherwise, the paint may flow from one fragment to another and mix. Remove bloopers with an ear stick soaked in alcohol.
- When the outline is dry, apply paint to the inner surface of the drawing fragments. Drip paint from the brush, distributing it evenly over the part until the layer reaches the required thickness. When all the fragments have been painted, leave the work until the paints are completely dry.
- The paints have dried, you can insert the glass into the frame. Look at the photo how beautiful the stained glass drawing made with paints looks.

Video on the topic of the article
Stained glass is experiencing a renaissance. Colored glass paintings are increasingly used by designers to decorate interiors in a variety of styles. Such a painting can decorate a room, become its accent, and set the tone for the entire interior. But previously, making stained glass was labor-intensive and expensive, but modern techniques allow you to create masterpieces on glass yourself.
Styles and techniques
There are many styles of stained glass, because stained glass itself dates back to the Middle Ages. Over time, it changed, reflecting the cultures of different countries and eras; the emergence of new techniques made it possible to diversify the materials used. Nowadays, several styles are used to decorate rooms.
- Classical. Assumes a symmetrical design, floral motifs or geometric pattern. Made in warm, pastel colors. Suitable for classic interiors with clear lines and good quality, heavy furniture.
- Gothic. This is the style of Catholic churches of medieval Europe. Twilight, upward direction of narrow lancet windows and high towers with spiers, dark red, scarlet, gold, green, blue, purple colors. It uses religious motifs or scenes from the life of medieval knights, castles, exploits, dragons, unicorns. Gothic stained glass will give the space a touch of mystery and fabulousness. It was during the Middle Ages that the most famous stained glass windows, recognized as masterpieces, were created.
Stained glass in Gothic style - a fairy tale and mystery in your home
- Modern. Perhaps a universal style for any interior. The main motives of this style are marine, the idea is the priority of form over content. This style is characterized by smooth, fancy lines, one way or another repeating the shape of a sea wave, grace, and sophistication. Pale, muted colors, halftones, blue-green tones. Art Nouveau goes well with modern technology and goes well with a high-tech interior.
Stained glass in Art Nouveau style is appropriate in any interior
- Abstract. Involves a geometric pattern and bright, cheerful colors. Does not conflict with almost any interior, except for the most orthodox one. Brings a special emotionality into the space. In abstract stained glass it is important to maintain a balance between form and color and then it will never get boring, charging you with optimism and encouraging creativity.
Stained glass in an abstract style is suitable for any interior and will never get boring
- Egyptian. Dim paintings in sandy-brown tones. The drawing reproduces Egyptian hieroglyphs, gods, pharaohs and scenes from their lives.
- Antique. The paintings resemble antique mosaics with ancient Greek scenes. Characterized by the presence of many small details. Suitable for rooms in a minimalist style.
Stained glass in an antique style is often a finished product
- Byzantine. It is distinguished by the use of not only colored, but also transparent glass, which makes the image seem to be hanging in the air. Such stained glass windows resemble glass painting and are suitable for rooms filled with light.
The use of transparent glass in the Byzantine style creates the illusion of the design floating in the air
- Vanguard. The subject of the drawing can be anything. But thanks to modern execution techniques, it is given a sense of volume. The image is multi-layered, with three-dimensional details, on transparent or frosted glass, glossy, shining. This stained glass window sets the tone for the entire room and makes it trendy.
Stained glass in an avant-garde style can contain voluminous details
Stained glass in the interior creates a powerful accent, so it is important not to make a mistake when choosing a style. It should be in harmony with the overall style of the room or set it. Then the rest of the interior items will complement and play with it without creating dissonance.
You can decorate any glass or mirror surface with stained glass. This will give the interior uniqueness, originality and a feeling of luxury. It is appropriate to place a stained glass window in any room.
Where to place stained glass in an apartment
- Window. Stained glass will give the bedroom a feeling of coziness, and the nursery - a fabulous feel. Stained glass in a window can be used as protection from the sun, hide the bathroom from prying eyes, and add festiveness and comfort to the kitchen.
A floral pattern on the balcony window will create the illusion of a country house
- Doors. You can decorate both fully glass doors and glass inserts. It is better to do the drawing in the same style on all doors.
It is better to keep the pattern on all doors in the same style
- False windows. This glass picture is backlit and is often installed in bathrooms or on staircases.
A stained glass window will help avoid the feeling of a closed space and additionally decorate the room
- Ceiling lamps. Large glass shades or acrylic inserts in the ceiling will add originality to the interior.
The Gothic interior will be decorated with a stained glass ceiling
- Glass partitions. They can be transparent or matte. Such partitions are often installed between the kitchen and the bathroom or the toilet and the bathroom. Stained glass allows light to pass through, but does not allow you to see what is happening behind it.
Stained glass is a good solution for zoning a room
- Furniture fronts, glass countertops. Decorating furniture with stained glass is a good way to give it personality. Even old furniture decorated with stained glass looks expensive and luxurious.
Stained glass inserts are appropriate for both living room and kitchen furniture
- As already mentioned, the plot of the drawing should correspond to the general style and atmosphere of the room.
- Dark tones and horizontal lines are suitable for spacious rooms with high ceilings; they visually reduce the space.
Dark tones of stained glass create an atmosphere of mystery, but visually reduce the space
- Stained glass on a mirror is a good choice for small spaces. It will create a perspective of space and visually enlarge the room.
Stained glass on the mirror will create a sense of perspective and expand a small room
- The abundance of bright colors and colorful images can become boring over time. Take this into account when choosing an ornament.
- For the bedroom and nursery, it is better to choose calm, light colors that are conducive to relaxation.
For the bedroom it is better to prefer calm tones
- It is appropriate to decorate the kitchen with a landscape or still life, and the bathroom with a marine theme.
Scenes with fish are suitable for the bathroom
But not every stained glass window can be done independently. There are several types of execution techniques.
Types of equipment
- Classic or typesetting. The most complex and ancient technique. Colored glass fragments are inserted into metal frames, assembled into a pattern and soldered. The technique requires special tools and skills. Used for large structures and only by professionals.
Stained glass using the classic technique is indispensable for large areas
- English or film. The pattern is formed on glass from stained glass self-adhesive film. Each fragment is cut out separately and glued to the place determined by the stencil. The pasted fragments are framed with lead tape. With certain skills, you can make such a stained glass window yourself.
- Fusing. Stained glass is made without a metal frame by sintering multi-colored fragments into a monolithic pattern. It is impossible to make such a stained glass window at home; a special oven with a high temperature is required.
Stained glass using the fusing technique amazes with the brightness of colors and integrity of the composition
- Tiffany. This technique is similar to the classical one. Pattern fragments are cut out of colored glass and bordered with copper tape. The finished elements are assembled into a pattern and soldered together. This technique is difficult for beginners, but it can be mastered and used at home.
Stained glass using the Tiffany technique successfully replaces the classical technique
- Sandblasting. It involves processing glass using a stencil with sand supplied under high pressure. The treated areas become matte, and the pattern becomes airy. It cannot be used at home; it requires special equipment.
- Cast. Each element is cast or blown from glass separately. After this, the fragments are assembled into a picture using reinforcement or mortars. Not used at home.
- Etching. By etching glass with hydrofluoric acid, deep relief patterns are created. Using this strong acid at home is hazardous to health.
- Painted stained glass window. The pattern is copied onto the glass and outlined. After the contour of the void has dried, it is painted with stained glass paints.
Using the painted technique you can create real paintings
- Contour filler. As with the painted technique, the outline of the design is first prepared. After it dries, the voids are filled with a thick layer of paint. If necessary, the paint is leveled with a brush or wooden stick.
The pouring technique most successfully imitates classical styles
Video: making English film stained glass with your own hands
Painted stained glass and contour pouring techniques are the most accessible for self-production. They do not require special knowledge, materials or tools, and can imitate almost any other technique. To make such stained glass windows you only need special paints, accuracy and patience.
Video: do-it-yourself stained glass using the Tiffany technique
What you need to make stained glass
Before you start work, prepare everything you need. For painted and filled stained glass you will need paints.
Paints
Special stained glass or acrylic glass paints are used. They all have their own characteristics.
Acrylic paints
The composition includes three main components: pigment, water and acrylic polymer emulsion. Sold in tubes or jars.
Acrylic paints are sold in jars and tubes
Acrylic paints dry quickly, after which they become durable and resilient. After drying, they are resistant to temperature and humidity changes. It is very difficult to scrape off a dried coating, as well as to remove it with sandpaper.
Acrylic paints dry quickly and are easy to work with at home.
The color of the finished coating is matte and bright. It is not subject to fading and does not fade over time. Paints of different colors can be mixed with each other. The brush should be washed with water immediately after use; if it becomes dry, you will have to use a solvent.
There are two types: fired and unfired. After application, those fired are heated in the oven, harden and become resistant to external influences. The firing temperature is indicated by the manufacturer on the packaging.
Stained glass paints can be fired or unfired
If the paints are not fired, after a week they will dry and harden in the same way as when fired, but before this point there is a risk of smearing them. Paints are water-based, so they are diluted with it. Brushes can also be washed with water.
Unfired paints dry in 1 to 3 days, depending on the manufacturer. The drawing requires fixing by applying a layer of nitro varnish.
These colors are more vibrant. They are thicker due to the synthetic solvent they contain. They fit well and are more convenient to work on vertical surfaces.
Homemade paints
Some craftsmen prefer to use their own paints. They are easy to make yourself from what is sold in construction stores.
- Based on nitro varnish. NTs-2141 or another similar one is used. Nitrovarnish is diluted with solvent 647 in a ratio of 1 to 0.4. Can be tinted with artistic oil paint or construction paint. The dye is added little by little until the desired color intensity is achieved.
- Based on BF-2 glue. The glue is diluted twice with acetone and tinted with any alcohol-based dye. This could be ballpoint pen paste or other paint. The emulsion is stirred in a glass container and tested on the glass. If necessary, add paint until the required intensity is achieved.
- Gelatin based. 5-6 grams of gelatin are brewed with 200 ml of hot water to the consistency of a paste and fabric dye is added. A drawing made from such paint requires fixing with nitro varnish.
In addition to paints, you will need an outline for the work. This is a special thick paste for outlining the borders of a pattern. It imitates metal frames for pieces of smalt in painted and filled stained glass windows.
Circuit
Relief contours are made on a water basis and are sold in tubes. With their help, the drawing is outlined, which is then filled with paints. Can also be used to create a three-dimensional drawing.
Stained glass contours can be used to create a three-dimensional pattern
At home, contour paste can be prepared using PVA glue. To do this, you will need 50 ml of tableware PVA, 20-30 ml of natural black ink (the best is Dutch), 30-40 grams of silver or bronze powder.
Mascara is added to the glue with constant stirring, and then powder until a creamy consistency is obtained. This paste is prepared as needed and is not stored. Stir each time before use. Masters apply it with a brush, forming a roll; for beginners, it is more convenient to use a pastry syringe.
Required Tools
To make stained glass using different techniques, a special tool is required. In drawing and pouring techniques you will need a minimum of it:
- ruler;
- pencil;
- glass marker;
- tassels;
- wooden sticks or toothpicks.
And of course, making stained glass is impossible without a stencil of the design. Let's take a closer look at how to do it.
Stencil for stained glass
A suitable stencil can be purchased at a specialty store or from a stained glass artist. But it’s much more interesting to make a stencil yourself by choosing a suitable sketch.
Do not choose a sketch with many details and voids; such a design will look sloppy on the finished stained glass window.
The image can be downloaded from the Internet and simply printed at the required scale, taking into account the size of the future stained glass window. Or take a picture or postcard you like and enlarge it to the required size.
Photo gallery: samples of stencils for creating stained glass yourself
 Floral motifs never go out of style and are suitable for any room
  The stencil details are numbered for easy painting of the stained glass window.
  The lattice complements the flower and gives the design a finished look.
  Birds are another timeless subject for stained glass
Number the parts of the drawing with the same color. This will help you avoid making mistakes when coloring.
How to enlarge a drawing
- Draw the pattern into cells with a side of no more than 1 cm.
- Number the resulting grid vertically and horizontally.
- Take measurements from stained glass.
- Transfer the dimensions onto paper.
- Mark the sheet according to the number of cells in the picture.
- Draw a grid on the sheet in accordance with the markings.
- Cell by cell, transfer the image from the postcard onto paper on an enlarged scale.
- The finished drawing can be adjusted and colors changed.
If you have drawing skills, you can create the pattern yourself. To do this, transfer the dimensions of the future stained glass window onto a sheet of paper and mark the contours of the pattern location. Draw with a simple pencil so that you can correct inaccuracies.
When choosing an image, keep in mind that if you enlarge it, its proportions may suffer. If necessary, draw the drawing not in squares, but in rectangles.
Draw in the details, you should get a complete picture. Trace the finished drawing along the contour with a ballpoint pen or a thin marker.
Application

Having prepared everything you need, you can begin making stained glass. Make sure that the work surface is level, and remember that the glass may break if handled carelessly.
Making stained glass: step-by-step instructions
- Place the glass on the prepared stencil so that their edges coincide.
- Thoroughly degrease the glass with alcohol, acetone or vinegar. Dry the surface with a dry, lint-free cloth.
- Transfer the outlines of the design from the stencil onto the glass with a special disappearing marker. If you have experience in drawing, the lines can be applied directly with a contour or contour paste.
Drawing a contour requires accuracy and a precise eye.
- Let the outline dry, otherwise the drawing will smudge.
- Now all that remains is to fill the voids of the drawing with paints. This is done with a thin brush or straight from the tube. Tubes of ready-made paints are equipped with a convenient spout.
Paints are applied to stained glass with a brush or using a tube attachment.
- Paint is applied from the edges to the center. It’s okay if paint gets on the outline during work - touch it up with a wooden stick or toothpick. After drying, special paints become transparent and the outline appears through them.
- If the design involves color transitions, lighter or darker tones are applied after the base ones. They can be mixed or shaded with the main ones using a toothpick.
- Bubbles formed during the work are also removed using a toothpick.
- Let the finished painting dry completely. Some paints require additional coating with nitro varnish, please pay attention to this. This information is indicated on the packaging.
- All that remains is to insert the stained glass into the frame.
Stained glass can be inserted into the frame
To protect yourself from cuts, you can first cover the edges of the glass with masking tape before work.
Video: master class on making stained glass using poured technique
Having mastered the painted and poured techniques, you can try yourself in the English film or fusion technique. This will require a lot of expense, materials and skills, but it's worth it.
Photo gallery: several ideas for placing stained glass windows in the interior
 Abstract drawing suitable for high-tech style
  Floral ornament will decorate the living room windows
  Stained glass on the bathroom window will add a special atmosphere and protect from prying eyes
  A geometric pattern for a living room can be easily made using stained glass film
  The stained glass windows of the landing windows are made in the same style
  Bay windows are well suited for stained glass
  The ceiling insert can be decorated with stained glass film
Creating stained glass windows is a creative and exciting activity. Even children can make the simplest stained glass windows. And let your work not be similar to the masterpieces of world painting, but they will bring originality and a piece of your individuality to your home.
I prepared this lesson at the request of Inna Filonova. You can also order a drawing lesson from me. Go to, all the details are there. I needed to make a sketch for a stained glass window measuring 90 by 15. The task itself is difficult, since we usually draw in A4 format, that is, with a ratio of ¾ roughly speaking. I could choose the theme for the stained glass window myself, which is very good. Inna suggested either a seascape, or a seabed with fish and corals, a cityscape, or an African savannah with animals. I really love fish, so I decided to draw the seabed with fish. If you want to try other topics, then watch my lessons about:
- (not complicated);
- (difficult);
I myself draw manga and anime, I don’t have to use paints. Therefore, I decided to turn to my artist friend, who often makes stained glass windows. This is what my friend advises DeiFan’s readers:
- Stained glass windows are made only by professionals. This is always manual and very difficult work. Using paints instead of glass, you can create an imitation of stained glass. But if you try hard, it will also turn out beautiful;
- The paints are not expensive, but they are very high quality. I recommend paints from the French company Pebeo or Kreul. Sold in any artist store, always in stock;
- When you trace the edges of the glass on paper, remember that you need to add another 5 millimeters on each side for the frame.
- If you put the stained glass window in a warm place, the paint will dry faster. But wait at least 6 hours after finishing work for them to dry;
Before creating a stained glass window, you need to create a sketch of the drawing. It is not necessary to make a very detailed drawing. Here it is only important to outline the contours very clearly. If your glass is smaller than the paper, simply place the glass on the paper and trace its outline. This will give you a work surface to draw on. In our case with Inna, the glass size is 90 by 15. I don’t have such paper. So I made the drawing on the computer in Photoshop.
I created a sheet of the size I needed and drew a sketch: (it will enlarge if you click on it, but be careful, the drawing is very wide) I will not publish the stages of creating a sketch on DayFan. The sketch took about four hours. If you want to draw the same one, write to me in a personal message, I will send you the source file. Next, you need to print out a sketch of the seabed with fish and put it under glass. It is important to secure the sheet with tape or something else, since the process of creating a stained glass window takes a lot of time, and it will be very bad if the lines diverge. Transferring a design from paper to glass is very simple. We look and transfer the contours to the glass. It is important to degrease the glass using alcohol. They say you can just wash with soap and wipe. But I'm not sure this will work. Better use alcohol. Next we apply the contours to the glass. This is the most important stage. Give him enough time. When the outline is ready, you need to wait until the paints dry. Usually about three hours. All that remains is to fill in the drawing with stained glass paints. And I colored all the fish in Photoshop. These are the colors I have: You can color them your own if you want, or if you don't have those colors. You can also add other sea creatures to your stained glass window:


