Download the program for singing through a microphone. The best programs for recording audio from a microphone
From time to time, users have a not very popular need - to record an audio track of what is currently playing on the PC. Quickly navigating and saving, for example, an important conversation on Skype, can be problematic if you have never encountered sound recording on a computer before and don’t know where and what to look for. Therefore, it is better to familiarize yourself with the capabilities of Windows in advance.
You can record important audio information in the following ways:
- if you have a stereo mixer: built-in sound recording program in Windows;
- without a stereo mixer: special programs for sound recording, for example, Audacity;
- using an audio cable;
- recording using online programs.
First of all, you need to activate the stereo mix. This device is usually disabled in settings. To enable it, you need to right-click on the speaker icon in the notification area and click on “Recording devices”.

If the stereo mixer does not appear in the list that appears, right-click in the empty field in this window and turn on the “Show disabled devices” mode. Next, we activate the stereo mixer by pressing the right button as usual, then confirm the default use.
It should be noted that for non-standard cards there may be another device instead of a standard stereo mixer. For example, the source of the recording "What U Hear" from Sonic Blaster.

It is worth noting that after turning on the stereo mixer, you can enjoy a nice bonus - through the Shazam application for Windows. It allows you to determine the name of the song being played by sound.
The easiest way to make a sound recording is to use the built-in program in Windows. To do this, in Win 7 and 8, go to the Start menu -> All Programs -> Accessories -> Sound Recorder. For Win 10 – Start -> Voice Recording.

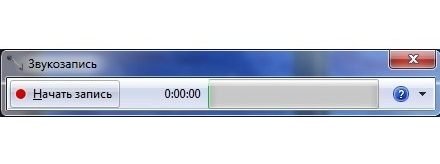
The standard sound recording program is very unpretentious and very easy to use, it starts with the “Start Recording” button. After clicking the “Stop Recording” button, it will offer to save the file in wma format (this is a licensed format for working with audio streams from Microsoft) in the folder of your choice.

If you need a different sound format, you can use alternative recording programs, for example, AudioMaster, but you will have to download them. Using this program, you can edit previously made digital recordings in any format or record new ones.
Record audio from a computer without a stereo mixer
It happens that some sound cards do not have drivers for a stereo mixer or the manufacturer has blocked such a device. A good assistant in this case will be the Audacity program, which is also useful if you have a stereo mixer. The program has advanced capabilities compared to standard audio recording applications.

To record sound from a computer using this program, you need to select Windows WASAPI in the first drop-down list, or your sound card in the second (which serves as your sound source) and press the start button.
Recording using an audio cable
This method is a little exotic, but useful if the stereo mixer is not supported and there is no Internet. Consequently, there is no way to download a recording program or use an online service, but you still need to record an audio track. You will need a cable with a 3.5 connector on both ends.

You need to connect one of the plugs to the microphone jack, the second to the audio output (headphones). After this, you can open any available recording program, for example, built into Windows, and carry out the necessary actions.
Online services for recording
There are also sites that provide the ability to record audio without having to install additional applications on your computer. Here are the most popular ones:
- vocalremover.ru;
- online-voice-recorder.com;
- vocaroo.com;
- audio-joiner.com/ru/;
- sound-recorder.ru and many other sites and browser add-ons.

Let's look at the sound recording process using the first site as an example. It’s easy to do: click the “Start Recording” button, and after finishing, click the “Stop” button. You can listen to the result before downloading and re-record if the recording is unsuccessful. There are also several additional options: changing the tempo, key, format converter. The downloaded file will be in the most popular MP3 format.
Thus, there are many opportunities to make high-quality audio recordings on your PC with any equipment.
Video - How to record sound from a computer
Recording sound from a microphone is a simple matter. In addition, a great many programs have been written that can record audio. Such software may be very different from its competitors, but at the same time, it copes with its tasks quite well.
Let's look at the most “capable” representatives of audio recording software.

A small but quite powerful utility, “tailored” for recording audio in MP3 format. It is for this format that the program provides a large number of settings.
Free Audio Recorder

Another program for recording sound from a computer. Unlike Free MP3 Sound Recorder, it records (logs) all actions performed by the user. Logs can be used to diagnose and correct errors.
Free Sound Recorder

Kat MP3 Recorder

Quite an old, but quite functional program. It copes with its tasks perfectly.
It can record audio in rare formats, and the scheduler has a built-in function for recording audio using a link from the Internet.
UV Sound Recorder

A very easy-to-use program for recording sound from a sound card. For all its simplicity, it can record audio from several devices at once into different files, as well as convert audio to MP3 format on the fly.
Sound Forge

Powerful paid program. In addition to recording sound, it allows you to edit audio. The editor is professional, with many functions.
NanoStudio

NanoStudio is a free software for creating music with a large set of built-in tools.
Audacity

The program is very similar in functionality to Sound Forge, with one small difference - it is completely free. For a free program, Audacity has surprisingly powerful functionality.
These are the representatives of audio recording software. Some can only write audio, some can also edit, some are paid, others are free. It's up to you to choose.
Recording a voice on a computer in today's conditions is as easy as shelling pears. It is enough to connect the microphone to a stationary terminal or use the built-in device on a laptop. But if you don’t know how to set up a microphone on Windows 10 or any other system, you may not be able to achieve normal quality. Next, we will discuss some issues related to setting the optimal parameters and applications used. But first, it’s worth focusing on the general principles of sound recording.
General principles for setting up a microphone on a computer
The very first and most important thing that needs to be clearly understood is that absolutely all applications related to sound recording are completely dependent on the operating system settings (installed devices, drivers, volume level, etc.)
Regardless of the acoustic system used (passive or active), so-called interference (whistle in the speakers) may occur from the microphone during the recording process. The general rule is to turn off the speakers while recording. You will not hear the voice being played back at the time of recording. But that doesn't matter.
The second point is related to setting the recording level. Half the volume is considered the best option. But for sensitive professional-grade microphones, you can install less.
The third question relates to the soundproofing system. It is clear that at home, you can achieve professional sound only with the help of a whole range of applications that allow you to remove extraneous noise after speech or vocals are recorded. Here you will need programs for setting up the microphone, called audio editors. Naturally, to set up devices that combine both headphones and microphones, which are mostly used in team games, special quality of signal transmission and reception may not be required. But there are some nuances here too.
Connecting a microphone
As for connecting microphones, any computer's sound card has a special input for a 3.5 mm plug. If the microphone model is equipped with a regular jack, you will have to purchase a special adapter separately.

On laptops, there may be no Line-In or Mic input. Therefore, you will have to be content exclusively with the device that is integrated into the device. You won’t get much quality, since such a microphone can only be used for communicating in instant messengers like Skype, although in this case you will also need to make adjustments.
Windows sounds and audio devices
The standard setting of any Windows system is called up through the corresponding section of the “Control Panel” or through the RMB menu (right mouse button) on the image of the volume icon in the system tray. Here you simply select the recording device.

If your sound card has additional software (for example, Realtek HD Audio Manager for motherboard-integrated devices), you can use that too. At least, there are somewhat more possibilities in terms of set parameters here than in the “native” Windows options.
Sound recording
Now you need to record the material. To do this, you can use a standard tool of the operating system itself in the form of a built-in recorder.
Here you just need to press the start recording button, then speak or sing what you want, and after stopping, listen to the material. If desired, it can be overwritten (the previous recording will be re-saved). But further editing of the material will be impossible without special software packages.
The most popular programs for setting up a microphone
Both allow you to record audio. The only question is how to edit it later. As you can already imagine, recorders only record sound, and programs for setting up a microphone in the form of audio editors allow you to change the recorded track, even adjusting the pitch.
Recorders
Among the usual audio recording tools today you can find quite a lot of simple programs that you don’t need to understand much about.

For users who are not looking for professional quality, we can recommend the following applications:
- Free MP3 Sound Recorder;
- MooO VoiceRecoder;
- Sonarca Sound Recorder Free and the like.
Audio editors
With audio editors the situation is somewhat more complicated. Programs for setting up a microphone of this level look much more complex and, so to speak, sophisticated. They take a different approach to the concept of audio recording than conventional recording applications.
Despite the fact that today there are many (compressed and uncompressed) with quite high bit rates and sampling rates, programs for setting up microphone sound of this type by default save material in the old WAV format, which is considered the most suitable for creating an original sound file for the purpose of its further conversion .

Among the most popular and widespread applications are Sony Sound Forge, Adobe Audition (formerly Cool Edit Pro), ACID Pro, etc. And this is not about professional studio sequencers like Pro Tools, which have even more tools.
But there is one more point. Some applications can not only record audio in any format or open it for editing, but also change the pitch of the recorded track if the vocalist, to put it mildly, at a certain moment did not reach the desired note. The most popular application is considered to be a program for setting up a microphone on Windows 8 or other versions of the system called Melodyne. It is available both as a desktop application and as plug-ins for DAW studios (VST, DX, AAX, AU, etc.).

The application opens any audio file as a wave. The editor itself has a piano keyboard or a note panel, which corresponds to the pitch of the track fragments. It is enough to set automatic analysis of the material, and the program itself will adjust inappropriate frequencies to standard ones. Along the way, you can do what is called the English term Quantize. This is the equalization of sound across beats at a given tempo.
Finally, when considering how to set up a microphone on Windows 10 or another OS, you can't ignore applications like AAMS, which are automated mastering systems based on a selected template.

Let's say you recorded a music track with vocals. Do you want it to sound like the classics? No problem! Select any track of the group as the source material from which the template will be created, and after that add your composition indicating processing based on the analyzed track. This, of course, takes a fair amount of time, but you won’t have to mess with the microphone settings. The program will still do everything on its own.
And one more “trick” that some audio editors have is that you can change your own voice, making it an exact copy of famous vocalists. Since we're talking about the band Metallica, in the same Adobe Audition application you can set a vocal template and then change your voice to his. But that's not all. There is also an interesting function of influencing the subconscious, when noise in the ultra- or infrasound range is added to the edited audio. But they can evoke completely different emotions, which, alas, do not depend at all on our consciousness.
What's better?
In general, any program for setting up headphones with a microphone or just a microphone allows you to perform certain actions in terms of recording and setting input signal parameters. But professional packages have the advantage that with their help the recorded material can be subjected to any processing you like. They look quite complicated, and the average user without special knowledge will take a long time to figure them out. But if he masters it, he will immediately appreciate all the opportunities they offer.
The use of a home PC is incredibly versatile. In particular, it is widely used for recording a variety of sounds.
Recording music at home, creating a variety of podcasts and voice notes is used by a large number of users.
It is for them that this review of three excellent and truly free audio recording utilities is intended.
Audio Master
A Russian program for recording sound from a computer allows you not only to record speech, but also to edit the track.
This is more of a full-fledged editor than a special utility for recording audio. Nevertheless, it performs at a decent level as a home studio.
First you will need to download a program for recording sound in Russian, then install it. After installing the program, creating a record will occur in three simple steps.
Stage I: Recording
The “Record audio from microphone” option is highlighted in the window. It will open the recording window.
In it you will need to select a recording device (drop-down list after the “Select recording device”) item.
If only one microphone is connected, it will be the default recording device.
Then you will need a large button in the middle of the window (Start a new recording). Recording begins with a three-second delay, so there is time for preparation.
During the process, you can pause it, and if something doesn’t work out, then cancel it altogether and start again.
The “checkmark” at the bottom of the window allows you to record the track directly to the file being processed.


Stage II: Setup
The recorded file can be edited. Special tools are used for this:

If the recording turned out normal and without any effects, then you don’t have to worry about adding them. It is now available in the editor as a regular track.
In addition, the audio track may be cut from a home (or any other) video.
Phase III: Conservation
After editing, the finished track can be saved in one of seven formats (WAV, MP3, MP2, WMA, AAC, AC3, OGG, FLAC).

Free Audio Recorder
This is a great little program for recording audio from a microphone. To record sound, you must first download and then install the program.
Once the installation is complete, the steps will look like this:


The program itself is simple and not very different from a standard audio recording utility. It's nice to have the ability to save records to a specific directory.
This is very helpful in organizing a large archive of records.
The only sad thing is the inability to capture sound from the computer itself.
NanoStudio
The name of the program is completely true. It includes all the necessary tools to create a complete composition.
And thanks to the mobile version, they all fit into a mobile phone.
The main sound generation comes from the virtual synthesizer and sample pad. Additional tools include a drum machine, sequencer and mixer.
The finished song would be incomplete without vocals, but it will have to be added in another program.
You can add multiple effects to each track.
Sound recording in the program occurs using a variety of special mixing tools.
Fifteen cells are available to the user for simultaneous use of various tools:


Quite often we need to record sound from a computer. Perhaps this is some kind of song playing from the speakers. Or maybe you need to record your speech spoken into a microphone. How to do it? There are a lot of options. I chose the simplest one. I will describe it in detail and with pictures. Go.
We record sound from a computer. How?
Many programs have been written for this: both paid (Super Mp3 Recorder) and free (Moo0, Echo, NanoStudio, etc.)
Yes, even Windows itself has a mechanism for recording sound from computer speakers! The latter is located at All Programs->Accessories->Entertainment->Sound Recorder.
But we will talk about another option. There is a wonderful program that:
a) free
b) weighs little
c) intuitive
We are talking about Moo0 VoiceRecorder
The description for it says that the software is ideal for recording sounds from a sound card and/or microphone.
This is what she looks like:

under No. 1 - the address of the final file that will result from recording
under No. 2 its name
No. 3 - click to start.
Principle of operation.
Turn on the song or whatever you need, click the “Record” button in the main program window. That’s it.
Additional settings.
Settings are called up by clicking the corresponding button in the upper left corner
1. There is a timer for delayed work
2. You can set the quality of the resulting recording. Default is mp3 192 kb/s
3. Filter out certain noises
It is important! You may need to make one extra move, namely turn on the stereo mixer on your computer.
In the lower right corner, click on the icon with headphones (or a speaker or whatever you have). Or go to the toolbar, “Sounds and Audio Devices” item, on the “Volume” tab, click on the “advanced” button. In short, look for a menu like:

If the stereo mixer we need is not there, then go to Options-Properties (it’s in the upper left corner)


