Landscape of autumn leaves. Master class with photos
Paintings made from dry leaves are a very interesting way of using natural materials, which gives wide scope for creativity to both children and even adults.
A beautiful picture of leaves on the theme “Autumn” is obtained when the work is built in several successive stages.
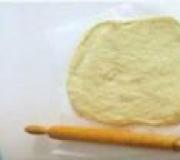
At the first stage of making a painting with our own hands, we will turn an ordinary white sheet into a bright base for applique. First, let's give the sheet the desired shape and size.

Now we place it on the work surface.

And with a simple pencil we draw the outlines of the drawing. We need a silhouette of a princess girl with a fluffy skirt. We transfer the girl’s face and shoulders onto tracing paper or thin white paper. You can use carbon paper to get exactly the same features. We put it aside - we will need them later.

In the meantime, we start coloring our sheet. Apply water to the drawing.

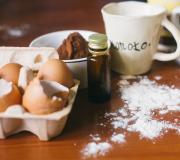
We apply the brightest and richest shades of watercolor to it (without looking at the contours of the picture). Then, while the paint is still wet, sprinkle the paper with fine salt.

And leave it to dry.

As a result, we will get a colorful background with original patterns.

Now we take well-dried small leaves (for example, birch leaves) and begin to lay out the princess’s skirt with them.

To make the picture more interesting, we use combinations of leaves of different shapes.

When the skirt is half pasted over, we will need the silhouette of the face and neck that we drew earlier. We cut out a blank from white cardboard according to this silhouette.

We draw facial features.


We decorate the hair and crown of the princess with leaves or pine needles.

“Sew” the sleeves to the dress.

Making a bust.

And we continue to paste over the skirt.

Dark leaves can be used to apply various patterns on the dress.

And we make shoes from them.

OK it's all over Now! The picture is ready! Our princess is in a hurry to take part in the autumn ball.

Painting of autumn leaves “Queen of Autumn”
You can make a beautiful portrait of the autumn queen from autumn leaves.

Applications from autumn leaves
A classic example of autumn leaf applique pictures is a hedgehog with apples in a clearing.

Painting from leaves "hedgehog"
You can also use leaves to make an owl on a branch, a parrot or a butterfly.

Look at the video for examples of autumn leaf applique pictures:
In the production of autumn paintings, not only leaves can be used, but also twigs, flowers, moss and even cereals. First we need to make the base of the craft from cardboard. We cover the base with twigs, making a frame. Inside we lay out a tree of twigs.

We lay out the outline of an owl from buckwheat (sprinkle the grain onto the glue). Glue the owl's wings from moss or juniper. The beak and legs can be made from threads. We make the eyes from cardboard.

We complement our picture with leaves, moss, flowers and insect figures.

Handicraft master class "Landscape of autumn leaves"
Annenkova Elena Nikolaevna, teacher of fine arts and technology, Glebovskaya Secondary School, Fatezhsky district, Kursk region.Description of material: I offer you a master class on creating an autumn landscape using floristry techniques. This material is aimed at middle and senior level students and will be useful to technology teachers, additional education teachers, and all creatively oriented people.
Purpose: DIY gift, decorative interior decoration with an original product.
Target: creating an autumn landscape from dried leaves.
Tasks:
1. get acquainted with the basics of floristry techniques,
2. develop imaginative thinking,
3. develop creative abilities, aesthetic taste, environmental consciousness.
All art originates from natural sources. Leaves, flowers, twigs, herbs, and spikelets make up a non-woven carpet, forming bizarre, intricate patterns. You can not only enjoy this beauty, but also continue it. Natural material- a storage room for the development of children's creativity. You just need to know how to manage the wealth from this pantry. With a little imagination and perseverance, wonderful paintings can be made from the simplest materials. The main idea of such creativity is for children to realize that nature, even in the smallest particles, is a reflection of the entire vast world as a whole.
One of the directions in working with natural materials is floristry. This word translates as "flat ikebana".
Each blade of grass is uniquely individual, has its own, unique silhouette, pattern, and evokes certain associations: cineraria leaves with snow-covered trees, yarrow heads with a blooming apple tree, lupine flowers with flying birds...
I'm trying to reach timid souls
Tell your students:
In the hands of skilled people, maybe even
Dry branch bloom.
I teach you to take Nature as a co-author,
After all, we all originate from it.
Art that serves the people
She rocked it in her hands.
To work in floristry techniques, you need to dry leaves, flowers, inflorescences, and herbs. To do this, use a stack of old newspapers. The material to be dried is laid out between layers of newspapers and placed under a press. To ensure that parts of the plants do not lose their color, after 3-4 days they need to be transferred between layers of new newspapers.
For landscape work we will need:
- dried leaves of corn, birch, willow and other trees, twigs of wormwood, a large poplar leaf, woody lichen;
- a sheet of blue matte cardboard (it doesn’t stick well to glossy material),
- a sheet of tracing paper,
- scissors, PVA glue,
- a clean cloth.

Take a sheet of blue cardboard and draw a horizon line.

We crumple the sheet of tracing paper and smooth it slightly.


We spread glue on the future sky, paste on crumpled tracing paper, forming small folds. Press the tracing paper well with a cloth. Trim off the excess around the edges. The result was cirrus clouds.


We lay out dried corn leaves, simulating fields, half a poplar leaf - a hillock. Thus, we create a preliminary drawing using the leaves.

We start gluing the leaves from the horizon line. First, the poplar leaf is a tubercle.
We spread the sheet with glue, placing oilcloth on it, and press it well with a cloth to the background.
If necessary, you can put the work under a press (something heavy).


Apply glue to the next sheet and glue it in the same way. Glue a willow leaf nearby, creating a horizon pattern.


Gradually fill the entire lower part of the cardboard with corn leaves.


Next stage: we lay out birch leaves and other small leaves of a different shape, imitating trees; twigs of wormwood, imitating grass on the field. We place smaller leaves closer to the horizon line, and larger ones below the previous leaves.

We glue the details of the composition one by one.


And smear the wormwood branches well with glue and stick them on the corn leaves.

The final stage: we glue wood lichen on the horizon line, imitating the mass of trees in the distance.

All that remains is to insert our landscape into the frame.
Types of applications
Overlay applique. Try to start by coming up with pictures that do not require cutting out any details from the leaves, but are created by overlaying the leaves. You can come up with a lot of such pictures: butterflies, mushrooms, chickens and other birds... The missing elements can be drawn in with a felt-tip pen or made from other natural materials.
Having mastered simple pictures, children can begin to come up with multi-tiered images. In this technique, leaves are glued on top of each other in layers. The application will turn out bright and cheerful if the leaves are different in color.

Silhouette applique. In this type of appliqué, excess parts of the leaf are cut off so that the result is exactly what the little artist intended.

Modular application (mosaic). Using this technique, a picture is created by gluing many leaves of the same or similar shape and size (or, for example, maple seeds). This way you can make the scales of a fish, the tail of a cockerel or a firebird.
Symmetrical applique. It is used to create individual images or entire paintings with a symmetrical structure, as well as to obtain two completely identical images (for example, reflection in water). To do this, you need to select similar leaves to get an image with its “reflection” or symmetrical in itself (“Butterfly”, “Dragonfly”, “Landscape with a lake”, “Boat on the river”).
Ribbon applique - a type of symmetrical appliqué. Its difference is that it allows you to get not one or two, but many identical images - ornaments. You get a whole “round dance” of trees, flowers, mushrooms, butterflies, etc.
1. On paper, draw a sketch of the printed landscape with a pencil (photo 1). We outline the light on the trees and bushes, as well as their reflection in the water. When drawing a sketch, it is necessary to take into account that objects located close to the shore and their reflection in the water are equal in size.
2. Using the back side of poplar and silver maple leaves, we depict the sky and its reflection (photo 2). To do this, carefully coat the inside of the sheet with glue and glue it to the base according to the sketch.
3. To depict trees and bushes, in the foreground we glue different leaves torn off piece by piece according to the shape of the objects. We start with the shadow part, using dark and cool colors, and gradually move on to light ones, where the main shades will be ocher, grass, terracotta and yellow. You can improvise a little by adding openwork tree crowns among the greenery. Taking into account the aerial perspective, we paste out the background of the forest in purple and blue-blue tones.
4. When reflecting objects in the water, we select and glue leaves of different trees three shades darker than on land (photo 3). Lungwort leaves are suitable for transmitting water ripples. To ensure that the finished painting is preserved for a long time, we frame it.
After each stage of the work completed, the painting must be placed under a press for some time so that the plant material sticks well, straightens out and becomes smooth.
With my own hands. The technology is simple, and the result can be very effective. This decor is suitable simply as an interior decoration. Making is easy to turn into a creative activity with children.
Panel made from natural material
It is very possible to create by gluing dried leaves and flowers, individual petals onto a base, for example, made of cardboard. This technique has its own name - oshibana (or oshibana). Quite often acts as a hobby for adults. Oshibana is the ancient Japanese art of painting with dried leaves and flowers.
This option is also suitable for children's creativity. In the process of completing crafts and preparing materials, the child will learn new information about the world around him and learn to compare colors and shapes. He will develop fine motor skills and perseverance. It is very good to combine leaves and flowers with twigs, seeds, and grains. This way you can get a relief surface and even three-dimensional details.
DIY panel of autumn leaves
So, what does it take to build such beauty? A panel of autumn leaves (photo below) can be made only from flat elements, using both natural forms of objects and complex configurations of artificial origin created on a paper backing.

You can choose the following stories:
- bouquets;
- landscapes;
- still lifes;
- portrait or complex thematic ideas.
In a word, this technique is very interesting and unusual. The result depends on your imagination, perseverance and the preparations you have.
Materials and tools
To make a panel of autumn leaves with your own hands, you will need the following:
- base (cardboard, fiberboard, paper, for example, colored);
- dried leaves, flower petals;
- glue;
- brush for applying glue (optional);
- glass and frame for decorating the work.
So, nothing special is required. The main thing is patience and the desire to do something special.

Leaf preparation technology
To make a beautiful panel from natural material, it is important to properly prepare the source materials. You will need:
- freshly picked leaves, flowers, petals;
- unnecessary thick books;
- cardboard;
- cotton wool;
- scissors;
- threads or large rubber bands (not erasers, but those used for banknotes);
- a flat surface that is free for several days (table, shelf).
Drying the material is a slow process, but you definitely shouldn’t rush to get high-quality workpieces for work.

The sequence of drying leaves is as follows:
- Place the leaves evenly and neatly between the pages of the unwanted book (the paper may get dirty). Do not lay out the leaves one after another, it is better to do this over several pages (they will dry faster and better and will not stick together).
- Place a book under a press (a box, drawer, or several large books).
- Wait a few days.
- Check if the workpieces are dry. If you are satisfied with the quality, take out the leaves and get to work. If the material is not dry, leave it for another couple of days.
How to dry flowers
Flower petals or small (not thick) flowers are dried in the same way as leaves. So, you can prepare flowers of daffodils, phlox, bindweed, viola (pansies), and bells. But asters, roses and other flowers, which have a dense, fleshy base, are best dried as follows:
- Prepare a sheet of cardboard or thick paper slightly larger than the flower itself.
- Fold the blank in half like a postcard.
- Cut a hole of any shape in the center of each side (this is a kind of ventilation so that the flower does not rot).
- Unfold the cardboard and put a layer of cotton wool inside.
- Place the flower on the cotton wool.
- Add another layer of cotton wool on top.
- Cover with cardboard (fold the flaps).
- Secure the “card” with rubber bands or tie with thread.
- It is advisable to put it under a press.
- Check the result after a few days. If the cotton wool is very wet and the flower is not dry, change the cotton wool and dry it completely.
As you can see, the technology for harvesting leaves and flowers is simple, but if you don’t follow it, you won’t get high-quality material. Leaves that are not dried enough may become deformed, and flowers may lose their petals.

Panel technology
To make a beautiful panel of leaves (photo above), you need to work like this:
- Use a cardboard base or colored paper if part of the background remains uncovered by the dried material.
- To make objects of complex unnatural shapes (vases, houses), cut out substrates (blank parts) from thin paper.
- Apply glue to one side of the paper backing and place dry leaves on top.
- Wait for the element to dry and trim along the edge contour. Throw away small leaf scraps and use large ones for other parts.
- When all the components are ready, apply glue to the base and glue the blanks. If necessary, lay out a background of leaves or petals first.
- After the painting has dried, frame it under glass. This way the panel will be better preserved.
Panels of dry leaves can be made in the form of relief using twigs, spikelets, cones, grains and seeds. This option is perfect for children's creativity.
So, making a panel of autumn leaves with your own hands is not difficult. This creative activity can be a fun and rewarding way to spend time with your child. Prepare quality material and explain the technology. Even small children can make a simple composition of leaves and flowers.