Children's drawings with paints. First steps in drawing: teaching your child creativity
Summary: Children's drawings on the theme of winter. How to paint winter with paints. How to draw winter with a pencil. How to draw winter step by step. Drawing of a winter landscape. Drawing winter fairy tale. Picture of a winter forest.
In winter, adults and children spend a lot of time at home, so there are more opportunities to get creative. Winter is a very beautiful time of year. Try to convey the beauty of this time of year in winter drawings. We will share with you simple drawing techniques with which you can independently teach your child to draw beautiful drawings on the theme of winter. From this article you will learn how to make voluminous snow paint and learn how to draw winter pictures using the spray technique. When drawing pictures on a winter theme, we will use all kinds of additional materials, and not just a brush and paints. You may not even suspect that you can draw winter using plastic film or salt, bubble wrap or shaving foam.
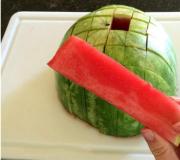
1. Winter drawings. "Volume snow paint"
If you mix equal amounts of PVA glue and shaving foam, you will get wonderful airy snow paint. She can draw snowflakes, snowmen, polar bears or winter landscapes. For beauty, you can add glitter to the paint. When drawing with such paint, it is better to first outline the contours of the drawing with a simple pencil, and then paint it with paint. After some time, the paint will harden, and you will get a voluminous winter picture.

2. Winter drawings of children. Using electrical tape in children's creativity
3. Winter drawings. Drawings on the theme of winter
If there is snow outside the window, you can depict it using a cotton swab.


Or use a brush to put snow on each branch.

11. Winter drawings. Drawings on the theme of winter
An interesting idea on the topic of children's winter drawings was proposed by the author of the Homeschool Creations blog. She used putty to paint snow on the transparent film. Now it can be applied to any winter pattern or appliqué, simulating falling snow. They put the film on the picture - it started snowing, they removed the film - the snow stopped.

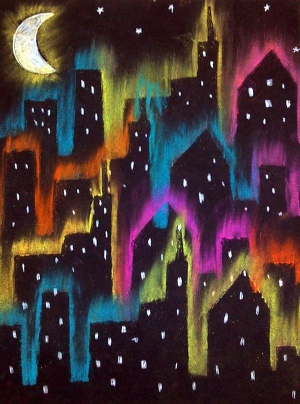
12. Winter drawings. "New Year's lights"
We would like to tell you about one interesting unconventional drawing technique. To draw a New Year's garland like in the photo, you will need a sheet of thick paper of a dark color (blue, purple or black). You will also need regular chalk (the kind you use to draw on asphalt or a blackboard) and a light bulb stencil cut out of cardboard.
On a piece of paper, use a thin felt-tip pen to draw wires and light bulb sockets. Now apply the light bulb stencil to each socket in turn and outline it boldly with chalk. Then, without removing the stencil, smear the chalk on the paper using a piece of cotton wool or directly with your finger to create rays of light. You can replace chalk with colored pencil graphite chips.


It is not necessary to use a stencil. You can simply paint over the light bulbs with chalk, and then gently rub the chalk in different directions to make rays.

Using this technique, you can also draw a winter city, for example, or the northern lights.
13. Drawings of a winter fairy tale. Winter forest drawings
On the Maam.ru website already mentioned above, you will find an interesting master class on drawing winter landscapes using templates. You will only need one base color - blue, a coarse bristle brush and a white drawing sheet. When cutting out templates, use the cutting method from paper folded in half. Look at what a magnificent drawing of a winter forest the author of the painting created. A real winter fairy tale!


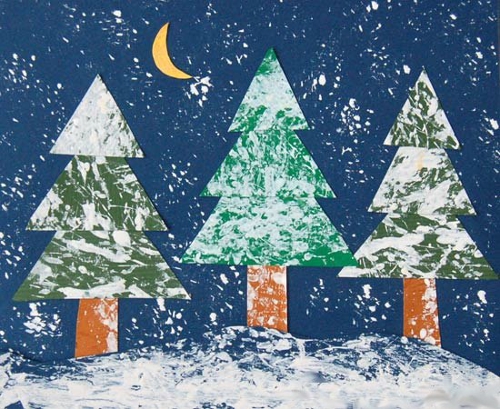
14. Winter drawings. Drawings on the theme of winter
You are probably very eager to find out how the wonderful “marble” Christmas tree in the photo below was painted? We'll tell you everything in order...To draw such an original drawing on the theme of winter you will need:
Shaving cream (foam)
- watercolor paints or food coloring in green shades
- flat plate for mixing shaving foam and paints
- paper
- scraper

1. Apply shaving foam to a plate in an even, thick layer.
2. Mix different shades of green paint or food coloring with a little water to make a rich solution.
3. Using a brush or pipette, drip paint onto the surface of the foam in a random order.
4. Now, using the same brush or stick, beautifully smear the paint over the surface so that it forms fancy zigzags, wavy lines, etc. This is the most creative stage of the whole work, which will bring pleasure to children.
5. Now take a sheet of paper and carefully apply it to the surface of the resulting patterned foam.
6. Place the sheet on the table. All you have to do is scrape off all the foam from the sheet of paper. For these purposes, you can use a piece of cardboard.
Simply amazing! Underneath the shaving foam you'll find stunning marble patterns. The paint has time to quickly absorb into the paper; you just need to let it dry for a few hours.
15. How to draw winter. How to paint winter with paints
Concluding our review article on winter drawings for children, we want to tell you about another interesting way how you can paint winter with paints with your child. To work, you will need any small balls and a plastic cup (or any other cylindrical object with a lid).
Place a piece of colored paper inside the glass. Dip the balls in white paint. Now put them in a glass, close the lid on top and shake well. As a result, you will end up with colored paper with white streaks. Similarly, make colored paper with white streaks of other colors. From these blanks, cut out the details of the applique on a winter theme.

Material prepared by: Anna Ponomarenko
Other publications on the topic of this article:
Kids really like to draw, but by middle preschool age their works of art barely resemble anything realistic. How to organize drawing classes for children 4-5 years old in such a way as to instill in the little ones a love of fine art and teach them how to draw simple drawings? We'll tell you where to start, what the benefits of such lessons are, and what art supplies you can use.
The benefits of drawing
Creative activities are an important element in the development of a child. Preschool children are characterized by visual-figurative thinking, so drawing lessons are of great importance at this age stage.
Drawing helps in the development of:
- imagination;
- abstract logical thinking;
- fine motor skills;
- logic;
- creative thinking;
- attentiveness.
Drawing is also a reason to spend more time with your baby, which has a significant impact on his psycho-emotional development.

Accessories
What supplies you need for class depends on what you plan to draw with. And you can do this in different ways:
- fingers;
- palms;
- tassels;
- pencils;
- felt-tip pens;
- cotton swabs;
- cotton wool
You can use coloring books or just landscape sheets.
To make drawing for children as effective as possible, use a variety of objects and forms of lessons. For example, you can show your child several creative techniques using colored pencils, and the next day reinforce these techniques by drawing with crayons on the asphalt, etc. Children 4-5 years old may not like the monotony of drawing with felt-tip pens or pencils, so it is important to periodically change the methods training.

5 learning ideas
To teach a child to draw, you need to know a few interesting techniques that will instantly get your little one excited about learning. Consider them and start with the most suitable one.
- Blots.
This is a simple method, but kids love it very much. You will need a landscape sheet, paints and brushes. Fold the sheet in half, draw a butterfly wing on one side, then press the halves tightly together so that the wing is imprinted on the empty part. In this way you can draw not only a butterfly, but also a leaf, a flower, two friends, etc.
- Geometric figures.
Use geometric shapes familiar to your baby. For example, to draw a girl step by step, use a circle, line and triangle. First, we draw the head (show the baby how to draw a circle), from the circle you draw a dress in the form of a triangle, the legs and arms are drawn, respectively, with lines.

- Stencils.
Prepare in advance various stencils that the child will first trace and then paint. Gradually he will remember the image and shape, and he will no longer need a stencil to draw a certain object. If the baby has a stencil of a square, triangle and rectangle, then he will be able to draw a house. Then he will begin to imagine what else he could draw from these figures.

- Prints.
At 5 years old, children love to color in something and then make prints. You can start with your palms, then take prints from convex surfaces. Curly seals are now being sold, from which a child can create images. From the flower prints you get a flower field, and above it you can draw a sun from a geometric figure - a circle.
- Applications.
Combine drawing with other creative techniques. You can draw a background (blue sky, mountains, rocks, etc.), and cut out other objects (stars, clouds, trees) from paper, color them and glue them to the background. You can also use colored sand or beads.

Conclusion
Drawing with children is part of your communication with them. During classes, you constantly talk to your child, ask leading questions, and when he thinks about them, he comes to certain conclusions. This is how his ideas about the world are formed. When drawing the sea, the child may have never seen it, but he already knows what color it is and that there are waves on the sea. By depicting a tree, the baby remembers what it is made of and that the time of year can be determined by the foliage. Be sure to include drawing lessons in your child’s activities, because it contributes to the full formation of his personality.
In this article you will find many interesting ideas on how to diversify painting activities with your child and make them interesting and educational.
Eco-friendly paints for children
There are 3 types of safe paints for children, which parents prefer:
- finger-shaped
- gouache
- watercolor
It’s better to start with finger paints; they are suitable for younger children. You can learn more about them from the article. Gouache and watercolor for older children.
A child is interested in exploring something new, but over time he may get tired of the monotonous procedure of coloring a sheet with paint. To prevent this from happening, parents need to show their child how to draw.
There are many ways to paint with the above paints. Various techniques will not let your child get bored and will show him a lot of new and interesting things that he has not seen before.


Finger painting for kids
This is the most interesting activity for little ones, because you first need to feel the paint before learning how to paint with it. Dip your index finger into the paint and use it to make spots on the paper, using them to draw a flower or a caterpillar. Draw lines with your finger, make rays of the sun. Show your child that you can draw like this and let him create on his own, let him draw what he wants.

Painting with a brush for children
When the child can already hold a brush in his hands, show him how to paint with it. Explain to your child that before taking a new color, it needs to be washed. Take the paint with a brush and apply it to a piece of paper. Try painting with brushes of different sizes and shapes, see what kind of drawing you get.
You can paint with a brush in the following ways:

Dot painting for kids
Show how you can draw with dots; for this you can use a brush, a finger, or a cotton swab. Dip your tool into the paint and quickly touch it to the paper. You can color simple pictures using this technique; kids really like this activity, and it is also very useful for developing fine motor skills.


Drawing with stamps for children
Apply paint to the stamp and apply it to the paper, press down. An imprint of the picture will remain on the paper. Show your child how to work with it. The stamps can be painted in different colors; instead of ready-made stamps, you can use homemade ones. For example, to make circles with straws, you can use figures from sorters, parts from construction sets, and even cut vegetables and fruits. 

A very interesting texture is obtained if, instead of a stamp, you use a regular napkin with pimples. Dip it into the paint and, as if blotting, walk it over a sheet of paper.
Drawing with foam rubber
Cut a piece of foam and dip it in paint, then press it onto the paper and remove it. You can draw lines and paint over some shapes. Show your child how to draw. Your child will also be interested if you make different geometric shapes from foam rubber. You can attach them to a pencil or stick and use them as stamps. This way, by playing, you can learn not only colors, but also shapes. Then complicate the task, try to draw ornaments, first from two shapes, then use more shapes.


Drawing on wet paper
Wet a piece of drawing paper with water. Now draw on it with paint. The contours of the lines blur, become fuzzy, smooth transitions and haze are excellent. Just don’t overdo it with water; it will be better if you wipe it with a damp cotton swab. This technique is good for paintings with rain, images of fog, flowers behind a curtain.


Blotography
Teach your child to make blots, because then it’s so interesting to guess what they look like.
Take a sheet of paper, fold it in half, unfold it and put a few blots on the fold; you can make them the same color or different ones. Fold the sheet along the fold line and run your fingers from the center of the design to its edge. You can say something like “sim-salabim”.
Unfold the sheet and show your child what you came up with. When the child grows up a little, you can ask him what he sees in the drawing, what it reminds him of. When the drawing is dry, you can add small details with a felt-tip pen or outline the outline. This develops imagination and abstract thinking very well.


Nitcography
To do this you will need a sheet of thick paper and a woolen thread. Bend the sheet in half and unfold it, lower the thread into a jar of paint, then place it on the paper and fold it. Move the thread, pressing the sheet with your palm. Unfold and see what happens. You will see chaotic strokes of paint, look at them with your child, maybe you will see some familiar objects in them, circle them and complete the details, say what they are called. The combination of creativity, mental and speech work will help your child develop intellectually.


Wax painting
This is a very common and interesting technique. Draw a picture on a sheet of paper with a wax crayon or a piece of wax candle, and then with your child, paint over this sheet of paper with paint. Since the wax is greasy, the paint will not cover it and you will see your drawing. This method can also be used to make secret notes or write congratulations.


Waxing and waxing technique
Place something under a sheet of paper, such as a coin or other embossed object, rub the sheet with wax, paint on top and you will get an image of the object.
Drawings with salt
Sprinkle the finished drawing with salt. When the paint dries, the salt will remain on the sheet and give an interesting texture to the design. This way you can make a three-dimensional drawing, for example, highlighting stones or a path in the image. On blue paint, salt will look like snowflakes; if you sprinkle green leaves with salt, they will become like alive, translucent.


Drawings with masking tape
Molar tape sticks and peels off paper well, so it can be used in drawing and get interesting effects. For example, you can make a birch forest: cut out tree trunks from tape, you can glue twigs and branches from the leftovers, and glue the tape onto a sheet of paper. Paint everything on top with paint, when it dries, remove the tape, white stripes will remain under it. All you have to do is add details and the forest is ready!


You can cut out something more complex, such as houses and draw a whole city. The good thing about adhesive tape is that it can be used instead of a stencil, but paint drips are unlikely to get under it, and there is no need to fix it additionally.
You can also use the tape as a frame for the picture, when you remove it, the edges of the picture will be clear and it will be neat.

Drawing pictures using cling film
Yes, yes, you can also make interesting drawings using cling film. Lay it on a sheet of paper covered with wet paint and move it around a little. When you remove it, you will see interesting abstractions that resemble crystals.


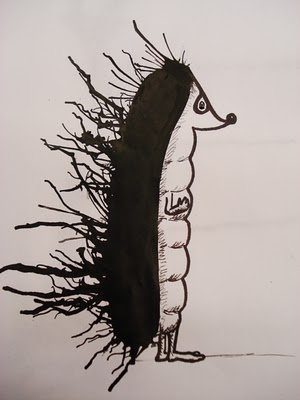
Blowing paint through tubes
Thin the paint with water to make it thinner. Take one or two colors. Drop paint onto the sheet and blow into the tube, directing it in different directions onto the paint. What you draw will resemble the interweaving of tree branches, or you can add a face and it will be hair - let the child dream up.


Coloring drawings
Draw some animal on a piece of paper and ask the child to hide it, just show how first: paint it completely over it. You can tell a fairy tale, for example, that there was a mouse, she went for delicious cheese, and a cat was waiting for her, who wanted to eat the mouse. And ask your child how you can help the mouse? Of course, it must be hidden. And ask him to do it.

Leaf drawing
A very interesting way of drawing. For this you will need leaves from trees. Apply paint to the leaves, you can paint them in different colors, attach the leaf with paint to the paper and press it, then carefully remove it. You can make such a beautiful forest.


If you turn on a little imagination, you will come up with a lot of new ideas with which drawing will not only be a fun activity, but also educational, educational and useful.
In addition to paints, there are other tools for drawing. Your baby will definitely love wax pencils, markers, and crayons. More details about fine art and other types of creativity are described in the article
VIDEO: Let's paint! Drawing games
Snow outside the window is a great reason to pick up a brush and depict all the beauty of winter. Show your kids several ways to draw snowdrifts, “crystal” trees, “horned” snowflakes, fluffy animals, and let winter “drawing games” bring the joy of creativity and decorate your home.
Music to which masterpieces are created
So, let's turn on some pleasant background music and... draw winter with the children!
Drawing with “snow”

mtdata.ru
You can imitate snow in a drawing in different ways.
Option No. 1. Draw with PVA glue and semolina. Squeeze out the required amount of glue directly from the tube; if necessary, you can spread it with a brush (if you plan to cover large surfaces). Sprinkle the image with semolina. After drying, shake off excess cereal.

www.babyblog.ru
Option number 2. Paint with salt and flour. Mix 1/2 cup of water with 1/2 cup of salt and the same amount of flour. Mix the “snow” well and draw winter!

www.bebinka.ru
Option number 3. Draw with toothpaste. Toothpaste perfectly serves as “snow” in the drawings. It can be tinted with watercolor or gouache if you need to get a color image.

Drawings with white paste on dark paper look beautiful. And they SMELL delicious!

Toothpaste has perhaps gained the most popularity due to the fact that it is easily washed off, so you can draw with the paste on glass. Feel free to pick up the tubes and go decorate mirrors, windows and other glass surfaces in your home!
 polonsil.ru
Option number 4. Draw with shaving foam. If you mix PVA glue with shaving foam (in equal proportions), you will get an excellent “snowy” paint.

www.kokokokids.ru
Option #5. Painting with salt. If you pour salt onto a pattern outlined with PVA glue, you will get a sparkling snowball.
Drawing on crumpled paper
An unusual effect can be achieved if you draw on previously crumpled paper. The paint will remain in the creases and form something like crackle.
Drawing with stencils

img4.searchmasterclass.net
Stencils make the drawing process easier for those who “don’t know how” (as they think). If you use several stencils at the same time, you can get an unexpected effect.

mtdata.ru
By leaving the part of the image covered with the stencil unpainted, you can pay more attention to the background: sprinkle salt on the still wet surface, apply strokes in different directions with a hard brush, etc. Experiment!
 www.pics.ru
Several sequentially applied stencils and sprays. It is convenient to use an old toothbrush or a stiff bristle brush for these purposes.

www.liveinternet.ru
A knitted snowflake will help you create real lace on paper. Any thick paint will do: gouache, acrylic. You can use a spray can (spray from a short distance strictly vertically).
Drawing with wax

Drawings drawn with wax look unusual. Using a regular (not colored) candle, we draw a winter landscape, and then cover the sheet with dark paint. The image “appears” right before your eyes!
Who are you? Seal?

masterpodelok.com
The effect of fluffy wool can be created by a simple technique: dip a flat brush in thick paint (gouache) and apply strokes with a “poke”. Drawings with white paint always look better against a dark, contrasting background. All shades of blue are great for winter motifs.
How to draw winter trees

www.o-detstve.ru
The crowns of these trees are made using a plastic bag. Dip it in paint and blot it in the right places - that’s the whole secret of “snow caps” for trees.

cs311120.vk.me
Finger painting is suitable for kids. Dip your index finger into thick gouache and generously sprinkle snow on the branches!
 masterpodelok.com
Unusually beautiful snow-covered trees are obtained using cabbage leaves. Cover a leaf of Chinese cabbage with white gouache - and voila! This painting looks especially impressive against a colored background.
 www.mtdesign.ru
No cabbage - no problem. Any leaves with pronounced veins will do. You can even sacrifice your favorite ficus. The only BUT, remember that the juice of many plants is poisonous! Make sure your child doesn’t taste his new “brush.”

ua.teddyclub.org
The trunk is a handprint. And everything else is a matter of minutes.

www.maam.ru

orangefrog.ru
A favorite technique for many is blowing paint through a tube. We create “snowiness” using the little artist’s fingerprints.
 www.blogimam.com
Not everyone will guess how this charming birch grove is drawn. The resourceful artist used masking tape! Cut strips of the required width and glue them onto a white sheet. Paint over the background and remove the paint. Draw the characteristic “dashes” so that the birch trees become recognizable. The moon is made in the same way. Thick paper is suitable for these purposes; the tape should not be too sticky so as not to damage the top layer of the design.
Drawing with bubble wrap
 mtdata.ru
Apply white paint to the bubble wrap and apply it to the finished drawing. It's snowing!
 mtdata.ru
The same technique can be used in applications.
The snowman has melted. It's a pity…

mtdata.ru
This idea is suitable for both the youngest artists and those who want to give a gift “with humor.” Cut out “spare parts” for the snowman from colored paper in advance: nose, eyes, hat, twig arms, etc. Draw a melted puddle, wait for the paint to dry and glue what’s left of the poor fellow snowman. Such a drawing can be an excellent gift to loved ones on behalf of the baby. Even more ideas in our article.
Drawing with palms

www.kokokokids.ru
An easy way to create a surprisingly touching New Year's card is to tell a story about funny snowmen. You can create a whole family if, based on a palm print, you add carrot noses, coal eyes, bright scarves, buttons, twig hands, and hats to your fingers.
What's there outside the window?

ic.pics.livejournal.com
What does a window look like from the street side? Unusual! Invite your child to look at the window through the eyes of Santa Claus or another character who may find himself outside in the most severe cold.
Dear readers! Surely you have your own “winter” drawing techniques. Tell us about them in the comments.
Drawing is a very interesting type of applied art; drawings with paints for children allow them to develop personal qualities in children and instill in them a sense of taste. By working with a child, you can teach him to think, think, feel. It is especially useful to paint with young children. After all, by drawing a year, they develop fine motor skills of the hand, which is very useful for mental development.
At two years old, children not only willingly play with blocks, but also show interest in drawing. Here mom has the opportunity to show all her creative imagination. You can draw almost anything. These could be chairs, toys, dishes, a favorite cat.
Drawings with paints for children will help to fully prepare your child for further education at school. Firstly, hand coordination and fine motor skills improve for 4 years old, and secondly, intelligence can be developed.
Well, making precise movements with a brush or pencil is a great way to prepare your hand for writing.

You can playfully teach how to distinguish colors and paints, determine sizes and teach basic counting. Drawing helps to cope with psychological complexes up to 7 years.
Since simple drawings with paints can be started quite early, it is absolutely not necessary to wait until the child asks for drawing tools. To begin with, you can draw yourself, saying “look what I draw,” and the baby can easily act as a spectator. A baby at 4 months of age will not yet be able to hold a pencil or brush.
At the same time, not only pencils and paints can act as materials. You can master finger painting using your fingers and palms.

What colors are suitable for children's creativity?
Today you can buy paints in stores that are ideal for children's creativity. Among them:
- Special finger painting kits for children 2 years old.

- Gouache paints - from the age of four.

- Watercolors from 6 years old.

Since we plan to start drawing lessons at the age of 2-3, we should choose finger lessons. For children 3-4 years old, you can switch to gouache and watercolor.
Painting for children should not be monotonous. It is not at all necessary to color a regular piece of paper. You need to gradually add new elements.

On video: how to simply and beautifully draw an octopus with paints.
What drawings should you start with?
If we learn to draw, then we need to start with the simplest. As you gain experience and skills, the task will become more difficult. When working with a child, there is no need to ensure that he does everything correctly. Children must go through the soiling stage. This stage continues until approximately two years of age. At first, the baby will simply scratch pencils on paper.
However, a little more can be taught during this time. Note:
- With children 2-3 years old, you can master the skills of working with a pencil, felt-tip pen and brush.
- From five, carefully put dots, make lines, circles, ovals, paint over drawings with strokes.
- From seven you can really master composition skills.

Simple drawing lessons for kids
I usually teach these simple drawing lessons with kids. Children's drawings using the finger painting technique are very interesting. Here's how to do it:
- Invite your child to dip his finger in the paint. Now place your finger on a piece of paper, you will get a speck.
- Help me draw a petal or some kind of caterpillar.
- Drawing lines, draw rays like the sun.

Let the child now try to draw something himself. As his hands become more confident at age 5, you can teach him to use a brush. You need to show your child the three basic skills of painting with a brush; show how to wash it before adding new paint.
There are several ways to paint with a brush:
- By dipping. We draw, lightly touching the paper, and immediately remove the brush, applying spots of paint. Let a 3-year-old child observe how the image is produced.
- Strokes technique. From the age of 3, carefully draw lines in a variety of directions. Let them differ in length.
- Draw a sketch using a pencil with 8. First, make basic lines and a sketch using a pencil, and then paint.

As your skills develop, the tasks will become more difficult. There are very interesting techniques. They can be mastered by conducting regular activities with the child. To consolidate a particular skill, several lessons are required.