Master class on felting decorative panels. Master class on felting decorative panels Dry felting panels
Nowadays a lot of women are engaged in needlework. Cross-stitching, knitting, origami - all this, of course, is very interesting and requires effort and talent, but it has become banal and not so interesting. But felting paintings from wool is definitely an original activity, the paintings turn out simply amazing, they can be a wonderful accessory for decorating your interior or a gift for any occasion. In our article we will tell you everything about this unusual activity.
There are two felting techniques - dry and wet, we will try to tell you about both options. Our first lesson will be in the dry felting technique; after each stage of work, the product should be held under glass to secure it; this technique is not used in wet felting.
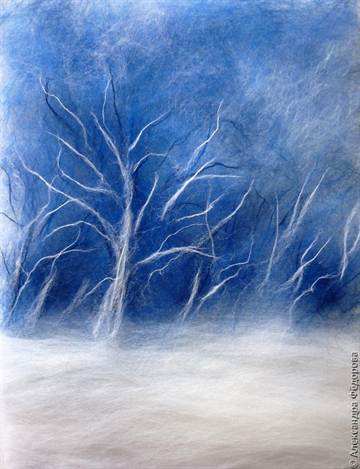
"Winter night"
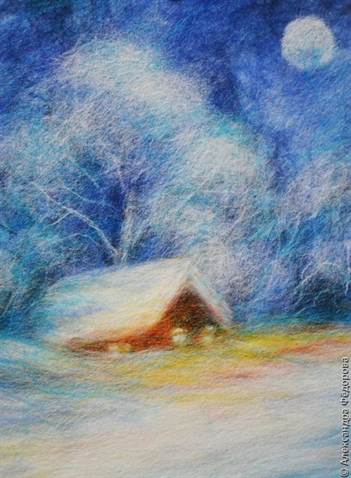
We bring to your attention a master class that is perfect for beginning needlewomen, because the painting itself is not complicated, and the lesson will be very detailed, with step-by-step instructions and photos of each stage of the work.
To work you will need:
- Wool (white, blue, dark blue, light blue, turquoise, dark brown, brown, yellow, orange and red);
- Non-woven backing measuring 18 x 24 centimeters;
- Scissors;
- Tweezers;
- Photo frame with glass.
We take strands of wool and cover the surface of the base (non-woven backing) with them. We lay out our pieces in different directions, the wool should protrude beyond the base by about two centimeters (a little less is possible). Now cover the craft with glass and cut off the excess pieces.

Now we need to make the background. We lay wool in different shades (from dark to light). Then we put the glass on again and cut off the excess particles.

Since our painting will depict winter, we need to make snowdrifts. To do this, take white wool and lay it horizontally at the bottom of the picture.

Now we take dark blue wool, twist it into small “sausages” and lay out the silhouettes of trees with them.
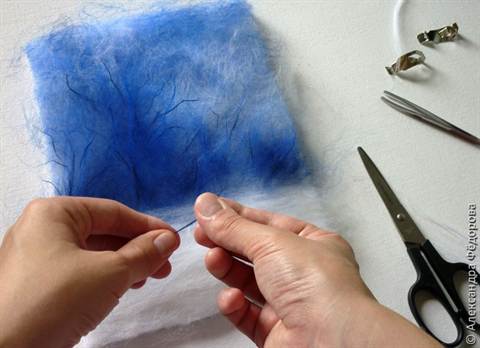
It’s winter here, our trees need to be “dusted” with snow. We take white yarn, twist it into a “sausage” and lay out snow-covered trees.
Again, we make a tree crown from white wool; to do this, the wool needs to be fluffed up a little.


Now we make a ring out of white or yellow wool and place it on the picture, thus we have outlined the outline of the moon. We cut the wool into small pieces and fill our moon.
Now we “build” a house from brown and dark brown wool. The wall located on the side of the moon should be lighter; this should be taken into account when working.

Now we make dense pieces of white wool and make the roof of our house from them. The edges should be smooth and crisp; it is best to trim them with scissors.

The lower part of the house needs to be covered with “drifts”; it is not worth mentioning what color yarn we make them from.

Now we make windows and a door from yellow or white wool.
Now let's give our picture even more realism by adding light pouring from the windows. We make shimmers from orange and yellow wool. You can use tweezers to drape white and yellow wool over the house.

It is better to mute bright colors with thin strands of white wool, and small turquoise hairs can add expressiveness to the picture.

Our painting “Winter Night” is finished. Now place it in a beautiful frame under glass and you can safely hang it on the wall or give it to family or friends.

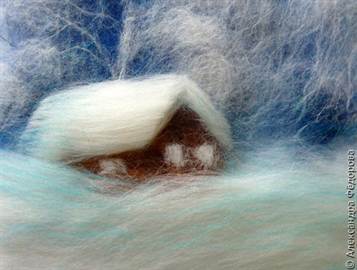
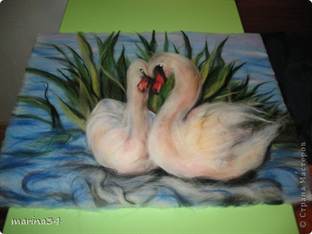
We invite you to look at some other paintings, perhaps you will gain new ideas or be inspired to create a new masterpiece.

Wet felting
As noted above, there is another technique for creating paintings from wool - wet felting. It is a little more complicated in its execution, but the resulting paintings are no worse, unusual and beautiful.

We invite you to watch a very interesting video tutorial from which you will learn how to make a three-dimensional picture with cats.
The master class is very detailed, each action is explained in accessible language, the instructions will be understandable to both beginning needlewomen and experienced girls who have long been familiar with the wet felting technique. This work will be a little more complicated, but no less interesting and exciting.
Video on the topic of the article
Now you can proudly call yourself an experienced felter. As you can see, this work is painstaking, but it is addictive, and what beautiful paintings come out. Of course, it is very important to choose the right sketch, drawing that you want to immortalize in such an unusual way. We invite you to familiarize yourself with the materials in this video collection, thanks to which you will be able to consolidate your acquired knowledge and acquire new interesting ideas.
Like any work, felting should begin with a sketch:
In order to felt a panel measuring 45*32, we will need approximately 100 grams. unspun wool. Moreover, about 40-50 grams of them. - so-called sliver, coarse wool, which is used as the basis of the panel. For “painting” with wool, both combed tape and carded tape are suitable - they will give different effects similar to painting with watercolors.
We will also need: plastic “bubble” film (which is used for packaging equipment), thin plastic film (cut bag), a bar of soap (for children), rubber bands, cotton fabric, a watering can or a plastic bottle with 5-6 holes in the cork holes, as well as a stick 60 cm long and 4 cm in diameter (you can take a rolling pin or a shovel handle)
It is necessary to take into account that wool shrinks by 30% during the felling process, which means the panels need to be laid out a third more on each side.
We begin the process of laying out the wool: take a strand of sliver in one hand, and with the other we pull out a small piece from it
We place it on bubble wrap, which is laid out with the ribbed surface facing up. We lay out the strands, orienting the direction of the fibers in one direction. In this way we lay out the entire area of the panel, not forgetting that it should be 30% larger than the final size. Then we lay out the second layer of sliver in the same way - now with the fibers in the other direction. This is necessary so that shrinkage occurs in both directions. When the entire sliver sheet is laid out, lightly press it down with your hands.
Then, in accordance with the sketch, we begin to lay out the colored wool. The layout is in such a way that the color that is in the background is laid out first. Those. First we lay out the background, and then the figure on it. We divide the wool into thin layers, which we place on a drainer. During the layout process, we use different colors, slightly overlapping one color with another, to achieve a painterly effect.
When the background is laid out, we proceed to laying out the fur on the cat figurine
We also use different shades. After that we lay out the small parts. Please note that small and thin parts may shift slightly during the felling process.
You can also use regular woolen threads (yarn) in panels to outline the elements. The yarn will fall to the wool and give an interesting “trembling” effect).
This is what our panel looks like ready for wet felting. Note that sometimes laying out the wool takes longer than the actual felting.
Prepare a soap solution: grate three baby soaps and pour 1-2 tablespoons of soap into 1 liter of boiling water. We wait for the soap to dissolve and carefully water the panel using a watering can. You should not pour a lot of solution - excess will spill out and create inconvenience, but the entire product should be evenly moistened. Small parts may shift - correct them by placing them in place and pressing lightly.
Then cover the panel with thin plastic film in one layer. Gently press the film onto the wool, lightly moisten it with soapy water (so that your hands glide over the film better), then begin to rub the entire product, pressing the wool evenly over the entire area. Three minutes 5-7 - at this time the initial falling of the wool occurs. Excess solution may spill out - keep diapers handy.
Then we tightly wrap all the layers (film and wool) onto the stick. We tie the resulting “roll” with rubber bands in three places, wrap it in a diaper, which we also secure with rubber bands, and begin to roll it with our hands. We roll along the entire diameter, move our hands along the entire length - this will ensure that the product falls evenly. We roll with effort for about 15 minutes.
Then we unfold it and check whether the product is deformed. Uneven edges can be folded inside out
Then we roll it into a “roll” in the same way, but in a different direction (i.e., if earlier you rolled it widthwise, now the panel should be wound lengthwise around the stick. This will allow the product to shrink in both directions proportionally)
At the second stage of felting, the “roll” can be placed on the floor (with an oilcloth underneath) and rolled with your feet - because the legs have more strength than the hands and the product is felted better
In total, the product should be subjected to friction for 40-50 minutes. Periodically unfold and change direction; the panel can be slightly pulled, eliminating deformation of the edges.
Indicators of felting of a product are: shrinkage of the product by 30 percent or more, inseparability of fibers from each other, general uniformity of felt.
When the product is felted, unroll it and wash it free of soap under warm running water. Gently squeeze into a dry diaper and lay out to dry.
The finished panel can be placed in a frame or sewn on the back of the slats and hung on the wall.
Wet felting from wool is used to create flat fabrics, which is why it is sometimes also called flat felting. Flat felting with wool for beginners may seem narrow-minded, but it's not!
Using this technology, you can make not only plain canvases and colored panels, but also handbags, covers for homemade notebooks, scarves, mittens and even flowers! Interesting? Then let's try it.


What do you need for wet felting?
Unlike dry felting, wet felting requires quite a lot of materials. But you can probably find them all at home. So, you will need:
- bedding made of waterproof material (usually bubble wrap is used);
- soap;
- warm water;
- net (for example, mosquito net);
- towel;
- spray bottle or sponge;
- bamboo napkin or washboard;
- decorations for your future masterpiece (optional).
Where to begin?
Wet felting lessons from wool for beginners usually involve creating simple things. For example, you can make a small panel - see the instructions for creating it below.
Lay out the bubble wrap with the bubbles facing up. Now take the wool for felting. Holding it with one hand, pull out small bunches from the tape. How small? Imagine that you are pulling out a fluffy bunch from a faded thistle flower - this is approximately the volume the bunches should be.

Lay the bundles parallel to each other, overlapping the thin edges. When you have covered the intended area of your workpiece, begin the second layer. Lay the second layer perpendicular to the first. Then repeat again, and again. The result should be 4 layers, and each subsequent one is perpendicular to the previous one.
Now it's time to check the quality. Gently pressing the wool, look for any gaps. Clearances are “blanks” for future holes in the canvas. If there are gaps, they need to be covered with tufts of wool.
How to wet felt wool?
Wet felting involves moisture. For this you need a soap solution. The technique of wet felting wool for beginners allows preparing a soap solution from ordinary soap, although professionals often use expensive ready-made felting solutions. So, take two glasses of warm water and dissolve two tablespoons of grated baby soap or three tablespoons of liquid soap in the water. Pour the solution into a spray bottle, but if you don’t have it, it doesn’t matter. A sponge will also work for moisturizing.
Cover the workpiece with a net. It should cover it entirely and be even larger than it. Starting from the middle, moisten the surface with soapy water. To ensure that the solution penetrates deeply, press the product with your hands. How to understand that the workpiece is moistened enough? It is quite wet, but when pressed, no water comes through under your fingers. If water appears, blot the surface of the future panel with a towel. Balance is very important here: wool that is too dry will not mat, but wool that is too wet will unravel.
Happened? Now let's finish the product. Remove the mesh. Decorate the surface of the panel with beautiful woolen threads (if so intended), and trim the fluffy edges, tucking them into the total mass of the canvas.

Now let's start felting.
Wet felting with wool may seem uncomfortable for beginners. To prevent your first time from turning into a tragedy, use gloves. Cover your future masterpiece with the mesh and smooth it with light circular movements. You don't need to press too hard. After some time, check whether the workpiece is falling against the mesh. In this case, the pressure must be reduced. When the top layer falls off, the mesh can be removed.
When will it be ready? Easy to check. Pinch the surface of the workpiece. If hairs of fur come off, it's not done yet. When is it ready? When the entire canvas follows your fingers.
When the front part is felted, start working on the back side. Turn the workpiece over and continue felting on the other side.
When the other side is ready, take the workpiece in your hands and rub it with your hands. The first stage of felting is completed.
Now take a bamboo napkin. Place it so that it is convenient to roll it up. Place the canvas on a napkin and roll it into a roll. Place a towel on the table so that the napkin does not slip, and roll the roll over the towel. Then unroll the roll, flip the piece over at a 90-degree angle, and repeat.
If you don't have a bamboo napkin, you can roll the fabric on a washboard. To do this, spread the product on a board and rub it as if washing. When it wrinkles, smooth it out, turn it at a right angle and rub again.
And now that the panel has fallen off, it needs to be rinsed. Place it in the sink or bathtub and run hot water over it. Rinse until the water runs clear. Then rinse with cold water and dry by rolling it in a towel. Then lay it out on a horizontal surface to dry completely.
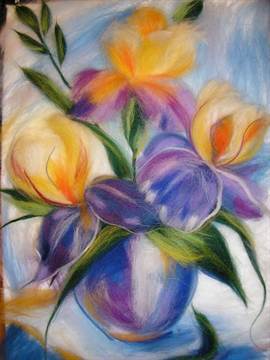
A picture of poppies made using the felting technique
Felting is one of the oldest technologies for creating textiles. During excavations, archaeologists found that the approximate age of this method is 8000 years.
Felting came to Russia in the 13th century during the Mongol-Tatar invasion. Cloth and felt were made and used in household affairs. Felted clothing was also common. They made hats, skirts and pouches in which to store tobacco for smoking. The peculiarity of wool was used to insulate houses.
Currently, this technique is acquiring an artistic form and has a specific name - felting. It is used to create toys, paintings, crafts and clothing.
Types of wool felting
How and why does felting happen? It turns out the principle is the same as with our hair. Hair consists of scales that, when closed, look healthy and smooth. But if the scales are open, tangles can form and fall off. However, this property is an advantage for art.
Felt paintings


Dry felting
Dry felting of wool paintings is done using a needle. It should be quite thin, have small notches and resemble an L shape. With the help of such a tool, the fibers are easily tangled, and the process becomes similar to modeling from plasticine.
 Poppies made by laying out colored sheep's wool in layers
Necessary materials:
- sheep's wool;
- special needle;
- thimble (required).
Everything you need for dry felting
Felting technique:
- We separate a small lump from the wool and tangle the fibers between our palms. Roll it into a tight rope.
- We stick the needle deeply into the lump and first of all we start compacting from the inside (this is important). We gradually move towards the outer walls, compacting and felting. This will level the surface.
- To make the figure denser, use a thinner needle. If during the felting process the figure does not change its appearance, shape and density, then felting should be stopped. To create a bulge in a certain area, lay down this area for a short amount of time.
Dry felted wool painting
Wet felting painting
Wet felting from wool is a classic method. With the help of soapy water and friction in different directions, the fibers fall tightly together.
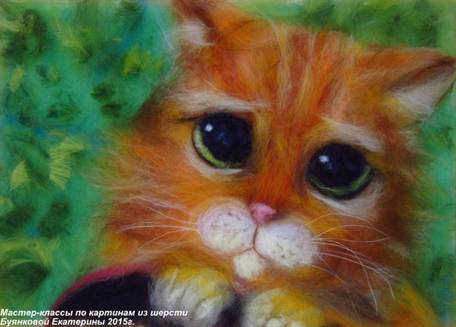
 A painting made of wool looks voluminous and unusual
For this technique you will need:
- unspun wool;
- film (bubble);
- bamboo napkin;
- felting needle;
- thimble;
- soap;
- net;
- warm water
Everything you need for felting
Technique:
- We separate thin shreds of 8 cm long from the unspun wool. We lay out the shreds on bubble wrap, slightly layering them on top of each other. Thus we lay out 3-4 layers.
- On the penultimate layer we lay out the drawing. It may consist of woolen threads, scraps of wool and other suitable materials.
- Spray the workpiece with soapy water and cover it with a net.
- We iron the wool in all directions to compact the material.
- Place everything on a bamboo napkin and roll it tightly like sushi. Next, wrap it in a towel and roll it around the table about 100 times.
- We unfold the structure and roll it back, turning it 90 degrees.
- When felting, the canvas will shrink by 20-40%. When everything is ready, rinse in warm water and dry.
For the wet technique, you will need a felting needle. This is a special metal needle with a wooden handle. It is needed in order to imprint the design onto the canvas. The needle has multidirectional notches that can damage the skin if used carelessly.
The splendor of wet felting paintings
Felting paintings
Felting wool paintings is one of the most unique and unusual forms of art. This painting can be done using both dry and wet techniques. However, you should stick to your preferences. If you want a picture with voluminous, convex figures, then the dry felting technique for paintings from wool is intended for this. Using the wet method, wool paintings are flatter and can be placed in a frame with glass.
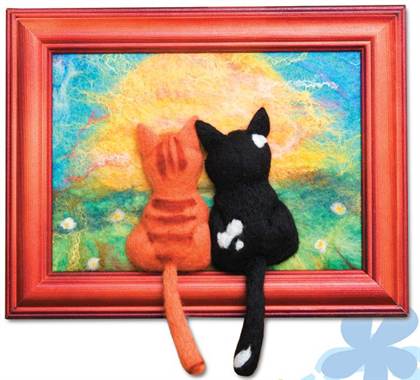
 This three-dimensional painting is made using dry technique.
Advantages and features of the technique of felting wool paintings:
- an interesting skill that can be useful on the farm;
- the process itself is quite easy, which is good for beginners;
- the opportunity to decorate the house and make gifts with your own hands.
You can choose any pattern for felting a picture of wool and the idea itself, it’s a matter of your imagination. When choosing colors, you should pay attention to the level of complexity of the craft itself. For beginners, it is better not to choose a large number of colors. A large number of flowers requires a lot of time, more accuracy, experience and the necessary skills.
You should also pay attention to the compatibility of colors and the range that you have chosen. Layering colors can result in a messy design if the colors don't match or there are too many colors piled in one place.
Description of the painting felting process
First of all, to create a picture you need to choose a felting method. Wet equipment will look more convenient and beautiful. The base picture can be found on the Internet. It can be of any quality and color, the main thing is that you yourself understand what you want to see in the end.
Execution sequence:
- For the base of the picture, spread a bamboo napkin or papyrus paper on the table. We put some bubble paper nearby and lay the picture itself on it. The base of the picture is needed nearby only to monitor the size of the craft.
- It should be taken into account that the size of the painting in the original version will shrink by about a third. We fill the background of the picture tightly and without gaps, tearing off small pieces of wool. The wool should be laid out in three rows so that one is across the other. The thickness of the entire craft should be approximately the same, so where the design is intended, you should not lay out the background wool. If you want to make the picture more airy, then the background layer is made thin accordingly.
- We also lay the pattern tightly in accordance with the colors. The last layer can be laid out along an oblique line - this will hold it tighter. To fix the design, you need to press it with your hands or use a needle for filing.
- If the design is airy and openwork, very thin flaps of wool will look good against a contrasting background. We lay them out in the desired shape as if we were drawing. To make the design look even more interesting, you can use small pieces of yarn and arrange them as needed.
- After the entire drawing is laid out, we cover the craft with a net. During felting, you need to lift the mesh from time to time so that it does not fall off with the picture. We wet everything with the prepared soap solution using a sponge or sprayer. Then we smooth it out and felt it (three times intensively). We continue felting until the fibers stop separating.
- Next, put everything on a bamboo napkin and roll it tightly like sushi. Next, wrap it in a towel and roll it around the table about 100 times.
- When felted until ready, you can rinse and leave to dry.
Master class on felting a picture
Such a painting will not only be a beautiful home decoration, but also an excellent gift.
Tatiana Yasinskaya
Materials and tools:wool for felting(sold in craft stores, felt in A-4 format, scissors, knitting threads for the outline. We lay out the outline of the future image with knitting threads. Separate the lumps of wool and lay out the space inside the outline with these “clouds”.
The main background is superimposed. Now with thin strands of wool we lay out the striped details on the abdomen, emphasizing the line of the wings

We must prepare the finished work - insert it under glass and into a frame.

Following panel with a caterpillar - we also lay out the outline with threads

Fill the space inside the outline with twisted strands of wool (wind the strand around your finger).We use different shades of wool for an expressive look. We work slowly and carefully.

We complement the image with chopped strands of white wool, add accents, paws, etc. Done!

Publications on the topic:
Both adults and children are waiting for the end of December, They tear off this calendar sheet with pleasure. The holiday of masks, tinsel and confetti, among.
Materials 1. Polystyrene foam 2. Stationery knife 3. Pencil 4. Scissors 5. Brush 6. Dragon glue 7. Self-adhesive 8. Sakura artificial flowers.
Among the many favorite flowers, I would like to mention chrysanthemums. Initially, chrysanthemums were only yellow. Today it exists.
Autumn is a wonderful time of year! A riot of colors in the autumn forest. Now the larches have changed their outfit! Now they are standing in yellow-orange dresses.
Pano Snowman We will need: blue and black colored cardboard, green and white colored paper, scissors, PVA glue, plain glue.
Master class on making the “Sun” panel.
Recently, our kindergarten hosted a “Do-it-yourself dolls” competition. So I decided to make Kitty the cat. Mainly dry method.