How to draw stained glass on paper with a pencil. Master class “Autumn” using the technique of “Stained glass drawing”
If you want to understand how to make stained glass on paper, then this article is for you. Stained glass on paper is also called squiggle design - this is an unconventional technique for making stained glass. This is mainly a children's activity. Making a wonderful picture using this technique is quite simple and interesting. Cardboard, glass, plastic, plywood are suitable for the base of the picture. For wall paintings, it is better to use opaque materials.
It’s up to you to decide which subject to choose for the picture. The image affects the atmosphere of the room. For a nursery, of course, it is better to choose children's drawings, for the kitchen - geometric drawings or abstraction. For the remaining rooms, you can choose a variety of ideas that will fit well into your interior and will look stunningly beautiful. Stained glass has been known for several centuries and is an element of luxury and a sign of wealth.
What is needed for the job? The basic list of required materials and tools may include:
- Paper – sheet A4;
- Simple pencil;
- Marker or black felt-tip pen;
- Cardboard;
- Eraser;
- Watercolor paints;
- Frame.
Let's go to the lesson
Stained glass always starts with an idea. In order to make a picture out of paper using watercolors, you will need: a pencil, scissors, half a sheet of white Whatman paper.
How to draw a stained glass window and make such a beautiful picture with your own hands?

Step-by-step work:
Stage 1: determine the size of your stained glass window.

Stage 2: draw a stained glass pattern with a pencil. You can draw a sketch for a future painting yourself or download a ready-made template.

Stage 3: paint the remaining stained glass colors. First, paint all the fragments of the pattern with the same color. Let the paint dry to avoid mixing colors, then apply another color, etc. Having painted all the fragments, leave the picture until completely dry.

Stage 4: fill the space around the main pattern.
Stage 5: draw the outline in black. You can also paint it black with a thin brush or use a black felt-tip pen. It is better to start drawing from the upper left corner so as not to smudge the drawing.

A little about other types
There are many types of stained glass. The technology for making stained glass from colored paper is almost the same as using paints.

First we make a sketch. On a sheet of paper we draw a frame of 3-4 cm and transfer the drawing to it in full size. The contours should be wide. We color the outline with a black felt-tip pen. Cut out fragments of the design using a sharp knife. Then you need to cut out the parts from colored paper and glue them to the back of the work. Trim off excess. Your stained glass window is ready!
You can make a stained glass window with your own hands.


Filled stained glass- This is a unique process of imitation of stained glass, which is performed on a whole sheet of glass using self-made paints. To do this, place a large sheet of paper on the table, with a working glass on top. Trace the outline of the glass. Transfer the sketch to paper and trace all the contour lines of the sketch well and place the glass on top. Use the prepared paint to draw all the contour lines. Now prepare the fill paint and fill the fragments between the contours with paint. Fill in 3-4 layers, and the varnish should dry for 10-15 minutes after each pour. Then cover the top of the drawing with clear varnish and leave to dry completely. In 2-3 hours your stained glass window will be ready.

Little tricks
Stained glass is a decorative picture that can be made in any style.


Masters often keep silent about some, in their opinion, insignificant details. Here are some tips to help you make stained glass:
- Never start learning with the most complex, start with the simplest. Never take on a large drawing with many small details at once. Try a simple pattern first, and when you master the technique a little, you can take on complex designs.
- use different types of paints for your work, they all also apply to the drawing differently. The brightness and light transmission of the design depends on the number of layers of paint.
- To carefully adjust the pattern, use ear sticks and cotton pads.
- Use a sharp knife or blade to remove defective lines.
- Use wet alcohol wipes on your hands.
- The lighting should be good both from below and from above the work in order to immediately reveal the shade of color and the density of the coating.
- One of the main components of beautiful and neat work is its quick completion. For example, if you apply the contour paint too slowly, it will vary in both color and thickness. If poured slowly, the paint will lay down in an uneven layer and this will affect the quality of its surface.
Video on the topic of the article
If you want to understand how to make stained glass on paper, then this article is for you. Stained glass on paper is also called squiggle design - this is an unconventional technique for making stained glass. This is mainly a children's activity. Making a wonderful picture using this technique is quite simple and interesting. Cardboard, glass, plastic, plywood are suitable for the base of the picture. For wall paintings, it is better to use opaque materials.
It’s up to you to decide which subject to choose for the picture. The image affects the atmosphere of the room. For a nursery, of course, it is better to choose children's drawings, for the kitchen - geometric drawings or abstraction. For the remaining rooms, you can choose a variety of ideas that will fit well into your interior and will look stunningly beautiful. Stained glass has been known for several centuries and is an element of luxury and a sign of wealth.


What is needed for the job? The basic list of required materials and tools may include:
- Paper – sheet A4;
- Simple pencil;
- Marker or black felt-tip pen;
- Cardboard;
- Eraser;
- Watercolor paints;
- Frame.
Let's go to the lesson
Stained glass always starts with an idea. In order to make a picture out of paper using watercolors, you will need: a pencil, scissors, half a sheet of white Whatman paper.
How to draw a stained glass window and make such a beautiful picture with your own hands?

Step-by-step work:
Stage 1: determine the size of your stained glass window.

Stage 2: draw a stained glass pattern with a pencil. You can draw a sketch for a future painting yourself or download a ready-made template.

Stage 3: paint the remaining stained glass colors. First, paint all the fragments of the pattern with the same color. Let the paint dry to avoid mixing colors, then apply another color, etc. Having painted all the fragments, leave the picture until completely dry.


Stage 4: fill the space around the main pattern.


Stage 5: draw the outline in black. You can also paint it black with a thin brush or use a black felt-tip pen. It is better to start drawing from the upper left corner so as not to smudge the drawing.

A little about other types
There are many types of stained glass. The technology for making stained glass from colored paper is almost the same as using paints.

First we make a sketch. On a sheet of paper we draw a frame of 3-4 cm and transfer the drawing to it in full size. The contours should be wide. We color the outline with a black felt-tip pen. Cut out fragments of the design using a sharp knife. Then you need to cut out the parts from colored paper and glue them to the back of the work. Trim off excess. Your stained glass window is ready!
You can make a stained glass window with your own hands.


Filled stained glass- This is a unique process of imitation of stained glass, which is performed on a whole sheet of glass using self-made paints. To do this, place a large sheet of paper on the table, with a working glass on top. Trace the outline of the glass. Transfer the sketch to paper and trace all the contour lines of the sketch well and place the glass on top. Use the prepared paint to draw all the contour lines. Now prepare the fill paint and fill the fragments between the contours with paint. Fill in 3-4 layers, and the varnish should dry for 10-15 minutes after each pour. Then cover the top of the drawing with clear varnish and leave to dry completely. In 2-3 hours your stained glass window will be ready.

Little tricks
Stained glass is a decorative picture that can be made in any style.


Masters often keep silent about some, in their opinion, insignificant details. Here are some tips to help you make stained glass:
- Never start learning with the most complex, start with the simplest. Never take on a large drawing with many small details at once. Try a simple pattern first, and when you master the technique a little, you can take on complex designs.
- use different types of paints for your work, they all also apply to the drawing differently. The brightness and light transmission of the design depends on the number of layers of paint.
- To carefully adjust the pattern, use ear sticks and cotton pads.
- Use a sharp knife or blade to remove defective lines.
- Use wet alcohol wipes on your hands.
- The lighting should be good both from below and from above the work in order to immediately reveal the shade of color and the density of the coating.
- One of the main components of beautiful and neat work is its quick completion. For example, if you apply the contour paint too slowly, it will vary in both color and thickness. If poured slowly, the paint will lay down in an uneven layer and this will affect the quality of its surface.
Video on the topic of the article
Stained glass is one of the types of artistic painting; nowadays it is becoming increasingly popular. Stained glass on glass is absolutely safe and can be done with children. It is made using acrylic paints. To perform this job, you do not need to have any special skills or abilities. The necessary colors can be purchased at any art or construction store. Painting can be done not only on transparent surfaces, but also on wood, plastic, ceramics, metal or plaster.
Just the facts
The name "stained glass" comes from the Latin word vitrum - "glass", which implies transparent patterns, paintings or drawings made on glass or from colored glass.
Stained glass on glass dates back to ancient times. Most often it was used in temples and churches. In the churches of Germany and France, the first narrative stained glass windows were used, made in bizarre shapes, of different colors, and of quite large sizes. The stained glass windows depicted religious events, the life and everyday life of saints. This is the so-called painting on glass.
Stained glass appeared in Russia only in 1820 and they were first called transparent paintings. Just at this time, the revival of this art form began in Europe after a long period of oblivion.
Necessary tools for acrylic painting
If you don't know how to draw stained glass on glass, we will tell you. You need to prepare the following tools:
- the most suitable sketch made on paper;
- which is supposed to be painted;
- pre-selected shades (it doesn’t matter which company you choose, the main thing is that at least 12 hours pass between applying layers, and 3-4 days before the first wash);
- solvent, it is advisable to choose one company with paints;
- ferrule;
- stained glass outline;
- cotton buds;
- toothpick or thin stick;
- synthetic brushes.
Once you have everything ready for work, you can proceed directly to creating your masterpiece.

Making stained glass with acrylic
So, let's start making stained glass on glass carefully and without rushing.
Glass is laid out on a pre-prepared sketch, the edges are aligned so that the drawing is in the right place. The glass must first be washed and degreased; for this you can use ordinary vinegar or alcohol.
To make the line made by the contour thinner, a special metal tip is put on it. Using an outline, the design is applied to the glass. Movements should be fairly confident, clear and fast, with light pressure on the bottle. In order for the paint to flow better and the contour to be a little more voluminous, the tip must be held at a large angle to the glass. The outline must be applied carefully enough so that there are no breaks in the drawing, since then it will need to be filled with liquid paint, and it may blur through the gaps.

After the application of the main contour is completed, you must wait until it dries. Then we start filling it out. The technique of filling the contour is so simple that you can do it even with a child. To do this, select the necessary shades of acrylic paints. When working, you need to remember that only enough paint should be applied to the surface so as not to exceed the height of the contour. If the paint has flowed a little onto the outline, don’t worry; after drying it will become transparent, and your mistake will no longer be so noticeable.
When making stained glass, artists often want to achieve smooth transitions or different shades. To do this, you need to mix or shade several colors. This can be done with a regular toothpick. One of the colors is applied with a slight distribution towards the center. Then a second color is applied from the center to the edges, which is necessary for mixing. Then, using a toothpick, the paint is mixed and leveled so that it is evenly distributed over the element to be painted. If air bubbles appear during application, they can be easily removed with the same toothpick.
Little tricks
- While working, don’t worry about being too pale and not looking the way you would like. After drying, it will darken a little and become much more transparent.
- To make the paint apply more evenly, you can lightly tap the glass from below - it will spread better.
- It is very convenient to work with acrylic paint not only on horizontal planes. You can also use it to decorate and even make a stained glass window on the door glass without removing it from the frame.
- To make the design look a little more voluminous, use a sponge when applying a pure white color.

Advantages and disadvantages
Stained glass on glass is created quickly enough, and the work will not have any similar ones. The biggest advantage of such a painting will be its practicality. Painted stained glass windows, unlike soldered ones, can be used for large surfaces; moreover, they do not require cutting out individual pieces of glass and attaching them to the sketch. Therefore, when painting glass with acrylic paints, you get a durable and solid image. In addition, stained glass made with paints can be inserted into a double-glazed window, which will save much more heat than if soldered stained glass is inserted into them.
Glass painting fits much more easily into any apartment interior, while soldered stained glass windows require carefully selected furnishings. In addition, painted glass perfectly transmits light, creating a slight kaleidoscope effect.
Other types of stained glass
Stained glass on glass using paints is the easiest to do at home, but there are other types and methods of such work.

The most common of them:
- classic soldered stained glass;
- Tiffany stained glass;
- fusing;
- frosted stained glass;
- Plastic Lead stained glass windows;
- stained glass windows made using casting technique;
- film stained glass window made using SGO technologies;
- faceted stained glass;
- bending;
- combined stained glass;
- stained glass window made by etching;
- laser engraving.
If you decide to decorate glass with stained glass, then before starting the main work, practice on small glasses, so to speak, get your hands on a little.
How to make a hand-drawn stained glass window yourself. (Lesson one)
Lesson one.
This technique is much simpler, cheaper and more accessible than classic stained glass.
This technique, in comparison with classical stained glass, benefits in many ways - in addition to effort, time and money, it also allows you to obtain interesting effects that are impossible for classical stained glass - color transitions, for example, mixing colors.
You can also draw on vases, bottles and any other objects, but this is somewhat more difficult.
Such stained glass looks very impressive on the glass of internal doors.
A combination of painting techniques and stained glass, consisting of glued fragments of colored glass, is possible.
Here are a few samples made on glass using various techniques.


In the simplest case, a pattern outline is applied to the glass, repeating the sketch or picture placed under the glass. Then the outline is filled with special paints.
There is a technique for painting without an outline and simply drawing on glass.
I use paints based on organic solvents; they dry in air and do not require heat treatment (transparent paints from WAGO or Vitrail).
To get started you need:
A set of paints, at least 6-8 colors, solvent for them from the same company.
Set of brushes.
Contour (concealer) - 2-3 colors (black, gold, silver "DEСORfin Relief Paint").
Solvent (acetone) for washing brushes and removing stains on hands and surrounding objects.
Regular glass on which you want to paint stained glass
A picture, photograph or sketch of a drawing that you want to transfer to glass.
It is convenient to use white plastic caps for mixing paints and washing brushes, ear sticks for removing drops of paint from glass, a Japanese knife for cutting off excess contour lines (only after it dries!), a pipette for collecting solvent, washable balls for erasing traces of paint, and so on. . Whichever is more convenient for you.

At the beginning of my work, I bought frames with glass (for painting), watches, mirrors for decoration, and colored glass “buttons” at dollar stores. It’s not expensive, there’s a large selection and you don’t mind if you mess something up.
First, you need to wash the glass very well and then try not to grab its surface with your hands so as not to leave a “fingerprint.”
We place clean glass (in my case, a vase - also from the dollar store) on the selected picture.

We take the outline in our right hand, and a cotton ball in our left hand; we will use the cotton to remove excess contour paste from the tip of the tube in between drawing individual lines. Otherwise, you will end up with a blot on the glass.
We outline the outline of the drawing, separating areas of different colors. We try to draw a line of uniform thickness without interrupting it.
When drawing, do not touch the tip of the tube to the surface of the glass, keep it suspended, otherwise you will end up with a double line.
If you draw the wrong line, leave it until it dries, then cut it with a Japanese knife.
The outline should not be interrupted anywhere, otherwise the paint will leak out when drawing.

Did you draw it?
We leave it to dry for several hours, or better yet until tomorrow.
It is convenient to make 2-3 pictures at once, today - an outline, the next day - a painting.
Thank you catstail for her master class.
Before we start painting, we must decide whether our work will be a stained glass window to be viewed in transmitted light (against the light) or whether we will hang it on the wall as a painting.
For stained glass designed for kitchen windows or doors, it is good to use geometric patterns that can be “borrowed” from the websites of stained glass studios (for example, http://www.anantiquemarket.com/stained_glass_gallery.htm )
or draw it yourself using ornamental elements.
Here is another good link in Russian “How to write on glass”
http://www.artservice.ru/rus/interestin g/vetro2.htm
A small stained glass window with any design looks beautiful if hung on a window.
For stained glass, paints should be more intense than for paintings; for geometric designs, paints of pure spectral colors (red, yellow, blue, green) are well suited. In this case, we simply fill the areas outlined with paint. It is convenient to use a pipette for filling.
Of course, you can take a risk and paint a stained glass window in the same way as a picture. But the effect of future work is unpredictable.
Drawing an imitation of stained glass that will serve as a picture is somewhat more difficult, but more interesting.
An additional effect can be achieved by using different backgrounds - paper or fabric of different colors and textures, wood, etc. Depending on this, the impression of the work changes.
Want examples? I have them. This is how the same picture looks, depending on the background.
On the tree 
On a white background 
To the light 
And the last one, where the background was “golden” candy paper after I tried a dozen other options 
Important!!!
Ensure good ventilation - open a window, turn on the hood or work on the balcony.
Remove children, cats and allergy-prone adults from the premises.
Finally, we get to the actual drawing.
To start, we all chose a small drawing. It is better to start by painting on flat glass, since the convex surface creates additional difficulties - the paint flows off.
We take paint of the selected color from a jar with a brush and mix it in a white (to see the color) bottle cap with another paint until the desired tone is obtained.
The paints usually last a long time (I've been using one set for three years now), so it's especially important not to contaminate the paints in the jars. For each color we use our own brush (you can wash one each time, but this is inconvenient, and the acetone evaporates, and we breathe it in).
If we choose a pure tone, then fill the surface inside the contour with it.
When the surface is large, for example, a stained glass window for a door or window, it is convenient to use a pipette rather than a brush. The paint spreads and leaves no brush marks.
I mix white paint with a little yellow to create a creamy tone and use a brush to paint over the top petals of the iris.
In another lid I dilute a little lilac paint with solvent (Do not use a brush in the jar of solvent!!! Take it with a pipette). Using dotted movements, I apply paint to the edges of the cream petals. The paint spreads, so you can get a “marble” effect. 
I apply lilac paint to the central part of the lower petals of the iris. Then (with another brush!) apply blue to the edges of the petals. I add a drop of solvent (with a pipette) between these paints, they mix as they please, but sometimes an interesting effect is obtained. You can add a third paint - for example, white, if there is any left in the first lid (Don't throw it away, really!). Here there is room for imagination. 

This is where minor troubles happen - the paint has flowed over the edge of the outline. We collect it with a stick with cotton wool on the tip. Then, after finishing work, you can wipe the stained surface with a stick soaked in acetone.
At this stage, you can rest a little, citing the fact that this part of the work should dry out. You can drink tea and make sure that the cat hair flying everywhere in the air does not stick to the paint. Then we won’t pull it away.
We try not to touch the painted surface.
But if we want to get an effect in the form of veins or stripes, it’s time to move a dry, clean brush over the half-dried paint. I hope that the result will be visible in the photo. 
At the same stage, you can apply drops of solvent to the selected areas (again with a pipette) and admire the resulting effect.
This stage also involves rampant imagination.
It’s easier with leaves - no one pays much attention to them, so we draw them last, when time and patience run out.
We're done!
We wash the brushes in acetone, poured into the same caps, wipe them, throw away everything that has traces of paint and acetone. Otherwise it will “smell” until tomorrow.
We leave our work to dry in a horizontal position for at least several hours. And all this time we admire our work and are amazed at how talented we are. And no one told us about this before.
All that remains is to choose the background and frame. (I hope that you bought a frame along with the glass on which you drew).
A simple way to make an original thing is to combine hand-drawn stained glass and fragments of painted (colored) glass or other materials.
This combination allows you to obtain a variety of effects due to different refraction and reflection of light in colorless and colored glass.
Multi-colored glass fragments (balls, stars, animal figurines, etc.) can again be purchased at the dollar store or at a craft store.

Using the example of decorating a vase, let's see how this is done.
We use simple hemispheres (“buttons”) made of colored glass as decorative elements.
We glue these fragments onto the surface of colorless glass in accordance with the selected pattern. For gluing, we use any glue suitable for gluing glass and ceramics (“Cement”, “Moment”, epoxy-based glue).
Let it dry.
As in the case of painting on glass, we apply a drawing with an outline.
Dry it.

We paint the selected areas with paints.
The simplest result looks like this. 
Or so 
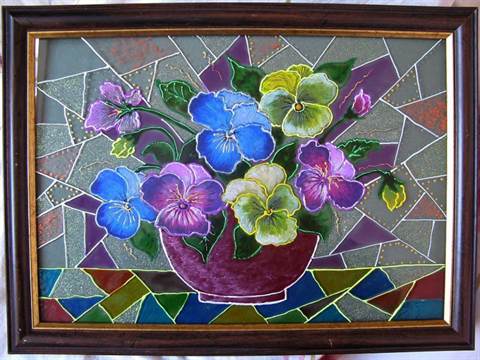
Stained glass on paper is called a squiggle pattern - this is an unconventional technique for making stained glass. This technique is mainly used to develop drawing skills in children. The purpose of creating stained glass is to teach children to create a drawing in a stained glass style, increase the level of self-esteem, and develop originality. How to draw a bright stained glass window and its design yourself? This is very easy to do - just follow our instructions!
How to draw a stained glass window with step-by-step instructions and photos
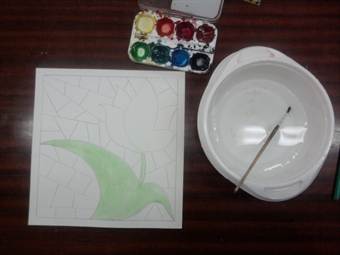
To work you will need:- Sheet of paper A 4.
- A simple pencil.
- Eraser.
- Tassels.
- Water.
- Watercolor.
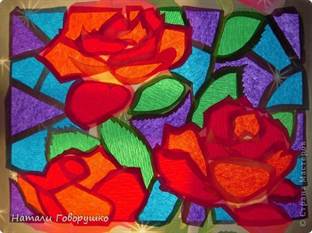
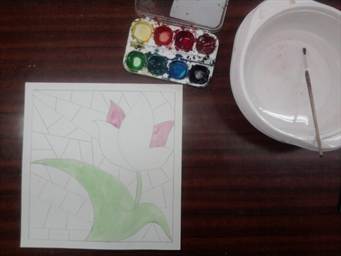
- Draw a rose on paper with a simple pencil.
- Draw random lines on the bud, leaves and stem.
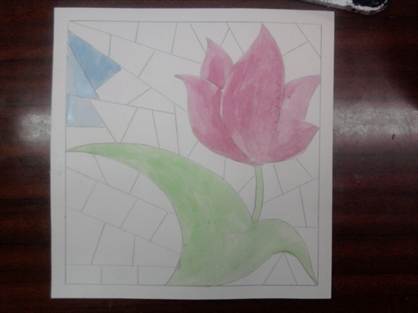
- Paint over the bud fragments with red paint without going beyond the contours
- In the same way, step by step, paint over the remaining fragments of the bud with two more halftones.
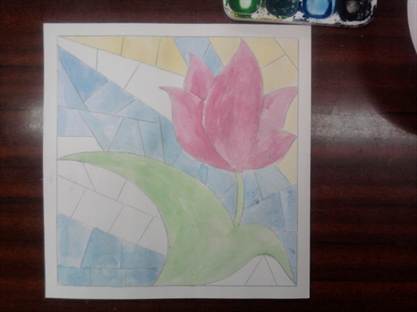
- Do the same with the leaves and stem.
- After the paint has dried, outline all the contour lines with black paint.
In this way you can draw any flowers or berries.
 Learning little tricks for big work: nuances for beginners
A few secrets about painting on glass, when a colorless glass surface turns into a work of art in just a few hours.
How to correctly depict a picture on windows, glass doors of kitchen cabinets, bottles, flowerpots and other interior items? Often, masters are silent about some, in their opinion, insignificant details. Although for many inexperienced beginners, many nuances are valuable in learning the correct technique for making stained glass.
- Never start learning with the most complex, start with the simplest. Those. If you decide to take up stained glass painting for the first time, then never immediately take on a large drawing with many small details. First, try your hand at small glass with a simple template, and when you master the technique a little, you will be able to take more complex drawings.
- Also try using different types of paints, they also apply differently. Stained glass paints are thicker, and they are applied pointwise, followed by distribution over the surface of the fragment being performed. Varnishes are liquid in consistency and spread quickly, so they are usually applied in several layers, drying in between. The brightness and light transmission of the pattern depends on the number of layers.
- Cotton pads and ear swabs are needed to carefully adjust the pattern.
- Several sewing pins, for different colors, in case a bubble appears on the surface covered with paint, you should puncture it.
- Toothpicks are necessary to fill the outline evenly.
- A sharp knife or blade to remove defective lines.
- Wet wipes, alcohol-impregnated, for hands.
- Good lighting from below and above the work to immediately reveal the density of the coating and the shade of color.
- The working glass must be in a strictly horizontal position so that the paint does not flow to one side.
- Try to work quickly - this is one of the main components of beautiful and neat work. For example, if contour paint is applied too slowly, it will vary in both thickness and color. And if the pouring is done slowly, the paint will lay down in an uneven layer, which will affect the quality of its surface. When applying paint to a point, clear and fast movements are needed, the uniformity of the size of the dots and their density - the distance between them - depends on this.
If you take into account all the nuances, your work will be of higher quality.

- If you decide to make a stained glass window with your own hands, you must immediately decide what design you want to see on the window and make a sketch on whatman paper.
- Then you should carefully prepare the glass by first removing it from the window frame or door. Wash the surface with detergents or degrease with an alcohol solution.
- Attach the sketch to the back of the glass with tape and place it on a flat table.
- Draw all the contour lines of the design on the glass with contour paint. Make sure all lines are closed. Otherwise, the paint may flow from one fragment to another and mix. Remove bloopers with an ear stick soaked in alcohol.
- When the outline is dry, apply paint to the inner surface of the drawing fragments. Drip paint from the brush, distributing it evenly over the part until the layer reaches the required thickness. When all the fragments have been painted, leave the work until the paints are completely dry.
- The paints have dried, you can insert the glass into the frame. Look at the photo how beautiful the stained glass drawing made with paints looks.

Video on the topic of the article