What to draw for a birthday: ideas. What and how to draw for a birthday: the best ideas with photos Draw every day plan
Now you will learn how to draw a beautiful birthday card step by step with a pencil. Birthdays happen only once a year, and for some people it can happen twice, there are many different circumstances and reasons for this. A birthday is always fun, joy, gifts and a birthday cake, what would you do without it? I came across this picture by chance and really liked it, a teddy bear with a cake.
And this is what we should get.

We draw an oval at a slight angle, draw a curve in the middle (show where the middle of the head is), then draw the muzzles and nose, all also in the form of ovals, only of different sizes.

We paint over the nose, leaving a large highlight, then we draw the eyes and mouth, then the ears and eyebrows. Erase the auxiliary curve and we must draw lines for sewing the head, it goes almost in the same place, only we need to draw from the middle of the nose to the middle of the mouth, from the middle of the head to the middle of the nose, only not to the nose, but to the muzzle, and the curve under the muzzle.

Let's draw the body.

One leg.

Then the second leg, erase the part of the previous leg that is in this one. Further to the left side of the head at the level of the neck, which we cannot see, draw a plate.

We draw three parts on the plates, the higher it is, the smaller it becomes. Erase all the unnecessary lines (part of the bear's head) that are in the cake. We draw the front paw that holds the plate. Step back a little from the contour of the body to the left and from the head down - this is the beginning of the arm.

We draw the cream with elongated wavy movements from the top of each cake.

Draw the second arm, which is only slightly visible, and the stitching lines on the body and paws. I showed with a dotted line that there is only one curve, but there is no need to draw a dotted line, this is for visualization, so that part of the seam is not unclear where it is.

Now let's move on to the background, here you can stick whatever you want. It's our birthday, and on this day there are a lot of things. I attached one ball with a rope to the bear’s ear. And the hearts and circles are for beauty, so that the background is not empty, and if it’s all painted in color, it will be absolutely beautiful. That's it, the drawing for the birthday of your mother, grandmother, aunt, uncle, brother, sister, friend is ready. You can also give this drawing to your mother on March 8th.
Summary: Children's drawings on the theme of space. How to draw a picture for Cosmonautics Day.
On the eve of Cosmonautics Day, it will be important to talk about children's drawings on the theme of space. In this article we want to tell you how to draw space using unconventional drawing techniques. Here we will look at drawings on the theme of space, made in the techniques of grattage, matte, and spray. You will also learn how to draw an unusual design for Cosmonautics Day using shaving foam or bubble wrap. The techniques for drawing space described in the article are easy to implement and accessible, including to children of preschool and primary school age.
1. Drawings on the theme of space using scratch paper technique
The word “grattage” comes from the French gratter - to scrape, scratch, so another name for the technique is the scratching technique.
To draw a drawing on the theme of space using the scratchboard technique, you will need:
Heavy weight white paper (or cardboard)
- colored wax crayons
- black gouache paint or ink
- dishwashing liquid
- tassel
- any sharp object (wooden skewer, toothpick, knitting needle, etc.)

Work plan:
1. Color the paper using colored wax crayons in a free style. Don't skimp on the crayons; they should cover the paper with a thick layer. Note: even a small child can handle this part of the job.

2. Mix 3 parts black gouache paint (ink) and 1 part dishwashing liquid. Cover the paper with the resulting mixture in an even layer.

3. Let the paint dry completely. You can speed up this process using a hairdryer. Now comes the fun part! Take any sharp object and scratch your drawing on the theme of space with it. The result will be an original work for Cosmonautics Day, made using the unconventional scratch painting technique

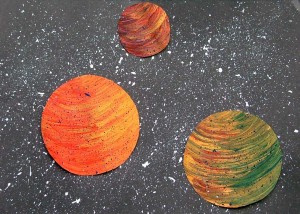
2. How to draw space. Drawing using the "passepartout" technique
This is a very unusual and fascinating drawing technique. First, as in the previous technique, you need to color a sheet of paper with colored wax crayons. The result is a bright, colorful rug. After this, draw templates of planets, flying saucers, space rockets, stars, etc. on cardboard. Cut out the templates. On a thick sheet of black paper, lay out the cut out templates in the form of a composition. Trace them with a pencil, then cut out the silhouettes using nail scissors. Note: This step of the job must be performed by an adult. Now place a black sheet of paper with cut out silhouettes on the “rug” painted with crayons. The drawing of space using the passe-partout technique is ready. Link to the original source.

3. Children's drawings on the theme of space. Drawing with shaving foam
For children in creativity, the process itself is more important than the result obtained. We, adults, are interested in the final product of our activities. Today we want to offer you a type of play with colors that will satisfy the needs of both children and adults. The website games-for-kids.ru describes an interesting way to create the so-called. "marble paper" using regular shaving foam and paints (or food coloring). Using the detailed instructions for making “marble paper” described on this site, you can make beautiful drawings on the theme of space for Cosmonautics Day.

4. Drawings for Cosmonautics Day. Drawing space to music
In 1914-1916, the English composer Gustav Holst composed the symphonic suite "The Planets". The suite consists of 7 parts - according to the number of planets of the solar system (with the exception of Earth) known at the time of writing. We invite you to conduct the following interesting activity with your child, dedicated to the theme of space, on the eve of Cosmonautics Day.
Give your child a large piece of paper and paint. Ask him to use a simple pencil to divide the sheet into four equal parts. Now let him listen to any 4 parts of the suite in turn (for example, Mars, Venus, Jupiter, Uranus). Listening to each part of a piece of music, he must depict on canvas the emotions and feelings that this music evokes in him. Children, as a rule, really like this kind of work. This is what one of our students drew.

From the resulting abstract paintings you can then cut out the planets and stick them on a sheet of black paper. The drawing for Cosmonautics Day is ready!


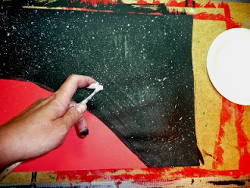
5. Drawings on the theme of space. Drawing space with a toothbrush
We invite you to make a drawing on the theme of space in the so-called. spray technique. Using a toothbrush, splatter white paint on a piece of black paper. You will get a starry sky. Planets can be drawn with a sponge by smearing paints of different colors on it. Look what a beautiful drawing we have made on the theme of space!


6. Children's drawings on the theme of space. Unconventional drawing techniques
If you happen to have a piece of bubble wrap lying around your house, now is the time to use it for children's creativity. After all, with the help of this wonderful material you can very simply paint the planet. You just need to apply paint to the film and attach it to the drawing in the right place.

The planet in the picture below was also made using this non-traditional drawing technique. Additional prints were made using a cardboard toilet paper roll and a plastic straw. Also, when drawing this picture on the theme of space, the so-called. spray technique.


7. Drawings of space. Drawings for Cosmonautics Day
An interesting project for children for Cosmonautics Day was prepared by the website MrBrintables.com. On this site you can download and print a drawing of the Moon. The moon comes in three sizes: large (22 sheets), medium (6 sheets) and small size (1 sheet). Print out the drawing and stick the sheets on the wall in the correct sequence.
Now invite your child to imagine who lives on the moon. Let him draw its inhabitants, their houses, transport, etc.

8. Drawings on the theme of space. Children's drawings on the theme of space
These charming aliens are drawn using such an unconventional painting technique as blowing paint through a straw (plastic tube). What is this technique?

Using a brush (or pipette), apply paint diluted with water onto a sheet of paper to create a spot of paint on the sheet. After this, we blow on the paint through a straw, it spreads in different directions and we get a weirdly shaped spot. When the paint is dry, we add all the necessary details to our alien.
Every year at the beginning of April, schoolchildren are introduced to such a Russian holiday as Cosmonautics Day. This date is famous for the first human flight into space. To make it more interesting for children to study this topic, competitions are usually held for the best drawing for Cosmonautics Day. " What to draw for April 12? - This question interests many parents and their children.
I have collected for you a bunch of interesting and modern ideas for drawings that children of different ages, from elementary school to high school, can repeat. Some ideas are accompanied by step-by-step lessons. I hope you find it for yourself
What can you draw for Cosmonautics Day?
Cosmonaut
You will find how to draw an astronaut in four different versions in.

Space
There are a great many lessons on drawing space on the Internet, including step-by-step photo tutorials and videos. Most often, when painting space, watercolors are used, because... it is translucent and blends easily.
I like the videos on the channel TILLITH. She has a whole playlist on how to draw space.
Here is one of her videos:
There is also a step-by-step guide on my website.

Rocket
In a recent lesson I showed:

Satellite

I found how to draw an artificial satellite with colored pencils on the website prodelkino.ru.
Planets
It’s easy to draw a planet, but it always looks epic, especially if you color it beautifully.

Below is a step by step lesson how to draw a planet similar to Saturn.
Step 1
First draw a nice and large circle to illustrate the volume of the planet. Leave a little space on each side to then draw the rings.

Step 2
Now for the rings: Draw a long, thin oval shape in the center of the circle. You can tilt this shape (almost at a 45 degree angle) to make the planet look more attractive. 
Step 3
Now transform the oval shape into a nice and edgy ring. Carefully erase the extra lines.

Step 4
Then add multiple lines on the planet to create different stripes of gas. You can also add a couple more rings. 
Step 5
Use several colors in shades of orange and yellow. The combination of these colors will make the planet more realistic. 
Step 6
The last step is to add shadows: one on the right side, one under the ring, and one behind the planet on the right side of the rings.

A beautiful, colorful and voluminous planet, drawn in just six simple steps, is ready!
Orbital station

You will find a lesson on drawing a station.
Galaxy
Space doodles
This direction in drawing arose not so long ago and now it is mega-popular. Verbatim doodle- these are dashes, scribbles, meaningless drawings that are created mechanically, thinking about something else. Drawing space objects in doodle style looks just right. I'll give you a few examples that you can easily repeat with a black helium pen. And if you then color the drawing, then you have every chance of taking first place in the competition for the best drawing for Cosmonautics Day!


Images taken from pinterest.com.
Comet
Moon with starry sky
I hope that you have found an interesting idea for drawing for Cosmonautics Day. Use your imagination and you will succeed!
For any person, regardless of age, a birthday means the beginning of something new, where cherished desires come true and, of course, the most secret dreams come true. On this wonderful day, the birthday person eagerly awaits gifts and congratulations from his loved ones. After all, they are the ones who make the recipient smile and rejoice.
Each of us, without exception, loves surprises. Therefore, if you are going to celebrate a birthday, you need to prepare for this celebration in advance. Let's look together at several options for postcards that you can make yourself and give to your loved one.

How to draw a birthday card for mom?
Of course, the card should look beautiful and touching. Perhaps you want to do something specific? Then we advise you to write the usual, but very pleasant inscription on the product itself: “To my beloved mother.” To make it, take scissors and glue, and also stock up on the following items:
- A blank for needlework (you can take thick cardboard).
- A background image (you can take regular colored paper, a piece of scrap paper, and so on).
- Chipboard for inscriptions (buy a ready-made one in advance or use a stapler that forms the edges).
- Decorative elements (flowers, butterflies, beads, leaves) – 2 pcs.
- Large decorative elements (bow, flower) – 2 pcs.
- Decorative tape.
- Lace or scalloped ribbon.

Manufacturing process:
- To begin, make a sketch using a regular pencil. Add colors that will give you the opportunity to understand what shades you will use while working.
- Glue the background to the card blank. Arrange large flowers. Complete the overall composition with decorative elements.
- Dry your work thoroughly.
- When it dries, decorate it with glitter.
- After that, write wishes to dear mommy on the card.
- Inside the card you can draw beautiful flowers or bows and write a wish to your loved one.
How to draw a birthday card for dad?
A greeting card to your beloved daddy for his birthday is, to say the least, touching. It is difficult to choose a theme for such a postcard, but there is one detail that you simply must apply - this is the style. If you get a stylish card, believe me, your dad will definitely be delighted with such a gift. Even if the postcard itself does not contain symbols of “masculinity,” for example, an image of a car, a weapon, or fishing.
You can make a card for daddy with embroidery, threads, and so on. Try to bring all the patience and love into your own creativity. To begin with, select the theme of the postcard; for example, any element of a man’s portrait can be suitable, for example, a beard, a smoking pipe, hipster-style glasses. Choose the shades you want. Calm and beautiful people who will harmonize with each other are considered ideal.


Manufacturing process:
- Take the card base. Cut out a “shirt” for her.
- Cut out a triangle in the center of the shirt.
- Glue a rectangle under the “shirt”.
- Take a satin ribbon. Tie a tie from it in the form of a knot and glue it to the base.
- Glue the “shirt” on top of the tie.
- Using a special outline, make “stitches”.
- Glue buttons onto the card.
- Write congratulatory wishes inside the card, add small drawings, for example, balloons.
How to draw a greeting card for your grandfather's birthday?
You can give your grandfather a beautiful card that you make with your own hands. To create this craft, you will need to spend a minimum of free time, plus a lot of imagination, and also take scissors with glue, and stock up on the following:
- Colored cardboard
- Colored paper
- Paper strips for quilling
- Buttons
- Double-sided tape


Manufacturing process:
- To create a blank for a postcard, take cardboard. You can use double-sided or single-sided cardboard. Fold it into two equal parts.
- Carefully press down the line where the card will fold.
- Then make a small cut at the top of the card, approximately 2 centimeters.
- Fold the edges of the card so that you get a collar.
- Make a “vest” from colored stripes. Carefully glue the strips to the outside of the product, alternating colors at your own discretion. Instead of paper strips, you can draw stripes using pencils or paints.
- Take a brown strip. Glue it in the center of the card.
- Also, cover the edges of the vest with this strip.
- Make a bow. Attach it to the collar using tape or glue.
- Glue small pockets on the right and left sides. And glue a button in the center (you can have one or several at once).
- Next, design the inside of the card as you wish.
How to draw a greeting card for your grandmother's birthday?
Grandma is exactly the person who is always ready to feed you delicious pies and pies, listen and give useful advice. If you want to surprise your grandmother with a unique gift on her birthday, give her a beautiful card. But not the one you can buy in a store, but one made with your own hands.
To make a postcard, take the following materials and tools:
- Cardboard colored and white with black
- Lace - approximately 12 cm, but no less
- White ribbon – 30 cm
- Artificial flowers – 3 pcs.
- Buttons matching the color of the paper – 3 pcs.
- Scissors
- Ruler with glue
- Pencils
Manufacturing process:
- Cut out a 16 cm * 20 cm rectangle from white cardboard. Bend this rectangle into two equal parts. This will give you the base of the postcard.
- Take black cardboard. Cut 2 rectangles from it (15.6 cm * 9.6 cm and 8 cm * 3.2 cm).
- Take colored cardboard. Cut out rectangles from it (15.2 cm * 9.2 cm and 7.7 cm * 2.9 cm).
- Glue the colored cardstock over the black to create a black frame.

- Assemble the backing.
- Glue the smaller rectangle and "Happy Birthday" onto the smaller rectangle.
- Then glue the lace. Cut a 12 cm strip from the white ribbon. Glue it on top of the lace.

- Make a bow from the ribbon and glue it to the backing. Also glue flowers and buttons onto a small rectangle.
- Glue the backing to the base of the product.
- Next, decorate the card as you wish using colored pencils. Don't forget to write a congratulations.


How to draw a greeting card for your friend's birthday?
What can you give to your beloved friend? Habitual gifts, sometimes, are no longer able to please the birthday person. But a postcard made by yourself can really surprise any person. Moreover, you will spend only 30 minutes for production, maybe a little more. So, you should have the following materials in stock:
- A piece of double-sided cardboard
- A piece of snow-white cardboard
- Scissors
- Blade or knife
- Double sided adhesive
- Measuring accessories (ruler with pencil)
- Ribbon
- Decorating elements
- Hole puncher

Manufacturing process:
- Take colored cardboard. Cut out a rectangle and bend it into 3 equal parts. Mark the outline of the handbag on the cardboard.
- Cut out the postcard shape.
- Take a blade or knife. Cut out the handle of the bag. Fold it inside the product.
- Using tape, stick a rectangle cut out of snow-white cardboard into the inside of the bag. You can use a hole punch to cut out the edges of the rectangle.
- Decorate the product - tie a bow and glue it to the clasp. Glue the decorative elements.
Please your beloved friend with this card!
How to draw a birthday card for a friend?
If you have a very close friend whom you have known almost since birth, you can draw him an unusual and bright card for his birthday. Try to imagine what exactly your friend likes and depict it on your postcard. We suggest you make the following postcard. Take:
- Snow-white paper (landscape sheet)
- Ordinary pencil
- Multi-colored pencils
- Scissors with ruler

Manufacturing process:
- Take the paper. Fold it in the center.
- On the inside of the paper, using a simple pencil, draw whatever you want, for example, balloons.
- Then write wishes for the birthday boy in multi-colored letters. Place a message on the balloons or write nice words at the bottom of the card.
- Once you have decided on the design of the card, paint it.
- You can use multi-colored pencils, or watercolors. It all depends on what you can work with best.
- If you want to draw beautiful nature on a postcard, then it is advisable for you to use paints for this. With them you can more naturally convey the shades of nature and its violence.
How to draw a birthday card for your sister?
Do you have a younger sister? Is it her birthday very soon? Then you should worry about the gift in advance. To make the final result very colorful and beautiful, then take the following elements:
- High density colored paper – 1 set
- Markers or felt-tip pens
- Multi-colored pencils
- Colored pens
- A simple pencil, well sharpened
- Scissors with glue
Manufacturing process:
- Take the paper. Bend it in half.
- On the outside, draw an image, on the inside, write a wish for the birthday girl.
- Now start drawing. Take a simple pencil. Draw an oval on the card. Draw a curved stripe in the center of the oval (this will be the center of the teddy bear's face). Then draw the muzzle and nose itself.
- Sketch the nose, leave a small highlight.
- Next, draw the eyes, mouth, eyebrows and ears of the bear. Color them with colored pencils.
- Draw the torso. Draw 2 parallel rounded stripes from the head (this is how you get the body of the bear).

- Draw 2 lower legs for the bear.
- Then draw a cake in the drawing and decorate it. Add one top paw.
- Then draw another upper paw.

- Design the background of the postcard. You can draw balloons, and on each balloon write the letters that spell out the phrase “Happy Birthday.”
- Finish the card - simply color it with different colored pencils.

As a result, you will receive a beautiful postcard that your sister will definitely be delighted with.
How to draw a birthday card for your brother?
If you want to give your little brother an unusual gift, then make him a card yourself. You can draw an elephant on a postcard. Read below how to do this.
- On a blank sheet of paper, draw a couple of circles that should be superimposed on each other. Just keep in mind that these parts must be different in size.
- Draw an elephant's trunk in the center of a smaller circle. Above the trunk, draw eyes and eyebrows.
- Draw the elephant's ears big. Apply smooth stripes at the top and wavy ones at the bottom.
- At the bottom of the larger circle, draw legs.
- Make folds on them (knees and claws).
- Draw a tail for the elephant and a tassel at its tip.
- Use an eraser to remove additional lines, and carefully outline the main ones.
- Color the elephant as you wish. Write your wishes.

How to draw a birthday card for a teacher?
A handmade greeting card is the best gift for a teacher from a student. There are a large number of options, but we suggest you use ours. To create such a card, stock up on materials:
- Cardboard (you will use it to make the base)
- Gouache paints or watercolors
- Napkin

Manufacturing process:
- Make the base for your card. Take snow-white cardboard.
- Then take the prepared paints. Dip your fingertips into the paint.
- Use this method to draw a flower in the central part of the card.
- Wait for the card to dry completely.
- Write a beautiful poem inside the card. You can even come up with it yourself.
How to draw a birthday card for your aunt, godmother, or woman?
Flowers must be depicted on the card for aunt and godmother. After all, all women, without exception, adore them. We suggest you make the following version of a postcard, which you can give not only to a loved one, but also to a neighbor, mother, friend, and so on.

Manufacturing process:
- First, draw a vase on the card. Mark the places where the flowers will occupy.
- Then draw the flowers themselves, for example, roses. The quantity is not that important. The most important thing is that it is odd.
- Finish drawing the rose petals. Then draw a beautiful bow on the vase.
- Draw rose leaves.
- At the very end, add all the elements. Color the drawing with red or burgundy paints. You can paint the vase blue.
How to draw a birthday card for a man?
For a man, for example, for a boss, you can make an interesting postcard in an antique style. You can look at the drawings in advance, which are very suitable for that time. After you select a drawing, print it on a printer or draw it. Especially if you love to draw.
To make it, take:
- Base paper (cardboard paper, colored or white).
- Scissors.
- Knife.
- Elements for fastening.
- Decorating elements.
- Pencils or paints.

Manufacturing process:
- First, decide on the color scheme and the main pattern.
- Make a base for a card of any shape. If you want the card to open, then fold it in half.
- On the postcard, paste a photo, pieces of material and other decorative elements. Make sure they fit the overall theme.
- Glue these elements one by one onto the base.
- Draw congratulatory words on the inside and outside of the product with bright pencils.
- If you want to make the card more interesting, tie a thin ribbon around it and then tie it with a bow.
How to draw a birthday card for a boy?
Every child dreams of having all his cherished desires come true. And who can fulfill them? Of course, a goldfish. You can make a greeting card by decorating it with a goldfish. The baby will definitely believe that she will make his dreams come true. To do this, take:
- Blue cardboard (the size of a landscape sheet).
- Gold nail polish or gold jewelry is also gold in color.
- Glue.
- Gel pen (preferably several different colors).
- An ordinary pencil.
- Eyes (beads).
- Scissors with a ruler, plus double-sided tape.

Manufacturing process:
- Fold the cardboard in half. The blue side should face outward. Draw an outline of the fish in the center. Circle it with a pen. Draw the crown and fins.
- Draw an eye with a simple pencil or stick on a prepared eye (bead).
- Lubricate the fish with glue. Sprinkle gold jewelry in the form of small balls on the fish.
- Then draw air bubbles.
- Write “Happy Birthday” at the bottom of the card.
How to draw a birthday card for a girl?
Girls, as a rule, unlike boys, love it when they are given unusual and bright gifts. If you give a card that you make yourself, you will definitely be able to give the girl a lot of positive emotions. For your own creativity, take:
- Colored paper.
- Snow-white paper.
- Glue with scissors.
- Cardboard.
- Paints or colored pencils.

Manufacturing process:
- Draw hedgehogs on snow-white paper using pencils or paints. Glue different sized mugs onto the card.
- If you want some of the balls to be voluminous, stick balls of similar size onto the drawing, but fold them in advance in the form of a book. Write a beautiful wish on the inside of each balloon.
Isn't it a wonderful card? You can also make it for a nephew or niece, for a goddaughter or godson, and so on.
How to draw a birthday card for kindergarten?
Now let's try together to make a postcard for the youngest children who are still in kindergarten. Draw a cute cat with a cake in its paws.
- First, make a blank for the postcard.
- On the outside, draw a ball, a muzzle, eyes, a nose and a mouth of a cat. If you wish, you can draw whiskers for the cat.
- Draw the cat a festive cap, ears and tail.
- Draw a cake with candles in front of the cat.
- Add stripes to the animal on the body and tail.
- Behind the cat, draw wrapped gifts.
- Write “Congratulations” inside the card.

Video: DIY postcard
Everyone wants to give their beloved mother a gift that will make her happy. Sometimes you really need to prepare a drawing for her. This article will tell you how to draw a gift for mom.
Drawing “Me and Mom”
Very young children really want to express their boundless love and affection for their mother in a drawing. Therefore, they usually do not face the question of giving it as a gift for their mother. Of course, this will be a picture where the most beautiful woman in the world smiles joyfully and tightly holds the hand of the best child in the world, that is, the author of this masterpiece.
But you should not limit this topic to age limits. And old enough children may well turn to this topic. And they might even end up with a pretty good drawing. And if the situation with artistic talents is, to put it mildly, not very good, then the picture will come out with humor, since you can draw a gift for your mother in the style of a “kalak-kalyak”, imitating the kids.
Mommy will be happy with flowers, that’s a fact!
But don’t be too zealous in showing your humor. Perhaps the child still has some rudiments of the talent for drawing on paper, since to draw a gift beautifully means to do something nice for a loved one. Moreover, you can not just hand your mother a sheet of paper with a drawing, but paint, for example, a glass or tray, a wall plate or a kitchen board.

Since drawing a gift is all about flowers, here is a master class on how to draw a rose. If desired, the donor can make a postcard with his own design.
Step-by-step instructions for drawing a rose
Anyone who does not know how to draw a gift will cope with the task easily if he strictly follows the instructions.
- At the top of the sheet there is a slightly inclined oval with horizontal elongation.
- From the edges at the widest point of the oval, two asymmetrical arcs are drawn down, which are parts of a circle of large diameter.
- From below, the ends of the arcs smoothly connect - the lower part of the flower is formed.
- Below are two open rose petals.
- The middle of the flower can be made in the form of a rolled up roll. It is depicted like a snail curl.
- Several small leaves of the peduncle will decorate the lower part of the bud.
- Since it is best to draw a gift for mom in the form of a rose in a naturalistic way, you should depict the stem of the flower.
- A few thorns and leaves on the stem - and it’s almost ready.
- Now everyone understands how to draw a gift for mom step by step. You need to color the rose with pencils or felt-tip pens, but you can also use paints.
Cute little animals will delight mommy!
If the question of what gift to draw for your mother has not yet been decided, experts advise: there is nothing more pleasant than receiving a picture of a cute animal as a gift. It could be anyone - a bunny or a fox, a puppy or a kitten, a squirrel or a bear cub. It’s great if the animal holds a flower, a heart, a cake or a box with a gift beautifully tied with a bow in its front paws. Since you can draw a gift for mom not only on paper, but also on fabric, you can use acrylic paints or those specially designed for fabric to color the outline of the image.

as a gift for mom
- The head is depicted in a circle.
- An oval is placed horizontally at the bottom of the circle.
- Inside the oval, another smaller oval is inscribed. They should touch with their upper parts. This will be the tip of the nose.
- The eyes are drawn in small circles, painted black, leaving small areas - highlights - unpainted.
- The bear's ears are semicircles. They are drawn at the top of the head.
- The body of the bear is drawn with an oval slightly larger in size than the head.
- Two small ovals are inscribed inside it on opposite sides - the front paws of the animal.
- The hind legs are depicted as segments of straight parallel lines. The feet are also oval.
- The section of the mouth and the claws on the paws are depicted with smooth lines.
- The bear cub can hold any symbol of a gift in its hands.
- You can paint the animal as the artist’s imagination dictates.
Wonderful handmade card
It is appropriate to draw a birthday gift on thick cardboard, make a bright congratulatory inscription and fold the sheet in half. This will make an excellent card. Inside you should write warm words of congratulations and wishes.
Mothers are touched when they see funny ones. Why not draw in this case a cute little elephant with a trusting look and naively raised eyebrows?
Sketch of the head and legs of a baby elephant
Not everyone can make a beautiful drawing. But I really want to please my mother! But how to draw a gift step by step? A simple and detailed master class on the image of a baby elephant will help you cope with the task.

- A circle is drawn at the top of the sheet.
- They make “dents” in it on the sides, highlighting the baby elephant’s cheeks.
- On the top of the head - in the upper part of the circle - swirls are drawn.
- Mark the direction of the back of the sitting animal with a line from the head down.
- It's quite easy to depict the baby elephant's front leg.
- The second front leg is located slightly obliquely to the first, they seem to cross, with the first protruding slightly forward in relation to the second.
- The baby's plump tummy is outlined with an arc from below.
- The hind legs are spread out in different directions, the baby elephant seems to be doing the splits. For the leg whose foot is slightly turned towards the viewer, there is no need to draw the foot itself.
Full outline of the baby elephant without drawing out the features of his “face”

- The animal's foot is depicted as an oval. The artist uses arcs to paint nails on all four legs of the baby elephant.
- A baby elephant's ear is shaped like an egg with its pointed end pointing down. The line of the head near the ear that is closer and in full visibility should be erased at the junction with an eraser.
- In each ear, an internal contour should be drawn that follows the external one.
- You should mentally divide your head vertically into four parts. In the lower part is the base of the trunk, and the upper line falls exactly on the division point.
- Along the trunk there are small arcs representing skin folds.
- Near the end of the bottom line of the trunk, a smile is indicated by a small arc.
- An oval is drawn at the end of the trunk - the nasal opening.
The final stage of working on the drawing

- Two ovals, slightly inclined in opposite directions with their upper parts, represent eyes.
- Inside them are the same ovals, but smaller.
- In each eye, a small circle is drawn in the upper part. These circles should be slightly shifted to the side, and in both eyes to the same one.
- Eyebrows are drawn in arcs above the eyes.
- Eyelashes in the corners of the eyes look charming. And even though in reality elephants do not have eyebrows or eyelashes, people often transfer features of their appearance onto animals.
- Since it is best to draw a gift in color, the picture should be colored. The inside of the ears is painted pink, the pupils (inner oval) are painted black. The circles in the eyes will act as reflections, so you should leave them without color. But the baby elephant itself can be painted in any color, because it is not a real animal, but a symbolic one. Therefore, it can even be polka dots or stripes, like in a real fairy tale.