Step by step drawings of space. How to draw the planets of the solar system
Congratulations to everyone on the greatest event in history! This morning, August 6, 2012, the Curiosity rover reached its goal and landed in the area of Martian Gale Crater!
Introduction: Where are we from and why are we like this? People never stop developing. Human capabilities are becoming more perfect and flawless every day. Although our life expectancy is short, with the help of modern technologies, children absorb new knowledge so quickly that it seems as if a modern child is a real scientist compared to people who lived two hundred years ago. Don't believe me? I'll prove. At the moment, you, my dear readers, are near your monitor and, surfing the Internet, looking for pencil drawing lessons, it is so? But to get them, you use a lot of knowledge and skills that were previously unavailable to the average person, for example:
- Quick typing of characters on the keyboard
- Using search engines
- Using key combinations, sets of codes, ciphers
- Even a simple VKontakte registration will require knowledge of a certain algorithm.
Still not sure? But you have much more knowledge today, at this particular moment, than advanced programmers had 30 years ago! And you try to explain to your grandfather, who never used a computer, that it is possible to see Paris from a bird's eye view without leaving your home on Google Maps, or even better, take a virtual walk through the streets of the city. And such an opportunity has long become commonplace for us! Let me return to my question. Who are we? Why can’t my cat know how to type on a keyboard, even though he lives with us? We are different. Perhaps not even from this planet, not from this galaxy. Unsuccessful attempts to find out this here on Earth no longer leave hope. That is why the most brainy people on our planet are trying so hard to explore the vastness of space. I'm sure there's an answer there. Let's just wish them success! Let's get back to drawing.
How to draw space with a pencil step by step
Step one. Draw a round shape for the planet and the outline of the landscape.  Step two. Let's correct the contours of the planet and its satellite. In the foreground we draw two men, these are astronauts sent to the moon.
  Step three. Let's add some touches.
  Step four. Let's draw a starry sky. Or more precisely, it is outer space. In the middle of the lunar landscape we will draw several craters.
  Step five. All that's left to do is add some shadows. The result was this picture of space:
  I hope that scientists will still be able to find life on this planet. And in the near future, we will make flights to Mars not as scientific expeditions, but as if it were a vacation package, like Korben Dallas in the film The Fifth Element. See the continuation of this lesson.
So the month of April has come... with hope for warmth and bright sunshine, with flowers and joy... Very soon the world will celebrate Cosmonautics Day. This is a holiday that includes important events and greatest discoveries, achievements of human civilization and the discovery of inaccessible secrets and worlds.
At different times, the children and I conducted various activities on the topic of Space; links to some of them will be at the end of the article and in. And today I invite you and your children to arm yourself with pencils and paints and go paint space!
Hooray! I announce the opening new section “Learning to Draw” and I invite you to meet the artist Julia, who shared her drawing skills with us.
How to draw space step by step
Drawings on the theme of space are a common April assignment in schools and kindergartens. Yulia offers us two options for a space theme for different ages: for preschoolers and elementary school students.
I know that many parents are categorically against templates and examples in drawing. But I am also convinced that in order to learn to draw, sometimes you need a push, an example, which, when embodied, the child will believe in himself and begin to reveal his capabilities and talents. Shall we try?
Drawing “Rocket in space” for children 4-5 years old.


The drawing is so simple and easy that it seems to me that it does not need additional descriptions. However, if you prefer the video format of the lesson, then watch this video:
Drawing on the theme “Space” for children 6-7 years old.

And here is the video MK of the rocket’s drawing, posted on ours:
These are the simple and accessible drawings about space that the artist Julia offered us today. And I am grateful to her for her beautiful creativity.
What do you think of these drawings about space? And what do you and your children like to draw on a given topic? By the way, you can send your drawings for this MK to me by email, I will post them in this article.
Well.. While I’m loading the movie, I’m doing a lesson on drawing space.. It might come in handy.
How to draw space with a pencil step by step
Step one.
Draw a round shape for the planet and the outline of the landscape.
Step two.
Let's correct the contours of the planet and its satellite. In the foreground we draw two men, these are astronauts sent to the moon.

Step three.
Let's add some touches.

Step four.
Let's draw a starry sky. Or more precisely, it is outer space. In the middle of the lunar landscape we will draw several craters.

Step five.
All that's left to do is add some shadows. In the end it turned out like this space picture:

How to draw the Earth with a pencil step by step
Step one. Drawing a circle by hand is very difficult. First we need two squares, divided in half, so that we can fit the colo into them. Of course, you can take a compass and draw a circle. But this is not a royal matter.  Step two. As mentioned above, we make the outline of our planet, draw four arcs at the corners of the square.
  Step three. Now it will be easier to draw an even circle. We combine the arcs so that everything turns out as clear as possible.
  Step four. Now we sketch all the continents, oceans, islands and peninsulas on our ball. Anything that will fit and be noticeable.
  Step five. We remove the auxiliary lines. We stick dots around the planet - the image of distant stars, move the pencil, depict space so that the planet does not look lonely.
How to draw the planets of the solar system with a pencil
Step one
Drawing the orbits of the planets. Their shape is an ellipse, close to a circle. But, if we look from one point, then visually we see not circles, but arcs, parts of ellipses. Such as in the picture. On the lines we outline the positions of the planets.

Step two
We draw circles - planets. We start with small Mercury, then larger Venus and Earth, again a small circle is Mars and further, as in the picture. In the lower left corner we will show the edge of the Sun.

Step three
Let's erase the auxiliary lines - the axes of the circles. Let's make the orbits brighter.

Step four
Let's add other celestial bodies: comets, asteroids. Let's draw “rings” to the large planets.

Step five
Let's do the shading. With its help we must turn our circles into a sphere. We remember that we have the Sun in the center, and light falls from its side. But the opposite side of the planet will be darkened. The result should be something like this:

How to draw an astronaut with a pencil step by step
There are four steps ahead.
Step one.
At the top of the sheet we will place a large round head. She's big because she's wearing a helmet. Let's draw two curved lines down - this is the outline of the body. We will draw an astronaut in zero gravity. And this immediately sets his position. Let's draw the contours of the arms and legs. The spacesuit has a belt. Let's outline the backpack behind our shoulders.

Step two.
We begin to draw out the details: the helmet, fingers, all sorts of bells and whistles on the “suit”. Moreover, all the elements are quite large.

Step three.
On the helmet we will outline an opening for the eyes and make it three-dimensional. Let's start drawing shoes. Let's show a pocket-bag on the belt. Look carefully at the picture and fill in what is missing on your sheet. Rivets, bends on the fingers, etc.

Step four.
We will show horizontal shading on the belts. Let's draw the shoes: the pattern on the sole, the clasp. The astronaut wears a small electronic device on his hip. Now let's outline the main elements of our drawing. Almost done. You can use shading to “revive” our hero, or add color using paints!

How to draw a space rocket with a pencil step by step
Step one. Our rocket is not just some kind of device with an engine, but an entire spaceship. We draw two oval figures - this is the hull of the ship. Below we will notice one wing of the rocket, and behind it is the tail.  Step two. Connecting the ovals. The structure of the rocket and its structural parts have a complex shape, which makes no sense to describe. Therefore, try to repeat it as you see in the picture, or you can come up with your own rocket.
 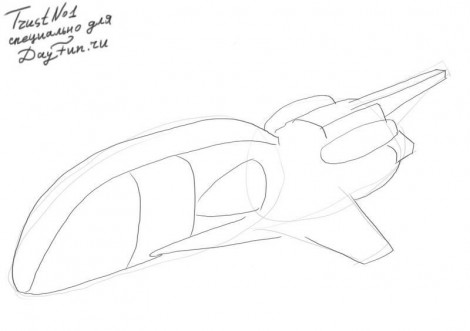 Step three. The ship should have many different parts on the hull, plates, guns, portholes.
  Step four.
 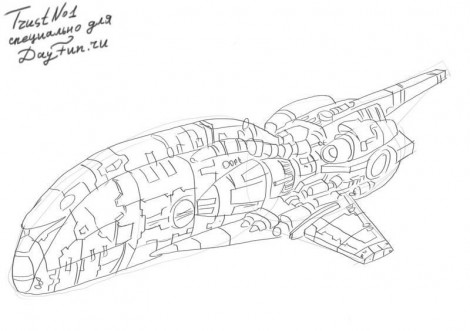 Step five.
How to draw a lunar rover with a pencil step by step
Step one. Let's divide the device into structural parts, depicting them on paper in the form of rectangles.  Step two. Let's sketch a sketch of an astronaut sitting in a car.
  Step three. Add a small antenna in front of the vehicle and outline the person behind the wheel in more detail.
  Step four. Let's remove the auxiliary lines and outline the contours more clearly.
  Step five. To show the effect of movement, we will make shadows under it, and also add shading to the wheels, the astronaut and other parts. Here:
How to draw a spaceship with a pencil step by step
Step one. We sketch a template with geometric shapes for the ship, display the hull and places for the engines.  Step two. Let's draw the jet turbines, adjust the lines of the hull a little and add a small cannon underneath it.
  Step three. You need to highlight the borders with a pencil with a thicker line, add a lot of details to the wing, outline them, and also add number 09 for appearance.
  Step four. With light movements we will shade the entire area of the ship horizontally, and completely shade out the windows, turbine outlets and the cannon.
How to draw the moon with a pencil step by step
Step one. Let's mark the location of the moon on paper using a square.  Step two. Let's draw a circle, preferably an even one. Although the surface of the moon is not smooth, it will appear different from afar.
  Step three. Let's add craters, mountains and depressions to the surface.
  Step four. Let's add some shading.
Drawing space with gouache is very simple, and even a novice artist can draw beautiful space without any special skills. Therefore, we will complicate the task a little and draw not just stars, but a more complex composition on the theme of space, from several elements, so that the picture has an interesting plot.
First of all, you need to outline the main details on a sheet of paper with a pencil. To make space look realistic, you can use one or more photographs of real space as a sample. For example, here, as a visual aid, we took individual photographs of Saturn, the surface of the Moon and, in fact, space. At the same time, in order for the picture to turn out holistic, and not cobbled together from different parts, one important point must be taken into account - the light must fall on all objects in the same direction. Therefore, we have determined for ourselves the conventional location of the light source that illuminates our planets from the right. And on the left side we marked a shadow by shading it with a pencil.
Next we paint the background. In order to make our space colorful, we will paint the background not just with black paint, but with all colors. After all, stars located at a great distance, although individually indistinguishable, together form luminous clouds. And, despite the fact that their color may seem equally white to us, they all have three main shades - red, yellow, blue. By the way, these three colors are also the primary colors from which all other colors can be obtained - blue, purple, orange, green, etc.
So, armed with this knowledge, we draw star clusters with all the colors of the rainbow, mixing them separately and directly on paper. We paint denser areas with bright colors - yellow, red and blue, with the addition of white, and darker areas - with blue and purple, with the addition of black paint. In our case, we draw from a photo our Milky Way galaxy, since we see it from the Earth and from the solar system.

After the dark background is painted, we draw the individual stars. To do this, we take a hard brush or toothbrush, dip its tip in white and, running our finger over it, spray the paint over the picture. At the same time, you need to make sure that the paint is not splashed too evenly, because the density of star clusters in different parts of space is different. For example, we deliberately make more stars in the region of the Milky Way and fewer at the edge. It is advisable to spray in different directions to avoid homogeneity. We also use not just white paint, but add a little yellow, red and blue to it. By the way, the brightest stars are usually blue. We will make some stars the brightest by painting them separately with a small brush.

After the stars are splattered, we will color the planets. Planets can be drawn from a photograph or invented, but it is important to remember that the shadow should fall in the same direction. The properties of light in space differ from its properties on Earth, and when drawing space, this must be remembered. Thanks to the earth's atmosphere, light is scattered and, as it were, bends around objects, therefore, we can always see the shadow side of objects as dimly lit. But if you look at the Moon in space, where there is no air, you will only be able to see its illuminated side, while the shadow side will be completely devoid of illumination if there is no other light source there. It’s the same with any other object in space - if no light falls on it, it is completely dark and it is impossible to distinguish any details on it.
But in our case, we will use a trick and draw the shadow side of the planets a little lighter so that they do not come to the fore. Although this is not necessary. We also do not forget that if we draw Saturn, then it may have a shadow that it casts on its rings.

After deep space is drawn, we move on to near space and draw the landscape of the planet on which we find ourselves. First, paint over all the illuminated areas with light paint. At the same time, in order to make the landscape more picturesque, it is worth painting not with one color, but constantly mixing different colors.

Further, if we were drawing a landscape on Earth, we would move on to depicting the penumbra, but since we are drawing the surface of the planet without an atmosphere, there is no scattering of light and penumbra, and what is in the shadow is simply black. But we still dilute medium-light paint and paint partial shade. Thus, we depict areas consisting of many small individual shadows and which, at a distance, merge into one spot of average illumination. And we make only the shadow of the craters that are closest to us as dark as possible, because more contrasting objects visually come to the fore.

Well, so that the landscape would not be so deserted and deserted, we will draw a spaceship with researchers. We will draw it in the same way as the rest of the celestial bodies: we will outline its outline and color it in the main color, and then we will draw a shadow.

After that, we’ll add a few details and the ship with astronauts is ready to roam the endless expanses of outer space.

We hope that this master class was not only simple and understandable for you, but also useful. Have fun with your drawing!
What do we think about when looking at the night sky? Many of us imagine space as infinity. Many stars, planets, orbits and other celestial bodies. Even the smallest fraction of space has not yet been explored. If you want to express your emotions on paper, draw the Universe. We will discuss how to paint space in watercolor in today's article.
Beginning artist school
From school astronomy lessons we remember that space is the space in which other planetary systems, stars, meteorites, comets, and satellites are concentrated. Man has already been to space several times, but no one has been able to convey his feelings and the bewitching beauty of emptiness and infinity in words.
Through drawing you can express your emotions, unleash your imagination and creativity. Drawing space is the perfect place to start. There is no need to draw strict lines and certain objects; mixing colors is your drawing.
Many novice creators are interested in how to draw space with gouache and a sponge. There's nothing complicated about it. A dark background is applied to the sheet, and then different colors of paint are mixed to create the effect of abyss, serenity, remoteness, and mystery.
Small stars, planets and comets have the right to be in your drawing. The easiest way to paint space is with watercolors, since they mix easily and give the picture volume and unprecedented beauty. You can experiment and combine two opposite colors, the result will pleasantly surprise you.
Before we tell you how to paint space with watercolors step by step for beginners, learn a few tips:
- for painting space with watercolors, a sheet of thick paper of any format and size is suitable: the larger the better;
- the image is drawn in several stages, at the first level we dilute the paints with water;
- first you need to completely paint over the sheet with a dark background, for example, black or dark blue;
- the first layer must dry thoroughly, otherwise mixing tones may bring an unexpected and not at all impressive result;
- then you can draw patterns in any color that smoothly connect with each other;
- at the very end the picture shows galaxies, stars, comets, nebulae or planets.
If you are drawing planets or comets, then their outlines can be drawn with a simple pencil. This will make it easier for you. The stars are far from us, and they need to be drawn with fuzzy and blurry lines. But if you are drawing space, which is visible through a telescope, then the features of the stars must be correct. Draw four to six edges. To make the drawing acquire some mystery, first rub a sheet of paper with wax. The result will be a brilliant work of art.
Don't start drawing when inspiration has left you. To paint space with watercolors, you need to think about something sublime and eternal.
Eternal and unattainable
People are trying to conquer space and are rapidly exploring the surface of the Moon and Mars. There are many other galaxies in this space. Ours is called the Milky Way, but to the closest one, Prosima, the distance is as much as four light years. And this is neither more nor less - trillions of kilometers and hundreds of years.
We can only imagine this unknown space and draw it in our imagination. Today we will learn how to paint space with watercolors. The master class will tell you how to depict infinity step by step and what techniques you should use.
For convenience, you can use an easel. We fix the canvas with masking tape. To mix colors you simply cannot do without a palette.

Required materials and tools:
- brushes;
- a set of watercolor paints;
- a sheet of thick paper;
- coarse salt.
Step-by-step description of drawing:

Tip: after each color, the brush should be thoroughly rinsed and blotted in water. This way you can avoid getting muddy shades.