Children's crafts made from puff pastry. How to make toy figures from salt dough
Crafts made from salt dough are a fascinating creative process. The material for modeling is inexpensive, and you can show your imagination twice: when you sculpt something and when you then paint the finished product. My daughter loves both very much, and I myself, to be honest, often get very carried away by the process. We like to make small compositions, for example, from several animals, paint them and give them to grandparents and other relatives and friends. Making your own salt dough at home is as easy as shelling pears.
You don't need much to make puff pastry animals!
To make the dough itself you need
: salt, flour, water and a little vegetable oil.
To work with it you will need
everything that we use when working with plasticine: a modeling board or backing, a rolling pin, stacks.
In addition, you will need foil, paints, brushes, water, clear varnish, toothpicks and any decorative items to decorate and complement the image (ribbons, buttons, beads, feathers, eyes, etc.).
Making play dough at home
My daughter eagerly participates not only in modeling and coloring, but also in kneading dough.
To prepare, take 2 cups of flour and 1 cup of salt. The salt should be finely ground, optimally Extra, not iodized.

Mixing the ingredients
Mix salt and flour and, adding water in small portions, knead a fairly tight dough, similar in consistency to dumplings. A little less than a glass is required. You can add 1 tbsp for better elasticity. l. vegetable oil.

Flour for dough
After kneading, put the dough in a bag and leave it in the refrigerator for 1-2 hours.

Knead the dough
The finished dough does not stick to your hands, wrinkles easily, and holds its shape. It can be colored in bulk, that is, add paint directly to the dough and knead. It can successfully replace soft plasticine. We paint ready-made crafts.
Interesting ideas for modeling with your child
In addition to directly sculpting various figures, salt dough can be used to make paintings. For example, my daughter and I made a small picture on the theme “Fairy Tales of Pushkin.”
Step 1
We came up with a drawing and painted a small board with blue gouache.

Step 1. Color the board and draw a picture
Step 2
The details of the design were sculpted from salt dough and glued to the board with PVA glue.

Step 2. We make parts from the dough and glue them to the blue board

Step 2. Add details
Step 3
The finished picture was dried at room temperature for 3 days.

Step 3. Dry the painting for 3 days
Step 4
Painted and coated with clear varnish.

Step 4. Decorate with paints

Step 4. Varnish
For little kids, you can offer an interesting option for working with dough.
- Roll out the dough into a layer , cut out figures with cookie cutters or plasticine, dry.
- Recolor . My 2.5 year old son can do such crafts.
You can make a garden of rocks and other “valuables”: artistically place finds from your walk on a piece of salt dough—pebbles, leaves, twigs.
How my daughter and I made crafts from dough
One of our recent crafts is Antarctica. We often get ideas from books about modeling, but there are some differences in working with dough. For example, you don’t have to sculpt separately parts of different colors, because the dough is painted in whatever color you need.
Also, when sculpting three-dimensional figures, foil is used as a frame; it prevents the figure from “sinking” while it is drying, and the drying process itself is accelerated.
Let's make a penguin
You will need 5 blank balls:
- 1 large - for the body;
- 2 small - for wings;
- 2 even less - for the paws.

Let's roll the balls

Roll out dough balls
Place a wad of foil in the center of a large ball and shape it into a pointed pear. We roll out the blanks of wings and legs into cone-shaped sausages and flatten them. We bend the body blank to create a head with a beak.

Forming the torso
We connect the wings and legs to the body, glue on eyes made of small balls.
We put the penguin on an ice floe: we rolled out a layer of dough and cut out a circle with a glass.

We collect the penguin and put it on the layer
Dry at room temperature for about a week.
Do not place the figures on the battery or speed up the process with a hairdryer, this can lead to cracking.
You can dry it in the oven at 50-150 degrees for several hours.
Let's make a seal
We also prepare 5 blanks: the body and paws. As a frame we use a strip of foil folded several times.

Forming balls of different sizes
We give the body the shape of an oblong cake and place foil in the middle. Roll the foil into the dough sausage.

Roll out a large ball into a flat cake and place foil on it

Roll the foil into the dough
Roll out the fin blanks into cone-shaped sausages and flatten them. Apply stripes in a stack.

Making seal feet
We bend the body, as shown in the photo, and connect it to the flippers.
We use small balls to make a nose and eyes.

Collecting seals
Can be dried.
As an additional decoration, we made a fish.

Making a fish
We paint the dried products with gouache and watercolors and cover them with transparent varnish (you can use acrylic artistic varnish, or you can use regular wood varnish).

Modeling has a beneficial effect on the child, his creative imagination, thinking abilities, develops fine motor skills and gives a wonderful mood. In this article we have prepared a selection of simple salt dough crafts especially for children.
You will need: a glass of wheat flour, a glass of extra salt, half a glass of cold water, a bowl.

Recipe

The finished salted dough should not stick to your hands or crumble. It should be cool and easy to sculpt. I recommend watching the video master class!

There are two most common ways to dry salt dough. The first method: the finished craft will dry on its own. The main thing is that it should not be exposed to direct sunlight, otherwise it will crack. The craft can be placed on a flat surface and wait a few days. Second method: dry the finished craft in the oven for 3 to 6 hours (depending on the size of the craft). Drying occurs in batches with breaks. One approach is 1-2 hours. For quick drying in one go, set the oven to 75-100 degrees, and then the craft will dry in an hour. At a temperature of 120 degrees, the craft will dry in 30 minutes, but it is better to dry it naturally.

There are two most common ways to color salt dough. The first method: after drying, paint the finished craft with acrylic paints or gouache using a brush. Second method: food coloring is diluted in water, then added while preparing the dough. When the craft is completely painted and dried, it must be coated with transparent manicure or furniture varnish in 2-3 layers. Each layer must dry before applying the next. This way the craft will be preserved

You will need: salted dough, rolling pin, cookie cutters, stars, hearts, etc..., cocktail tube, thread or rope for hanging, acrylic paints or gouache, brush, clear manicure polish.
Master Class

The salt dough figures are ready!

You will need: salt dough, gouache, brush, foil, water, permanent marker, clear manicure polish.
Master Class
- Mold the sheep's feet into 4 balls.
- Make a ball of foil, then roll it in the dough so that it is inside. This will be the body of a sheep.
- Attach the body over the legs using water.
- Make the head, ears, eyes and horn curls. Attach with water.
- Roll small flat balls and attach them as wool using water.
- Dry the craft.
- Paint the sheep with paints and wait until it dries completely.
- Draw eyes, eyelashes and outline the contours of the curls with a marker.
- Cover the craft with varnish and wait until it dries completely.
The salt dough lamb is ready!

You will need: salt dough, rolling pin, stack, toothpick, paints, brush, glitter, clear manicure polish, cocktail tube, thread for further hanging.
Master Class
- Roll out the dough into a thin layer using a rolling pin.
- Draw a house on the dough, then cut out with a stack.
- Make dots along the contour of the house, window, chimney with a toothpick.
- Make a hole for further hanging with a cocktail tube.
- Dry the craft.
- Paint the house, decorate it with glitter and wait until it dries completely.
- Attach thread for further hanging.
The salt dough house is ready!
Salt dough owl

You will need: salt dough, felt-tip pen cap, stack, paints, brush, clear manicure polish.
Master Class
- Roll the dough into a ball.
- Press it down to make a flat circle.
- Make feathering by pressing with the cap.
- Fold the sides of the circle towards the center.
- Fold the upper part of the circle into the center and form ears.
- Make the owl's eyes by pressing with the cap of a felt-tip pen.
- Dry the craft.
- Paint the owl and wait until it dries completely.
- Cover the craft with varnish.

You will need: colored salt dough, cookie cutters, cocktail straw, rolling pin, glass, water, clear nail polish.
Master Class

The salt dough figure frame is ready!
Salt dough bear

You will need: salt dough, stack, pva glue, black and pink paint, brush, clear manicure polish.
Master Class
- Blind the eyes and nose, paint them black and set aside to dry.
- Make 2 flat circles for the paws, paint them pink and set aside to dry.
- Make an oval shaped body of the bear.
- Roll into a ball for the head.
- Glue the head to the body.
- Make a flat ball, draw a smile with a stack and glue it to the face.
- Blind the paws, then glue them and draw the fingers in a stack.
- Roll the ball and glue it in place of the tail.
- Glue on the eyes and nose.
- Glue pink circles onto the bear's back legs.
- Dry the craft.
- Cover the craft with varnish.
The salt dough bear is ready!

You will need: salt dough, glass, acrylic paints, glitter, brush, ribbon for hanging, cocktail tube, dog's paw for imprinting on the dough or your fingers, transparent glue, rolling pin.
Master Class


You will need: colored salt dough, stack, clear manicure polish, toothpick.
Master Class

The salt dough star is ready!
Salt dough caterpillar

You will need: colored dough, knife, pva glue, toothpick, pendant, clear manicure polish.
Master Class
- Roll out the sausage.
- Cut it into 6 equal parts.
- Roll into balls.
- Glue 5 balls together.
- Glue the head.
- Make a nose and eyes, then glue them on.
- Poke a toothpick into the hanging area.
- Dry the craft.
- Apply varnish and wait until completely dry.
- Attach the pendant.
The salt dough caterpillar is ready!
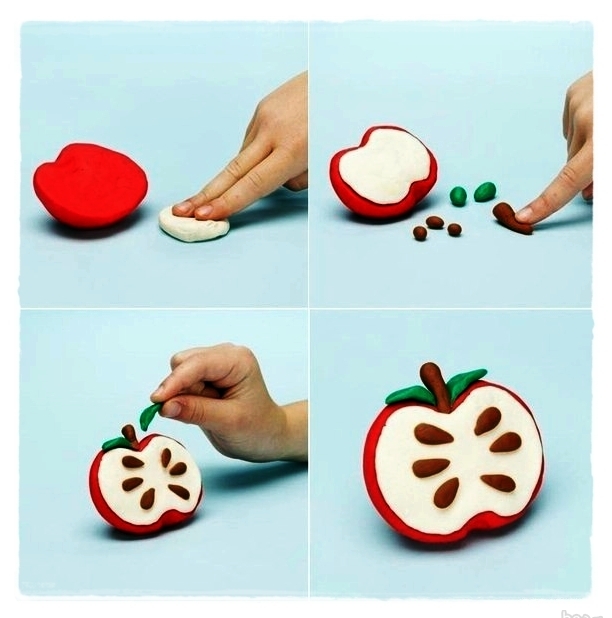
Salt dough apple
You will need:
Master Class
- Make half an apple, make the inside flat, pressing it onto a flat surface.
- Make a thin flat center and glue it to the main part.
- Roll 6 seeds and a stick, then glue to the apple.
- Blind the leaves, then glue them.
- Dry the craft.
- Apply varnish and wait until completely dry.
The salted dough apple is ready!
Salt dough elephant

You will need: colored salt dough, pva glue, clear manicure polish.
Master Class
- Make the elephant's body by rolling an elongated ball.
- Make 4 legs in the shape of plump sausages.
- Make a proboscis.
- Make the elephant's ears in this way: roll out 2 flat cakes, glue flat cakes of the same shape of a smaller size and a different color to them.
- Make a small ponytail.
- Blind your eyes.
- Assemble the elephant in the following sequence: glue the legs to the body, then glue the proboscis, then the ears, eyes and tail.
- Dry the craft.
- Apply varnish and wait until completely dry.
The salt dough elephant is ready!
Salt dough dachshund

You will need: salt dough, simple pencil, scissors, cardboard, paints, brush, rope, toothpick, foam sponge, clear varnish, PVA glue.
Master Class

The salt dough dachshund is ready!
Boletus mushroom made from salt dough

You will need: salt dough, light bulb, paints, brush, foil, cardboard, masking tape, superglue, PVA glue, paper napkins, clear varnish, stack.
Master Class

Boletus mushroom made from salt dough is ready! I recommend watching this video!
Funny salt dough pigs

You will need: salt dough, paints, brush, foam sponge, stack, thin rope, toothpick, black gel pen, PVA glue.
Master Class

Funny salt dough pigs are ready! I recommend watching this video!

You will need: salt dough, nail scissors, PVA glue, acrylic paints or gouache, manicure brush.
Master Class

Salt dough hedgehog is ready!
Modeling figures from salt dough or dough plastic is a very exciting activity that does not require special skills or special financial investments. Salt, water and flour are the main ingredients for this type of needlework. The dough turns out soft and pliable, allowing even beginners to make wonderful crafts.
First, you can sculpt the simplest figures, then try to make more complex products: small souvenirs, dolls and even three-dimensional paintings. By gaining a little experience and using your creative imagination, you can make real works of art! In addition, by doing various crafts with your children, you will not only teach them creative work and develop fine motor skills, but also enjoy precious minutes of communication.
Our master class and several interesting ideas will help you complete simple crafts, and the necessary tips will make this creative process as fruitful and exciting as possible.


There are quite a lot of recipes for modeling salt dough. Depending on the scale of the crafts, salt, flour and water are mixed in different proportions, and, among other things, additional ingredients are added to the dough: glycerin, glue, vegetable oil, starch and even hand cream. For beginners, it is recommended to make the dough according to the classic recipe. To do this, mix flour and salt in equal proportions with the gradual addition of cold water. For example, for 200 g of salt and 200 g of flour you will need 125 g of water.

Advice for beginners!
- Flour should be regular rye or wheat flour without adding baking powder or other ingredients.
- It is best to take fine-grained salt and in no case iodized. To better dissolve the salt, some needlewomen add a little water to it before mixing it with flour.
- To ensure that the dough is homogeneous, it is recommended to use a mixer.
- To please children during the modeling process and to add color to the product, you can add food coloring to the dough.
- For better adhesion of individual parts of the craft to each other, moisten them with a brush.
- It is best to dry the product in an oven preheated to 50-60 degrees. Depending on the size of the craft, this procedure may take about 1 hour or more.

Master class on making mukosolek
In addition to flour, water and salt, the following equipment will be needed for the master class:
- modeling board;
- small rolling pin;
- small knife;
- a toothpick or ballpoint pen for small holes and patterns;
- water container;
- brush and paints;
- coating varnish.
Depending on what kind of figures you will make, you may need cookie cutters, beads, buttons, and leaves of different shapes to create impressions.
- Roll out the prepared salt dough into a layer half a centimeter thick.
- Using cookie cutters, cut out the desired number of shapes. Using a toothpick or a pen refill, make holes in the figures in order to thread ribbon loops through them. Decorate crafts using beads, buttons, or tree leaves as stamps.
- Preheat the oven, line the bottom of a baking sheet with tracing paper or special baking paper.
- Place the figures on a baking sheet and bake in the oven until the dough hardens.
- Place the mucosols on a flat surface and paint with colors of your choice.
- To add shine to finished products, coat them with varnish.


Flour pickles can be made using a small knife, cutting out all kinds of elements. For example, you can make a hanging house for children for the New Year tree or a funny cat with rope paws. A salty pancake can make a cute owl if you fold its three edges and cut out eyes and a nose.


The materials and equipment needed to create such a funny lamb will be the same as in the previous master class.
- Knead the dough according to the classic recipe and put it in the refrigerator for 2 hours.
- Make 4 small balls from the dough for future lamb legs.
- To make the body, roll a sheet of foil into a ball and cover it with a salted dough pancake. Place the resulting ball on the legs.
- Make a lamb's head, horns, ears and eyes from the dough. Use small balls of dough to form the fur of the toy.
- Dry the salted dough lamb in the oven for 2.5-3 hours, and then let it cool for 30-40 minutes.
- Paint and varnish the toy.

Modeling three-dimensional panels and paintings from salt dough

As a rule, salt dough is used for paintings according to the following recipe: one glass each of salt and flour, 1 tbsp. water. For beginners, it is best to use a small number of salted figures in the painting, decorating the rest of the space with decorative materials. It is best to make salted parts on foil so that their back surface is perfectly flat and easily glued to the field of the picture.

Possible problems for beginners when making crafts from salt dough
- After painting, the products cracked.
- Clean the craft with sandpaper, dry it in fresh air and paint it again.
- The crafts cracked due to the large thickness.
- Remove excess dough from the back. If the figure is large, it needs to be turned over periodically when drying.
- If a part breaks off from the toy, glue it together with PVA glue or decorate it with a suitable decoration.
You can make a huge number of crafts from salt dough, for example: flowers, animals, various figures, inscriptions, numbers, toys, paintings and whatever you want! Modeling from salt dough is called bioceramics. The advantage of salt dough is that it is convenient to work with, this material is absolutely harmless and crafts made from it will delight you for several years. In this article we will look at how to make crafts from salt dough with your own hands.
You will need: a glass of wheat flour, a glass of extra salt, half a glass of cold water, a bowl.
Recipe
The finished salted dough should not stick to your hands or crumble. It should be cool and easy to sculpt. I recommend watching the video master class!
There are two most common ways to dry salt dough. The first method: the finished craft will dry on its own. The main thing is that it should not be exposed to direct sunlight, otherwise it will crack. The craft can be placed on a flat surface and wait a few days. Second method: dry the finished craft in the oven for 3 to 6 hours (depending on the size of the craft). Drying occurs in batches with breaks. One approach is 1-2 hours. For quick drying in one go, set the oven to 75-100 degrees, and then the craft will dry in an hour. At a temperature of 120 degrees, the craft will dry in 30 minutes, but it is better to dry it naturally.
There are two most common ways to color salt dough. The first method: after drying, paint the finished craft with acrylic paints or gouache using a brush. Second method: food coloring is diluted in water, then added while preparing the dough. When the craft is completely painted and dried, it must be coated with transparent manicure or furniture varnish in 2-3 layers. Each layer must dry before applying the next. This way the craft will last for a long time.
You will need: colored salt dough, stack, clear manicure polish, toothpick.
Master Class
The salt dough star is ready!
Salt dough caterpillar
You will need: colored dough, knife, pva glue, toothpick, pendant, clear manicure polish.
Master Class
- Roll out the sausage.
- Cut it into 6 equal parts.
- Roll into balls.
- Glue 5 balls together.
- Glue the head.
- Make a nose and eyes, then glue them on.
- Poke a toothpick into the hanging area.
- Dry the craft.
- Attach the pendant.
The salt dough caterpillar is ready!
Salt dough apple
You will need:
Master Class
- Make half an apple, make the inside flat, pressing it onto a flat surface.
- Make a thin flat center and glue it to the main part.
- Roll 6 seeds and a stick, then glue to the apple.
- Blind the leaves, then glue them.
- Dry the craft.
- Apply varnish and wait until completely dry.
The salted dough apple is ready!
Salt dough elephant
You will need: colored salt dough, pva glue, clear manicure polish.
Master Class
- Make the elephant's body by rolling an elongated ball.
- Make 4 legs in the shape of plump sausages.
- Make a proboscis.
- Make the elephant's ears in this way: roll out 2 flat cakes, glue flat cakes of the same shape of a smaller size and a different color to them.
- Make a small ponytail.
- Blind your eyes.
- Assemble the elephant in the following sequence: glue the legs to the body, then glue the proboscis, then the ears, eyes and tail.
- Dry the craft.
- Apply varnish and wait until completely dry.
The salt dough elephant is ready!
You will need: salt dough, foil, a candy bowl or similar plastic container, gouache, a brush, clear manicure polish, a modeling board, a knife or a stack.
Master Class

You will need: salt dough, nail scissors, PVA glue, acrylic paints or gouache, manicure brush.
Master Class
Salt dough hedgehog is ready!
Owl (eagle owl) made from salt dough

You will need: salt dough, pva glue, nail file, manicure scissors, acrylic paints or gouache, brush, wooden board with a pendant, clear manicure varnish.
Master Class

The salt dough owl is ready!

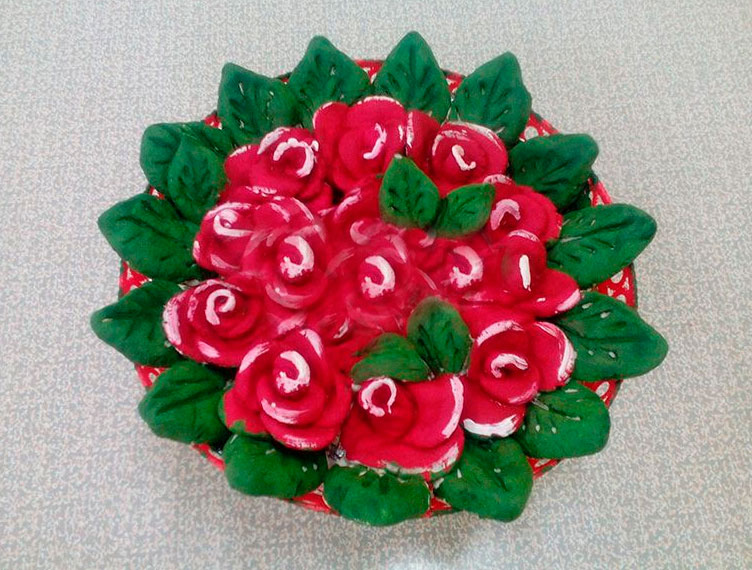
You will need: salted dough, the base on which the craft will be attached, for example, a board or plate, a glass or a knife, a sheet of paper, a simple pencil, a garlic press, a rolling pin, pva glue, acrylic paints or gouache, a brush, clear manicure polish, cloves.
Master Class

Salted dough fruit basket is ready! I recommend watching the video master class!

You will need: salt dough, knife, rolling pin, simple pencil, sheet of paper, sandpaper, acrylic paints or gouache, brush, transparent manicure varnish, glue gun or pva, base for crafts, for example: a board with a frame, transparent manicure varnish.
Master Class

Salt dough pencil

You will need: water, flour, extra salt, cardboard jar for the frame, PVA glue, scissors, a piece of decorative rope or corrugated paper, gouache, brush, button, stacks, acrylic varnish for crafts, toothbrush.
Master Class
- Knead the salted dough in this way: add a glass of flour, a glass of salt, add water, then knead until the desired consistency of the dough. Separate part of the dough, add beige gouache, then knead.
- Roll out the cake to a thickness of 10-15 mm.

- Apply PVA glue to the outer rim of the jar and wrap it with dough. Cut off the excess with a stack and smooth the joints with a damp brush.
- Create a small dotted texture with a toothbrush on the surface of the dough.
- Knead the brown dough, roll it into a flat cake 10-15mm thick.

- Cut a 5cm wide strip of brown pastry and glue it to the bottom of the jar.
- Make 2 large owl eye bases from white dough, then glue them on.
- Make a beak out of brown dough and glue it on.
- Make eyes from turquoise dough and glue them on.
- Roll out 8 strips of pink dough, twist them into 4 flagella and make a bow, then leave it to dry for 2 hours.
- Make droplet-shaped owl wings using brown dough, then glue them on.

- Weave ropes of beige dough and glue them onto the neck of the jar.
- Roll out a sausage from white dough, draw the texture of the lace with a stack and glue it as a collar under the beak.
- Place the craft in a warm place for a day.
- Paint the bottom and wings with brown gouache and decorate with white dots.

- Draw the pupils and eyelashes with black gouache, wait until the paint dries, then paint white highlights on the eyes.
- Glue a pink bow above the wing.
- Glue a button with a bow from a corrugated strip onto the lace.
- Cover the craft with varnish and wait until it dries completely.
The salt dough pencil is ready!
Salt dough dachshund
You will need: salt dough, simple pencil, scissors, cardboard, paints, brush, rope, toothpick, foam sponge, clear varnish, PVA glue.
Master Class
The salt dough dachshund is ready!
Boletus mushroom made from salt dough
You will need: salt dough, light bulb, paints, brush, foil, cardboard, masking tape, superglue, PVA glue, paper napkins, clear varnish, stack.
Master Class
Boletus mushroom made from salt dough is ready! I recommend watching this video!
Funny salt dough pigs
You will need: salt dough, paints, brush, foam sponge, stack, thin rope, toothpick, black gel pen, PVA glue.
Master Class
Funny salt dough pigs are ready! I recommend watching this video!

You will need: salt dough, baking sheet, rolling pin, knife, sheet of paper, acrylic paints, brush, ribbon, water, shoehorn, pencil, sandpaper, clear manicure polish.
Master Class

After I “got sick” with salt dough and began actively posting photos on social networks, many of my friends also began to try this type of needlework. Not everyone succeeds the first time. I want to save you from the main mistakes when sculpting. Someone writes down their knowledge and sells salt dough modeling courses on the Internet. I'm not a good trader.)))) That's why I share my advice for free.
1. Cracks in salt dough crafts
Unfortunately, when drying, cracks sometimes appear on crafts. What to do?
1st method: You need to cover the crack with the same salt dough and PVA. To mask off the caulk (patch), wet your finger and rub the area of the caulk to hide the masking marks and create a smooth surface.
2nd method: We hide the crack behind decorative elements. The cracked area can be covered with a twig, flower, pebble, etc., depending on the theme of your craft.
To avoid cracks, dry your crafts indoors without changes in humidity.
2. How to tint and paint a craft made from salt dough
First you need to define relief of the product. We take the dried craft and paint it with brown gouache. Leave for about 15 minutes. Then we wet a soft cloth, wring it out well so as not to “wet” the craft, and carefully wipe off the paint.
The indentations will remain dark and the raised areas will be light brown. Even areas with a flat surface can be erased “artistically” by making lighter and darker areas.
It takes a lot of brown paint to paint crafts for the first time, so it’s more convenient to buy a larger jar at the stationery store.
This is what the craft looks like after marking the relief.
After the product has dried after the first painting, you can begin painting. Any paint, watercolor, gouache, acrylic paints. To begin with, the convex areas can be tinted with white paint, gouache or acrylic. We take an old sponge or a piece of foam rubber, dilute a little paint with water, apply it to a dry (!) sponge and “smack” the craft. Practice on a white sheet of paper. The paint should not be too liquid. Can be tinted with a semi-dry brush.
Usually the main background of the product is not painted with solid paint, otherwise you will lose all the texture. Therefore, we tint most of the crafts, first with white, then with colored paints.
But we paint small details, flowers, leaves, characters with a thin brush. But even here it is advisable to preserve the shadows of the recesses and play with the gradient.
Incorrect painting.
Right house- my first fairy house. I painted the walls a solid tone of beige paint. It doesn't look very good and has lost all its texture.
Left house my friend did it - too continuous, a thick layer of paint on the roof, windows and door.


Correct painting - coloring the craft with a gradient.
My last houses for gnomes


3. How to make a beautiful texture with your own hands
You can get an interesting relief on a craft made from salt dough using any available means. Using a stack (knife) you can imitate brick and stone masonry and wood patterns. You can print on the dough any objects that you find at home: buttons, nozzles for a pastry syringe, pasta, leaves and twigs of trees, oilcloth/napkin with a convex pattern, coarse fabric such as burlap. Take a fresh look at familiar objects and you will definitely find something original.