Painting winter with paints with children. Drawing in the preparatory group in kindergarten
Drawing on the topic: Winter for children 5-7 years old
"Winter sun". Master class for educators
Sredina O.S. teacher of MDOU TsRR d.s. No. 1 “Bear Cub”, Yuryuzan, Chelyabinsk region.Target:
Introducing preschoolers to the possibilities of a limited palette in color reproduction.
Training in working techniques on large format (A3).
Tasks:
Teach how to work with flat and round bristle brushes in gouache
Improve work with the palette to compose shades of cold and warm colors,
Develop the ability to notice, see and describe color nuances
Cultivate love for native nature.
Develop curiosity.
Materials:
A3 format, palette, two sponges, gouache in white, blue, scarlet and yellow. Plastic spoon. Round and flat bristle brushes (No. 1-5).
Literary materials:
Poems by Russian poets
Preliminary work:
1 We look at a presentation with photographs of winter landscapes. It contains images of the sun rising or setting in winter. We admire the beauty of our native nature.


2 Listen to poems about winter.
S. Yesenin
White birch tree under my window
She covered herself with snow, like silver.
On fluffy branches with a snow border
The tassels bloomed with white fringe.
And the birch tree stands in sleepy silence,
And snowflakes burn in golden fire.
And the dawn, lazily walking around,
Sprinkles the branches with new silver.
Options:
A. S. Pushkin “Here is the north, the clouds are catching up...”; A. A. Fet "Mom! Look from the window"; A. N. Apukhtin “A white, fluffy robe”; L. A. May “Double green formation...”; S. A. Yesenin "Powder"; A. S. Pushkin “Winter Road” 4 S. A. Yesenin “Winter Sings and Sounds”; I. A. Bunin "Blizzard"; S. D. Drozhzhin “Snow flies and sparkles...”; N. A. Nekrasov “Frost the Voivode”; A. S. Pushkin “Winter!.. Peasant, triumphant...”
N. A. Nekrasov “A Little Man with a Marigold”; A. S. Pushkin “The dawn rises in the cold darkness...”; A. A. Blok "Dilapidated hut"; K. D. Balmont "Snowflake"; A. S. Pushkin “Winter Morning”; I. Z. Surikov "Winter"; F. I. Tyutchev “The Enchantress in Winter...”; A. A. Fet "Wonderful picture..."
3 We talk about the color of the sky (pink, lilac) and the solar disk. We find shades of the sun: white, yellow, light yellow, golden, orange, pink...
Thinking about the sun. Why does it only shine in winter and not warm? Why is there no winter at the equator and no snow in Africa? Do we actually see the rays from the sun that we usually draw? What is the sun like in winter - at dusk or in fog, in frost: clearly defined or looks like a blurry spot?
Practical work
Let's draw together with the teacher. Variations are welcome. This could be the location of the horizon line, the number of trees, snowdrifts, the location of footprints in the snow.
Description:
1). Take a sheet of A 3 format and prepare the background. To do this, take two sponges. We wet them with water. Alternatively, you can moisten the sheet with water. We put a little white and scarlet gouache on one sponge, white and blue on the other. Our sky will be pink. And the snow is blue.


2) We work with the palette. Lay out white and blue gouache. White - using a spoon (so that the paint remains white and not dirty in the jar). Even a cleanly washed brush, picking up white gouache, adds its own shade to it. Mix to get a blue color (several shades can be made).
Mix white gouache and yellow to obtain a pale yellow color.
Mix yellow and red to get orange.
Mix white and orange to get a pale orange color.
3) The sun is rising (or setting). This means that its circle will only rise slightly above the horizon line. Place the sun slightly to the right or left of the center of the sheet. Place the white color in the center of the solar circle. We outline the small solar circle with smooth movements in large yellow, orange, light orange. Using a clean, damp brush, I blur the transitions from one color to another.


4)
We draw blue spruce trees on the horizon line. We arrange them not like a fence of fir trees of the same height, but in a free order.

5) Let's talk about the composition of the sheet. Would it be beautiful if the large, main tree in the picture was located right in the middle of the picture? And if the tree is pressed to the edge, will it remain the main one? Where should it be drawn? Slightly to the right or left of the center of the sheet.
Using blue gouache we draw a tree trunk in the foreground. Let's imagine that this is an old oak tree. First we draw its long side branches, and then thin branches.


6) Drifts and footprints appear in the snow.
Who left them? You can play a game, remembering who does not sleep in the forest in winter, and what
to whom do the traces belong?


7) On the trunk - with vertical lines of a blue tint - bark. Next to the old oak tree is a young tree.
8). Take the thickest round bristle brush. Using a dry brush, pick up blue gouache and, holding it vertically, apply strokes, imitating snow-covered branches.


9) After the work has dried, you can (optional) work on the trunk of the old oak tree. We take a black wax chalk and go flat across its surface. Due to uneven strokes, the bark becomes textured. The chalk leaves marks only on the protruding parts.
Drawings by preparatory group students:


In the garden, my eldest and I were given a task to jointly draw a drawing of a winter landscape for an online competition. I don’t like to draw and I don’t know how, so Google can help me)))
Found a lot of interesting things:
You can get a lot of ideas here by looking at the finished competition works of preschoolers: Children's drawing competition. January 2014. Preschoolers
Lesson summary for children 5-7 years old
“DRAWING A WINTER LANDSCAPE WITH TOOTHBRUSHES”
Goal: to teach children to draw a winter landscape using an unconventional technique using toothbrushes.
Educational:
Introduce students to the unconventional technique of drawing with toothbrushes;
Give an idea of the winter landscape;
Provide students with information about proper dental care;
Educational:
Develop cognitive interest, the ability to observe and use your observations in practical activities.
Promote the development of fine motor skills of the hands;
Strengthen drawing skills;
Develop children's creative abilities.
Educational:
To cultivate in students perseverance, attention, accuracy and perseverance in achieving their goals;
Strengthen the habit of regular dental care in students;
Instill in students a love of nature.
Lesson format: workshop using ICT.
Materials and equipment:
1. Sheets for watercolor A4
3. Toothbrushes
4. Brushes No. 2 for painting
5. Paper napkins
6. Glasses of water.
Progress of the lesson
Today guys, I want to teach you an unusual way of drawing.
First, let’s check readiness for class: is everyone sitting correctly? Our back is straight, we don’t bend too low at the table, we have everything for drawing.
Which of you guys likes to draw? (children raise their hands)
What do you use to draw with? (That’s right, you can draw with pencils, felt-tip pens, paints)
And look what we have on our desks that doesn’t look much like a drawing instrument? (Of course, it’s very unusual that we have toothbrushes with our brushes)
The fact is that today we will draw with a toothbrush. Each of you has a toothbrush at home.
What is it for? (Correct for brushing your teeth)
What do you know about teeth, shark teeth?
Start of the presentation
Slide number 2
The lemon shark is known to replace its teeth every 8-10 days, while the great white shark replaces its teeth every 100 days.
Slide number 3
For humans, everything is different: once in our lives we exchange baby teeth for permanent ones, and then we live with these teeth all our lives. Therefore, you need to protect your teeth and take proper care of them!
Slide number 4
How to properly take care of your teeth? Look at the pictures... Of course, you shouldn’t eat foods that spoil your teeth (sweets, soda, chips cause caries - tooth decay, and if you bite nuts, you can break a tooth).
Slide number 5
Do you know what foods are very good for teeth? (that’s right, fruits, carrots, dairy products and fish are very healthy, as they contain a lot of vitamins and minerals specifically for strong teeth).
Slide number 6
What should we do every day to keep our teeth healthy and serve us for a long time, and decorate our smile? (Of course, you should brush your teeth morning and evening).
Who knows how often you need to change your toothbrush?
That’s right, you should definitely change your toothbrush once every three months, because the bristles of the brush become soft and do not penetrate well between the teeth and do not clean them well from plaque.
But don’t rush to part with your old brush; you can play with it for the benefit of your health.
Slide number 7
Repeat after me the words and movements (Rubging the fingers of your left hand with a brush, starting with the thumb and ending with the little finger. Then rubbing the palms with a brush.):
Little hedgehog -
Quadrupeds,
A hedgehog walks through the forest
Sings a song:
Fuf-you-fuf-you-fuf-you-fu,
I carry a leaf on me,
I'm the strongest in the forest
I'm only afraid of the fox.
Little hedgehog -
Quadrupeds,
A hedgehog walks through the forest
Sings a song:
Fuf-you-fuf-you-fuf-you-fu,
I carry a fungus on me,
I'm the strongest in the forest
I'm only afraid of the fox.
They massaged their hands and prepared them for work.
As I promised, we will paint the landscape with toothbrushes.
Do you know what “landscape” is? (children's answers)
That's right, a landscape is an image of nature.
And we will draw our winter landscape in the forest.
Let's now see how Russian artists depicted the winter landscape in their paintings.
Slide No. 8, 9, 10
Conversation with children about paintings.
Practical work
Slide number 11
First, we will draw the background with you. It will be a beautiful evening sky.
Dip the toothbrushes in water, blot them with a napkin and take the blue paint. Paint the sky a little blue, then wash the brush, blot it with a napkin and paint the sky with pink paint.
Now with white paint, we will add some light colors to the sky. Now let’s draw snow with you. What color do you think the snow is? (children's answers).
Slide number 12
The white color reflects the surrounding colors and if you look closely, the snow can be light blue, lilac, pink or yellow!
And now, while our background dries a little, you and I will play at our desks.
The wind is a cloud-mill
He spins at full speed (we twist the handles like a mill,
And it creeps to the ground
White-white fluff (shake palms).
Close the windows
Close the doors (put your palms together).
Cover your ears (cover your ears,
Close your nose (close your nose).
Walks and wanders along the roads
Old Grandfather Frost (we walk with the index and middle fingers)
It stings your ears, it stings your nose,
Santa Claus pinches the cheeks (we pinch the named parts of the body).
Slide No. 13 and 14
Look how beautiful the trees look in white frost in Kustodiev’s photograph and painting.
Let's try to draw a light, airy tree crown using a toothbrush. Take white paint with a brush and apply it to the paper, trying to draw an oval with fluffy edges.
We won’t paint the trunk and branches yet, the white paint needs to dry.
Slide number 15
Now let's admire the snow-covered spruce trees and draw them in our picture.
Using purple or green paint, draw the branches of the Christmas tree using downward and sideways movements, pressing the brush to the paper.
Using a thin brush, paint the trunks and branches of the trees with brown paint. Our drawings are ready!
Guys, you all turned out wonderful drawings!
Let's arrange an exhibition of your drawings and admire the beautiful snow-covered forest.
I was pleased to learn today that you know so much about your health. Don't forget to take care of your teeth. I hope our lesson was interesting and useful. Did you like drawing in such an unusual way? Be sure to go to the park on the weekend and admire the winter landscape, maybe it will inspire you to new creative works.
Now let's put things in order in the workplace.


New Year's creativity: drawing patterns on the windows
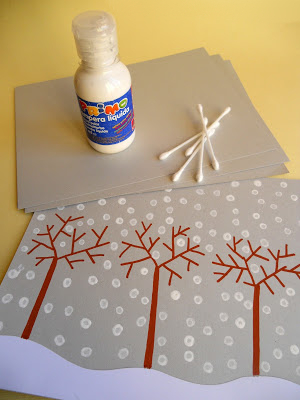
Why do I offer this particular type of window decoration? Firstly, everything you need is already in every home, and there is no need to buy anything special. Secondly, the drawing process is very simple; in case of failure, all marks can be easily removed with a damp cloth, and when you get tired of the drawing, it is easily washed off with water. Further, this activity is suitable for children of any age and can captivate and amuse them for a long time. So, let's begin! Squeeze white toothpaste from the tube onto a saucer. If you want bright colors, mix toothpaste with paints.  Go to the window and try making a few brush strokes. It's not difficult, is it? Come up with any plot and make a drawing. It can be snowflakes, animals and birds, winter landscapes and everything that your imagination tells you.
Lessons ISO-2.
This “Winter Village” was painted in gouache in three stages: background, houses and freshly fallen snow with shadows.

"Winter morning". Gouache.

"Bullfinches". Gouache.

"Winter City". Gouache.

“Winter mood”. This work was done by 4-year-olds. The background was painted in watercolors, and the drawing itself was done in white acrylic from a hardware store. Unfortunately, I don’t have a photo of the children’s work, the memory card of the camera was covered with all the children’s work (I’m crying), but believe me In other words, the kids have a very wonderful winter!!! It’s almost impossible to ruin the work!
Winter landscape in an unconventional technique "Hare under a bush."
Author: Malevannaya Natalya Nikolaevna, teacher of additional education, MBOU DOD SYUN, Ussuriysk.
Description: the master class is intended for children of senior preschool age, primary school students, additional education teachers, teachers.
Purpose: Use in drawing classes.
Target: introduction to non-traditional drawing techniques.
Tasks:
1.Improve gouache drawing skills;
2.Introduce non-traditional drawing techniques (blowing with a cocktail tube, three-dimensional drawing with a mixture of flour and salt, and drawing with cotton swabs);
3.Develop thinking, imagination, creative imagination;
4.Develop aesthetic perception, artistic taste;
5. Foster hard work, independence and activity at work;
6. Foster love and respect for nature;
Tools and materials:
1. Sheet of paper;
2. Gouache;
3. Painting brushes (No. 10 and No. 3);
4. Cocktail straw;
5. Flour, fine salt, PVA glue;
6. Cotton swab;
7. A small container for stirring the flour mixture;
8. A glass for water.
9. Sponge.

A story about a hare.
The most common hares in our country are the hare and the hare. Both are brown-gray in summer. By winter, the hare becomes a little lighter, and the hare sharply changes the color of its fur to pure white. The hare lives in the forest - it is a forest hare. The white hare sleeps during the day and comes out to feed at night. In winter it feeds on tree bark. A hare near a tree often rises on its hind legs to reach the softest bark. Most often, he gnaws young aspen and birch trees, and runs to the river bank to feast on the soft bark of willow.


The white hare easily moves through deep snow. By winter, its legs are overgrown with fur, even shaggy hair grows between its toes. The hare is warm, and it’s easier to stay on the snow: the leg becomes wider, as if the hare were putting on skis. When a hare jumps, just like a squirrel, it lifts its hind legs far forward. It is from them that larger holes remain in the snow than from the front paws.
By following the hare's tracks you can also get to the hare's winter lair - to its "bed". In winter, the den is deeper and looks like an oblong hole. The hare hides in it from enemies and from the wind. But the hare will not lie down in vain: he ran and ran, saw a suitable place and lay down. No, he will start meandering, retracing his steps, taking notes - huge leaps to the side. He gets confused, gets confused and makes the final estimate. He will run a little more and lie down. Sometimes a hare gets completely carried away in a strong blizzard. A snowy arch forms above him, from under which he has to dig out in order to emerge into the light.

The brown hare lives in fields and steppes. He also goes out to feed at night, digging out snow on winter crops. When the field is covered with deep snow and the hare cannot get to the winter crops, he begins to run to the gardens and gnaw on the stalks. If they are not there, he jumps to the haystacks. He also runs into the gardens, where he gnaws the bark of young apple trees. Browns cause great harm to gardens. During the day, the hare sleeps in a hole in a meadow or field. Often it gets stuck under a snowdrift.
The white hare in the forest relies more on hearing. Hiding, he hides and lies down more often than a hare. The hares run away from the chase in circles. In whites they are smaller, in hares they are wider. The hare often stops while moving, trying to see the enemy. And the hares have many enemies: hunters, wolves, foxes, dogs, eagles, owls. But most of all he is afraid of the forest cat - and just look at the lynx from the top, as if from the sky, he will jump on his back. What saves hares is their ability to run fast: during a chase, they can run 70 km in an hour.
The hare is also saved by a white fur coat that matches the color of the snow, and the hare on the field looks like a stump or a stone dusted with snow. However, the hare tribe is quite tenacious. The hare brings 3-4 litters per year, from 3 to 10 cubs in each. The first hares are born, as a rule, in March, the last - in September. After the birth of the cubs, the hare, after feeding, leaves them for 2-3 days. The little hares sit motionless in the grass all this time, which saves them from predators. Their mother or another hare will feed them 3-4 more times. And 1.5-2 weeks after birth, the bunnies begin to feed on plants on their own.

Master Class:
Let's start drawing our winter landscape "Hare under a bush".
First we need to tint a sheet of paper. In order for the paints to apply more evenly, moisten a sheet of paper with water using a sponge.

First of all we draw the sky. We will be drawing a winter evening, so the sky in the picture will be lilac-pink. We will mix the paints directly on the sheet. To begin, apply strokes of red gouache to the top of the sheet with a wide brush.

Add strokes of blue paint. There should be approximately the same number of red and blue ones.

We put white gouache on a wide brush, making sure that it is not too thick (but not liquid either). We blur the previously applied crimson and blue paint on the sheet using white paint.

Here's what we get:

The color saturation of the sky depends on the ratio of blue and red gouache. For some it may turn out lighter, for others it may be darker. It seemed to me that there were not enough red reflections of the sunset in my sky, so I immediately, while the paint was still wet (in general, in this case, you need to tint as quickly as possible so that the paints do not have time to dry), add a few strokes of red gouache.

I blur them so that they don’t stand out too sharply against the general background.

Now let's start drawing snow on the ground. I always explain to children that any water is a mirror that reflects what is nearby, which is why the lake, for example, turns red at sunset, the color of the sky. And snow is also water, but only turned into ice, so of course, snow lying on the ground in winter will reflect the colors that are in the evening sky, only to a lesser extent than a body of water.
Thus, at the bottom of our leaf we will do the tinting according to the same principle as on the top, only this time we will use much less red and blue paint. It’s important not to overdo it here, otherwise the snow may turn out brighter than the sky, and we don’t want that.

While I was painting the sky, the lower part of the sheet dried out, I had to add water, so I immediately washed out the blue paint with a damp brush, and only then began to add red (at this stage I realized that it is better to wet the part on which you will paint, immediately before applying paints, don't repeat my mistake!)

Add just a little red paint.

We blur it again with white gouache.

The background dries out quite quickly if everything is done correctly. Therefore, you can immediately continue drawing further. Using black liquid paint (take more water on the brush) we paint the base of the bush at the bottom of the leaf, we will have four main branches.

Using a cocktail tube, blow the branches in different directions, adding more black paint as needed (preferably before each blowing). Here's what I got:

We draw a bunny hiding under a bush with white paint. For now only the body, paws, head, ears and tail, without drawing small details.


Now let's start three-dimensional drawing using a mixture of flour, salt and PVA glue. Mix a teaspoon of white flour with half a teaspoon of fine salt and dilute with PVA glue (the mixture should look like thick sour cream).


Apply the resulting mixture to the branches of the bush. It will be snow. I applied the mixture using a brush. Although it may be more convenient for someone to do this with their finger.
I found an interesting selection on the Internet. (the most interesting, for me, is at the end))
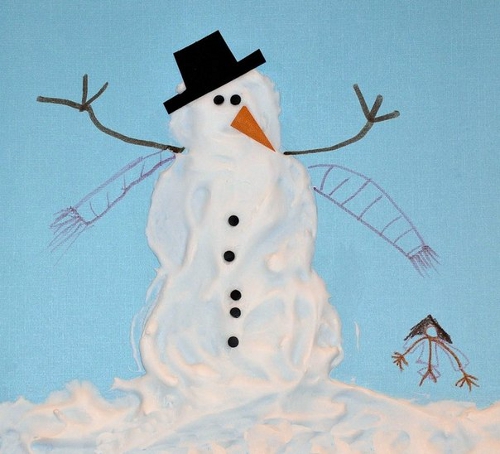
1. Winter drawings. "Volume snow paint"
If you mix equal amounts of PVA glue and shaving foam, you will get wonderful airy snow paint. She can draw snowflakes, snowmen, polar bears or winter landscapes. For beauty, you can add glitter to the paint. When drawing with such paint, it is better to first outline the contours of the drawing with a simple pencil, and then paint it with paint. After some time, the paint will harden, and you will get a voluminous winter picture.

2. Winter drawings of children. Using electrical tape in children's creativity

If there is snow outside the window, you can depict it using a cotton swab.

Or use a brush to put snow on each branch.

11. Winter drawings. Drawings on the theme of winter
An interesting idea on the topic of children's winter drawings was suggested by the author of the blog Homeschool Creations. She used putty to paint snow on the transparent film. Now it can be applied to any winter pattern or appliqué, simulating falling snow. They put the film on the picture - it started snowing, they removed the film - the snow stopped.

12. Winter drawings. "New Year's lights" We would like to tell you about one interesting unconventional drawing technique. To draw a New Year's garland like in the photo, you will need a sheet of thick paper of a dark color (blue, purple or black). You will also need regular chalk (the kind you use to draw on asphalt or a blackboard) and a light bulb stencil cut out of cardboard.
On a piece of paper, use a thin felt-tip pen to draw wires and light bulb sockets. Now apply the light bulb stencil to each socket in turn and outline it boldly with chalk. Then, without removing the stencil, smear the chalk on the paper using a piece of cotton wool or directly with your finger to create rays of light. You can replace chalk with colored pencil graphite chips.
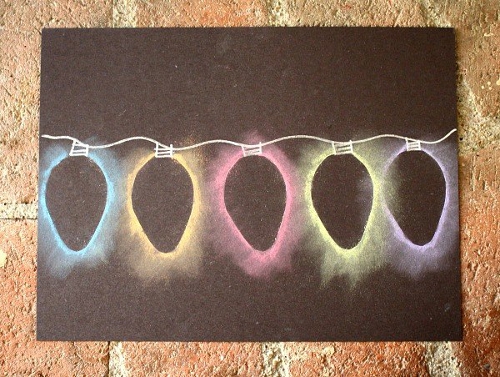
It is not necessary to use a stencil. You can simply paint over the light bulbs with chalk, and then gently rub the chalk in different directions to make rays.

Using this technique, you can also draw a winter city, for example, or the northern lights.

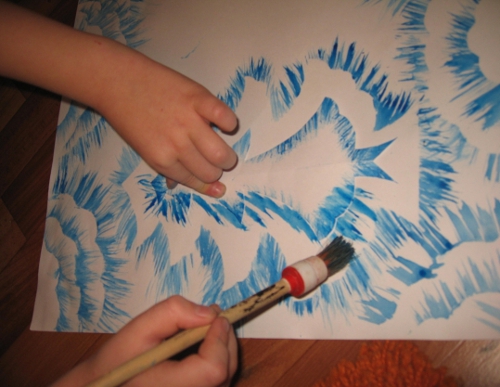
13. Drawings winter fairy tale. Winter forest drawings
On the site already mentioned above Maam.ru you will find an interesting master class on drawing winter landscapes using templates. You will only need one base color - blue, a coarse bristle brush and a white drawing sheet. When cutting out templates, use the cutting method from paper folded in half. Look at what a magnificent drawing of a winter forest the author of the painting created. A real winter fairy tale!

14. Winter drawings. Drawings on the theme of winter
You are probably very eager to find out how the wonderful “marble” Christmas tree in the photo below was painted? We'll tell you everything in order...To draw such an original drawing on the theme of winter you will need:
Shaving cream (foam)
- watercolor paints or food coloring in green shades
- flat plate for mixing shaving foam and paints
- paper
- scraper

1. Apply shaving foam to a plate in an even, thick layer.
2. Mix different shades of green paint or food coloring with a little water to make a rich solution.
3. Using a brush or pipette, drip paint onto the surface of the foam in a random order.
4. Now, using the same brush or stick, beautifully smear the paint over the surface so that it forms fancy zigzags, wavy lines, etc. This is the most creative stage of the whole work, which will bring pleasure to children.
5. Now take a sheet of paper and carefully apply it to the surface of the resulting patterned foam.
6. Place the sheet on the table. All you have to do is scrape off all the foam from the sheet of paper. For these purposes, you can use a piece of cardboard.
Simply amazing! Underneath the shaving foam you'll find stunning marble patterns. The paint has time to quickly absorb into the paper; you just need to let it dry for a few hours.
15. How to draw winter. How to paint winter with paints
Concluding our review article on winter drawings for children, we want to tell you about another interesting way how you can paint winter with paints with your child. To work, you will need any small balls and a plastic cup (or any other cylindrical object with a lid).

Place a piece of colored paper inside the glass. Dip the balls in white paint. Now put them in a glass, close the lid on top and shake well. As a result, you will end up with colored paper with white streaks. Similarly, make colored paper with white streaks of other colors. From these blanks, cut out the details of the applique on a winter theme.


Material prepared by: Anna Ponomarenko
Oksana Stol
Hello, dear friends and guests of my page!
I bring to your attention a photo report from classes on unconventional drawing on the theme "Winter"
"Penguins" - imprinted with vegetables (potatoes)
Means of expression: color, spot.
Materials: potatoes cut in half, saucer with gouache, thick paper.
Method of obtaining an image: a child dips a potato in a saucer of paint and makes an imprint on paper.
Potato signets - cut the potatoes in half, make a comfortable “handle” on the workpiece. For each child, two signets of different sizes.
We apply snow and snowdrifts to the pre-tinted sheets with a foam sponge. We make black prints, then white ones, then we draw all the other parts of the body, and finally we draw snow with cotton swabs.


If after the print there are still unpainted areas, paint over them with a brush.


We also drew, as last year, some works that children really like (but now with different children)
"Fairytale Tree" in mixed media: wood - blotography with a tube, snow - poked with a hard brush, snowflakes - with cotton swabs, owls - finger painting
Goal: to introduce children to a new drawing technique - tube blotography; develop imagination, imagination, interest in creative activities.


"Polar Owls"- foam sponge technique


"Owls"- palm painting

"Winter in the Village" with elements of unconventional drawing - cotton swabs.
Goal: to teach children to convey a picture of winter in the village in a drawing, to consolidate the ability to draw different houses and trees. Learn to draw using different techniques, using the classic technique - with a brush, drawing with cotton swabs - snow. Develop imaginative perception and imaginative ideas, creativity.


"Polar Bear and Northern Lights"- drawing with applique elements
Goal: To clarify and expand children’s knowledge about the natural phenomena of the Far North.
Learn to create an image of the northern lights using watercolors - using the “wet on wet” technique
Strengthen children's knowledge about climate features;
Develop creative imagination, fantasy, fine motor skills;
Continue teaching children to carefully cut out bears by first folding the sheet in half
To develop children's interest in natural phenomena


Publications on the topic:
Dear colleagues! Before we had time to celebrate summer, its golden mean arrived. Flower beds are fragrant with their beauty and at home.
Unconventional drawing - consultation Unconventional drawing is the art of depicting without being based on tradition. Drawing in unconventional ways, fascinating, mesmerizing.
Dear colleagues. Unconventional drawing leads to the development of imagination and creativity. Each technique is a small game.
Topic: "Chicken" Program content: Continue to introduce various methods of non-traditional drawing - finger painting. Encourage.
Drawing is one of the most favorite activities for children. There you can reflect everything - your mood, your impressions, desires, etc. And drawing.
“Reflection of trees in the river” (monotype) Purpose: to introduce children to an unconventional technique for depicting landscapes - monotype; show her.