Craft for a boy from dough. Hobby for beginner sculptors: beautiful crafts made from salt dough
Salted play dough is a safe material for children's crafts. You can use it to make cool Christmas tree decorations of any shape. Let's look at a few master classes prepared by designers.
Salt dough recipe
For dough crafts, take:
- 1 glass of salt;
- 1 cup flour;
- water;
- colored gouache.
This is the simplest salt dough recipe. To improve it, add 5 tablespoons of sunflower oil.
IDEA! The paint can be replaced with juice (cherry or beetroot). If a child eats a piece of dough while modeling, he will definitely not be poisoned. The dough can be colored at the end.
How to make dough at home? Step by step:
- Place all ingredients into a deep plate. First dry, then only water and oil.
- Mix everything so that the dough turns out like dumplings. It shouldn't be oak.
- To make the mixture faster, turn on the mixer.

IDEA! If the toys are small or you need to make small parts, make the dough separately with PVA or starch. There may be some glue left after wallpapering. Use it instead of PVA.


How to make crafts from salt dough with your own hands
Salt dough, the recipe for which will be easy to master even for children, is a very flexible material, but its composition is absolutely safe. Add food colors or even natural ones (fruit or vegetable juices) to it. Even if you leave your child alone to sculpt, nothing will happen to him.

Modeling tools:
- rolling pin;
- flat working surface;
- ball pen;
- paint brush;
- cup;
- threads;
- medium size needle;
- silicone baking molds;
- any stencils for patterns;
- paint (acrylic or gouache);
To prevent the gouache from cracking, add glue to it.


Cover the figure with paint and varnish

The dye is added not only at the stage of kneading the dough, but also during modeling. Simply divide the dough into several parts (1 part = 1 color), make a depression in the center and add dye. When sculpting, it will be distributed evenly throughout the piece.
 Using a regular brush you need to paint the indentations from the paw
 When the figurine is ready, coat it with varnish, so the paint will definitely not roll off and become lighter. The aerosol form will facilitate the coating process.

If the varnish is liquid, cover the toy in several layers. Cover thickly in one layer. It can also be matte.
IMPORTANT! If you dry the toy properly, you can do without varnish. It is needed if you are not entirely sure that you did everything correctly.

What could go wrong?
- Cracks or bubbles appeared after drying. This means you dried the figurine incorrectly. Most likely, the temperature is high with the oven door closed. Try sanding these areas with sandpaper.
- Cracks may also appear after painting. Let the craft dry completely and only then paint. Let the figurine dry naturally, sand the cracks and paint again.
- If any part of the figure breaks off, glue it with PVA.
- Store the figures in a dry place at normal room temperature. They can be put in any cardboard box, then nothing will happen to them for the next holiday.
Simple Christmas tree toys made from salt dough for beginners
Let's watch a few step-by-step master classes and figure out how to make simple but interesting Christmas tree toys from dough.

Idea 1. Gingerbread men
Try making gingerbread men with your kids. This will be a lot of fun. Do the most difficult stages of the work, and let them knead the dough themselves. Show what kind of face the little man will have, let them try to repeat it.


Idea 2. Flat colorful figures
 We will need: flour, salt, water - for the dough; blender; dyes for its color; molds in the form of circles and hearts; rolling pin; ribbons, twine or thread, a sharp object for making holes and decorating figures; baking parchment


Idea 3. Snowflakes with patterns
Find out how to save on holiday packaging and make it yourself in the article
What else can you make from salt dough to decorate a Christmas tree? Let's try to make snowflakes.
 Take the same composition for the test, acrylic paint in three colors (we have white, black and blue). Tools include a ballpoint pen, a stationery knife and a round object for squeezing. Markers will also come in handy

Idea 4. Shiny figures
The advantage of products made from salt dough is their weight - the toys are very light. The branches will not bend.


 You can make a lot of toys and decorate the Christmas tree with them. It will be very beautiful
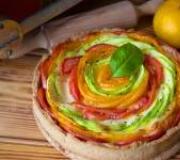
Option 5. Circles with flowers


Idea 6. Silver stars
 Let's try to make shiny stars for the Christmas tree


Idea 7. Name tags for gifts
Labels can be not only in the shape of hearts, flowers or rectangles. For a New Year's gift, try making a house or a snowflake.
IMPORTANT! Read the article on what to give to loved ones for New Year and Christmas 2018.
Idea 8. Lace plates Children are very interested in making three-dimensional figures. You can start with simple vegetables. Use faux thread to make segments on your pumpkin.


Modeling from salt dough is attractive for a preschooler, the material is pleasant to hold in hands, it is not dangerous, it is cheap, it perfectly develops fine motor skills, the child immediately sees the result of his work, a wide selection of techniques. Modeling from salt dough develops a child's creative abilities, allowing him to fantasize and come up with new images.
How to make salt dough
Take two cups of flour, one cup of fine salt, stir well, add 2/3 cup of water, 0.5 cup of PVA glue, a dessert spoon of vegetable oil, knead until elastic (like dumpling dough). Store in plastic wrap in the refrigerator (or in plastic containers with a lid).
How to color salt dough
1st method: To color, first evenly divide the ingredients of the future dough into bowls, add environmentally friendly dye (gouache, food coloring), mix with flour, and then add water.
2nd method: paint finished figures with gouache after they are completely dry.
Drying salt dough crafts
1st method: dry the salt dough at normal temperature or on a radiator.
2nd method: dry in the oven at a temperature of 60-80 degrees for an hour if the craft is voluminous.
Advice: It is recommended to sculpt the craft immediately on a stand, on which the child’s work will then dry; if drying is planned in the oven, then you can use small iron trays or cardboard wrapped in food foil as a stand.
Workplace equipment
1. Plastic containers with an easy-to-open lid, since the surface of the dough dries out in the air and becomes cracked. During operation, the required amount of dough of a certain color is taken from the container, the rest is stored under a closed lid.
2. A bowl containing a cloth soaked in vegetable oil, which can be used to lubricate your hands and wipe tools so that the dough does not stick to them. If vegetable oil is added to the dough, then, as a rule, you can do without an “oil” napkin. The second way to prevent the dough from sticking is to use flour on your hands, a rolling pin, or a board.
3. Board, small rolling pins (making plates), a body for a marker, felt-tip pen (rolling tape).
4. Stacks (available in a set with plasticine), you can use them to cut out shapes and apply relief to crafts.
5. Fabric with a pronounced texture - to give relief to the craft (guipure, crinkled fabrics).
6. A set of beautiful beads, buttons, bugles, braid for imprinting into the dough, as well as making voluminous decorations (do not dry the craft in the oven with decorations made of artificial materials for safety reasons).
7. Brush, water for gluing individual parts, as well as repairing broken crafts.
8. Material for making the frame: jars, boxes, foil that can be crumpled into a certain shape, coils of wire, etc.
Step-by-step master classes on making crafts from salt dough with preschoolers
|
Modeling from salt dough with children of primary preschool age. Master class with step-by-step photos Author: Komissarova Natalya Gennadievna, teacher at MBDOU No. 196, Izhevsk. Description: this master class is intended for children of primary preschool age, educators, additional education teachers, parents and other creative people. Purpose: this craft can be used to decorate a New Year tree and as a gift. Purpose: making a gift from salt dough “Mitten... |
|
Candlestick made of salt dough for children 3-4 years old. Step-by-step instructions with photos Author: Komissarova Natalya Gennadievna, teacher at MBDOU No. 196, Izhevsk. Description: this master class is intended for children of primary preschool age, educators, additional education teachers, parents and other creative people. Purpose: The candlestick can be used to decorate the interior and as a gift. Goal: making a souvenir from salt dough. Tasks: - consolidate skills... |
|
Salt dough pork. Step-by-step instructions with photos. Author: Natalya Valerievna Sorokina, additional education teacher, MBOUDO "DDT" Navashino, Nizhny Novgorod region Description: the master class is intended for children of senior preschool and primary school age, and can also be used in individual work with children with disabilities, for parents and teachers who are interested in creativity. Purpose: can be given as a gift in the form of a souvenir, used... |
|
Pig" - a symbol of 2019 with your own hands. Master class with step-by-step photosAuthor: Svetlana Petrovna Semenova, teacher of the Children's Preschool Educational Institution "Ladushki" Kindergarten Purpose of the work: the craft can be used as a gift or souvenir for the New Year. Description: the master class is intended for children of senior preschool and school age, for teachers of preschool institutions and additional education, for lovers of creativity. Do you hear the door creaking? The pig is standing at the door! Friendly everyone... |
|
Pig is a symbol of 2019 made from salt dough. A step-by-step master class with photo MK is intended for children with disabilities of III-IV types, but can be useful to all creative and gifted children and teachers. You can make a “pig” with a magnet and give it to your family as a gift, or you can thread a string and hang it on a Christmas tree. Goal: - development of creative imagination; - development of fine motor skills of the hands; - development of memory, attention and thinking; - development of the ability to work according to a template, from a photo. May the Pig bring you good luck, And provide... |
|
Do-it-yourself aquarium made from salt dough for children 6-7 years old, step by step with photos. This material is intended for children of senior preschool age, teachers, parents and creative people. Purpose: subject development environment of kindergarten, creation of a board game. Goal: Development of graphomotor skills. Objectives: - develop fine motor skills, creative imagination, fantasy; - arouse interest in working with salt dough; - developing skills in working with salt dough; - educate ac... |
|
Do-it-yourself piggy made from salt dough. The master class is designed for children 6-10 years old, kindergarten teachers, primary school teachers, parents, and creative people. Purpose: 2019 is the year of the earthen pig, this souvenir can be used all year round as a souvenir for acquaintances, friends, relatives. Purpose of the master class: To teach children how to make souvenirs from salt dough. Goal: To cultivate accuracy in work, attentiveness and love for arts and crafts, to develop... |
|
Flower on a stick made of salt dough. Master class with step-by-step photos for beginners Author: Komissarova Natalya Gennadievna, teacher at MBDOU No. 196, Izhevsk. Description: this master class is intended for children of primary preschool age, educators, additional education teachers, parents and other creative people. Purpose: A flower on a stick can be used to decorate the interior and as a gift. Goal: making a souvenir from salt dough. Tasks: - complete... |
|
Rowan from salt dough. Step-by-step master class for children 3-4 years old. Author: Komissarova Natalya Gennadievna, teacher at MBDOU No. 196, Izhevsk. Description: this master class is intended for children of primary preschool age, educators, additional education teachers, parents and other creative people. Goal: making a souvenir from salt dough. Objectives: - expand children’s understanding of the rowan berry. - strengthening the ability to roll out dough in a circular motion, tuck... |
|
DIY Easter souvenir made from salt dough. A step-by-step master class with photo MK will be useful for special education teachers, preschool teachers and parents. Goal: acquaintance with the Orthodox holiday of Easter and the traditions of the Russian people. Objectives: - development of fantasy and creative imagination; - development of fine motor skills and sensory perception; Progress of the lesson. (Teacher's story with slide show). The Holy Resurrection of Christ is the most important Christian holiday. On this day, all Orthodox... |
|
Duckling made from salt dough with step-by-step photos Author: Chizh Lyudmila Adverikovna, teacher at GBOU School No. 1373 ODO 4 in Moscow. Description: the master class is intended for children of senior preschool age, additional education teachers, and educators. Goal: making a duckling from salt dough. Objectives: 1. introduce children to salt dough as a material for work; 2. cultivate children's creativity; 3. develop fine motor skills of the hands; 4. formation of creative activity, artistic... |
|
Didactic game "Beads as a gift." Master class with step-by-step photos. Author: Elena Vladimirovna Maksimova, teacher, MBDOU “Kindergarten No. 321” Samara. Description: I bring to your attention a master class on making a didactic game. This material is designed for preschool children, teachers, and parents. The beads are made from salt dough. Goal: development of general and fine motor skills of the hands. Objectives: - developing the ability to combine beads by color; - development of attention, perseverance... |
Today it is very useful to work with children and teach them something new. Caring mothers and fathers draw with their children, make interesting crafts from cardboard and plasticine, and also offer their children more interesting activities. If you and your child want to spend your free time with interest, then invite him to make crafts from salt dough with his own hands. And our article will help you with this. Here you will find a description and photo step by step for children.

Preparing the dough
Before talking about crafts made from puff pastry, you need to prepare the material for modeling. Therefore, first of all, it’s worth telling you the recipe for puff pastry for crafts. It is important to note that the dough for crafts is easy to make yourself. To prepare it you will need: fine salt, flour, water, citric acid, vegetable oil.
- To obtain the material, you should mix: a glass of flour with half a glass of salt. You need to add a couple of teaspoons of citric acid here.
- All ingredients are poured into a saucepan and a tablespoon of vegetable oil is added there.
- The mixture is placed on medium heat. Water must be added gradually. Also, do not forget to stir the whole mass. You should spend about half a glass of water.
- The mass should become one lump and fall away from the walls. At this stage, the pan needs to be removed from the heat.
- Prepare a board and lightly dust it with flour. Then we take the mass out of the pan and place it on this board. After that, you just need to knead the dough with your hands.
On a note! In order to make colored dough, dry food coloring is first diluted in water. You can also add gouache to the finished dough and knead everything thoroughly.
For the work to go well, you need to store the dough correctly. After production, it is placed in a separate bag. You can also put it in a container or wrap it in cling film.
On a note! If the dough is wet, then flour is added to it. If, on the contrary, it is dry, then add a few drops of water to it.
As you can see, the process of creating dough crafts is quite serious. And here everything depends on the quality of the material. Some tips given here below will allow you to prepare high-quality material from which you can make excellent crafts.
- So, if you make the dough a more liquid consistency, then it can be spread like butter on the base of the craft. For example, this way you can imitate chocolate icing for a cake.
- If you made food, it should be the same size as a plastic game plate. In general, it should fit in them.
- Use a brush to hold the pieces of puff pastry together.
- If you are making food for dolls, then the products must have exactly the same color as the original.
- A puff pastry craft can be coated with clear varnish. As a result of this action, the craft will not darken in the future.
How to dry figurines.
Crafts made from puff pastry can be dried in two ways.
Use air. In this case, the product is laid on a flat and smooth surface. It will take several days to dry. After the craft has dried on one side, turn it over and let the other side dry. So the craft should dry on all sides.
Use oven. In this situation, the oven warms up thoroughly. Baking paper is placed on a baking sheet, and the craft itself is placed on it. The baking tray with the crafts is placed in the oven and then it is turned off. There is no need to open the oven until the toys are dry. Crafts can be baked at a temperature of +100 degrees. But you need to watch them so that they don’t burn.
On a note! The described methods of drying crafts can be combined. For example, you can dry it in the oven, and then put the craft at room temperature to dry. Then you can put it in the oven again and return to room temperature.
If the craft contains beads and seed beads, then it should not be dried in the oven.
Crafts from puff pastry for the New Year
Well, the time has come to offer you crafts made from puff pastry. In addition to the description, you can find their photos in this article. So, you can make toys for the New Year from puff pastry.
Progress:
- Dough is prepared for modeling. You can use dough of different colors, or use uncolored dough.
- The dough is rolled out into a flat cake and figures are squeezed out of it using a cookie cutter.
- In order for the toy to be hung from the Christmas tree, a hole must be made using a cocktail straw.
- If you used colored dough, you can decorate it the way your child likes. You can stick puff pastry balls of different colors and make a garland. You can also decorate the toy with white snow.
- If unpainted dough was used, it is first dried and then painted.
- Be sure to dry the dough toy (you can do this in the oven), and then thread a string through the hole.

You can make many holes in completely different shaped figures. After which, the product must be dried and hung.


You can stick beads and beads into the figures. These crafts should be dried at room temperature. 
To decorate puff pastry figures, you can use beautiful ropes or ribbons.

To make products for decorating a Christmas tree made from puff pastry look unusual and bright, after drying, you need to apply PVA glue to them and sprinkle glitter on top. 
Puff pastry makes very beautiful snowflakes. To create them, you will need uncolored dough, which, after drying, is colored with a permanent marker. 
A mitten-shaped figure is cut out of a piece of puff pastry. A homemade button is made from the dough itself, which is attached to the mitten. Also attach a colored ribbon to the mitten. Place the toy in the oven to dry, and then attach a string to it. 
You can imprint your baby's hand on a piece of dough. Then paint Santa Claus in the palm of your hand.

If you don't tinker a lot, you can make another Santa Claus figurine. To create a beard in this case, use a garlic press.

Make these toys from brown dough. Don't forget to make a hole for the ribbon.

How to make a New Year's candle from puff pastry.
To create a New Year's candle, you should prepare: dough for working in various shades, a cylinder of paper towels, red and yellow napkins.
Progress:
- So, the child independently rolls sausages from the dough.
- These sausages are stuck around a cardboard cylinder.
- After which, the base is decorated with balls of different colors.
- You can also cover the cylinder with one color and then decorate it as you wish.
- To simulate a candle flame, use yellow and red napkins.


Making a Christmas tree from dough.
In this article we describe crafts made from puff pastry. Here you can find their creation step by step.

- So, in order to make a Christmas tree, you must first make a blank. In this case, use milk or juice packaging.
- The top of the package is first cut off. Then the box is cut on the sides and opened.
- All excess part is cut off from the rectangles of the box. Only what resembles isosceles triangles should remain. After which the cardboard base should be glued together.
- At the next stage, the child can start decorating it. At the beginning, the workpiece is covered with green dough. Then you can decorate the tree with dough balls and other New Year's decorations that will be created from the dough itself.

Easter crafts made from puff pastry
As mentioned above, completely different products can be made from puff pastry. Even for Easter you can make a lot of interesting things.
For example, you can make Easter eggs and even an Easter bunny.

An excellent option for crafts made from dough is a stand for Easter eggs, which can be a gift or decor for an Easter feast. 
How to make an Easter egg from puff pastry.
Even the smallest child can make this craft.
So, a piece of dough is taken, from which a figurine resembling an egg is molded.
After which, this figurine is decorated according to your wishes. It is important to note that in this case you can fantasize. All sorts of experiments are also welcome.

We make a stand for eggs from dough.
The stand, like other crafts, is very easy to make. You will need: a cardboard cylinder, paint and the dough itself.
Progress:
- This work uses uncolored dough. It is attached to a circle of cardboard, which is cut out from under the cylinder.
- For this element it is necessary to mold: a head, a tail and other parts.
- The stand is covered with pieces of dough on all sides.
- Then start decorating the crafts. Use your preferences and rely on your imagination.
- It is recommended to coat the finished craft with colorless varnish.


Crafts from puff pastry for February 14
Of course, everyone associates the Valentine's Day holiday with a heart. Therefore, you can make many different and cute hearts from puff pastry.


If you have patience, you can decorate the craft with a rose.

You can also make a funny heart keychain that has legs.

You can also make heart couples from the dough very quickly and easily.

If you make a huge number of dough hearts, you can form them into a garland, which will be an excellent decoration for the room.

Making a photo frame from dough.
We will have a photo frame in the shape of a heart. The frame can be made bright and decorated in a romantic style. You must insert a piece of cardboard on the back side.

With a little work, you can end up with a cute love fish.

Crafts for March 8
Creating crafts from puff pastry is incredibly enjoyable. A video and some tips can help you create them.
For mothers, sisters, grandmothers and other female acquaintances, you can make keychains in the shape of flowers. You can use both colored and uncolored dough.

You can make a cute candlestick from the dough as a gift.

You can make medals with your children. Let them choose their own decoration options.

You and your child can make figure eights from the dough and decorate them the way you want.

You can make a pendant from the dough and decorate it with flowers and leaves. When the craft is dry, you need to paint it.

Crafts for February 23
If you take cardboard, a piece of puff pastry and your imagination, you can get a wonderful craft.

You can make a wonderful medal for your dad or grandfather.

How to make an airplane from dough.
The next wonderful gift is very simple to make.

Progress:
- First, the base for the figurine is rolled up, which will serve as the body.
- One side of the base is folded over. This place will be the tail of the craft. It is also worth sculpting other parts that are attached to the craft.
- At the next stage, the fender liners and wheels are rolled off.
- Attach all parts to the body. But before joining, coat the parts with water using a brush.
- The wings are attached to the plane using toothpicks.
- A propeller is also made using a toothpick and puff pastry.
- Now the craft should dry at room temperature. After which you can paint it.
Crafts from dough for Maslenitsa
Maslenitsa is considered an ancient holiday, which has its own traditions and symbols. Crafts made from dough for Maslenitsa are varied. You have a choice.
The smallest children can make a sun.

And older kids can try to make a more complicated version.

A child can make pancakes from puff pastry.

You can also make funny keychains.

Other puff pastry crafts
Beads.
Our article contains crafts made from puff pastry. Here is a photo with instructions for making them. Making such crafts is very pleasant and this activity can be a real pleasure.
Progress:
- To create beads you will need multi-colored dough.
- Roll the dough into balls. They must be the same size. Pierce the center of the ball with a toothpick.
- They should now dry at room temperature. They must be turned over during the drying process.
- When the balls are dry, remove the toothpick.
- The resulting beads must be put on a ribbon or lace.

Puff pastry star.
- First, roll out a piece of dough colored in any color into a layer. Its thickness should be 1 cm.
- Using a cookie cutter, cut out a star.
- The corners are smeared with a wet finger using gentle movements.
- Now all that remains is to decorate the figurine.

Dough caterpillar.
- Take green dough and roll it into a sausage.
- Cut it into equal parts and roll it into balls of equal size.
- Blind the balls together, and moisten the joint with water.
- Make a face for the caterpillar.
- All that remains is to pierce the place where the loop will be attached with a needle.

Dough apple.
- Making an apple is very simple. Take a ball of dough and roll it out into the shape of half an apple. In order to get an even cut, you need to attach the craft to a flat surface.
- Add a strip of white dough to the apple. This is the middle of the apple.
- Roll out the seeds and tail from the brown dough. Make a leaf out of green.
- Now all that remains is to assemble the figurine and dry it thoroughly.

How to make a hedgehog from puff pastry?
- To create this craft you will need unpainted dough. The head and body of a hedgehog are formed from it.
- It is also worth making a nose and eyes. In this case, a pot of pepper or black dough will do.
- Using nail scissors, cut the dough. The result should be needles. Slightly lift them up. The second row is cut in a checkerboard pattern. This must be done to the end.
Animal creation workshops
Our huge article is a treasure trove of useful information. If you read ours carefully, you realized that you can make anything from puff pastry. And the following master classes should clearly explain to you the process of creating other crafts.


Finally
Be sure to do something interesting with your child. Remember that such an activity can bring you positive emotions and joy.
The origins of dough modeling go back a long way. There is a legend that it was invented by Slavic cooks who were bored and had fun by creating interesting, edible figures from dough. In addition, this material is one of the cheapest and available to everyone. That’s why this type of creativity is popular in our time; everyone has flour, water and salt in their home. So, here are some interesting DIY salt dough crafts, with photos and step-by-step instructions.
Crafts made from salt dough
If you decide to touch this art, and testoplasty really is such, you need to learn in detail about the material from which you will sculpt. For beginners who like to make dough, it is worth noting that the recipe is very simple.
- Flour - one glass
- Salt - half a glass
- Water – 125 ml
It is worth remembering that salt is heavier than flour, so you need to use half as much of it!
To sculpt thin relief figures, you need to add PVA glue, or starch, or wallpaper glue to the dough. Optionally, one tablespoon at a time, pre-mix wallpaper glue with water. To make the kneading process easier, use a mixer; it will make it better and make it easier to work with your hands.
For modeling from colored dough, food coloring is used; if there is none, you can use regular paint. If you want a rich chocolate color, add a small amount of cocoa. Remember that when the dough dries, it loses its color saturation. Therefore, it is better to transfer the dye than not to transfer it. Coating the finished dough craft with varnish will make it brighter and more practical.
Advantages
- It is one of the cheapest and environmentally friendly materials.
- Doesn't get your hands dirty (although this is a relative statement)
- It is easy to work with, very flexible and allows you to make parts of any complexity.
"Piglet"
Let's look at the easiest way to sculpt.
To work you need:
- Salty dough
- Brush
- Stack
- Paints
- Toothpicks
How to do it
- Roll the dough into a ball and give it an oval shape, this will be the body of the pig.
- Make a second ball (head) and place it on the body using a toothpick.
- Make a small heel for the pig, a flattened ball with holes, you can make holes with the back of a pencil.
- Making ears is also not difficult; moisten the triangles with water and carefully attach them to the head.
- Do the legs like this, roll two sausages, make a small cut at one end, attach the legs to the body with the other end.
- Our piglet will sit in a basin, to do this, roll out a ball of dough and give it the appearance of a basin.
- Place the piglet in a basin and paint your craft.
- Let your masterpiece dry.
Master class on how to make a pig from dough step by step video instructions
Little secrets
Everyone has a garlic squeezer in their house. It can be used in work by passing the dough through it to create long curls. They can be used in the form of hair, wool for your crafts. Having a tea sieve at home will produce thinner vermicelli, for finer details of the craft.
A comb can also be used when sculpting; it will perfectly imprint a ribbed pattern on it.
"Candlestick"
Ingredients
- puff pastry
- eggs (for brushing)
- prunes
- chocolate
Cooking method
- Roll out the dough on the table. The thickness should not exceed 0.5 cm. Using a glass, cut out circles.
- Place in the middle of the prepared circles
filling. It can be prunes, dried apricots, jam, the main thing is that the filling is not liquid. - From each circle we form a star (gathering it up like a bag)
- Cut the edges with pastry scissors. And we bend each strip, turning them to the center.
- We form a flower and coat it with egg.
- Bake in the oven at 180 degrees.
- Decorating our flowers. You can put a little jam in the middle.
- We take a flat dish and, using melted chocolate, draw a stem and leaves for our delicious craft. We distribute the finished flowers in the right places on the plate and our unusual flower is ready.
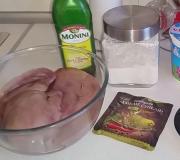
"Delicious squirrel"
To prepare this craft you need to take:

- 500 g flour
- 40 g yeast
- 100 g butter
- 100 g granulated sugar
- 250 ml water (milk)
- 1 yolk
- 60 pcs. nuts almonds peeled
- cardboard template
Cooking method
- Dissolve the yeast in warm water and add sugar and mix everything.
- Knead the dough. Mix the flour with the butter, add the prepared yeast mixture to it. Place in a warm place.
- After 45 minutes, divide the dough into lumps and roll each one 1 cm thick.
- You need to put ready-made templates with the image of a squirrel on the dough and use a sharp knife to cut out the figure along the contour.
- Beat the yolk and coat the squirrel with a brush.
- Decorate the figurine with almonds, placing them on the tail. We make the eyes using raisins.
- Place the baked goods on a baking sheet and bake at 190 degrees for about half an hour.
An article for those who like to be creative with their children. It contains recipes for salted play dough and many ideas for crafts.
Modeling is a fun and useful activity at the same time. By making figurines, paintings, and compositions from plastic material, the child develops imagination, logical thinking, fine motor skills, and learns perseverance.
Of course, mom can just buy plasticine or some branded modeling compound for the baby. But how high quality and environmentally friendly are these materials? As an alternative, you can use salt dough made with your own hands from inexpensive natural products.
How to make dough for crafts?
Environmental friendliness is not the only advantage of salt dough over plasticine or play-doh.
- The recipe according to which the plastic mass is prepared does not cause any difficulties for absolutely anyone. If a child asks to sculpt while at the dacha, for example, and there is no plasticine at hand, his wish can be fulfilled in half an hour
- Materials for modeling in the store are quite expensive. Ingredients for salt dough will cost much less
- Salted dough, even the one to which paint has been added, does not stain your hands or stick to your fingers. It's soft and pliable
- Crafts made from dough can be dried using a special technology. Then they will be stored for a long time and serve as a souvenir, Christmas tree decoration, or children's toy.
IMPORTANT: Even in ancient times, people mastered modeling from dough with salt. A whole art arose, which was called testoplasty. Women and children made very elegant crafts, painted them by hand and used them as decorations for their homes. Figurines symbolizing various benefits were considered expensive gifts, given only to close people. Our ancestors didn’t bother with the salt dough recipe, making the material only from water, flour and salt
Today, salt dough modeling, which has suddenly returned to popularity, is called bioceramics. The recipes for the dough itself are being improved. Unfortunately, some of them involve the use of wallpaper glue, synthetic paints, etc. The concept of absolute naturalness is lost.

Salt play dough has three main components. This:
Additionally widely used:
- gelatin
- starch
- vegetable oil
- natural dyes (beet juice, green beans, etc.)
- food colorings
- gouache or watercolor paints
- PVA glue
- wallpaper glue
Glue or starch makes ready-made dried dough figures more durable, but it is not advisable to add them to material intended for children under 5 years of age. But dough with butter can be greasy and stain your clothes.
IMPORTANT: You can color both the dough itself while it is being prepared and the finished figurine, then creativity will be doubly more interesting and useful

RECIPE No. 1. Simple dough
You need: wheat flour – 1 cup, extra salt – 1 cup, cold water – 0.5 cups
First of all, the dry ingredients, flour and salt will be combined. If the dough is colored with food coloring or paint, dissolve it in water. Gradually adding colored water to flour and salt, knead a fairly stiff dough, but such that it does not stick to your hands and does not crumble into crumbs.
IMPORTANT: To check whether the mass is suitable for modeling, roll out a smooth ball and press a hole in the middle of it with your finger. The dough should neither spread nor immediately return to shape. The edges of the recess should remain smooth
RECIPE No. 2. Dough with starch
You need: wheat flour - 0.5 cups, starch - 0.5 cups, extra salt - 1 cup, water - 0.5 cups.
Just as in the first case, first mix flour, salt and starch. Next, clean or colored cold water is gradually added. Modeling mass that contains starch becomes more elastic.
In addition to the saltiest modeling dough, you need to prepare:
- dostochku
- knives - stacks
- molds (such, for example, come complete with play-doh dough)
- beads, sequins, buttons, other improvised materials for decorating crafts
IMPORTANT: The flour and salt dough can be used several times in a row. To prevent it from drying out, place the material in a plastic bag or wrap it in cling film, then close it in an airtight container and put it in the refrigerator.
How to dry dough crafts?
If the dough crafts are small, they will dry out on their own. To prevent cracks from appearing on their surface, they are removed from direct sunlight.

You can also dry the dough figures in the oven at a minimum temperature and always keep the door ajar. Dry the dough in the oven for 3 – 6 hours, depending on the size of the craft. It goes into the oven three times for 1 - 2 hours, with a short break between each time.
Making salt dough with children
You can offer salt dough to your baby for the first time at the age of 1 year. This is not chemical plasticine or play-doh; mom doesn’t have to worry if the baby tastes the material or swallows it. For such small “homemade products”, the dough is prepared without synthetic dyes.

IMPORTANT: Play dough is very salty. As a rule, it is enough for a child to lick it to understand that it is not edible. But if the baby still ate a piece, you just need to give him plenty of drink, and if the mother is still worried, a bag of Smecta
Full-fledged developmental modeling classes are possible with children from 2 years old. From rolling out circles and balls from salt dough, they will smoothly move into real creativity, in which kids will be able to make flowers, animals, favorite fairy-tale and cartoon characters, etc.

The finished result of dough modeling is as important for kids as the process itself. The finished craft evokes strong positive emotions in them.
Crafts from dough for children in kindergarten
There is no need to think that salt dough is a “handicraft” material exclusively for home use. Kindergarten teachers have long taken note of recipes for plastic materials and are happy to replace plasticine with them in developmental classes with students.

So, in nurseries they often make casts of baby hands, circles, mushrooms, “sausages”, snails, etc. In older groups, children are already working on themed crafts, for example, for the holidays.
Crafts from dough for kids. Step-by-step dough crafts
When making dough with kids, you don’t need to come up with ideas for crafts: usually, they are born by themselves the moment your fingers touch the plastic material. Children love to sculpt:
- geometric figures
- flowers and trees
- fruits and vegetables
- animals
- dinosaurs
- little men
- fairy-tale creatures
- cartoon characters

Adults, mastering testoplasty, can get ideas on the Internet; there are many step-by-step master classes.
IMPORTANT: Good guides for both children and beginning adults are the books “Salt Dough Step by Step” by V. Khomenko and “Miracles from Salt Dough” by A. Firsova
Templates for crafts made from dough. Children's crafts made from salt dough
Crafts made from salt dough can be very beautiful. Children's crafts have their own touching charm. Adults are like pottery.
To get inspired for creativity, you can view a selection of thematic photos with crafts made from salt dough.
Panels and pictures made from salt dough
Such works of bioceramic art can be hung on the wall or placed in a prominent place. Photo frames made from salt dough are also very beautiful.


New Year's crafts made from salt dough
For the New Year, you can make not only Christmas tree decorations from dough, but also gifts - souvenirs for friends in the form of the symbol of the year. In 2016 this is a funny monkey.


Crafts made from salt dough heart
The heart is a symbol of Valentine's Day. Made with your own hands from flour, salt, water and, of course, love, it will turn into a very valuable gift.
A cute angel made from salt dough also looks very cute.


Aircraft craft made from salt dough


Crafts from dough for March 8th. We make flowers from salt dough. Craft roses from dough
Any mother will be touched by a craft given to her by her beloved child for the holiday of March 8th. Most often these are flowers, bouquets, floral arrangements. Roses made from dough will never wither.


Magnificent basket with flowers.
Crafts from dough for Maslenitsa. Easter crafts made from salt dough


Easter crafts made from salt dough will add a special flavor to the bright holiday
Animal crafts made from salt dough
Together with your baby, you can fashion a whole zoo out of salt dough!