Stars in gouache. How to paint space with watercolors: a step-by-step master class for beginners
Well.. While I’m loading the movie, I’m doing a lesson on drawing space.. It might come in handy.
How to draw space with a pencil step by step
Step one.
Draw a round shape for the planet and the outline of the landscape.
Step two.
Let's correct the contours of the planet and its satellite. In the foreground we draw two men, these are astronauts sent to the moon.

Step three.
Let's add some touches.

Step four.
Let's draw a starry sky. Or more precisely, it is outer space. In the middle of the lunar landscape we will draw several craters.

Step five.
All that's left to do is add some shadows. In the end it turned out like this space picture:

How to draw the Earth with a pencil step by step
Step one. Drawing a circle by hand is very difficult. First we need two squares, divided in half, so that we can fit the colo into them. Of course, you can take a compass and draw a circle. But this is not a royal matter.  Step two. As mentioned above, we make the outline of our planet, draw four arcs at the corners of the square.
  Step three. Now it will be easier to draw an even circle. We combine the arcs so that everything turns out as clear as possible.
  Step four. Now we sketch all the continents, oceans, islands and peninsulas on our ball. Anything that will fit and be noticeable.
  Step five. We remove the auxiliary lines. We stick dots around the planet - the image of distant stars, move the pencil, depict space so that the planet does not look lonely.
How to draw the planets of the solar system with a pencil
Step one
Drawing the orbits of the planets. Their shape is an ellipse, close to a circle. But, if we look from one point, then visually we see not circles, but arcs, parts of ellipses. Such as in the picture. On the lines we outline the positions of the planets.

Step two
We draw circles - planets. We start with small Mercury, then larger Venus and Earth, again a small circle is Mars and further, as in the picture. In the lower left corner we will show the edge of the Sun.

Step three
Let's erase the auxiliary lines - the axes of the circles. Let's make the orbits brighter.

Step four
Let's add other celestial bodies: comets, asteroids. Let's draw “rings” to the large planets.

Step five
Let's do the shading. With its help we must turn our circles into a sphere. We remember that we have the Sun in the center, and light falls from its side. But the opposite side of the planet will be darkened. The result should be something like this:

How to draw an astronaut with a pencil step by step
There are four steps ahead.
Step one.
At the top of the sheet we will place a large round head. She's big because she's wearing a helmet. Let's draw two curved lines down - this is the outline of the body. We will draw an astronaut in zero gravity. And this immediately sets his position. Let's draw the contours of the arms and legs. The spacesuit has a belt. Let's outline the backpack behind our shoulders.

Step two.
We begin to draw out the details: the helmet, fingers, all sorts of bells and whistles on the “suit”. Moreover, all the elements are quite large.

Step three.
On the helmet we will outline an opening for the eyes and make it three-dimensional. Let's start drawing shoes. Let's show a pocket-bag on the belt. Look carefully at the picture and fill in what is missing on your sheet. Rivets, bends on the fingers, etc.

Step four.
We will show horizontal shading on the belts. Let's draw the shoes: the pattern on the sole, the clasp. The astronaut wears a small electronic device on his hip. Now let's outline the main elements of our drawing. Almost done. You can use shading to “revive” our hero, or add color using paints!

How to draw a space rocket with a pencil step by step
Step one. Our rocket is not just some kind of device with an engine, but an entire spaceship. We draw two oval figures - this is the hull of the ship. Below we will notice one wing of the rocket, and behind it is the tail.  Step two. Connecting the ovals. The structure of the rocket and its structural parts have a complex shape, which makes no sense to describe. Therefore, try to repeat it as you see in the picture, or you can come up with your own rocket.
 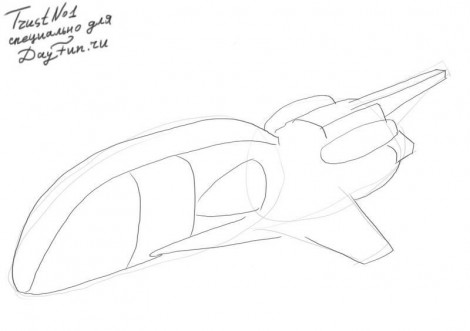 Step three. The ship should have many different parts on the hull, plates, guns, portholes.
  Step four.
  Step five.
How to draw a lunar rover with a pencil step by step
Step one. Let's divide the device into structural parts, depicting them on paper in the form of rectangles.  Step two. Let's sketch a sketch of an astronaut sitting in a car.
  Step three. Add a small antenna in front of the vehicle and outline the person behind the wheel in more detail.
  Step four. Let's remove the auxiliary lines and outline the contours more clearly.
  Step five. To show the effect of movement, we will make shadows under it, and also add shading to the wheels, the astronaut and other parts. Here:
How to draw a spaceship with a pencil step by step
Step one. We sketch a template with geometric shapes for the ship, display the hull and places for the engines. 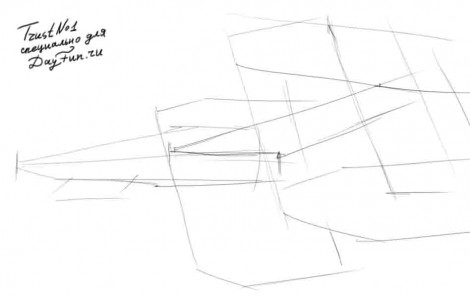 Step two. Let's draw the jet turbines, adjust the lines of the hull a little and add a small cannon underneath it.
  Step three. You need to highlight the borders with a pencil with a thicker line, add a lot of details to the wing, outline them, and also add number 09 for appearance.
  Step four. With light movements we will shade the entire area of the ship horizontally, and completely shade out the windows, turbine outlets and the cannon.
How to draw the moon with a pencil step by step
Step one. Let's mark the location of the moon on paper using a square.  Step two. Let's draw a circle, preferably an even one. Although the surface of the moon is not smooth, it will appear different from afar.
  Step three. Let's add craters, mountains and depressions to the surface.
  Step four. Let's add some shading.
The theme of space is an endless field for creativity; each artist will be able to find his own plot and create a unique cosmic landscape with bright lights, distant stars, mysterious planets and dangerous comets. You can draw space using various materials, but a drawing made with paints will look most impressive and vibrant.

Necessary materials:
- half of whatman paper;
- watercolor paints;
- white gouache;
- brushes of different sizes;
- a glass of water;
- a simple pencil;
- eraser;
- Toothbrush.
Manufacturing:
To make the drawing unusual, space can be depicted in a circle. To do this, in the center of whatman paper we draw a circle of the required size according to a pre-prepared template. Then moisten the surface of the circle with water using a thick brush - this will allow you to get smooth streaks of watercolor paint. We paint the center of the circle with light shades: yellow, orange, lilac, blue.

Now we mix two shades of blue on the palette: mix one with purple paint, the other with black. Apply the resulting colors to the drawing in small and random strokes. In this case, the brush should be washed after each shade. It is necessary to draw the image from the edges of the circle, gradually approaching the center of the illustration. Try not to apply dark colors over light colors, as it will be impossible to return the original version.

When the circle is completely filled in, you can begin to draw the details of the cosmic landscape. In the center of the circle, where the light tones of the picture are outlined, apply red and yellow watercolors with a thin brush.

All that remains is to complete the picture with many bright stars. To do this, apply white gouache to a toothbrush and, bending the edges of the bristles, spray the paint onto the image.

If you wish, you can draw several passing comets and a couple of small planets.
How to draw space with gouache

Necessary materials:
- hoop with thick paper;
- gouache;
- brushes of different sizes;
- white cardboard cutouts in the form of beautiful geometric patterns;
- beautiful photo card;
- colored cardboard;
- printed paper;
- white acrylic paint.
Manufacturing:
We moisten the blank in the form of a hoop with thick paper generously with water. Then use diluted gouache paints to create a blue-violet background. When the drawing is dry, use a thin brush to apply white dots with acrylic paint, which will imitate shining stars.

We complement the cosmic landscape with geometric shapes - constellations, made using a pre-prepared template, a thin brush and white paint. We cut out various shapes from colored cardboard and printed paper and create a beautiful composition from them, in the center of which there will be a successful photograph. Glue the resulting composition to the image.

The finished drawing will be an excellent option for a gift or an original decoration for your home interior.
Video on the topic
Drawing on the theme “Space” is an endless field for creative experiments. When depicting the Universe “on canvas,” a small or adult artist makes individual decisions: what paper to use, what colors to choose, how to design the composition and how to complement it. Depending on the choice of materials and execution technique, the design can be more vivid or less pronounced, rich in details or laconic and abstract. Space with planets, stars and a satellite, drawn in pencil or gouache, cannot be compared with watercolor in terms of realism. A small galaxy created with a sponge and acrylic paint will become the greatest pride of a novice artist or talented child. And if you have never had to do this kind of creativity before, don’t be upset. We will tell and show how to draw space in step-by-step master classes with photos and videos.
Drawings with colored pencils or paints on the theme “Space” - step-by-step master class for children

Children's drawings with paints or pencils on the theme “Space” are an excellent way of self-realization for the little ones. By depicting the cosmic abyss, colorful planets and fiery comets, children show their imagination, discover new talents, and show their individuality. And if several different techniques are used in a master class on creating illustrations, the process immediately becomes much more interesting, entertaining and educational.
Necessary materials for children's drawing with pencil and paints on the theme “Space”
- thick white paper
- black Whatman paper
- compass (or round objects of different diameters - lids, saucers, glasses)
- pencil
- gouache paints (including white)
- brushes of different thicknesses
- stationery scissors
- PVA glue
A step-by-step master class for children on creating a bright drawing on the theme “Space”
- Place a thick white sheet on the work surface. Using round objects of different diameters and an ordinary pencil, draw nine circles on paper.

- Depending on the diameter, the circle will be one or another planet. For example, the largest figure is Jupiter, and the smallest is Mercury.

- Using gouache paints, apply characteristic colors to the circles. You can look at the real colors of the planets in a children's encyclopedia, or you can create unusual fantasy planets to suit your taste.

- When the paint is completely dry, cut out the resulting shapes using sharp scissors along the contour.

- On a black piece of paper (you can use half) leave splashes of white gouache paint. To do this, take a little gouache on your brush and wave it over the paper several times.

- Plan the location of your planets "in space". Place them carefully on whatman paper and take a closer look. If you like the composition, proceed to the next stage.

- Using office glue or PVA, secure all the elements in place.

- Press each planet firmly with the palm of your hand or a thick textbook to ensure the pieces stick firmly. Do not overdo it with glue so that excess mass does not leak out to the sides. On a black background, the spots will be especially noticeable.

- After the glue has completely dried, remove the textbook and evaluate the result. Drawing with colored pencils or paints on the theme “Space” according to the step-by-step master class for children is completely ready! Photo 11
How to paint space with watercolors - an unusual idea for beginners

Using watercolor paints to create a “Space” drawing is much simpler than it seems at first glance. On a wet basis, the colors independently mix into bizarre galactic patterns, realistically displaying wondrous nebula and fine stardust. Even a child can cope with such a simple art technique. And for adults, we offer a more complicated option for beginning artists - an unusual idea to paint space with watercolors in a geometric shape.
Necessary materials for painting “Space” in watercolor for beginners
- sheet of thick white paper
- water and brushes of different sizes
- watercolor paints
- acrylic paints (black and white)
- salt
- ruler
- protractor
- sharpened pencil
- masking fluid for watercolors (Art Masking fluid)

How to paint space in watercolor in an unusual way - step-by-step instructions
- Take the “pacific” as the basis for the image - a sign of peace and love. Using a template from the Internet, transfer the outline onto thick white paper. You can also draw the drawing yourself using a ruler and compass.

- To prevent watercolor stains from getting into restricted areas, use a special masking agent. At the last stage of preparing the drawing, it is easy to remove it from the white area.

- Fill in the sign with watercolor masking without going beyond the outline. Wait until completely dry.

- Thoroughly wet the areas between the axes of the sign with clean water. This way the paint will form more realistic “cosmic” stains.

- Apply a drop of blue watercolor to one of the wet areas. Don't make too harsh strokes; let the paint spread on its own.

- Add black watercolor or ink to the blue tones to create a natural galaxy effect.

- Thus, fill all the free areas with colorful stains. When the watercolor has dried a little, add a yellow glow and purple reflections.

- Don't be afraid to protrude into the white areas of the sign. When you're done, you can clean them.

- Sprinkle the still wet picture with coarse salt. Sprinkle the resulting space with small specks of white acrylic paint.

- When the image is completely dry, sketch out the outlines of the marvelous space town with a pencil. Using a thin brush and white paint, draw all the lines.

- As a final step, remove the thin film of watercolor masking from the white areas of the sign. The contours will become smooth and clear, and the fields will become snow-white.

- Now you know how to paint space in watercolor - an unusual idea for beginners will allow you to create a beautiful panel for your home or a bright postcard for a loved one with your own hands. Photo25
How to draw the perfect cosmos with stars, satellites and planets with a sponge on home ceramics

Most often, space is painted with watercolors - quickly, conveniently, and practically. But what if you want to cover a household item that is completely unsuitable for watercolor with a fashionable galactic image? After all, ceramics, wood and other popular materials absorb watery paint, leaving only faded shades on the surface. In this case, it is better to use pigment ink or acrylic paints in combination with a soft sponge or foam sponge. This way the image will be successfully fixed and will retain its brightness and clarity for a long time.
To learn how to quickly draw space with planets and stars with a sponge and acrylic paint on ceramics, see our next master class with photos.
Necessary materials for the drawing “Space with stars and planets” on home ceramics
- old plain ceramic dishes
- acrylic paints
- spray with water
- sponges or sponges of different sizes
- synthetic brush
- Matt lacquer

How to paint space with stars on ceramics with a sponge and acrylic paints

Another interesting and original option on how to paint space with paints

Watercolor images of space are good in themselves. They seem to be imbued with a special atmosphere of depth and mystery. But even such seemingly extraordinary drawings can be made even more entertaining. For example, combining a space background with a city panorama. You will learn how to paint space with paints for such an original and unusual option in our next step-by-step master class.
Necessary materials for the original painting “Space” with paints
- thick landscape paper or watercolor paper
- watercolor paints
- masking fluid for watercolors
- white acrylic paint
- medical alcohol
- salt
- pencil and ruler
- brushes of different thicknesses
- artistic adhesive tape
- black gel pen

How to paint space in an interesting and original way - step-by-step instructions
- Draw a horizontal line along the bottom half of the paper with a pencil. This way you will limit the drawing area. From the line up, draw several slender houses by hand. Don't worry about their symmetry. The more chaotic the buildings, the more original the drawing will look.

- Apply artistic tape underneath the line. It will serve as a limiter for paints.

- Paint over the houses with white watercolor masking. Wait for the liquid to dry.

- Moisten empty spaces on the sheet with clean water. On the wet surface of the paper, spread different shades of blue: from deep inky to sky blue.

- Add additional colors to different tones of blue watercolor - lilac, pink, green, etc. The galaxy should turn out bright and more or less natural.

- Sprinkle the wet pattern with table salt. As soon as the “space” dries, shake off the grains.

- Using white acrylic paint and an art brush (you can use a toothbrush), leave small white drops - stars - on the drawing.

- Place drops of alcohol in several places. The substance will slightly blur the paint and give the image a more complete look.

- Use an eraser to lift the masking layer and remove the thin film. Now the places for houses are in perfect order.

- Using a black pen, draw windows and doors on the houses. Remove the art tape.

- This interesting and original version of how to paint space with paints will appeal not only to children. Even adults will enjoy spending time with such an exciting creative process.

How to quickly draw and successfully use the “Space” drawing in gouache

To beautifully draw space with gouache and use it in an original way in your home interior or as a souvenir, you need to make a blank yourself. To do this you will need thick paper and an ordinary wooden hoop. By carefully pressing a damp white sheet between the circles of the hoop, and then drying it with hairdryers, you will create an ideal field for “cosmic” creativity.
Necessary materials for drawing “Space” with gouache paints
- blank - hoop with paper
- gouache paints
- white cardboard cutouts (feather, polar bear, diamond, etc.)
- good photo
- white acrylic paint
- tinted or printed paper

Master class on the creation and original use of gouache drawing “Space”

After watching our step-by-step master classes with photos and videos, you learned how to draw space with a pencil, gouache, watercolor or sponge with acrylic paints. Spend a little more time on the process, and your drawing on the theme “Space” with planets, stars and a satellite will be ideal not only for children, but also for novice artists.
We have launched a watercolor painting competition. You can see all works by tag. We publish the best drawings and give a step-by-step master class on how to learn to paint space in watercolors.

Author of the photo - @shagero.alled

Author of the photo - @kamarkovskaya

Author of the photo - @arlyapovaeireen

Author of the photo - @katrin_is_art
Step-by-step master class
If you did not participate in the competition, but also want to learn how to draw space, save somewhere these step-by-step instructions on what and how to do to get bright and beautiful shimmers. We are publishing a lesson from Leonardo Pereznieto.
M materials
- Hot pressed watercolor paper, A4 or A3 format;
- Masking tape;
- Easel or wooden board;
- Palette;
- Water container;
- A piece of cloth;
- Salt in large crystals.
Watercolor:
- orange;
- cadmium red;
- manganese violet;
- delft blue;
- azure;
- indigo;
- Prussian green;
- green phthalocyanine;
- permanent green;
- dark cobalt green;
- brilliant blue-violet;
- chrome orange;
- cadmium light yellow;
- black ivory;
- titanium white.
Squirrel brushes:
- Mop brush;
- Brush No. 0;
- Brush No. 2;
- Brush No. 4;
- Brush No. 8;
- Brush No. 12.
Secure the watercolor paper to the wood board with masking tape. Mix orange with light cadmium red. You should get a light scarlet shade. Next, mix deep red with manganese violet and a drop of indigo to create a cherry red hue. Then add delfte blue to indigo to create a dark blue. And the last mixture is Prussian, permanent and dark cobalt green, phthalocyanine to get a medium green.
If you don't have all these colors, you can simplify the task and just paint with the colors that you have. The result will still be interesting.

Place the easel at a slight angle and wet all the paper with clean water using a squeegee brush. Apply dark red and light red colors to it in the upper left corner. Paint the lower right corner with a blue tint. Using a size 8 brush, apply the green shade diagonally from the bottom left corner to the top right corner.

You need to work fairly quickly while the paper is still wet. Using a size 4 brush, enhance some areas and fill in any gaps with whatever paint you want.
You should have an idea of what you want the final work to look like.

Try to avoid mixing complementary colors (such as yellow and purple, red and green, blue and orange) with each other, as this will cause the color to become muddy.
Once the paint begins to dry, apply another coat of paint on top to intensify the color. Remember to blot your brush each time before applying a new shade.

When you have finished applying the paint and are happy with the combination of colors and their vibrancy, sprinkle grains of coarse salt over the design. It will absorb water and take away some of the color, leaving beautiful stains in the form of nebulae. Wait until completely dry and carefully scrape off the salt.

We've only done half the work! Wet the entire surface again with water and fix the colors with their pure counterparts, using a brush number 2. To get a pure, bright color, add less water to the paint and do not mix the colors on the palette, but take them directly from the container.

While the paper is still damp, mix the glaze and black ivory. Using a #4 brush, apply paint along the edges of the sheet, around the edges of the nebula. Just don’t apply the paint in the form of a black frame, remember what nebulae look like - in the form of an elongated ellipse. At this point we will need a cloth that can be used to absorb the paint to soften the edges.

We wait for it to dry completely and use brush No. 2 for the final touches. To add stars to our space, place the easel on a horizontal surface. Take a stick (or other brush) in your non-dominant hand and hold it parallel to the paper. Load a brush with titanium white in your dominant hand and lightly tap the brush onto the stick so that tiny white particles of paint fall onto your painting. Add a few stars “by hand” using a fine size 0 brush.

Let the drawing dry, remove the masking tape. And here it is, your space!
So the month of April has come... with hope for warmth and bright sunshine, with flowers and joy... Very soon the world will celebrate Cosmonautics Day. This is a holiday that includes important events and greatest discoveries, achievements of human civilization and the discovery of inaccessible secrets and worlds.
At different times, the children and I conducted various activities on the topic of Space; links to some of them will be at the end of the article and in. And today I invite you and your children to arm yourself with pencils and paints and go paint space!
Hooray! I announce the opening new section “Learning to Draw” and I invite you to meet the artist Julia, who shared her drawing skills with us.
How to draw space step by step
Drawings on the theme of space are a common April assignment in schools and kindergartens. Yulia offers us two options for a space theme for different ages: for preschoolers and elementary school students.
I know that many parents are categorically against templates and examples in drawing. But I am also convinced that in order to learn to draw, sometimes you need a push, an example, which, when embodied, the child will believe in himself and begin to reveal his capabilities and talents. Shall we try?
Drawing “Rocket in space” for children 4-5 years old.


The drawing is so simple and easy that it seems to me that it does not need additional descriptions. However, if you prefer the video format of the lesson, then watch this video:
Drawing on the theme “Space” for children 6-7 years old.

And here is the video MK of the rocket’s drawing, posted on ours:
These are the simple and accessible drawings about space that the artist Julia offered us today. And I am grateful to her for her beautiful creativity.
What do you think of these drawings about space? And what do you and your children like to draw on a given topic? By the way, you can send your drawings for this MK to me by email, I will post them in this article.