Master class on a beautiful landscape with step-by-step photos. Seascape - drawing with gouache with children Drawing a human figure in motion and a face
Fine art lessons are undoubtedly very important for the development of basic drawing skills in children 4-5 years old; they can be taught not only in preschool institutions, but also at home.
To draw with children, it is recommended to use pencils or paints; gouache is an excellent choice. So what are the advantages of this type of paint for painting, why do we paint exactly like this? This paint has a number of advantages:
- High density;
- Good pigmentation;
- Excellent solubility;
- Can be used to create a drawing on both plain paper and canvas;
- Dries quickly, leaving an even matte layer;
- It does not have a pronounced odor, which is the main advantage over other types of paints.
For children 4-5 years old, drawing lessons bring great pleasure, because there is nothing simpler and more exciting than dipping a brush in bright colors and creating intricate lines, patterns, figures of animals and birds on a sheet of paper. Over time, art lessons will help children create more complex images, gradually honing their skills.
Drawing Rules
The first drawing lessons with children 4-5 years old can be held at home with their parents; it is recommended to follow the basic rules:
- Purity
Before starting fine arts lessons using gouache, you need to prepare, together with the children, the appropriate materials, as well as accessories: brushes, paints, dishes for clean water and for diluting paints, 2-3 pieces of cotton fabric, paper for lining the work surface and for drawing.
- First stroke
Gouache painting should be done using only one brush and one color of your choice. You can help a preschooler draw something specific or simply show how easy it is to apply paint to a sheet of paper.
How interesting it is to shimmer when mixed with water. Children 4-5 years old will be interested in the procedure of mixing colors and obtaining new shades.

Drawing lessons should begin with a demonstration of exactly how to hold a brush in your hand; tell them that the learning process will require some effort on the part of the preschooler.
Drawing lessons should begin with a demonstration of exactly how to hold a brush in your hand; explain that the process of learning the basics of fine art will require some effort on the part of the preschooler.
Agree on what exactly we are drawing in this lesson: a house, flowers, nature, a river or a sunset. To help beginning artists there will be special magazines on similar topics, “Drawing with Gouache,” or other publications for preschool children.
Tell your 4-5 year old toddler that you must first make a blank for the subsequent drawing, that is, first draw sketches on paper with a simple pencil or colorless gouache. It is worth noting that it fits perfectly on a sheet of paper, regardless of whether the previous layer was applied before or not.

How to work with paint
Before starting work, children should be familiarized with the types of gouache. It can be artistic or poster. It is recommended to take artistic gouache for drawing lessons, since working with such gouache is very convenient:
- It is diluted with ordinary water; it retains its original pigment even at a high degree of dilution.
- One shade can be easily covered with another color, more contrasting.
- It is better to paint with gouache using white, the shade will be deeper and more saturated.
- If necessary, the paint can be thickened using ordinary office glue.
- With the help of gouache you can draw almost any character from a fairy tale or cartoon.
Explain to your child that we only paint with paints; you should not taste them, although they are safe.
It is worth noting that for preschool children (4-5 years old), a drawing lesson should bring exclusively positive emotions; children should not be forced to take part in the lesson if they have no desire.
It is necessary to encourage children to draw with the help of games, getting them interested in the gouache depiction of their favorite cartoon character.

We draw together with a 4-5 year old child, teach him simple skills, talk about the simplicity and fun of this activity, and he will definitely show an interest in fine art and want to draw.
Master class “Drawing for the little ones.”
Shatokhina Rita Vyacheslavovna, teacher of additional education at the MBU DO “House of Children's Creativity in Kalininsk, Saratov Region.”
This master class is intended for additional education teachers and preschool teachers. The master class will also be of interest to little artists aged 4 years and older and their parents.
Purpose: This master class is a short drawing course for little ones, which shows how to draw with geometric shapes.
Target: creating conditions for acquiring drawing skills.
Tasks: teach your child how to draw familiar images using geometric shapes;
instill the skills to carefully work with paints and brushes;
develop creative imagination and fine motor skills.
The kids who come to my association for classes are still very young, but they really want to draw. From experience working with children, I realized that it is easier for them to draw with geometric shapes. Children draw according to my demonstration, step by step. When starting a lesson, I never tell the children what we are going to draw today. I know from experience that they find it more interesting. In the process, they guess who they are drawing, and this brings them a lot of joy. And everyone’s drawings are different.
Master class on drawing for children “Snail”
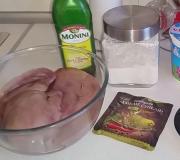
Prepare: A4 landscape sheet, watercolor paints, brushes of different sizes, a jar for water and a napkin.

Before we start painting, I tell the children that the paints are sleeping and need to be woken up by gently stroking them with a brush. Let’s wake up the yellow paint first and start painting.
Draw a bun in the center of the sheet, gradually unwinding the brush, and then draw an arc with brown paint.

We turn the arc into a loop.

We draw the horns and paint them over.

Decorating the snail's house.

We draw the eyes and mouth of the snail. Next, the children themselves come up with and decorate the background of the picture: where is the snail?

Children's works:


Master class on drawing for children “Turtle”.
Draw a “bun” in the center of the sheet with yellow paint, and draw 4 loops with brown paint.

The fifth loop is drawn larger in size; we paint over all the loops.

We draw circle eyes, first with white paint, then with black.

Decorate the turtle shell. The child can come up with his own pattern.

Master class on drawing for children “Fish”
We draw a “bun” with yellow paint, draw arcs: top and bottom, it looks like an eye.

Draw a triangle tail for the fish. Then we decorate the fish with red paint. draw with a brush: mouth, fins.

We draw scales and decorate the tail.

We “print” with a brush: we draw pebbles and water, draw lines with green algae paint.

Draw the eye of the fish with black paint. Black paint likes to play around, so we are especially careful with it.

"Winter meadow".
Take a sheet of blue color, A4 format. We paint the koloboks with white paint. We draw lines, draw snowdrifts.

Using brown paint we paint the trunk and branches of the trees, hands, eyes, mouth and broom of the snowman.

Decorate the drawing with snowflakes. Decorate the snowman: draw a bucket on his head and a scarf. Children complete the drawing and decorate it.

Using the same principle, you can draw an autumn forest, only initially the koloboks will be yellow, orange and green, and leaf fall, we draw by applying a brush, and print. Children's work:


Master class on drawing for children “Hedgehog”.
We draw the “bun” with brown paint.

Draw a triangle nose.

Child's work.
We draw a clearing for the hedgehog, the children fantasize.


Child's work:

Master class on drawing for children “Frog”.
Take a sheet of blue color, A4 format. Draw a “bun” in the center with green paint.

We draw another “bun”, and on top there are two “bridges”.

We draw the frog's legs and draw the children's attention to the fact that the frog's legs differ in their structure, which helps the frog to jump well and stay on even the most slippery surface.

We draw the frog's mouth and eyes. We decorate the picture after talking with the children: where does the frog live?

Master class on drawing for children “Cockerel”.
We draw a large bun - the body, a smaller bun - the head. We connect them with smooth lines, we get a neck.

We draw the cockerel's legs-triangles and tail, lines-arcs.

Use red paint to paint the cockerel's comb (bridges), beak and beard, and apply a brush.
You can draw such a seascape with children from 5 to 10-11 years old. The work must be done with gouache paints. In general, it is gouache, and not watercolor at all, that is the most convenient material for children's painting. Schools and kindergartens “respect” watercolor very much, not because it is good for children to work with, but because it is compact and not as “dirty” as gouache. In fact, watercolor is a very difficult material to work with. She doesn't forgive mistakes. Any mistake made is almost impossible to correct. By drawing this seascape with children we can solve quite a lot of problems. For example, introduce the child to the concepts of horizon line and perspective. And, of course, we will learn to apply paint evenly on paper, drawing lines from one edge of the sheet to the other. Toddlers may not be very good at this, but try to teach them this technique.
To draw a seascape with children we will need:
- A sheet of thick Whatman paper A3 or A4 format;
- Gouache in blue, white, green and black colors;
- Large soft brush (eg squirrel #6)
- Brush with stiff bristles;
- Old toothbrush;
- Palette for mixing paints (just a sheet of paper will do);
- A jar of water for rinsing brushes;
- A cloth for wiping brushes.
How to draw the sky in a seascape.
Draw a line with a pencil, dividing the sheet into two unequal parts - 1/3 will be the sky, the rest will be the sea. This line will become the horizon line. Take white and blue gouache, mix them to obtain the blue color of the desired intensity. Paint over the sky, making horizontal movements with the brush from one edge of the sheet to the other. Since the sky at the top of our picture should be darker, to create the effect of “depth”, you can first apply a dark blue stripe, and then paint the sky with blue paint, shading the dark blue stripe.

Draw clouds in the sky.
Apply dotted strokes with white gouache or completely paint over the cucumber clouds. While the paint is still wet, press a crumpled paper napkin onto the design. This will give the clouds a “fluffiness” and blur the clear boundaries.

How to Draw the Sea in a Seascape
Take the blue paint and cover the bottom of the sheet with it, moving the brush from one edge of the sheet to the other.  Add streaks of green and white paint over the blue layer. The closer to the horizon line, the darker the sea.
 Splashes of sea foam can be painted using the splash technique. Children of all ages really enjoy working with this technique. For this kind of drawing we need a brush with very stiff bristles or a toothbrush. You can do this kind of work more accurately with a brush, but it’s easier with a brush. Take a brush or brush, dip it in water and then in white paint. Run your index finger along the stubble. There will be small white splatters on the paper. The finger movement must be towards you, otherwise the splashes will end up on the artist!
  We paint large “lambs” on the waves with a brush with stiff bristles. The closer to the horizon line, the smaller the “lambs” and the shorter the distance between the waves.

Drawing details of the seascape
Paint a stone island on the horizon line with black or dark blue paint. Its shape can be completely arbitrary. Draw black checkmarks of seagulls in the sky.  To draw a ship, put a black dot - this is the stern of a retreating sailboat. The dots painted with white paint are the sails.
  If the seascape seems unfinished to you, you can add a few stones.
  Our seascape is completely ready. All that remains is to dry it and hang it on the wall.
Drawing with gouache. "Smile of the Rainbow Horse"
Master class on painting with gouache with step-by-step photos “The smile of a rainbow horse”
Author: Barieva Liliya Sergeevna.
Job title: teacher of additional education.
Place of work: State budgetary educational institution of additional education for children of the Republic of Mari El “Palace of creativity of children and youth”, Yoshkar-Ola.
The target audience: parents with children 5-7 years old.
Appointment of the master class: creating a painting for an exhibition or making a gift with your own hands.
Target: presentation of the work experience of a teacher of additional education in order to popularize joint child-adult creative activity.
Tasks:
To promote the leisure time of parents and children in a creative and constructive form.
Strengthen children's ability to draw circles of different sizes.
Continue teaching children to mix paints to obtain the required shades (orange, blue, purple, shades of brown).
To develop children's ability to use a brush to convey the features of an image.
To develop children's ability to orient an image taking into account the space of the sheet, observing the basic proportions between the elements of the drawing.
To develop children’s ability to use color to convey shades and artistic expressiveness of an image.
Cultivate accuracy in work, patience, self-control.
Progress of the master class
Hello, dear children, dear adults. I suggest drawing a rainbow horse with a smile! For drawing you will need the following materials:

watercolor paper (A3 format),
gouache (6 colors: white, yellow, red, green, blue, black),
palette,
stack,
simple pencil (TM),
washing gum,
container with water,
paper napkins,
flat brush No. 22 (bristles),
flat brush No. 8 (synthetic),
round brush No. 3 (synthetic).
We will arrange and arrange all the materials so that it is convenient to draw.
Place the sheet of paper vertically.
Stage 1. Sketch (drawing in pencil)
Dear parents, before we start drawing circles with our children, we will do some preparatory exercises. Take a simple pencil and draw circles in the air.

Small circle - using fingers,
medium-sized circle - holding the pencil with your fingers, rotating the brush,
large circle - holding the pencil with your fingers, rotating with your forearm. Repeat two or three times.
Let's move on to drawing on paper. Draw a large circle in the center of the sheet. Stepping back two fingers down, draw a medium-sized circle. We connect the circles with straight lines.

Draw a semicircle. Draw ears on both sides.

Divide the large circle into two equal parts and draw a horizontal line. For the eyes, draw lines diagonally, three fingers long. Add arcs at the top and bottom. The result was squinting eyes!

Draw a figure similar to a crystal. This will be a spot on the head.

Draw an arc to a medium-sized circle. It turns out to be a smile! We start from the center.
Draw vertical lines - these are teeth!

Divide a medium-sized circle with a horizontal line into two equal parts. Stepping back one finger from the edges, draw arcs. Draw the nostrils with a wavy line.

Using slightly curved lines we draw the neck. On the right we add part of the torso. And draw the mane with a beautiful wavy line. Erase all the extra lines. The horse is almost done!

Dear parents, some useful tips.
1. Gouache paints should be as thick as sour cream!
2. We put the paints from the jars into the palette using a modeling stack. We wash it and wipe it with napkins. Economical and neat!
3. How much paint should I take per stack? A wonderful bean seed serves as a guide!

4. If the paints are mixed, the painting process is in progress, but there is a need to interrupt for a long time? We take a plastic bag, spray water into it and put the palette. Inflate the bag slightly and close the edges.

5. Watch how the child rinses the brush. It is important that water from the bucket does not fly onto the drawing!
Stage 2. Background (sky, clouds)
So, we put white gouache in a stack into two cells. Add blue paint to one, mix in a stack, and get a nice blue tint.

We put out red.
Place yellow gouache in two cells. Add a pea of red paint to one, mix, get orange.

We spread the green one.

Blue, again, put in two cells. Add red paint to one to get a purple color.

It remains to obtain shades of brown: chocolate and coffee with milk. To do this, place red gouache (bean seeds) in two cells. Add a pea of green paint to both. Stir until you get a delicious chocolate shade! If the tint turns out to be greenish, then you need to add red paint.

Add white gouache to one cell with chocolate color. Mix and get a pleasant shade - coffee with milk.

This is what the finished palette looks like.

Let's change the water. Using a flat brush No. 8, take blue paint and paint over the sky, making strokes from left to right. Let's dry it.
We wash the brush, blot it on a napkin, and pick up white gouache. Using circular movements we draw the wings of the clouds.

Stage 3. Horse
Take a round thin brush No. 3 and carefully paint over the teeth with white paint. We wash the brush. Using the same brush we paint the spaces between the teeth.

Let's change the water. Take a flat bristle brush No. 22 and pick up red gouache. Draw red strands in the mane. Paint over the spaces.

Each time, rinse the brush well and blot it on a napkin. Next, draw the orange, yellow, green part of the rainbow. Before you draw a blue strand, you definitely need to change the water!
Draw the blue, blue and purple parts. Let's change the water! Let's continue, in order, to draw the colors of the rainbow. How much will it fit? Let's let the rainbow dry.

Using a flat brush number 8, paint the ears with chocolate color. Outline the horse's head along the contours.

We paint over the head, neck, part of the body so that the lines separating the muzzle and neck are visible.

Using the “poke” technique, using a No. 8 brush, paint the spot on the head with a shade of coffee with milk. Using the same color we highlight the ears, brow ridges, nostrils, and muzzle. Add to the neck and torso. Let's dry the work.

We put black paint on a round thin brush No. 3 and carefully paint over the eyes. Let it dry. Use the end of a thin brush to paint highlights with white paint and add the color of the sky to the eyes.

Using white gouache we draw strands in the mane, on the borders of the rainbow colors. Add white color to the spot on the head. Using a flat brush No. 8, in strokes we apply the coffee-with-milk shade to the spots on the face, near the nostrils.

Let's move on to drawing the bangs. Take a round thin brush No. 3, pick up red gouache, draw red strands.

We rinse the brush and blot it on a napkin. Without waiting for the red color to dry, draw the yellow strands.

Add white.

Using light movements, draw blue strands of hair. If you really want to decorate your horse, then do it by adding flowers, colorful dots to the mane or bangs!

The drawing is ready!

We bring order and cleanliness to the workplace.
The drawn gift can be framed in a photo frame - A 3 formats. It is necessary that the color of the frame “supports” the child’s drawing. Suitable for this work: white, blue (if you find it in the color of the sky in the picture), brown with a golden stripe.
Drawing savanna at night with gouache step by step, using ready-made stencils
"Night in the Savannah" Drawing in gouache, using ready-made stencils for children 6-7 years old. Master class with step-by-step photos
Yakovleva Natalya Anatolyevna, fine arts teacher, MAOU Secondary School 73 "Lira", Tyumen
Description: This master class will be useful for fine arts teachers, educators, additional education teachers, as well as creative people.
Purpose: use in drawing classes with children 6-7 years old, interior decoration or as a gift.
Target: creating a night savannah composition using ready-made stencils
Tasks: improve your skills in working with gouache
learn to draw a night landscape background
strengthen the skills of using stencils in your work
promote the development of creative abilities
develop a sense of composition, the ability to notice and reflect the beauty of nature in a drawing
maintain an interest in fine arts
Savannah is a special ecosystem inhabited by animals that cannot be found in any other part of the planet. There are several regions on Earth with a savannah climate, including Australia, Africa and South America. Naturally, the African savanna is of greater interest, since this is where animals that have become legendary live.
Therefore, classes on drawing the savanna arouse great interest among children. But what to do if problems arise with the image of animals? Currently, you can find ready-made stencils in stores that can come to the aid of both teachers and children.
Everyone knows the landscapes of the savannah at sunset! But it is very rare to see landscapes at night. And they are no less interesting, and create a certain mystery and enigma! I suggest drawing a savannah at night.
Materials: gouache, sheet of A-3 paper, stencil, pencil, brushes

Sequence of work:
We place the sheet horizontally and begin to fill in the background with a large brush. First we take dark blue and black. Then we work only in blue.

We continue with blue, with the addition of white. There should be a stretch from dark to light

Draw a circle of the moon at the top of the sheet with white paint.

We create a glow around the moon without adding paint. So that the background color is slightly mixed with white

Using black we draw the background of the earth and the protruding stone on the right

Spray the top of the sheet with white paint - these will be stars

Next we draw the silhouette of a tree

Draw small branches

Add small grass

Using stencils, we translate the silhouettes of animals in pencil.

Paint it black

Using a semi-dry brush using the “poke” method, we draw the crown on the tree and you can add small details. For example, birds and a spider

Can be framed

Another version of the work “Savanna at sunset”, using ready-made stencils.