How to draw a Christmas tree step by step with a pencil easily. Step-by-step methods for drawing a Christmas tree with a pencil: easy and beautiful
For it, an outline in the form of a triangle is created on paper, the shape of which will result in a Christmas tree with symmetrical sides and the desired size. To do this, you can use a ruler or a regular triangle, with which it is even easier to draw neat lines.
The top of the triangle will become the crown of the tree, the branches of which can have either clear lines or imitate needles if the lines of the design are not straight, but in the form of jagged cutouts. As the sides of the triangle expand, the branches of the tree also become more massive. The lower part of the picture may end with the image of a tree trunk or simply snow in which the spreading branches of the New Year's beauty are buried.
If there are doubts that it will be possible to make the branches the same size, then inside the triangle itself you can draw thin horizontal lines that will serve as the border between the branches of the tree, allowing them to be symmetrical. According to this scheme, difficulties with how to draw a Christmas tree step by step with a pencil, easily and beautifully and in a matter of minutes, will not arise at any level of professionalism and artistic skills.
Interesting! In this technique, a pencil may not be the only possible tool. With the same success, the base part of the tree can be outlined with felt-tip pens and painted over with paints. Three-dimensional appliqués will also help make the Christmas tree original, when toys and garlands are not drawn on top of a ready-made design, but are glued from other materials. You already know, ?
The second way to draw a Christmas tree is easy and beautiful
In order to use it and figure out how to draw a Christmas tree step by step with a pencil, easily and beautifully, a slightly different template is used than the one described above. The triangle is replaced by a vertical line indicating the height of the future tree. It is very easy to adjust the size using this method: the higher the line, the larger the spruce itself.
The drawing will begin with an image of a star crowning the top of the head and at the same time acting as the top of a tree. The tree will have three levels in total, the top of them in the shape of a triangle is drawn directly under the star. The jagged ends of the bottom line of the triangle imitate branches. It is advisable to make them not completely straight, but with a slight bend in the shape of a crescent, the protruding part of which will be directed downwards.

The second triangle is drawn larger and wider than the first, as the tree expands from the crown down to the bottom of the trunk. The largest triangle is the last one. The teeth on it must be present just like on all the others, otherwise the design will be more schematic and not reminiscent of a real fluffy beauty. We also tell you about Dogs according to zodiac signs.


The last step is to draw the tree trunk, the same vertical line helps to make it even and not make a mistake with the center. You can decorate the tree according to your taste and imagination.
New Year 2018 is approaching, and in all homes, kindergartens and schools, they are preparing to celebrate it: they decorate Christmas trees, hang toys and garlands on the paws of fluffy beauties, cut out snowflakes, and make drawings. Of course, not all kids know how to draw a Christmas tree quickly, easily and beautifully. Often they end up with sticks and squiggles that bear little resemblance to a spruce. That is why we decided to publish the best pencil and paint drawing master classes for beginners. Having learned to draw a New Year's tree step by step, the children will later draw Christmas trees without the help of diagrams.
How to draw a Christmas tree with a pencil step by step easily and beautifully - The best master class for beginners for the New Year 2018
In order to explain how you can draw a Christmas tree with a pencil step by step easily and very beautifully, we offer everyone the best master class for beginners. People are not born artists, but fine art can be learned, which is what we suggest you do.
We draw an elegant Christmas tree with toys using a pencil and a simple step-by-step master class
If you are ready to learn how to draw a Christmas tree with a pencil step by step easily and beautifully, the best master class for beginners on this page is for you! Follow his instructions and you will end up with a very cute Christmas tree.
- Start your drawing by creating a triangular "skirt" shape with a pointed top, as shown in the picture. Then draw a tree trunk at the base.
- Now draw four curved lines inside the “skirt”.

- Ruffle each of the four lines created earlier.


- “Scatter” circles - toy balls - throughout the Christmas tree.

- It's time to hang garlands on the Christmas tree.

- Now the most pleasant moment has come - coloring your drawing. Use markers, watercolors, pencils or gel pens.

How to paint a New Year tree 2018 step by step - Watercolor and gouache drawings for beginners
Beautiful Christmas trees are the most frequent “guests” of children’s drawing albums. It would seem that everyone already knows how to draw a Christmas tree with paints step by step, and drawings of Christmas trees in watercolors and gouache even for novice artists come out just fine. However, they spend a lot of time on such work. We will tell you in the master class how to quickly paint a beautiful Christmas tree.
How to draw a New Year tree 2018 with paints - Master class with explanations for beginners

Before you draw the Christmas tree with paints step by step - you can find watercolor and gouache drawings for beginners (examples) here - you will have to outline the outline of the Christmas tree with a pencil. There is nothing complicated about this - carefully study the photo below the text.
So let's begin...
- First draw an isosceles triangle. Draw a line inside it that goes down to the base of the future tree.

- Using a pencil stroke, make the spruce “paws” (see photo).

- Paint over the pencil drawing first with dark green, then with light green paint. This will give the image volume.

- Continue working with the brush, making strokes using 2-3 shades of green.

- Add shadows to the Christmas tree - gray, green-blue and even black colors.

- The spruce turned out to be alive!

How to draw a New Year tree with toys for kindergarten or elementary school
Before the New Year, educators and elementary school teachers always invite children to draw a Christmas tree. For some children, the green beauty does not turn out as beautifully as they would like. We are sure: when boys and girls learn how to quickly and easily draw a Christmas tree with toys, their work will be recognized as the best in kindergarten or elementary school.

How to draw an elegant Christmas tree with toys - Master class for children

Having learned in detail how to draw a New Year tree with toys for kindergarten or elementary school, children will be able to learn how to draw a Christmas tree quickly and in no more than 15 minutes. The master class will help them with this.
- First, draw a triangle with a curved base.

- Repeat the previous step - the second triangle, located above the first and overlapping it, should be smaller.

- Draw another triangle on top with a slightly elongated vertex.

- Paint on the trunk of the future Christmas tree.

- Decorate the top of the Christmas tree with a star and its paws with balls.

- Erase all auxiliary pencil lines with an eraser.

- Color the drawing.

- Add more balls to the tree and draw a shadow from the tree. Now you're all set!25
How to draw a Christmas tree for a child with a pencil step by step and quickly
Learn how your child can draw a Christmas tree with a pencil step by step and quickly using the following simple, illustrated instructions. This Christmas tree is perfect for making a wonderful festive Christmas card for your family and friends.

Quick step-by-step drawing of a Christmas tree with a pencil - Master class with photos

Looking at the image under this text, you will understand how a child can draw a Christmas tree with a simple and then a colored pencil step by step and quickly. Explanations for the master class in the photo are attached.


- Start with an image of a triangle curved at the bottom. It should look like a slice of pizza.
2 - 5. Draw smaller “pizzas” on top of each other as shown in the pictures.
- Draw a "W" at the top of the tree.
- Draw block letters "L" on the sides of the tree. Also draw a top "L" on the top of the tree above the "W" sign.
- Draw connected “W” signs—zigzag lines—on the wood.
- Complete the star on the top of the tree and the tinsel by simply adding curved lines running diagonally across the design.
- Start drawing the base of the spruce tree - the trunk in the pot.
- Finish drawing the pot.
- Color the drawing with pencils.
Now that even beginners have understood how to draw a Christmas tree easily and simply, you can explain to your child the step-by-step work on drawing a Christmas tree with toys. Save our drawing master classes to your computer - you will definitely need them in the future.
Take a sheet of paper or album, a pencil and an eraser. Ask your child what he will use to decorate the hedgehog and prepare pencils, markers or paints with a brush.
Tell your child the rules of how to work with paints.
- Prepare and moisten the paints with clean water;
- mix paints on a palette (white paper), not forgetting to wash your brushes;
- evenly cover the surface of the background and characters in the composition;
- at the end of the work, wash the brush, do not leave it in a jar of water, but wipe it with a cloth;
- After finishing the paint, put the pencil in boxes or in a pencil case.
How to draw a New Year tree


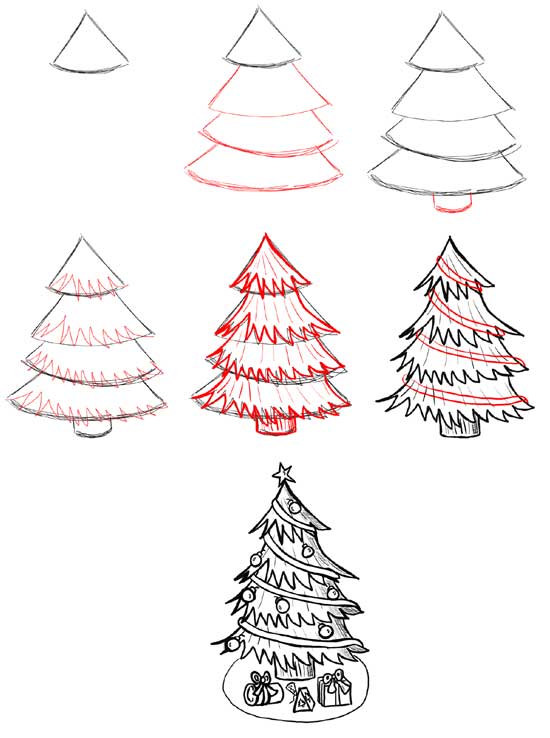
Step by step instructions on how to draw a Christmas tree.

1. Draw a triangle. Now draw a star on the top of the triangle. Leave enough space to add the rest of the tree.

2. Draw the top of the tree, which consists of three branches, as shown in the picture. Don't try to draw too accurately; less straight lines will look better. The ends of the branch lines should join the star.

3. Now add two more rows of spruce branches. Moreover, in each subsequent row of branches one more is added. Thus, row 1 - three branches, row 2 - four branches, row 3 - five branches.

4. Then simply draw a bucket under the tree and attach it to the tree using two lines, which will be the trunk of the spruce. Add two lines down the center of the bucket as a ribbon as shown. Erase all auxiliary lines.

5. Draw a bow on the ribbon and draw a ball on each branch. Give the star at the top of the tree a sparkling effect. Our Christmas tree is ready! Well done!

6. Now you can start decorating.
Whatever your child draws, be sure to praise him and hang the resulting masterpiece on the wall so that the child feels like a real artist.
How to draw a Christmas tree
We offer a Christmas tree option that you can decorate as you wish.

Send us the resulting drawing by e-mail. Please indicate I.F. child, age, city, country where you live and your baby will become a little famous! We wish you success!
Take a sheet of paper or album, a pencil and an eraser. Ask your child what he will use to decorate the hedgehog and prepare pencils, markers or paints with a brush.
Tell your child the rules of how to work with paints.
- Prepare and moisten the paints with clean water;
- mix paints on a palette (white paper), not forgetting to wash your brushes;
- evenly cover the surface of the background and characters in the composition;
- at the end of the work, wash the brush, do not leave it in a jar of water, but wipe it with a cloth;
- After finishing the paint, put the pencil in boxes or in a pencil case.
How to draw a New Year tree


Step by step instructions on how to draw a Christmas tree.
1. Draw a triangle. Now draw a star on the top of the triangle. Leave enough space to add the rest of the tree.
2. Draw the top of the tree, which consists of three branches, as shown in the picture. Don't try to draw too accurately; less straight lines will look better. The ends of the branch lines should join the star.

3. Now add two more rows of spruce branches. Moreover, in each subsequent row of branches one more is added. Thus, row 1 - three branches, row 2 - four branches, row 3 - five branches.
4. Then simply draw a bucket under the tree and attach it to the tree using two lines, which will be the trunk of the spruce. Add two lines down the center of the bucket as a ribbon as shown. Erase all auxiliary lines.

5. Draw a bow on the ribbon and draw a ball on each branch. Give the star at the top of the tree a sparkling effect. Our Christmas tree is ready! Well done!

6. Now you can start decorating.
Whatever your child draws, be sure to praise him and hang the resulting masterpiece on the wall so that the child feels like a real artist.
How to draw a Christmas tree
We offer a Christmas tree option that you can decorate as you wish.
Send us the resulting drawing by e-mail. Please indicate I.F. child, age, city, country where you live and your baby will become a little famous! We wish you success!
It's time for a festive mood. Preparing for the New Year holidays is a pleasant bustle and the smell of tangerines. Now we will talk about the main symbol of the New Year holidays - the Christmas tree. It has become an ingrained tradition of most people on earth. In every city, this evergreen tree becomes the center of cultural events. It pleases the eye, gives mood, brings back pleasant childhood memories and brings people together, because there is no better family tradition than the process of decorating a Christmas tree.
All over the world there are many types of holiday trees and ways to decorate them. Some people, when decorating it, resort to design solutions, while others like to decorate this symbol of the holiday with rare Christmas tree decorations that have been passed down from generation to generation.
Fortunately, the good traditions do not end there, because during this period children often wonder: how to draw a Christmas tree? Yes, it is on the eve of the New Year holidays, Christmas and after these wonderful dates that children are asked in schools or in creative circles to depict this beautiful and evergreen tree. Very often the desire to draw a Christmas tree comes along with a festive mood. Adults have to think about how to teach a child to draw this or that thing, but every child should be able to draw a Christmas tree. Children must develop creatively. That is why I will show you several easy ways to draw a beautiful Christmas tree.
What you will need for this:
- a sheet of white paper (you can use a sketchbook or sketchbook);
- a simple pencil;
- eraser;
- colour pencils;
- Christmas mood!


- Consider the following fun way to easily draw a Christmas tree. Take a simple pencil and draw a line in the form of a zigzag with rounded corners. Try to repeat the same broken line shape as in picture “1”. Below we draw a “tail” - it will be the trunk.
- We begin to draw another similar line to the right of the one we already have. We connect this zigzag to the upper and lower ends of the already drawn line and we get such a thick, uneven zigzag in the shape of a herringbone (try to follow the example in the picture). Draw a star on top.
- To decorate the Christmas tree, I took a green pencil and outlined the edges with dark green. The star can be decorated in any color. Yes, yes, this is an easy way to draw a Christmas tree.